light YAMAHA YZF-R1 2016 Owner's Guide
[x] Cancel search | Manufacturer: YAMAHA, Model Year: 2016, Model line: YZF-R1, Model: YAMAHA YZF-R1 2016Pages: 128, PDF Size: 9.43 MB
Page 74 of 128

Operation and important riding points
6-2
1
2
3
4
56
7
8
9
10
11
12 perature warning light should
come on, go off briefly, and then
remain on until the engine is start-
ed.
NOTICE
ECA22510
If a warning or indicator light does
not work as described above, see
page 4-6 for the corresponding
warning and indicator light circuitcheck.
2. Shift the transmission into the neu- tral position. (The neutral indicator
light should come on.)
3. Start the engine by pushing the start switch.
If the engine does not start within 5
seconds of pressing the start
switch, wait 10 seconds before
pressing the switch again to allow
the battery voltage to restore.NOTICE
ECA11043
For maximum engine life, never ac-
celerate hard when the engine iscold!
EAU67080
ShiftingShifting gears lets you control the
amount of engine power available for
starting off, accelerating, climbing hills,
etc.
The gear positions are shown in the il-
lustration.TIPFor speedy upshifts, turn on the quick
shift system. See QSS on page 4-17 formore information.NOTICE
ECA22520
Even with the transmission in the neutral position, do not
coast for long periods of time
with the engine off, and do not
tow the motorcycle for long dis-
tances. The transmission is
properly lubricated only when
the engine is running. Inade-
quate lubrication may damage
the transmission.
Except when upshifting with the
QSS turned on, always use the
clutch while changing gears to
avoid damaging the engine,
transmission, and drive train,
which are not designed to with-
stand the shock of forced shift-ing.
EAU16682
To start out and accelerate
1. Pull the clutch lever to disengage the clutch.
2. Shift the transmission into first gear. The neutral indicator light
should go out.
3. Open the throttle gradually, and at the same time, release the clutch
lever slowly.
4. At the recommended shift points
1. Shift pedal
2. Neutral position
1
1
2
2 3 4
5 6
N
2CR-9-E1.book 2 ページ 2015年8月20日 木曜日 午後4時46分
Page 75 of 128
Operation and important riding points
6-3
1
2
3
4
567
8
9
10
11
12
shown in the following table, close
the throttle, and at the same time,
quickly pull the clutch lever in.
5. Shift the transmission into second gear. (Make sure not to shift the
transmission into the neutral posi-
tion.)
6. Open the throttle part way and gradually release the clutch lever.
7. Follow the same procedure when shifting to the next higher gear.
TIPWhen shifting gears in normal operat-
ing conditions, use the recommendedshift points.
EAU58270
To decelerate1. Release the throttle and apply both the front and the rear brakes
smoothly to slow the motorcycle.
2. At the recommended shift points shown in the following table, shift
to a lower gear.
3. When the motorcycle reaches 25 km/h (16 mi/h), the engine is about
to stall or runs roughly, pull the
clutch lever in, use the brakes to slow the motorcycle, and continue
to downshift as necessary.
4. Once the motorcycle has stopped, the transmission can be shifted
into the neutral position. The neu-
tral indicator light should come on
and then the clutch lever can be
released.
WARNING
EWA17380
Improper braking can cause
loss of control or traction. Al-
ways use both brakes and apply
them smoothly.
Make sure that the motorcycle
and the engine have sufficiently
slowed before shifting to a low-
er gear. Engaging a lower gear
when the vehicle or engine
speed is too high could make
the rear wheel lose traction or
the engine to over-rev. This
could cause loss of control, an
accident and injury. It could also
cause engine or drive train dam-age.
EAU58280
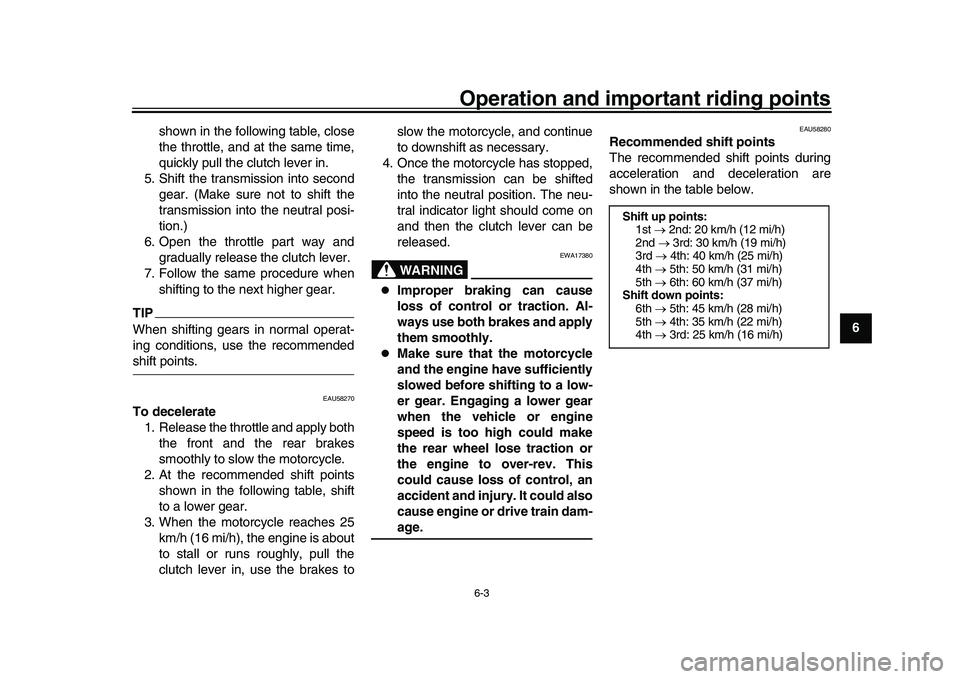
Recommended shift points
The recommended shift points during
acceleration and deceleration are
shown in the table below.
Shift up points:1st 2nd: 20 km/h (12 mi/h)
2nd 3rd: 30 km/h (19 mi/h)
3rd 4th: 40 km/h (25 mi/h)
4th 5th: 50 km/h (31 mi/h)
5th 6th: 60 km/h (37 mi/h)
Shift down points:
6th 5th: 45 km/h (28 mi/h)
5th 4th: 35 km/h (22 mi/h)
4th 3rd: 25 km/h (16 mi/h)
2CR-9-E1.book 3 ページ 2015年8月20日 木曜日 午後4時46分
Page 76 of 128

Operation and important riding points
6-4
1
2
3
4
56
7
8
9
10
11
12
EAU16811
Tips for reducing fuel
consumptionFuel consumption depends largely on
your riding style. Consider the following
tips to reduce fuel consumption:
Shift up swiftly, and avoid high en-
gine speeds during acceleration.
Do not rev the engine while shifting
down, and avoid high engine
speeds with no load on the engine.
Turn the engine off instead of let-
ting it idle for an extended length of
time (e.g., in traffic jams, at traffic
lights or at railroad crossings).
EAU16842
Engine break-inThere is never a more important period
in the life of your engine than the period
between 0 and 1600 km (1000 mi). For
this reason, you should read the follow-
ing material carefully.
Since the engine is brand new, do not
put an excessive load on it for the first
1600 km (1000 mi). The various parts in
the engine wear and polish themselves
to the correct operating clearances.
During this period, prolonged full-throt-
tle operation or any condition that might
result in engine overheating must be
avoided.
EAU17085
0–1000 km (0–600 mi)
Avoid prolonged operation above 7000
r/min. NOTICE: After 1000 km (600
mi) of operation, the engine oil must
be changed and the oil filter car-
tridge or element replaced.
[ECA10303]
1000–1600 km (600–1000 mi)
Avoid prolonged operation above 8400 r/min.
1600 km (1000 mi) and beyond
The vehicle can now be operated nor-
mally.
NOTICE
ECA10311
Keep the engine speed out of
the tachometer red zone.
If any engine trouble should oc-
cur during the engine break-in
period, immediately have a
Yamaha dealer check the vehi-cle.
TIPDuring and after the engine break-in
period, the exhaust heat may cause
discoloration of the exhaust pipe, butthis is normal.
2CR-9-E1.book 4 ページ 2015年8月20日 木曜日 午後4時46分
Page 83 of 128

Periodic maintenance and adjustment
7-6
1
2
3
4
5
678
9
10
11
12
23 *Rear suspension
relay arm and
connecting arm
pivoting points Check operation.
24 Engine oil Change.
Check oil level and vehicle for oil
leakage.
25 Engine oil filter
cartridge Replace.
26 *Cooling system Check coolant level and vehicle
for coolant leakage.
Change coolant. Every 3 years
27 *EXUP system Check operation, cable free play
and pulley position.
28 *Front and rear brake
switches Check operation.
29 Moving parts and
cables Lubricate.
30 *Throttle grip Check operation.
Check throttle grip free play, and
adjust if necessary.
Lubricate cable and grip housing.
31 *Lights, signals and
switches Check operation.
Adjust headlight beam.
NO. ITEM CHECK OR MAINTENANCE JOB
ODOMETER READING
ANNUAL
CHECK
1000 km
(600 mi) 10000 km
(6000 mi) 20000 km
(12000 mi) 30000 km
(18000 mi) 40000 km
(24000 mi)
2CR-9-E1.book 6 ページ 2015年8月20日 木曜日 午後4時46分
Page 88 of 128

Periodic maintenance and adjustment
7-11
1
2
3
4
5
67
8
9
10
11
12
EAU67110
Checking the spark plugsThe spark plugs are important engine
components, which should be checked
periodically, preferably by a Yamaha
dealer. Since heat and deposits will
cause any spark plug to slowly erode,
they should be removed and checked
in accordance with the periodic mainte-
nance and lubrication chart. In addition,
the condition of the spark plugs can re-
veal the condition of the engine.
The porcelain insulator around the cen-
ter electrode of each spark plug should
be a medium-to-light tan (the ideal color
when the vehicle is ridden normally),
and all spark plugs installed in the en-
gine should have the same color. If any
spark plug shows a distinctly different
color, the engine could be operating im-
properly. Do not attempt to diagnose
such problems yourself. Instead, have
a Yamaha dealer check the vehicle.
If a spark plug shows signs of electrode
erosion and excessive carbon or other
deposits, it should be replaced. Before installing a spark plug, the spark
plug gap should be measured with a
wire thickness gauge and, if necessary,
adjusted to specification.
Clean the surface of the spark plug
gasket and its mating surface, and then
wipe off any grime from the spark plug
threads.
NOTICE
ECA10841
Do not use any tools to remove or in-
stall the spark plug cap, otherwise
the ignition coil coupler may get
damaged. The spark plug cap may
be difficult to remove because the
rubber seal on the end of the cap fits
tightly. To remove the spark plug
cap, simply twist it back and forth
while pulling it out; to install it, twistit back and forth while pushing it in.
Specified spark plug:
NGK/LMAR9E-J
1. Spark plug gapSpark plug gap: 0.6–0.7 mm (0.024–0.028 in)
Tightening torque: Spark plug (new):18 Nm (1.8 m·kgf, 13 ft·lbf)
Spark plug (after checking):
13 Nm (1.3 m·kgf, 9.4 ft·lbf)
1
1
2CR-9-E1.book 11 ページ 2015年8月20日 木曜日 午後4時46分
Page 89 of 128
Periodic maintenance and adjustment7-12
1
2
3
4
5
678
9
10
11
12
EAU66533
Engine oil and oil filter
cartridgeThe engine oil level should be checked
before each ride. In addition, the oil
must be changed and the oil filter car-
tridge replaced at the intervals speci-
fied in the periodic maintenance and
lubrication chart.
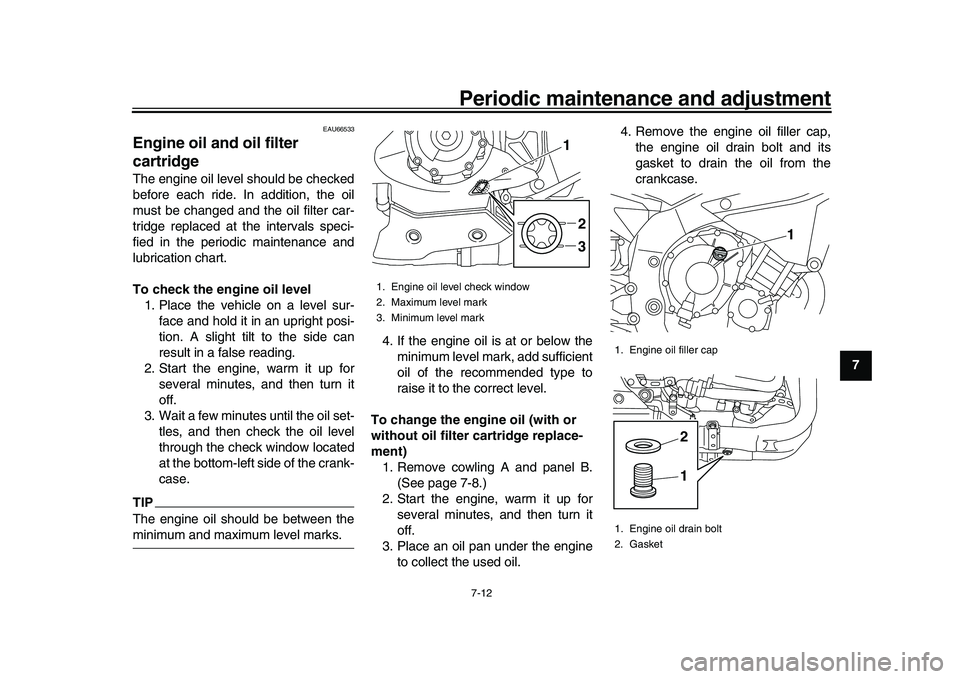
To check the engine oil level 1. Place the vehicle on a level sur- face and hold it in an upright posi-
tion. A slight tilt to the side can
result in a false reading.
2. Start the engine, warm it up for several minutes, and then turn it
off.
3. Wait a few minutes until the oil set- tles, and then check the oil level
through the check window located
at the bottom-left side of the crank-
case.TIPThe engine oil should be between theminimum and maximum level marks. 4. If the engine oil is at or below the
minimum level mark, add sufficient
oil of the recommended type to
raise it to the correct level.
To change the engine oil (with or
without oil filter cartridge replace-
ment) 1. Remove cowling A and panel B. (See page 7-8.)
2. Start the engine, warm it up for several minutes, and then turn it
off.
3. Place an oil pan under the engine to collect the used oil. 4. Remove the engine oil filler cap,
the engine oil drain bolt and its
gasket to drain the oil from the
crankcase.
1. Engine oil level check window
2. Maximum level mark
3. Minimum level mark
2
3
1
1. Engine oil filler cap
1. Engine oil drain bolt
2. Gasket
1
12
2CR-9-E1.book 12 ページ 2015年8月20日 木曜日 午後4時46分
Page 91 of 128

Periodic maintenance and adjustment7-14
1
2
3
4
5
678
9
10
11
12
TIPBe sure to wipe off spilled oil on any
parts after the engine and exhaust sys-tem have cooled down.NOTICE
ECA11621
In order to prevent clutch slip-
page (since the engine oil also
lubricates the clutch), do not
mix any chemical additives. Do
not use oils with a diesel speci-
fication of “CD” or oils of a high-
er quality than specified. In
addition, do not use oils labeled
“ENERGY CONSERVING II” or
higher.
Make sure that no foreign mate-rial enters the crankcase.
10. Start the engine, and then let it idle for several minutes while checking it for oil leakage. If oil is leaking, im-
mediately turn the engine off and
check for the cause.
TIPAfter the engine is started, the oil pres-
sure and coolant temperature warning
light should go off if the oil level is suffi-cient.NOTICE
ECA22490
If the oil pressure and coolant tem-
perature warning light flickers or re-
mains on even if the oil level is
correct, immediately turn the engine
off and have a Yamaha dealer checkthe vehicle.
11. Turn the engine off, wait a few min- utes until the oil settles, and then
check the oil level and correct it if
necessary.
12. Install the cowling and panel.
EAU20071
CoolantThe coolant level should be checked
before each ride. In addition, the cool-
ant must be changed at the intervals
specified in the periodic maintenance
and lubrication chart.
EAU66510
To check the coolant level 1. Place the vehicle on a level sur- face and hold it in an upright posi-
tion.TIP
The coolant level must be checked
on a cold engine since the level
varies with engine temperature.
Make sure that the vehicle is posi-
tioned straight up when checking
the coolant level. A slight tilt to theside can result in a false reading.
2. Check the coolant level in the cool- ant reservoir.
TIPThe coolant should be between theminimum and maximum level marks.
Recommended engine oil:Full synthetic
10W-40, 15W-50
Oil quantity:
Oil change: 3.90 L (4.12 US qt, 3.43 Imp.qt)
With oil filter removal:
4.10 L (4.33 US qt, 3.61 Imp.qt)
2CR-9-E1.book 14 ページ 2015年8月20日 木曜日 午後4時46分
Page 100 of 128
Periodic maintenance and adjustment
7-23
1
2
3
4
5
67
8
9
10
11
12 sult in loss of control and an acci-
dent.
EAU36504
Brake light switchesThe brake light, which is activated by
the brake pedal and brake lever, should
come on just before braking takes ef-
fect. If necessary, have a Yamaha deal-
er adjust the brake light switches.
EAU22393
Checking the front and rear
brake padsThe front and rear brake pads must be
checked for wear at the intervals spec-
ified in the periodic maintenance and
lubrication chart.
EAU36891
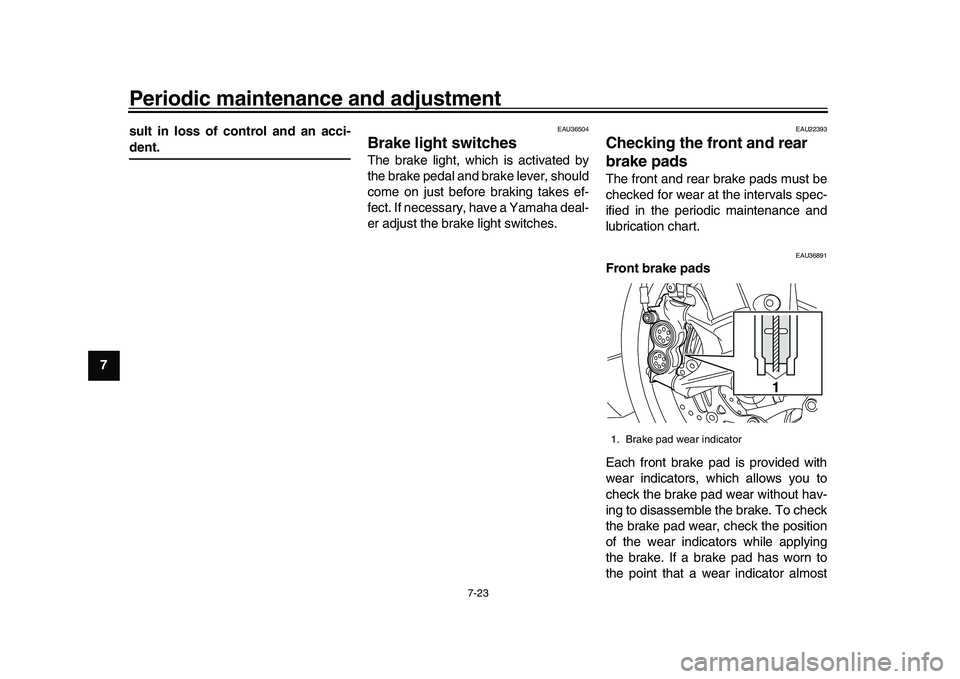
Front brake pads
Each front brake pad is provided with
wear indicators, which allows you to
check the brake pad wear without hav-
ing to disassemble the brake. To check
the brake pad wear, check the position
of the wear indicators while applying
the brake. If a brake pad has worn to
the point that a wear indicator almost1. Brake pad wear indicator
1
2CR-9-E1.book 23 ページ 2015年8月20日 木曜日 午後4時46分
Page 111 of 128
Periodic maintenance and adjustment7-34
1
2
3
4
5
678
9
10
11
12
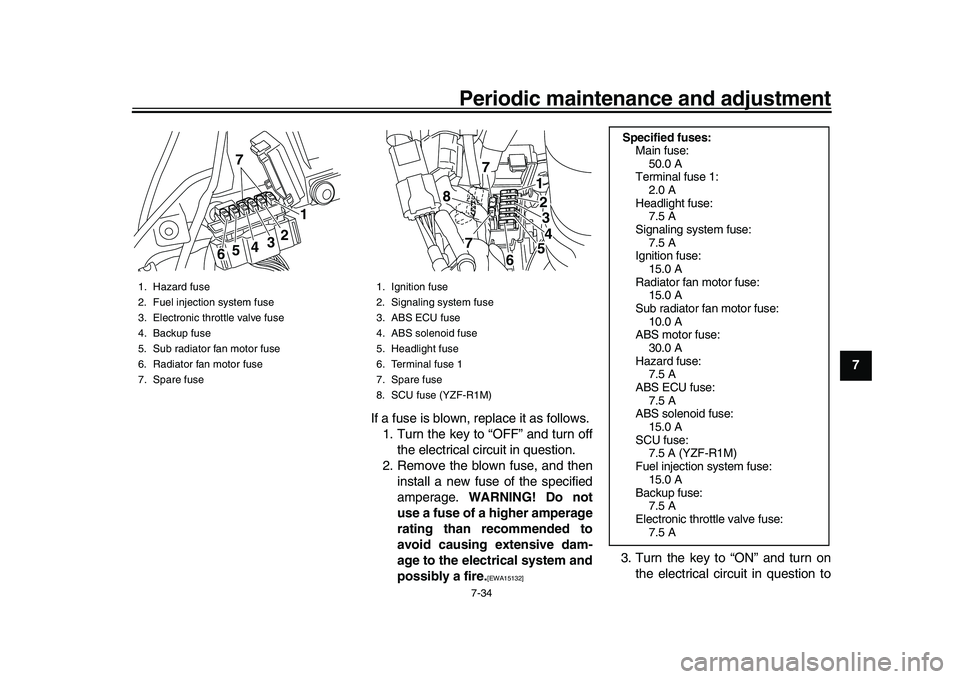
If a fuse is blown, replace it as follows.
1. Turn the key to “OFF” and turn off the electrical circuit in question.
2. Remove the blown fuse, and then install a new fuse of the specified
amperage. WARNING! Do not
use a fuse of a higher amperage
rating than recommended to
avoid causing extensive dam-
age to the electrical system and
possibly a fire.
[EWA15132]
3. Turn the key to “ON” and turn on the electrical circuit in question to
1. Hazard fuse
2. Fuel injection system fuse
3. Electronic throttle valve fuse
4. Backup fuse
5. Sub radiator fan motor fuse
6. Radiator fan motor fuse
7. Spare fuse
1
2
3
4
5
6 7
1. Ignition fuse
2. Signaling system fuse
3. ABS ECU fuse
4. ABS solenoid fuse
5. Headlight fuse
6. Terminal fuse 1
7. Spare fuse
8. SCU fuse (YZF-R1M)
1
23
45
6
7
8
7
Specified fuses:
Main fuse:50.0 A
Terminal fuse 1:
2.0 A
Headlight fuse: 7.5 A
Signaling system fuse: 7.5 A
Ignition fuse:
15.0 A
Radiator fan motor fuse: 15.0 A
Sub radiator fan motor fuse: 10.0 A
ABS motor fuse:
30.0 A
Hazard fuse: 7.5 A
ABS ECU fuse: 7.5 A
ABS solenoid fuse:
15.0 A
SCU fuse: 7.5 A (YZF-R1M)
Fuel injection system fuse: 15.0 A
Backup fuse: 7.5 A
Electronic throttle valve fuse: 7.5 A
2CR-9-E1.book 34 ページ 2015年8月20日 木曜日 午後4時46分
Page 112 of 128
Periodic maintenance and adjustment
7-35
1
2
3
4
5
67
8
9
10
11
12 check if the device operates.
4. If the fuse immediately blows again, have a Yamaha dealer
check the electrical system.
EAU67121
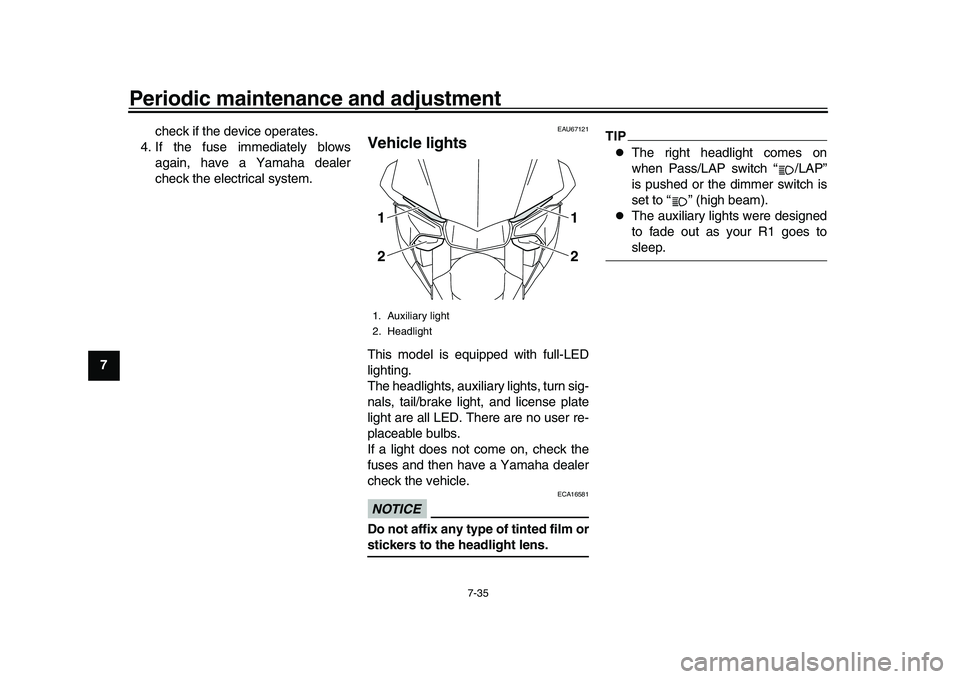
Vehicle lightsThis model is equipped with full-LED
lighting.
The headlights, auxiliary lights, turn sig-
nals, tail/brake light, and license plate
light are all LED. There are no user re-
placeable bulbs.
If a light does not come on, check the
fuses and then have a Yamaha dealer
check the vehicle.NOTICE
ECA16581
Do not affix any type of tinted film orstickers to the headlight lens.
TIP
The right headlight comes on
when Pass/LAP switch “ /LAP”
is pushed or the dimmer switch is
set to “ ” (high beam).
The auxiliary lights were designed
to fade out as your R1 goes tosleep.
1. Auxiliary light
2. Headlight
12
1
2
2CR-9-E1.book 35 ページ 2015年8月20日 木曜日 午後4時46分