lock YAMAHA YZF-R6 2014 User Guide
[x] Cancel search | Manufacturer: YAMAHA, Model Year: 2014, Model line: YZF-R6, Model: YAMAHA YZF-R6 2014Pages: 112, PDF Size: 2.52 MB
Page 77 of 112

PERIODIC MAINTENANCE AND ADJUSTMENT
6-26
6
EAU22582
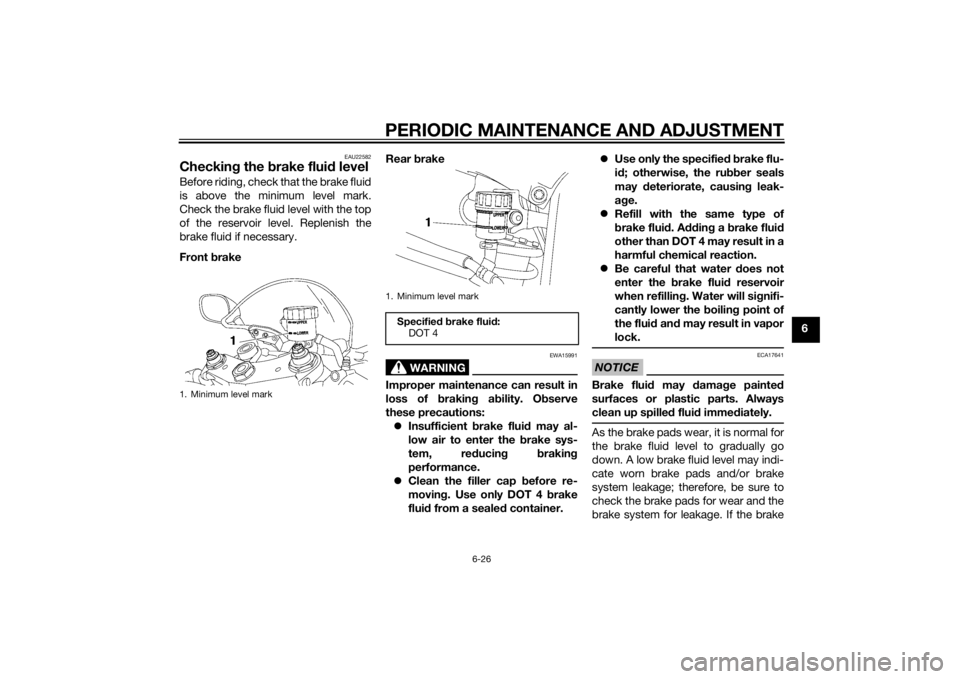
Checking the brake flui d levelBefore riding, check that the brake fluid
is above the minimum level mark.
Check the brake fluid level with the top
of the reservoir level. Replenish the
brake fluid if necessary.
Front brake Rear
brake
WARNING
EWA15991
Improper maintenance can result in
loss of b raking a bility. O bserve
these precautions: Insufficient brake flui d may al-
low air to enter the b rake sys-
tem, re ducin g brakin g
performance.
Clean the filler cap before re-
movin g. Use only DOT 4 b rake
flui d from a seale d container.
Use only the specifie d b rake flu-
i d ; otherwise, the ru bber seals
may deteriorate, causin g leak-
a g e.
Refill with the same type of
brake flui d. A dding a brake flui d
other than DOT 4 may result in a
harmful chemical reaction.
Be careful that water d oes not
enter the brake flui d reservoir
when refillin g. Water will si gnifi-
cantly lower the boilin g point of
the flui d an d may result in vapor
lock.
NOTICE
ECA17641
Brake flui d may damag e painte d
surfaces or plastic parts. Always
clean up spille d flui d imme diately.As the brake pads wear, it is normal for
the brake fluid level to gradually go
down. A low brake fluid level may indi-
cate worn brake pads and/or brake
system leakage; therefore, be sure to
check the brake pads for wear and the
brake system for leakage. If the brake
1. Minimum level mark
1. Minimum level mark
Specified b rake flui d:
DOT 4
U2CXE0E0.book Page 26 Monday, July 29, 2013 2:02 PM
Page 79 of 112

PERIODIC MAINTENANCE AND ADJUSTMENT
6-28
6
4. If the drive chain slack is incorrect,
adjust it as follows.
EAU39057
To a djust the drive chain slack
Consult a Yamaha dealer before ad-
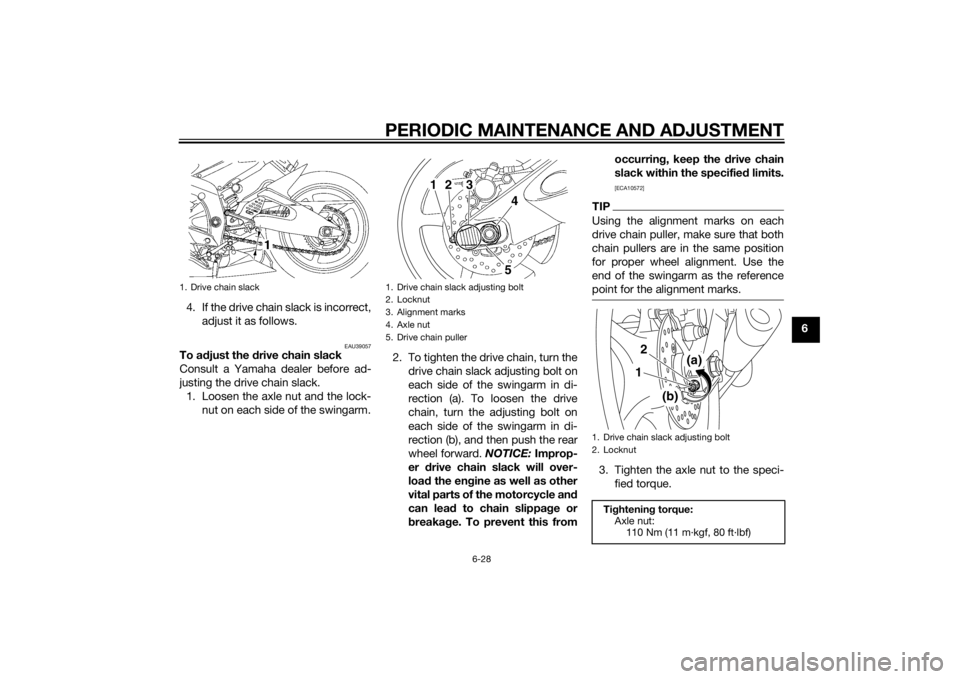
justing the drive chain slack. 1. Loosen the axle nut and the lock- nut on each side of the swingarm. 2. To tighten the drive chain, turn the
drive chain slack adjusting bolt on
each side of the swingarm in di-
rection (a). To loosen the drive
chain, turn the adjusting bolt on
each side of the swingarm in di-
rection (b), and then push the rear
wheel forward. NOTICE: Improp-
er drive chain slack will over-
loa d the en gine as well as other
vital parts of the motorcycle an d
can lea d to chain slippa ge or
b reakag e. To prevent this from occurrin
g, keep the d rive chain
slack within the specified limits.
[ECA10572]
TIPUsing the alignment marks on each
drive chain puller, make sure that both
chain pullers are in the same position
for proper wheel alignment. Use the
end of the swingarm as the reference
point for the alignment marks.3. Tighten the axle nut to the speci-
fied torque.
1. Drive chain slack
1. Drive chain slack adjusting bolt
2. Locknut
3. Alignment marks
4. Axle nut
5. Drive chain puller
45
1
2
3
1. Drive chain slack adjusting bolt
2. Locknut
Tightenin g torque:
Axle nut: 110 Nm (11 m·kgf, 80 ft·lbf)
(a)
(b)
12
U2CXE0E0.book Page 28 Monday, July 29, 2013 2:02 PM
Page 80 of 112

PERIODIC MAINTENANCE AND ADJUSTMENT
6-29
64. Tighten the adjusting bolts in di-
rection (a) to their specified
torque.
5. Tighten the locknuts to their spec- ified torque.
6. Make sure that the drive chain pullers are in the same position,
the drive chain slack is correct,
and the drive chain moves
smoothly.
EAU23026
Cleanin g an d lu bricatin g the
d rive chainThe drive chain must be cleaned and
lubricated at the intervals specified in
the periodic maintenance and lubrica-
tion chart, otherwise it will quickly wear
out, especially when riding in dusty or
wet areas. Service the drive chain as
follows.NOTICE
ECA10584
The drive chain must b e lubricated
after washin g the motorcycle, ri din g
in the rain or ri din g in wet areas.1. Clean the drive chain with kero-
sene and a small soft brush.
NOTICE: To prevent d amaging
the O-rin gs, do not clean the
d rive chain with steam cleaners,
hi gh-pressure washers or inap-
propriate solvents.
[ECA11122]
2. Wipe the drive chain dry.
3. Thoroughly lubricate the drive chain with a special O-ring chain
lubricant. NOTICE: Do not use
en gine oil or any other lu bri-
cants for the drive chain, as they may contain su
bstances that
coul d damag e the O-rin gs.
[ECA11112]
Ti ghtenin g torque:
Drive chain slack adjusting bolt: 2.0 Nm (0.20 m·kgf, 1.4 ft·lbf)
Ti ghtenin g torque:
Locknut: 16 Nm (1.6 m·kgf, 12 ft·lbf)
U2CXE0E0.book Page 29 Monday, July 29, 2013 2:02 PM
Page 86 of 112

PERIODIC MAINTENANCE AND ADJUSTMENT
6-35
6battery tends to discharge more quick-
ly if the vehicle is equipped with op-
tional electrical accessories.
NOTICE
ECA16522
To char
ge a VRLA (Valve Re gulate d
Lea d Aci d) battery, a special (con-
stant-volta ge) battery char ger is re-
quire d. Usin g a conventional battery
char ger will damag e the b attery.To store the b attery
1. If the vehicle will not be used for more than one month, remove the
battery, fully charge it, and then
place it in a cool, dry place.
NOTICE: When removin g the
b attery, be sure the key is
turne d to “OFF”, then discon-
nect the neg ative lead b efore
d isconnectin g the positive lea d.
[ECA16303]
2. If the battery will be stored for
more than two months, check it at
least once a month and fully
charge it if necessary.
3. Fully charge the battery before in- stallation. NOTICE: When install-
in g the b attery, be sure the key is turne
d to “OFF”, then connect
the positive lea d before con-
nectin g the ne gative lea d.
[ECA16841]
4. After installation, make sure that
the battery leads are properly con-
nected to the battery terminals.NOTICE
ECA16531
Always keep the b attery charged .
Storin g a d ischar ged battery can
cause permanent battery damag e.
EAU23707
Replacin g the fusesThe main fuse, the fuel injection sys-
tem fuse, and fuse box 1 are located
under the rider seat. (See page 3-20.)TIPTo access the fuel injection system
fuse, remove the starter relay cover by
pulling it upward.1. Main fuse
2. Fuel injection system spare fuse
3. Starter relay cover
4. Fuel injection system fuse
5. Fuse box 1
6. Backup fuse (for clock and immobilizer sys-
tem)
7. Electronic throttle valve fuse
8. Spare fuse
2
1
5
6
3
748
U2CXE0E0.book Page 35 Monday, July 29, 2013 2:02 PM
Page 88 of 112

PERIODIC MAINTENANCE AND ADJUSTMENT
6-37
61. Remove the headlight bulb cover
by turning it counterclockwise.
2. Disconnect the headlight coupler. 3. Unhook the headlight bulb holder,
and then remove the burnt-out
bulb.
4. Place a new headlight bulb into position, and then secure it with
the bulb holder.
5. Connect the headlight coupler. 6. Install the headlight bulb cover by
turning it clockwise.
7. Have a Yamaha dealer adjust the headlight beam if necessary.
1. Do not touch the glass part of the bulb.
1. Headlight bulb cover
1
1. Headlight coupler
1. Headlight bulb holder
U2CXE0E0.book Page 37 Monday, July 29, 2013 2:02 PM
Page 89 of 112

PERIODIC MAINTENANCE AND ADJUSTMENT
6-38
6
EAU24182
Tail/brake li ghtThis model is equipped with an LED-
type tail/brake light.
If the tail/brake light does not come on,
have a Yamaha dealer check it.
EAU24205
Replacin g a turn sig nal light
b ul b1. Remove the turn signal light lens
by removing the screw.
2. Remove the burnt-out bulb by pushing it in and turning it coun-
terclockwise. 3. Insert a new bulb into the socket,
push it in, and then turn it clock-
wise until it stops.
4. Install the lens by installing the screw. NOTICE: Do not over-
ti ghten the screw, otherwise the
lens may break.
[ECA11192]
1. Turn signal light lens
2. Screw
21
1. Turn signal light bulb
U2CXE0E0.book Page 38 Monday, July 29, 2013 2:02 PM
Page 94 of 112

PERIODIC MAINTENANCE AND ADJUSTMENT
6-43
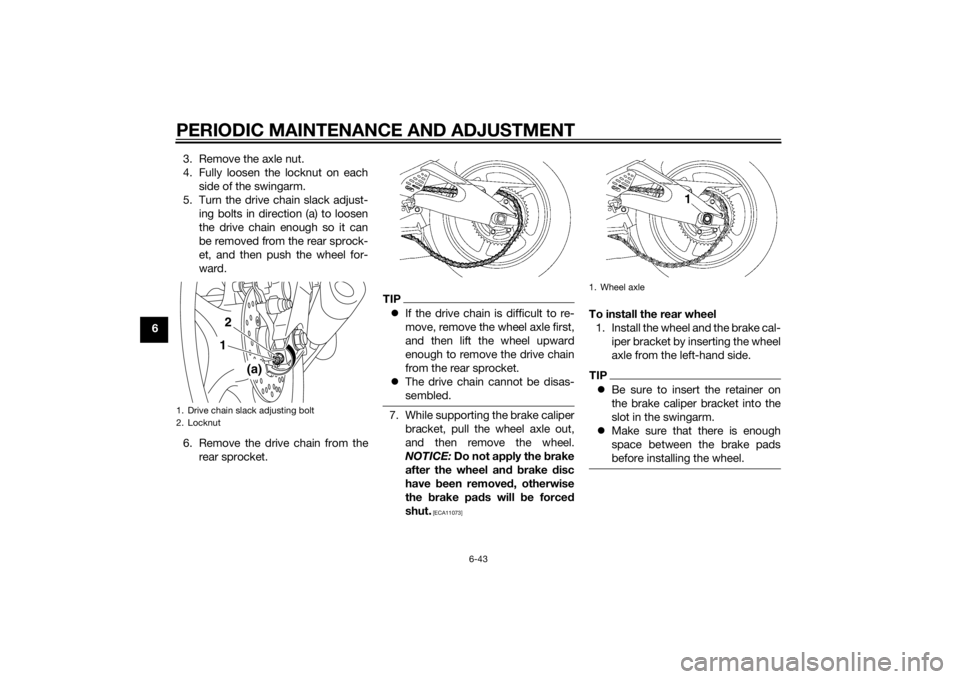
63. Remove the axle nut.
4. Fully loosen the locknut on each
side of the swingarm.
5. Turn the drive chain slack adjust- ing bolts in direction (a) to loosen
the drive chain enough so it can
be removed from the rear sprock-
et, and then push the wheel for-
ward.
6. Remove the drive chain from the rear sprocket.
TIPIf the drive chain is difficult to re-
move, remove the wheel axle first,
and then lift the wheel upward
enough to remove the drive chain
from the rear sprocket.
The drive chain cannot be disas-
sembled.7. While supporting the brake caliper
bracket, pull the wheel axle out,
and then remove the wheel.
NOTICE: Do not apply the brake
after the wheel an d b rake disc
have been removed , otherwise
the brake pa ds will be forced
shut.
[ECA11073]
To install the rear wheel 1. Install the wheel and the brake cal- iper bracket by inserting the wheel
axle from the left-hand side.TIPBe sure to insert the retainer on
the brake caliper bracket into the
slot in the swingarm.
Make sure that there is enough
space between the brake pads
before installing the wheel.
1. Drive chain slack adjusting bolt
2. Locknut
(a)
12
1. Wheel axle
U2CXE0E0.book Page 43 Monday, July 29, 2013 2:02 PM
Page 95 of 112

PERIODIC MAINTENANCE AND ADJUSTMENT
6-44
6
2. Install the drive chain onto the rear
sprocket.
3. Install the axle nut, and then lower the rear wheel so that it is on the
ground, and then put the side-
stand down.
4. Adjust the drive chain slack. (See page 6-27.)
5. Tighten the axle nut to the speci- fied torque.
6. Tighten the drive chain slack ad- justing bolts in direction (b) to their
specified torque. 7. Tighten the locknuts to their spec-
ified torque.
EAU25872
Trou bleshootin gAlthough Yamaha motorcycles receive
a thorough inspection before shipment
from the factory, trouble may occur
during operation. Any problem in the
fuel, compression, or ignition systems,
for example, can cause poor starting
and loss of power.
The following troubleshooting charts
represent quick and easy procedures
for checking these vital systems your-
self. However, should your motorcycle
require any repair, take it to a Yamaha
dealer, whose skilled technicians have
the necessary tools, experience, and
know-how to service the motorcycle
properly.
Use only genuine Yamaha replace-
ment parts. Imitation parts may look
like Yamaha parts, but they are often
inferior, have a shorter service life and
can lead to expensive repair bills.
WARNING
EWA15142
When checkin g the fuel system, d o
not smoke, an d make sure there are
no open flames or sparks in the ar-
ea, inclu din g pilot li ghts from water
1. Retainer
2. SlotTi ghtenin g torque:
Axle nut: 110 Nm (11 m·kgf, 80 ft·lbf)
1. Drive chain slack adjusting bolt
Tightenin g torque:
Drive chain slack adjusting bolt: 2.0 Nm (0.20 m·kgf, 1.4 ft·lbf)
Ti ghtenin g torque:
Locknut:
16 Nm (1.6 m·kgf, 12 ft·lbf)
(b)
1
U2CXE0E0.book Page 44 Monday, July 29, 2013 2:02 PM
Page 98 of 112

PERIODIC MAINTENANCE AND ADJUSTMENT
6-47
6En
gine overheatin g
WARNING
EWAT1041
Do not remove the ra diator cap when the en gine an d ra diator are hot. Scal din g hot flui d an d steam may be
b lown out un der pressure, which coul d cause serious injury. Be sure to wait until the en gine has coole d.
Place a thick ra g, like a towel, over the ra diator cap, an d then slowly rotate the cap counterclockwise to the
d etent to allow any resi dual pressure to escape. When the hissin g soun d has stoppe d, press d own on the cap
while turnin g it counterclockwise, an d then remove the cap.TIPIf coolant is not available, tap water can be temporarily used instead, provided that it is changed to the recommended cool-
ant as soon as possible.
Wait until the
engine has cooled.
Check the coolant level in the
reservoir and radiator.
The coolant level
is OK.The coolant level is low.
Check the cooling system
for leakage.
Have a Yamaha dealer checkand repair the cooling system.Add coolant. (See TIP.)
Start the engine. If the engine overheats again,
have a
Yamaha dealer check
and repair the cooling system.
There is
leakage.
There is
no leakage.
U2CXE0E0.book Page 47 Monday, July 29, 2013 2:02 PM
Page 108 of 112

10-1
10
INDEXAAir filter element .................................... 6-19
Auxiliary light......................................... 6-39BBattery .................................................. 6-34
Brake and clutch levers, checking and lubricating .................... 6-31
Brake and shift pedals, checking and lubricating .................... 6-30
Brake fluid, changing ............................ 6-27
Brake fluid level, checking .................... 6-26
Brake lever ............................................ 3-16
Brake lever free play, checking............. 6-24
Brake light switches.............................. 6-25
Brake pedal........................................... 3-16CCables, checking and lubricating ......... 6-30
Care ........................................................ 7-1
Catalytic converters .............................. 3-19
Clutch lever ........................................... 3-15
Clutch lever free play, adjusting ........... 6-23
Coolant ................................................. 6-16
Coolant temperature warning light ......... 3-5
Cowlings and panels, removing and installing......................... 6-8DDimmer switch ...................................... 3-14
Drive chain, cleaning and lubricating .... 6-29
Drive chain slack................................... 6-27EEngine break-in....................................... 5-3
Engine idling speed, checking .............. 6-19
Engine oil and oil filter cartridge ........... 6-13
Engine stop switch ............................... 3-14 Engine trouble warning light ................... 3-7
EXUP system........................................ 3-27
FFront and rear brake pads, checking ... 6-25
Front fork, adjusting ............................. 3-22
Front fork, checking ............................. 6-32
Fuel ....................................................... 3-17
Fuel consumption, tips for reducing ...... 5-3
Fuel level warning light ........................... 3-4
Fuel tank breather hose and overflow
hose ................................................... 3-19
Fuel tank cap ........................................ 3-17
Fuses, replacing ................................... 6-35HHandlebar switches .............................. 3-14
Hazard switch....................................... 3-15
Headlight bulb, replacing ..................... 6-36
Helmet holding cable ........................... 3-21
High beam indicator light ....................... 3-4
Horn switch .......................................... 3-14IIdentification numbers ............................ 9-1
Ignition circuit cut-off system ............... 3-28
Immobilizer system ................................ 3-1
Immobilizer system indicator light .......... 3-7
Indicator lights and warning lights ......... 3-4LLicense plate light bulb, replacing........ 6-39
Luggage strap holders ......................... 3-27MMain switch/steering lock....................... 3-2
Maintenance and lubrication, periodic ... 6-4
Maintenance, emission control
system.................................................. 6-3 Matte color, caution ................................7-1
Model label .............................................9-1
Multi-function meter unit .........................3-8
NNeutral indicator light ..............................3-4OOil level warning light ..............................3-4PParking ....................................................5-4
Part locations ..........................................2-1
Pass switch ...........................................3-14RRear view mirrors ..................................3-22SSafety information ...................................1-1
Seats .....................................................3-20
Shifting ....................................................5-2
Shift pedal .............................................3-15
Shift timing indicator light .......................3-7
Shock absorber assembly, adjusting ....3-24
Sidestand ..............................................3-28
Sidestand, checking and lubricating.....6-32
Spark plugs, checking ..........................6-12
Specifications .........................................8-1
Starting the engine ..................................5-1
Start switch ...........................................3-14
Steering, checking ................................6-33
Storage ...................................................7-4
Supporting the motorcycle ...................6-40
Swingarm pivots, lubricating ................6-32TTail/brake light ......................................6-38
Throttle grip and cable,
checking and lubricating ....................6-30
U2CXE0E0.book Page 1 Monday, July 29, 2013 2:02 PM