YAMAHA YZF-R7 1999 User Guide
Manufacturer: YAMAHA, Model Year: 1999, Model line: YZF-R7, Model: YAMAHA YZF-R7 1999Pages: 381, PDF Size: 18.88 MB
Page 11 of 381

CHAPTER 3
PERIODIC CHECKS AND
ADJUSTMENTS
INTRODUCTION ....................................... 3-1
PERIODIC MAINTENANCE AND
LUBRICATION INTERVALS ...................... 3-1
GENERAL MAINTENANCE AND
LUBRICATION CHART .............................. 3-2
FUEL TANK AND AIR FILTER .................. 3-4
COWLINGS ............................................... 3-6
ENGINE ..................................................... 3-9
CHASSIS ................................................. 3-36
ELECTRICAL SYSTEM ............................ 3-55
CHAPTER 4
OVERHAULING THE ENGINE
ENGINE ..................................................... 4-1
CAMSHAFTS ............................................. 4-8
CYLINDER HEAD .................................... 4-18
VALVES AND VALVE SPRINGS ............ 4-21
GENERATOR ........................................... 4-32
PICKUP COIL ........................................... 4-35
CLUTCH ................................................... 4-39
SHIFT SHAFT .......................................... 4-48
OIL PAN AND OIL PUMP ....................... 4-50
CRANKCASE ........................................... 4-56
CONNECTING RODS AND
PISTONS ................................................. 4-63
CRANKSHAFT ......................................... 4-74
TRANSMISSION ..................................... 4-79
CHAPTER 5
COOLING SYSTEM
RADIATOR AND THERMOSTAT .............. 5-1
RADIATOR AND THERMOSTAT .............. 5-3
OIL COOLER .............................................. 5-9
WATER PUMP ......................................... 5-12
Page 12 of 381

CHAPTER 6
ELECTRONIC FUEL
INJECTION
ELECTRONIC FUEL INJECTION ............... 6-1
CHAPTER 7
CHASSIS
FRONT WHEEL AND BRAKE DISCS ........ 7-1
REAR WHEEL, BRAKE DISC, AND
REAR WHEEL SPROCKET ........................ 7-9
FRONT AND REAR BRAKES .................. 7-15
HYDRAULIC CLUTCH ............................. 7-43
FRONT FORK .......................................... 7-55
HANDLEBARS ......................................... 7-67
STEERING HEAD .................................... 7-72
REAR SHOCK ABSORBER
ASSEMBLY ............................................. 7-76
SWINGARM AND DRIVE CHAIN ........... 7-80
CHAPTER 8
ELECTRICAL
ELECTRICAL COMPONENTS ................... 8-1
SWITCHES ................................................ 8-2
CHECKING THE SWITCHES ..................... 8-3
CHECKING THE BULBS AND
BULB SOCKETS ........................................ 8-4
IGNITION SYSTEM ................................... 8-7
ELECTRIC STARTING SYSTEM ............. 8-12
CHARGING SYSTEM .............................. 8-16
LIGHTING SYSTEM ................................ 8-19
SIGNALING SYSTEM ............................. 8-21
COOLING SYSTEM ................................. 8-24
ELECTRONIC FUEL INJECTION
SYSTEM .................................................. 8-28
ELECTRICAL CONTROL SYSTEM ......... 8-30
Page 13 of 381

1 - 1
GIVE SAFETY THE RIGHT OF WAY
GENERAL INFORMATION
GIVE SAFETY THE RIGHT OF WAY
Motorcycles are fascinating vehicles, which can give you an unsurpassed feeling of power and freedom. Howev-
er, they also impose certain limits, which you must accept; even the best motorcycle does not ignore the laws of
physics.
Regular care and maintenance are essential for preserving your motorcycle’s value and operating condition.
Moreover, what is true for the motorcycle is also true for the rider: good performance depends on being in good
shape. Riding under the influence of medication, drugs and alcohol is, of course, out of the question. Motorcycle
riders – more than car drivers – must always be at their mental and physical best. Under the influence of even
small amounts of alcohol, there is a tendency to take dangerous risks.
Protective clothing is as essential for the motorcycle rider as seat belts are for car drivers and passengers. Al-
ways wear a complete motorcycle suit (whether made of leather or tear-resistant synthetic materials with protec-
tors), sturdy boots, motorcycle gloves and a properly fitting helmet. Optimum protective wear, however, should
not encourage carelessness. Though full-coverage helmets and suits, in particular, create an illusion of total safe-
ty and protection, motorcyclists will always be vulnerable. Riders who lack critical self-control run the risk of going
too fast and are apt to take chances. This is even more dangerous in wet weather. The good motorcyclist rides
safely, predictably and defensively – avoiding all dangers, including those caused by others.
Enjoy your ride!
1
Page 14 of 381

1 - 2
DESCRIPTION
DESCRIPTION
Left view
Right view
1. Front fork compression damping force adjusting screw
2. Front fork rebound damping force adjusting screw
3. Front fork spring preload adjusting bolt
4. Air filter
5. Starter (choke) “ “
6. Shift pedal
7. Rear shock absorber spring preload adjusting ring
8. Rear shock absorber compression damping force adjusting screw
9. Rear shock absorber rebound damping force adjusting screw
10. Fuses
11. Rear brake resorvoir
12. Rear brake pedal
13. Radiator cap and coolant reservoir tank cap
14. Engine oil filter
14
56
78
9
2,3
10
11
1213 14
1
Page 15 of 381

1 - 3
DESCRIPTION
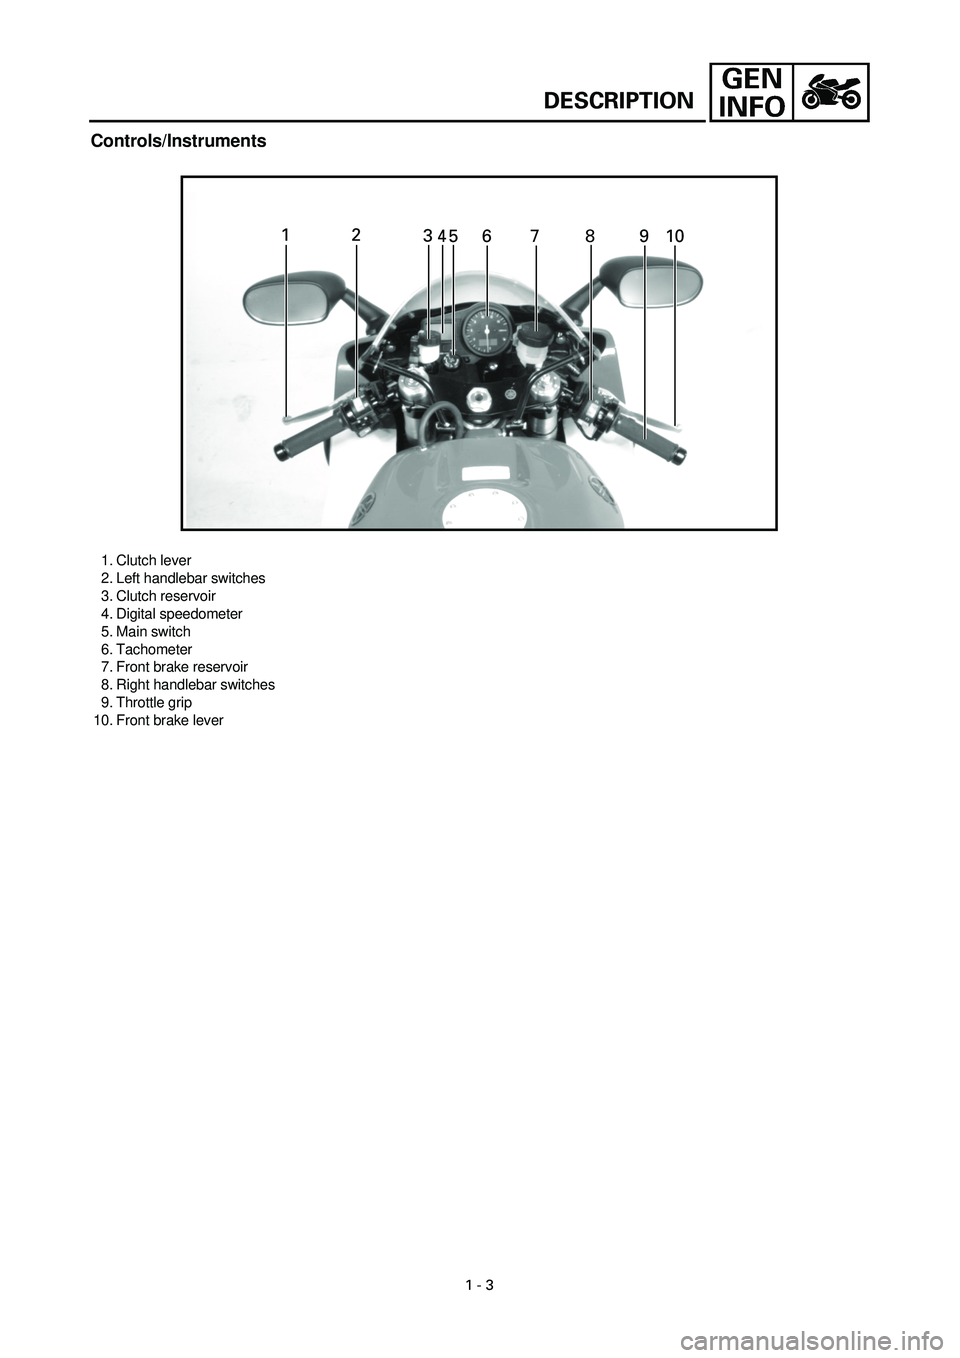
Controls/Instruments
1. Clutch lever
2. Left handlebar switches
3. Clutch reservoir
4. Digital speedometer
5. Main switch
6. Tachometer
7. Front brake reservoir
8. Right handlebar switches
9. Throttle grip
10. Front brake lever
12
3
456 7 8 910
Page 16 of 381

1 - 4
INSTRUMENT AND CONTROL FUNCTIONS
INSTRUMENT AND CONTROL FUNCTIONS
EAU00029
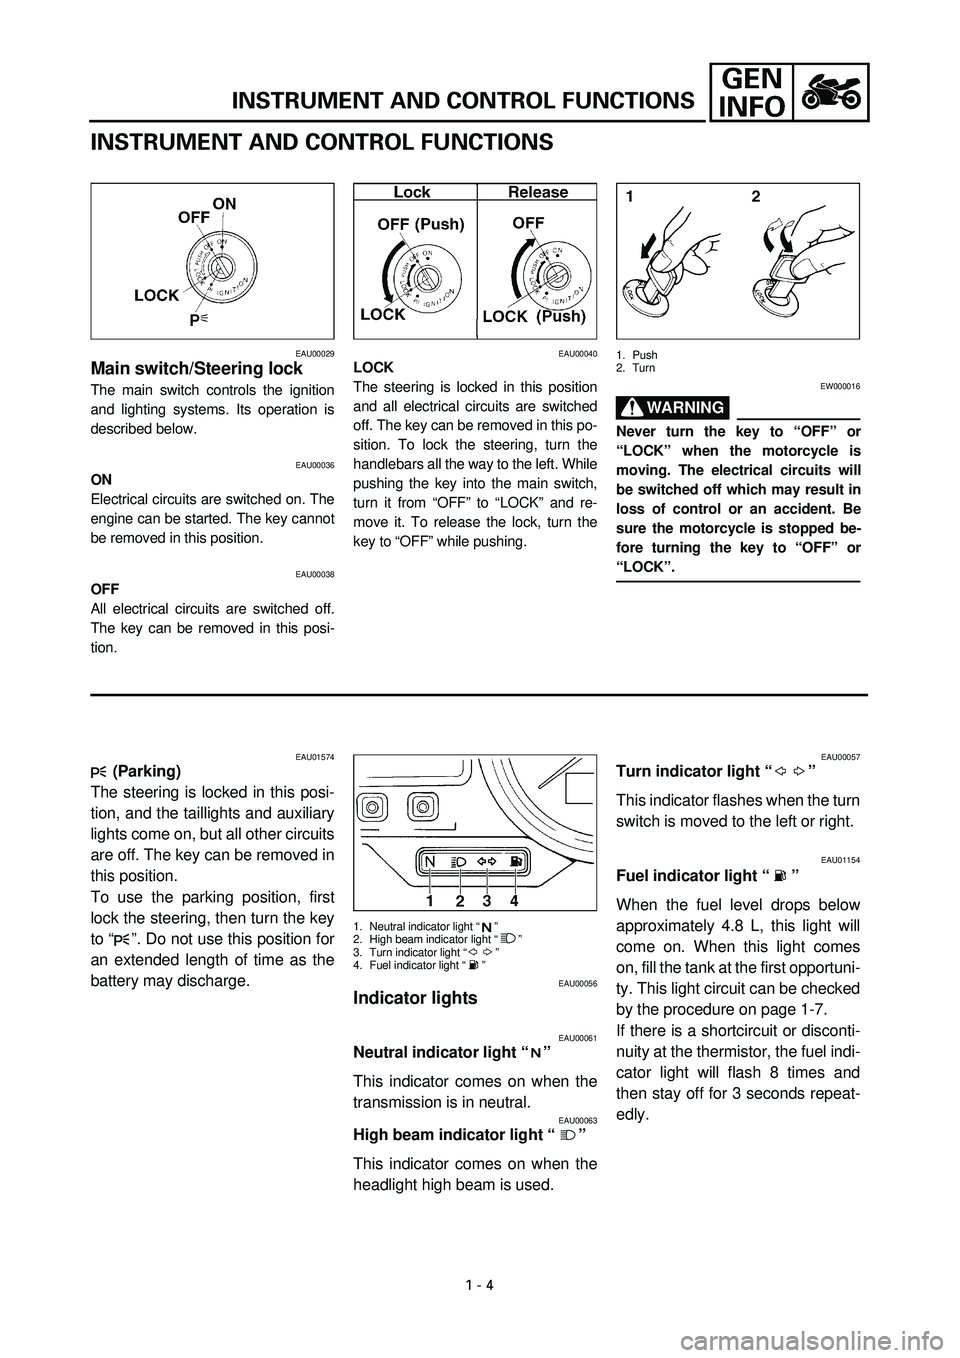
Main switch/Steering lock
The main switch controls the ignition
and lighting systems. Its operation is
described below.
EAU00036
ON
Electrical circuits are switched on. The
engine can be started. The key cannot
be removed in this position.
EAU00038
OFF
All electrical circuits are switched off.
The key can be removed in this posi-
tion.
EAU00040
LOCK
The steering is locked in this position
and all electrical circuits are switched
off. The key can be removed in this po-
sition. To lock the steering, turn the
handlebars all the way to the left. While
pushing the key into the main switch,
turn it from “OFF” to “LOCK” and re-
move it. To release the lock, turn the
key to “OFF” while pushing.
1. Push
2. Turn
EW000016
WARNING
Never turn the key to “OFF” or
“LOCK” when the motorcycle is
moving. The electrical circuits will
be switched off which may result in
loss of control or an accident. Be
sure the motorcycle is stopped be-
fore turning the key to “OFF” or
“LOCK”.
EAU01574
(Parking)
The steering is locked in this posi-
tion, and the taillights and auxiliary
lights come on, but all other circuits
are off. The key can be removed in
this position.
To use the parking position, first
lock the steering, then turn the key
to “ ”. Do not use this position for
an extended length of time as the
battery may discharge.
1.
Neutral indicator light “ ”
2. High beam indicator light “ ”
3. Turn indicator light “ ”
4. Fuel indicator light “ ”
EAU00056
Indicator lights
EAU00061
Neutral indicator light “ ”
This indicator comes on when the
transmission is in neutral.
EAU00063
High beam indicator light “ ”
This indicator comes on when the
headlight high beam is used.
EAU00057
Turn indicator light “ ”
This indicator flashes when the turn
switch is moved to the left or right.
EAU01154
Fuel indicator light “ ”
When the fuel level drops below
approximately 4.8 L, this light will
come on. When this light comes
on, fill the tank at the first opportuni-
ty. This light circuit can be checked
by the procedure on page 1-7.
If there is a shortcircuit or disconti-
nuity at the thermistor, the fuel indi-
cator light will flash 8 times and
then stay off for 3 seconds repeat-
edly.
Page 17 of 381

1 - 5
INSTRUMENT AND CONTROL FUNCTIONS
4 681012
14
x1000r/min
0
1 12
3 3
4
1. Warning light
2. Oil level symbol “ ”
3. Coolant temperature symbol “ ”
4. Engine trouble symbol “ ”
EAU01564
Warning light
This indicator light has three functions.
l
The light will come on and symbol
“ ” will flash if the engine oil
level is low.
If this symbol flashes, stop the en-
gine immediately and fill it with oil
to the specified level.
l
The light will come on and symbol
“ ” will flash if trouble occurs in
a monitoring circuit. In such a
case, take the motorcycle to a
Yamaha dealer to have the self-
diagnostic systems checked.
l
The light will come on and symbol
“ ” will flash if the coolant tem-
perature is too high. The following
chart shows the conditions of the
indicator light, symbol and tem-
perature display in accordance to
coolant temperature.
The light circuit can be checked by the
procedure on page 1-6.
EC000118
CAUTION:
l
Do not run the motorcycle until
you know it has sufficient en-
gine oil.
l
Do not run the motorcycle if the
engine is overheated.
NOTE:
Even if the oil is filled to the specified
level, the indicator light may flicker
when riding on a slope or during sud-
den acceleration or deceleration, but
this is normal.
CB-74ECB-74E
Coolant
temperatureDisplay Conditions What to do
~ 39 ˚CSymbol is on and “LO” is
displayed.OK. Go ahead with riding.
40 ˚C ~ 120 ˚CSymbol is on and temper-
ature is displayed.OK. Go ahead with riding.
121 ˚C ~ 139 ˚CSymbol and temperature
flash.
Warning light comes on.Stop the motorcycle and al-
low it to idle until coolant tem-
perature goes down.
If the temperature does not
go down, stop the engine.
140 ˚C ~ Symbol and message
“HI” flash.
Warning light comes on.Stop the engine and allow it
to cool. Seen page 1-19 if the
engine overheats.
—Symbol and message
“Err” flash.
Warning light comes on.Ask a Yamaha dealer to in-
spect the motorcycle.
C
C
C
C
C
Page 18 of 381

1 - 6
INSTRUMENT AND CONTROL FUNCTIONS
Warning light circuit check
CB-75ECB-75E
Warning light comes on. After a few seconds:Warning light does not come on.
Have a Yamaha
dealer inspect the
electrical circuit.
Turn the main switch to “ON”.
Have a Yamaha dealer inspect
the electrical circuit.
If symbol “ ” is on, check the
engine temperature. (See page 1-5.)
Warning light goes off.
No symbol is on.Symbol “ ”,
“ ” “ ” is on.
OK. Go ahead
with riding.
Warning light does not go off.
If symbol “ ”
is on, inspect the
oil level.
Oil level is OK.Oil level is low.
Have a Yamaha dealer
inspect the electrical
circuit.Supply
recommended
engine oil.
If the engine is hot,
allow it to cool and see
“Engine overheating”
in the troubleshooting
chart on page 1-19 for
instructions.If the engine
temperature is
normal, have a
Yamaha dealer
inspect the
electrical circuit.
If symbol “ ” is on.
Have a Yamaha dealer
inspect the self-
diagnostic systems.
Page 19 of 381

1 - 7
INSTRUMENT AND CONTROL FUNCTIONS
EAU01295
Fuel indicator light circuit check
CB-46ECB-69E
Turn the main switch to “ON”.
Indicator does not come
on.
Have a Yamaha dealer
inspect the electric
circuit.Indicator goes off.Indicator does not go off.
Inspect the fuel level.
Indicator comes on.
After a few seconds:
OK. Go ahead with
riding.Fuel level is OK.
Have a Yamaha
dealer inspect the
electric circuit.Fuel level is low.
Supply recommended
fuel.
1. Speedometer
2. Clock, odometer
3. “SELECT” button
4. “RESET” button
EAU01601
Digital speedometer
This speedometer is equipped with:
l
an odometer
l
two trip odometers
l
a fuel reserve trip meter
l
a clock
NOTE:
For UK models only:
To change the speedometer display
from kilometers to miles, press the “SE-
LECT” button for at least two seconds.
Odometer and trip meter modes
Use the trip meters to estimate how far
you can ride on a tank of fuel.
Use the fuel reserve trip meter to see
the distance traveled from when the
fuel level dropped to the reserve level.
Selecting a mode
Push the “SELECT” button to change
between the odometer mode “ODO”
and the trip odometer modes “TRIP 1”
and “TRIP 2” in the following order:
“ODO”
®
“TRIP 1”
®
“TRIP 2”
®
“ODO”
If the fuel level indicator light comes on
the odometer display will automatically
change to the fuel reserve trip meter
mode “TRIP F” and start counting the
distance traveled from that point. Push
the “SELECT” button to change be-
tween the fuel odometer, trip odometer
and odometer modes in the following
order:
“TRIP F”
®
“TRIP 1”
®
“TRIP 2”
®
“ODO”
®
“TRIP F”Resetting a meter
To reset a trip odometer to 0.0, select it
by pushing the “SELECT” button and
push the “RESET” button for at least
one second.
To reset the fuel reserve trip meter, se-
lect it by pushing the “SELECT” button
and push the “RESET” button for at
least one second. The display will re-
turn to “TRIP 1”. If you do not reset the
fuel reserve trip meter manually, it will
automatically reset and return to “TRIP
1” after refueling and the motorcycle
has traveled 5 km (3.1 miles).
NOTE:
After the fuel reserve trip meter is reset,
the display always returns to the “TRIP
1” mode. If “TRIP 2” was being used
before the fuel reserve trip meter is re-
set, be sure to push the “SELECT” but-
ton to change back to the “TRIP 2”
mode.
Page 20 of 381

1 - 8
INSTRUMENT AND CONTROL FUNCTIONS
1. Clock, odometer
2. “SELECT” button
3. “RESET” button
Clock mode
To change the display to the clock
mode, push both the “SELECT” and
“RESET” buttons.
To change the display back to the
odometer mode, push the “RESET”
button.
To set the clock
1. Push both the “SELECT” and
“RESET” buttons for at least two
seconds.2. When the hour digits start flash-
ing, push the “RESET” button to
set the hours.
3. Push the “SELECT” button to
change the minutes.
4. When the minute digits start flash-
ing, push the “RESET” button to
set the minutes.
5. Push the “SELECT” button to start
the clock.
NOTE:
After setting the clock, be sure to push
the “SELECT” button before turning the
main switch to “OFF”, otherwise the
clock will not be set.
4 681012
14
x1000r/min
0
1 1
1. Tachometer
EAU00101
Tachometer
This model is equipped with an electric
tachometer so the rider can monitor the
engine speed and keep it within the
ideal power range.
EC000003
CAUTION:
Do not operate at 13,800 r/min and
above.
Diagnosis device
This model is equipped with a self diag-
nosis.
Refer to “ELECTRICAL CONTROL
SYSTEM USER MODE” in chapter 8.
If some trouble should occur in an elec-
trical circuit the tachometer will repeat-
edly display change in r/min.If this occurs take your motorcycle to a
Yamaha dealer for repair.
EC000004
CAUTION:
To prevent engine damage, be sure
to consult a Yamaha dealer as soon
as possible if the tachometer dis-
plays a repeated change in rpm.