check engine YAMAHA YZF600 2000 Owner's Manual
[x] Cancel search | Manufacturer: YAMAHA, Model Year: 2000, Model line: YZF600, Model: YAMAHA YZF600 2000Pages: 109, PDF Size: 5.01 MB
Page 91 of 109

PERIODIC MAINTENANCE AND MINOR REPAIR
6-41
6
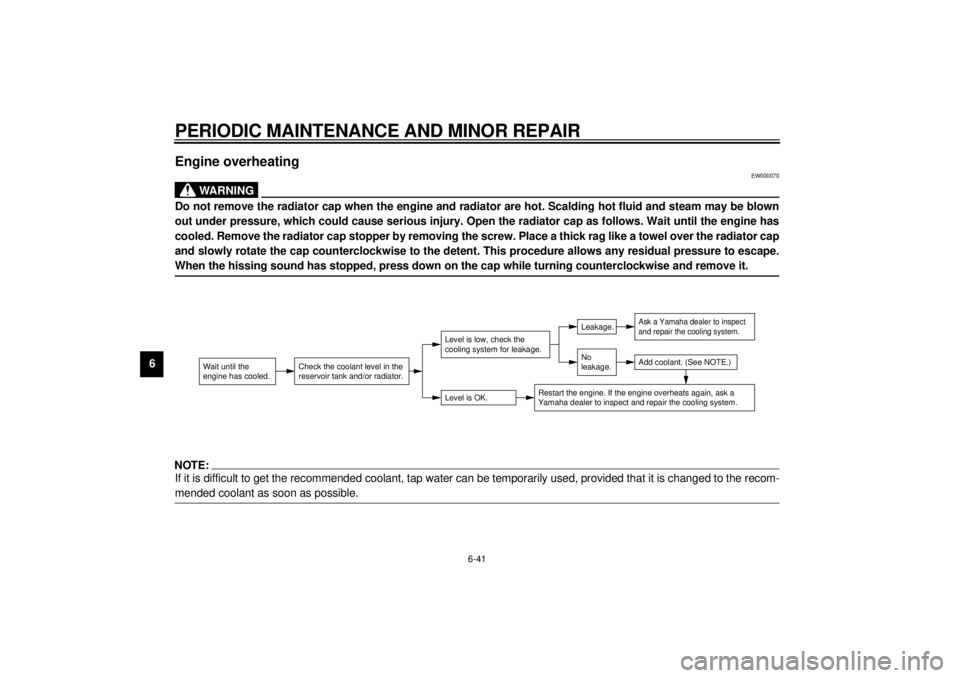
Engine overheating
EW000070
WARNING
@ Do not remove the radiator cap when the engine and radiator are hot. Scalding hot fluid and steam may be blown
out under pressure, which could cause serious injury. Open the radiator cap as follows. Wait until the engine has
cooled. Remove the radiator cap stopper by removing the screw. Place a thick rag like a towel over the radiator cap
and slowly rotate the cap counterclockwise to the detent. This procedure allows any residual pressure to escape.
When the hissing sound has stopped, press down on the cap while turning counterclockwise and remove it. @NOTE:@ If it is difficult to get the recommended coolant, tap water can be temporarily used, provided that it is changed to the recom-
mended coolant as soon as possible. @
Wait until the
engine has cooled.
Check the coolant level in the
reservoir tank and/or radiator.
Level is OK.Level is low, check the
cooling system for leakage.
No
leakage.Leakage.
Ask a Yamaha dealer to inspect
and repair the cooling system.Add coolant. (See NOTE.)
Restart the engine. If the engine overheats again, ask a
Yamaha dealer to inspect and repair the cooling system.
E_4tv_Periodic.fm Page 41 Wednesday, September 1, 1999 11:12 AM
Page 97 of 109

MOTORCYCLE CARE AND STORAGE
7-5
7a. Remove the spark plug caps and
spark plugs.
b. Pour a teaspoonful of engine oil
into each spark plug bore.
c. Install the spark plug caps onto the
spark plugs and place the spark
plugs on the cylinder head so that
the electrodes are grounded. (This
will limit sparking during the next
step.)
d. Turn the engine over several times
with the starter. (This will coat the
cylinder walls with oil.)
e. Remove the spark plug caps from
the spark plugs, install the spark
plugs and then the spark plug
caps.
EWA00003
WARNING
@ When turning the engine over, be
sure to ground the spark plug elec-
trodes to prevent damage or injury
from sparking. @
6. Lubricate all control cables and
the pivoting points of all levers and
pedals as well as of the sidestand/
centerstand.
7. Check and, if necessary, correct
the tire air pressure, then raise the
motorcycle so that both of its
wheels are off the ground. Alterna-
tively, turn the wheels a little every
month in order to prevent the tires
from becoming degraded in one
spot.
8. Cover up the muffler outlet with a
plastic bag to prevent moisture
from entering.9. Remove the battery and fully
charge it. Store it in a cool, dry
place and recharge it once a
month. Do not store the battery in
an excessively cold or warm place
(less than 0 °C or more than
30 °C). For more information, see
“Battery storage” in the chapter
“PERIODIC MAINTENANCE AND
MINOR REPAIRS”.
NOTE:@ Make any necessary repairs before
storing the motorcycle. @
E_4tv_Cleaning.fm Page 5 Wednesday, September 1, 1999 11:13 AM
Page 107 of 109

10-INDEXAAir filter ..................................................6-15
Air intake duct ........................................6-17
Air vent hose .......................................... 6-17
Antitheft alarm (optional) .......................... 3-7BBattery ................................................... 6-32
Brake and clutch lever lubrication........... 6-29
Brake and shift pedal lubrication ............ 6-29
Brake fluid replacement ......................... 6-26
Brake light switch adjustment ................. 6-24CCable inspection and lubrication ............ 6-28
Carburetor adjustment ...........................6-17
Care.........................................................7-1
Changing the coolant ............................. 6-13
Checking the front and
rear brake pads ................................... 6-25
Clutch lever .............................................. 3-9
Clutch lever free play adjustment ........... 6-23
Controls/Instruments ................................2-3
Coolant temperature gauge ..................... 3-8
Cooling system ...................................... 6-12
Cowling A and B ......................................6-5
Cowling C ................................................6-7
Cowling and panel removal and
installation .............................................6-5
DDiagnosis device ..................................... 3-7
Dimmer switch ......................................... 3-8
Drive chain lubrication ........................... 6-28
Drive chain slack adjustment ................. 6-27
Drive chain slack check ......................... 6-27EEngine break-in ....................................... 5-5
Engine oil ................................................ 6-9
Engine stop switch................................... 3-9FFront brake lever ................................... 3-10
Front fork adjustment............................. 3-16
Front fork inspection .............................. 6-30
Front wheel installation .......................... 6-36
Front wheel removal .............................. 6-35
Fuel ....................................................... 3-11
Fuel indicator circuit check....................... 3-5
Fuel indicator light ................................... 3-2
Fuel tank breather hose
(for Germany only) .............................. 3-13
Fuel tank cap ......................................... 3-11
Fuse replacement.................................. 6-33GGive safety the right of way ..................... 1-1
HHandlebar switches ..................................3-8
Dimmer switch ....................................3-8
Engine stop switch..............................3-9
Horn switch.........................................3-8
Lights switch .......................................3-9
Pass switch ........................................3-8
Start switch .........................................3-9
Turn signal switch ...............................3-8
Headlight bulb replacement....................6-33
Helmet holder.........................................3-15
High beam indicator light ..........................3-3
Horn switch ..............................................3-8IIdentification number records ...................9-1
Idle speed adjustment ............................6-18
Indicator lights ..........................................3-2
Fuel indicator light...............................3-2
High beam indicator light ....................3-3
Neutral indicator light ..........................3-2
Oil level indicator light .........................3-2
Turn indicator light ..............................3-3
Inspecting the brake fluid level ...............6-25KKey identification number .........................9-1LLeft view...................................................2-1
Lights switch ............................................3-9
Luggage strap holders ...........................3-21
E_4tvIX.fm Page 1 Wednesday, September 1, 1999 11:15 AM
Page 108 of 109

INDEX
MMain switch/steering lock ......................... 3-1
Model label .............................................. 9-2NNeutral indicator light ............................... 3-2OOil level indicator circuit check ................. 3-4
Oil level indicator light .............................. 3-2PParking .................................................... 5-6
Pass switch ............................................. 3-8
Periodic maintenance and lubrication ...... 6-2
Pre-operation check list ........................... 4-1RRear brake pedal ................................... 3-10
Rear brake pedal height adjustment ...... 6-23
Rear shock absorber adjustment ........... 3-18
Rear suspension lubrication................... 6-30
Rear wheel installation........................... 6-38
Rear wheel removal............................... 6-37
Recommended combinations of the
front fork and the rear shock
absorber settings................................. 3-20
Recommended shift points
(for Switzerland only)............................. 5-5
Right view................................................ 2-2
SSeat ...................................................... 3-14
Shifting .................................................... 5-4
Shift pedal ............................................. 3-10
Sidestand .............................................. 3-21
Sidestand/clutch switch operation
check .................................................. 3-22
Sidestand lubrication ............................. 6-29
Spark plugs ............................................. 6-7
Specifications .......................................... 8-1
Speedometer .......................................... 3-6
Starter (choke) “ ” ............................. 3-13
Starting a warm engine ........................... 5-4
Starting the engine .................................. 5-1
Start switch ............................................. 3-9
Steering inspection................................ 6-31
Storage ................................................... 7-4
Storage compartment............................ 3-15TTachometer............................................. 3-6
Tail/brake light bulb replacement ........... 6-35
Throttle cable and grip lubrication.......... 6-28
Throttle cable free play inspection ......... 6-18
Tips for reducing fuel consumption .......... 5-5
Tires...................................................... 6-19
Tool kit .................................................... 6-1
Troubleshooting .................................... 6-39
Troubleshooting chart ........................... 6-40
Turn indicator light................................... 3-3
Turn signal light bulb replacement ......... 6-35
Turn signal switch ................................... 3-8
VValve clearance adjustment ................... 6-19
Vehicle identification number ................... 9-1WWheel bearings...................................... 6-31
Wheels .................................................. 6-22
E_4tvIX.fm Page 2 Wednesday, September 1, 1999 11:15 AM