ECO mode Abarth 124 Spider 2016 Owner handbook (in English)
[x] Cancel search | Manufacturer: ABARTH, Model Year: 2016, Model line: 124 Spider, Model: Abarth 124 Spider 2016Pages: 224, PDF Size: 2.89 MB
Page 119 of 224
NOTE When the ignition is switched off,
the sport mode is cancelled.
NOTE Depending on the driving
conditions when sport mode is
selected, the vehicle may perform
shift-down or slightly accelerate.CRUISE CONTROL
This is an electronically controlled
driving assistance device that allows the
desired vehicle speed to be maintained,
without having to press the accelerator
pedal.
This device can be used at a speed
above 25 km/h on long stretches of dry,
straight roads with few variations (e.g.
motorways).
It is therefore not recommended to use
this device on extra-urban roads with
traffic. Do not use it in town.
ACTIVATION /
DEACTIVATION
145) 146) 147) 148)
IMPORTANT When the ignition is
switched off, the system status before it
was turned off is maintained. For
example, if the ignition is switched off
while the cruise control is operating, the
system will be operable when the
ignition is switched ON the next time.
Activating the device
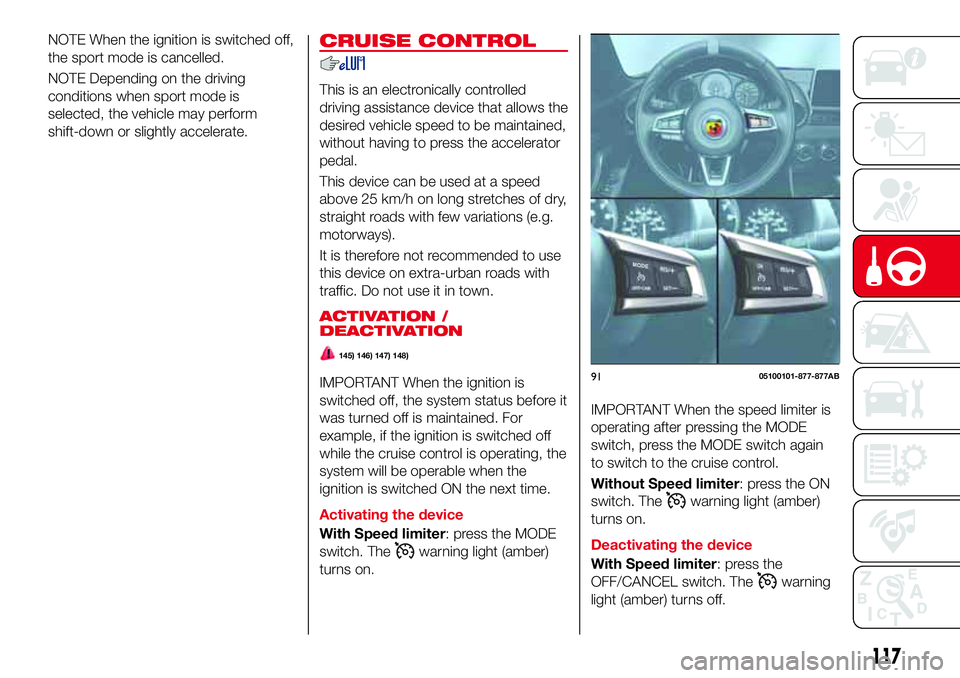
With Speed limiter: press the MODE
switch. The
warning light (amber)
turns on.
IMPORTANT When the speed limiter is
operating after pressing the MODE
switch, press the MODE switch again
to switch to the cruise control.
Without Speed limiter: press the ON
switch. The
warning light (amber)
turns on.
Deactivating the device
With Speed limiter: press the
OFF/CANCEL switch. The
warning
light (amber) turns off.
9105100101-877-877AB
117
Page 123 of 224
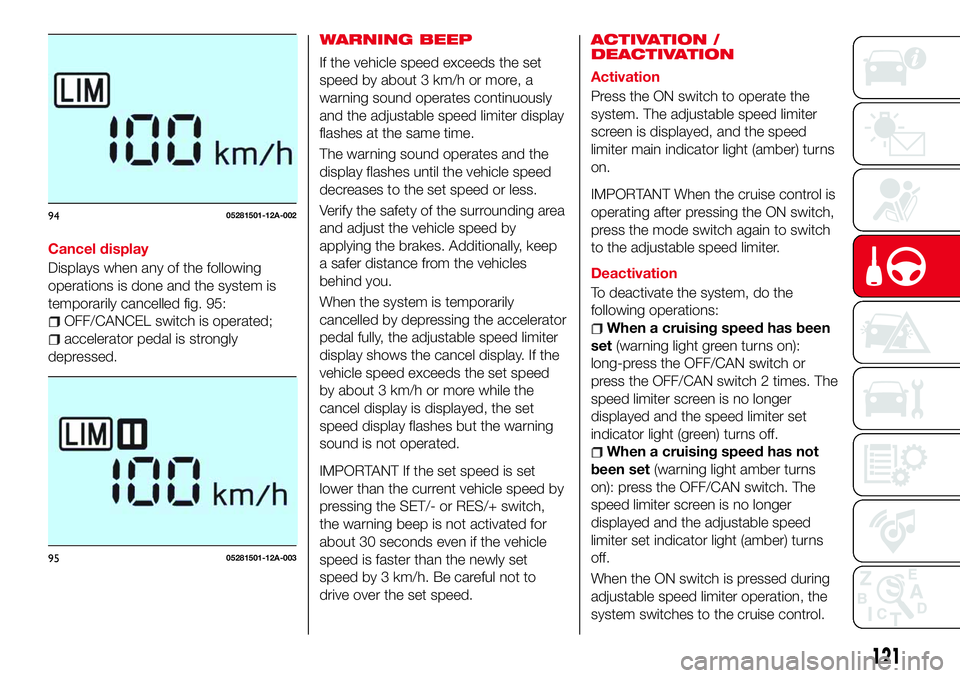
Cancel display
Displays when any of the following
operations is done and the system is
temporarily cancelled fig. 95:
OFF/CANCEL switch is operated;
accelerator pedal is strongly
depressed.
WARNING BEEP
If the vehicle speed exceeds the set
speed by about 3 km/h or more, a
warning sound operates continuously
and the adjustable speed limiter display
flashes at the same time.
The warning sound operates and the
display flashes until the vehicle speed
decreases to the set speed or less.
Verify the safety of the surrounding area
and adjust the vehicle speed by
applying the brakes. Additionally, keep
a safer distance from the vehicles
behind you.
When the system is temporarily
cancelled by depressing the accelerator
pedal fully, the adjustable speed limiter
display shows the cancel display. If the
vehicle speed exceeds the set speed
by about 3 km/h or more while the
cancel display is displayed, the set
speed display flashes but the warning
sound is not operated.
IMPORTANT If the set speed is set
lower than the current vehicle speed by
pressing the SET/- or RES/+ switch,
the warning beep is not activated for
about 30 seconds even if the vehicle
speed is faster than the newly set
speed by 3 km/h. Be careful not to
drive over the set speed.ACTIVATION /
DEACTIVATION
Activation
Press the ON switch to operate the
system. The adjustable speed limiter
screen is displayed, and the speed
limiter main indicator light (amber) turns
on.
IMPORTANT When the cruise control is
operating after pressing the ON switch,
press the mode switch again to switch
to the adjustable speed limiter.
Deactivation
To deactivate the system, do the
following operations:
When a cruising speed has been
set(warning light green turns on):
long-press the OFF/CAN switch or
press the OFF/CAN switch 2 times. The
speed limiter screen is no longer
displayed and the speed limiter set
indicator light (green) turns off.
When a cruising speed has not
been set(warning light amber turns
on): press the OFF/CAN switch. The
speed limiter screen is no longer
displayed and the adjustable speed
limiter set indicator light (amber) turns
off.
When the ON switch is pressed during
adjustable speed limiter operation, the
system switches to the cruise control.
9405281501-12A-002
9505281501-12A-003
121
Page 198 of 224
AF (Alternative Frequency);
REG (Regional Programme);
ALC (Automatic volume adjustment);
BASS (Low pitch sound);
TREB (Treble sound);
FADE (Front/back volume balance);
BAL (Left/right volume balance);
BEEP (Audio operation sound);
12Hr < > 24Hr (12 Hr/24 Hr time
adjustment).
CLOCK
Setting the time
The clock can be set at any time when
the ignition is switched to ACC or ON.
To adjust the time, press the clock
buttonFM/AMfor about 2 seconds
until a beep is heard. The clock's
current time will flash.
Time adjustment
To adjust the time, press the
hour/minute set button
/
while the clock's current time is
flashing.
The hours advance while the hour set
button
is pressed. The minutes
advance while the minute
set
button is pressed.
Press the clock buttonFM/AMagain
to start the clock.
OPERATING THE RADIO
Radio ON: press a band selector
button FM/AM to turn the radio on.
Band selection: press the band
selector buttonFM/AMto switch the
bands as follows: M1–FM2–MW/LW
Manual tuning: select the station by
pressing the tuning button
/
lightly.
Seek tuning: press tuning button
/. The search stops when a
station is found.
Scan tuning: press and hold the scan
buttonMEDIAto automatically sample
strong stations. Scanning stops at each
station for about 5 seconds. To hold a
station, press and hold the scan button
MEDIA again during this interval.
Preset channel tuning
The 6 preset channels can be used to
store 6 MW/LW and 12 FM stations.
To set a channel first select MW/LW,
FM1, or FM2. Tune to the desired
station.
Press a channel preset button for
about 2 seconds until a beep is heard.
The preset channel number or station
frequency will be displayed. The station
is now held in the memory.
Repeat this operation for the other
stations and bands you want to store.
To tune one in the memory, selectMW/LW, FM1, or FM2 and then press
its channel preset button. The station
frequency or the channel number will be
displayed.
AUX / USB / iPod MODE
Auxiliary jack / USB port
Audio can be heard from the vehicle's
speakers by connecting a commercially
available portable audio unit to the
auxiliary jack. A commercially-available,
non-impedance (3.5 Ø) stereo mini plug
lead is required. In addition, audio can
be played from the vehicle audio device
by connecting a USB device or an iPod
to the USB port.
How to use AUX mode
Switch the ignition to ACC or ON, press
the power/volume dial to turn the audio
system on and press theMEDIA
button of the audio unit to change to
the AUX mode.
How to use USB mode
This unit does not support a USB
3.0 device. In addition, other devices
may not be supported depending on
the model or OS version.
Playback
Switch the ignition to ACC or ON, press
the power/volume dial to turn the audio
system on and press theMEDIA
196
MULTIMEDIA
Page 199 of 224
button to switch to the USB mode and
start playback.
Track search
Press the track up button
once to
skip forward to the beginning of the
next track.
Press the track down button
within a few seconds after
playback begins to track down to the
beginning of the previous track.
Press the track down button
after
a few seconds have elapsed to start
playback from the beginning of the
current track.
How to use iPod mode
An iPod may not be compatible
depending on the model or OS version.
In this case, an error message is
displayed.
NOTE The iPod functions on the iPod
cannot be operated while it is
connected to the unit because the unit
controls the iPod functions.
Track search
Press the track up button
once to
skip forward to the beginning of the
next track.
Press the track down button
within a few seconds (depends
on iPod software version) after playbackbegins to track down to the beginning
of the previous track.
Press the track down button
after
a few seconds (depends on iPod
software version) have elapsed to start
playback from the beginning of the
current track.
Category search: press the category
down button5to select the previous
category and press the category up
button6to select the next category.
The types of categories include Playlist,
Artist, Album, Song, Podcast, Genre,
Composer, and Audio book.
List search: press the list down button
to select the previous list and press
the list up button
to select the next
list. When the selected category is
Song or Audio book, there is no list.
Bluetooth® HANDS FREE
Device pairing
To use
Bluetooth®audio and
Hands-Free, the device equipped with
Bluetooth®has to be paired to the
unit using the following procedure. A
maximum of seven devices including
Bluetooth®audio devices and
hands-free mobile phones can be
paired.
NOTE The
Bluetooth®system may
not operate for 1 or 2 minutes after the
ignition is switched to ACC or ON.
However, this does not indicate aproblem. If the
Bluetooth®system
does not connect automatically after
1 or 2 minutes have elapsed, make
sure that the
Bluetooth®setting on
the device is normal and attempt to
reconnect the
Bluetooth®device from
the vehicle side.
Pairing code setting
The 4-digit pairing code setting for
registration of your cell phone (pairing)
can be set beforehand. The initial
setting value is “0000”.
Proceed as follows:
press the pick-up button or talk
button with a short press;
Say: [Beep] “Setup”
Prompt: “Select one of the following:
Pairing options, confirmation prompts,
language, passcode, select phone or
select music player.”
Say: [Beep] “Pairing options”
Prompt: “Select one of the following:
Pair, Edit, Delete, List, or Set Pairing
Code.”
Say: [Beep] “Set pairing code”
Prompt: “Your current pairing code
is XXXX. Do you want to change it to a
different pairing code?”
Say: [Beep] “Yes”
Prompt: “Please say a 4-digit pairing
code.”
Say: [Beep] “YYYY”
Prompt: “YYYY is this correct?”
197
Page 200 of 224
![Abarth 124 Spider 2016 Owner handbook (in English) Say: [Beep] “Yes” or “No”. If “Yes”,
go to next step. If “No”, the procedure
returns to Step 9
Prompt: “Your new pairing code is
YYYY. Use this pairing code when
pairing devices to t Abarth 124 Spider 2016 Owner handbook (in English) Say: [Beep] “Yes” or “No”. If “Yes”,
go to next step. If “No”, the procedure
returns to Step 9
Prompt: “Your new pairing code is
YYYY. Use this pairing code when
pairing devices to t](/img/40/31046/w960_31046-199.png)
Say: [Beep] “Yes” or “No”. If “Yes”,
go to next step. If “No”, the procedure
returns to Step 9
Prompt: “Your new pairing code is
YYYY. Use this pairing code when
pairing devices to the Hands free
system. Do you want to pair a device
now?”
Say: [Beep] “Yes” or “No”. If “Yes”,
the system switches to the device
registration mode. If “No”, the system
returns to standby status.
Device pairing
Proceed as follows:
activate theBluetooth®application
of the device;
press the pick-up button or talk
button with a short press;
Say: [Beep] “Setup”
Prompt: “Select one of the following:
Pairing options, confirmation prompts,
language, passcode, select phone or
select music player.”
Say: [Beep] “Pairing options”
Prompt: “Select one of the following:
Pair, Edit, Delete, List, or Set Pairing
Code.”
Say: [Beep] “Pair”
Prompt: “Start the pairing process
on your
Bluetooth®device. Your
pairing code is 0000 (XXXX). Input this
on your
Bluetooth®device when
prompted on the device. See device
manual for instructions.”
using the device, perform a search
for the
Bluetooth®device (Peripheral
device)
select “124 Spider” from the device
list searched by the device and input
the 4-digit pairing code to the device;
Prompt: “Please say the name of
the device after the beep.”
Say: [Beep] “XXXX - - -” (say a
“device tag”, an arbitrary name for the
device.). Example:“Stan's device.”
Prompt: “XXXXXX---(Ex. “Stan's
device”) (Device tag). Is this correct?”
Say: [Beep] “Yes”
Prompt: “Pairing complete”
After a device is registered, the system
automatically identifies the device.
NOTE Say a paired “device tag” within
10 seconds. If more than two devices
are to be paired, they cannot be paired
with the same or similar “device tag”.
198
MULTIMEDIA
Page 203 of 224
Communication:Bluetooth®
related functions are available.
Navigation: Navigation screen
(where provided) is displayed. If
the SD card for the navigation
system is not inserted, the
compass indicating the direction
in which the vehicle is moving is
displayed. The compass may
not indicate the correct bearing
when the vehicle is stopped or
travelling at a slow speed.
Settings: overall setting menu
(such as display, sound,
Bluetooth®and Language).
Depending on the grade and
specification, the screen display
may differ.
OPERATING THE RADIO
Select the iconon the home screen
to display the “Entertainment” screen.
When selecting the desired radio, the
following icons are indicated in the
lower part of the display:
displays the “Entertainment”
menu. Use to switch to a
different audio source;
displays the list of receivable RDS
radio stations (FM only);
displays the station list (AM
only). Select“Update Station
List”to display the frequencies
of up to ten radio stations on the
auto memory preset list Select
the desired frequency.
displays the Favourites list.
Long-press to store radio station
currently being aired.
you can search for receivable
radio stations. Scanning stops at
each station for about five
seconds. Select again to
continue receiving the radio
station.
you can change the radio
frequency manually. Rotate the
commander knob, slide the
screen, or touch the radio
frequency. Press
orto
change the radio frequency one
step at a time. When
oris
long-pressed, the radio frequency
changes continually. It stops when
you remove your hand from the
icon or the commander knob.
switches the TA mode on and
off.
/Automatic radio station
selection. When
long-pressed, the radio
frequency changes
continually. It stops when
you remove your hand from
the icon or the commander
knob.
Displays the FM settings screen
(FM only). On/Off of Alternative
frequency and Region lock can be
set.
Displays sound settings to adjust
audio quality level.
NOTE When theoricon is
selected while FM is selected, each
programme is selected.
Digital Audio Broadcasting (DAB)
Radio
(where provided)
Select the icon
on the home screen
to display the “Entertainment” screen.
SelectDABthe following icons are
displayed at the bottom of the screen:
Displays the “Entertainment”
menu. Use to switch to a
different audio source.
Displays the station list (ensemble
and station). Select “Update List”
to update the station list. Select
“Select Ensemble” to select the
ensemble you want to display.
201
Page 204 of 224
Displays the favorites list. Press
and hold to store the currently
tuned station to the favorites list.
Searches your desired station
from the station list. Tunes to
each station in the station list for
10 seconds. Select again when
your desired station is tuned. If
the station list is not available, it
switches to the station list update
screen. Perform the station list
updating.
Switches the TA mode on and
off.
/Returns to the
previous/goes to the next
station. Touch and hold to
return to the top station in
the previous/next ensemble.
Displays the DAB radio setting
screen.
Displays sound settings to adjust
audio quality level.
SETTINGS
NOTE Depending on the grade and
specification, the screen display may
differ.
Select the
icon on the home screen
to display the Settings screen. Switch
the tab and select the setting item you
want to change.You can customize settings in the setup
display as follows:
“Display”: refer to “Volume/Display/
Sound controls” paragraph in Radio 7”
supplement;
“Sound”: refer to “Volume/Display/
Sound controls” paragraph in Radio 7”
supplement;
“Clock”: “Adjust Time”, “GPS Sync”,
“Time Format”, “Time Zone Select”,
“Daylight Savings Time”;
“Vehicle”: rain sensing Wiper/Door
Lock/Other;
“Devices”: selectBluetooth®or
“Network Management”;
“System”: “Tool Tips”, “Language”,
“Temperature”, “Distance”, “Music
Database Update”, “Factory Reset”,
“About (agreements and disclaimers)”,
“About (version Information)”
AUX / USB / iPod MODE
Audio can be heard from the vehicle's
speakers by connecting a commercially
available portable audio unit to the
auxiliary jack. A commercially-available,
non-impedance (3.5 Ø) stereo mini plug
lead is required.
In addition, audio can be played from
the vehicle audio device by connecting
a USB device or an iPod to the USB
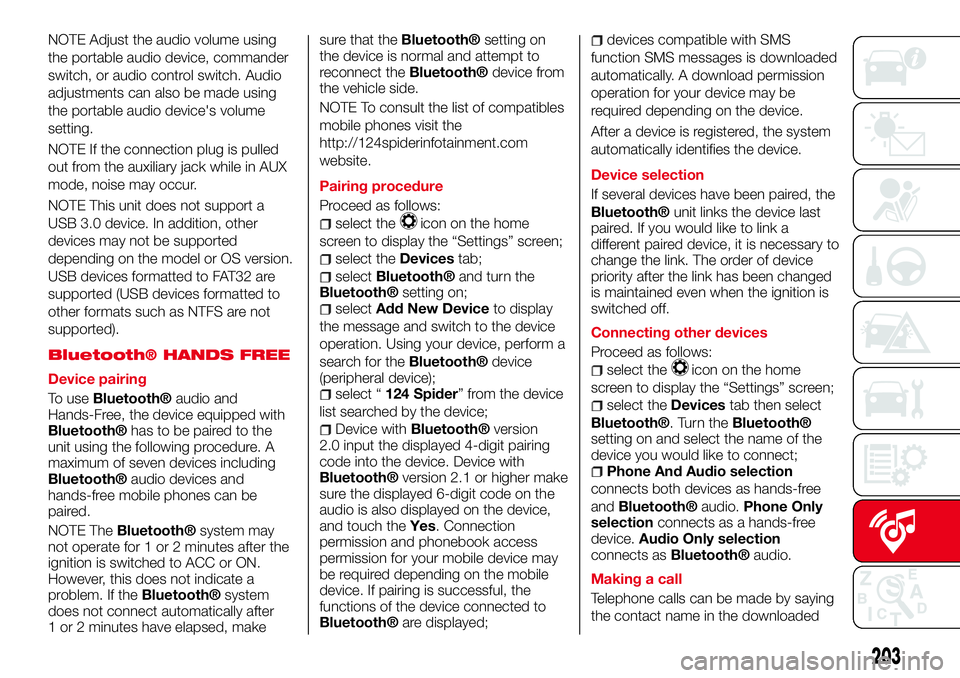
port fig. 165 (1= USB ports/2=
auxiliary jack).How to connect USB port / auxiliary
jack
Connecting a device: if there is a
cover on the AUX jack or USB port,
remove the cover. Connect the
connector on the device to the USB
port.
Connecting with a connector lead:if
there is a cover on the AUX jack or USB
port, remove the cover. Connect the
device plug/connector lead to the
auxiliary jack/USB port
How to use AUX mode
Select the
icon on the home screen
to display the Entertainment screen.
SelectAUXto switch to the AUX mode.
Playable data: MP3/WMA/AAC/OGG
file.
NOTE If a device is not connected to
the auxiliary jack, the mode does not
switch to the AUX mode.
16506020700-122-001
202
MULTIMEDIA
Page 205 of 224
NOTE Adjust the audio volume using
the portable audio device, commander
switch, or audio control switch. Audio
adjustments can also be made using
the portable audio device's volume
setting.
NOTE If the connection plug is pulled
out from the auxiliary jack while in AUX
mode, noise may occur.
NOTE This unit does not support a
USB 3.0 device. In addition, other
devices may not be supported
depending on the model or OS version.
USB devices formatted to FAT32 are
supported (USB devices formatted to
other formats such as NTFS are not
supported).
Bluetooth® HANDS FREE
Device pairing
To use
Bluetooth®audio and
Hands-Free, the device equipped with
Bluetooth®has to be paired to the
unit using the following procedure. A
maximum of seven devices including
Bluetooth®audio devices and
hands-free mobile phones can be
paired.
NOTE The
Bluetooth®system may
not operate for 1 or 2 minutes after the
ignition is switched to ACC or ON.
However, this does not indicate a
problem. If the
Bluetooth®system
does not connect automatically after
1 or 2 minutes have elapsed, makesure that the
Bluetooth®setting on
the device is normal and attempt to
reconnect the
Bluetooth®device from
the vehicle side.
NOTE To consult the list of compatibles
mobile phones visit the
http://124spiderinfotainment.com
website.
Pairing procedure
Proceed as follows:
select theicon on the home
screen to display the “Settings” screen;
select theDevicestab;
selectBluetooth®and turn theBluetooth®setting on;selectAdd New Deviceto display
the message and switch to the device
operation. Using your device, perform a
search for the
Bluetooth®device
(peripheral device);
select “124 Spider” from the device
list searched by the device;
Device withBluetooth®version
2.0 input the displayed 4-digit pairing
code into the device. Device with
Bluetooth®version 2.1 or higher make
sure the displayed 6-digit code on the
audio is also displayed on the device,
and touch theYes. Connection
permission and phonebook access
permission for your mobile device may
be required depending on the mobile
device. If pairing is successful, the
functions of the device connected to
Bluetooth®are displayed;
devices compatible with SMS
function SMS messages is downloaded
automatically. A download permission
operation for your device may be
required depending on the device.
After a device is registered, the system
automatically identifies the device.
Device selection
If several devices have been paired, the
Bluetooth®unit links the device last
paired. If you would like to link a
different paired device, it is necessary to
change the link. The order of device
priority after the link has been changed
is maintained even when the ignition is
switched off.
Connecting other devices
Proceed as follows:
select theicon on the home
screen to display the “Settings” screen;
select theDevicestab then select
Bluetooth®. Turn theBluetooth®
setting on and select the name of the
device you would like to connect;
Phone And Audio selection
connects both devices as hands-free
and
Bluetooth®audio.Phone Only
selectionconnects as a hands-free
device.Audio Only selection
connects as
Bluetooth®audio.
Making a call
Telephone calls can be made by saying
the contact name in the downloaded
203
Page 207 of 224
iDisplays the screen where traffic
information and the GPS reception
conditions can be set and verified.
Cancels waypoint/route.
Finds Places nearby. You can
search for Points Of Interest (POI) near
the vehicle position.
Displays the route parameters
and the route in its full length on the
map. You can also perform
route-related actions such as editing or
cancelling your route, picking route
alternatives, avoiding parts of the route,
simulating navigation or adding the
destination to your Favourites.
2D/3DChanges View mode. The
map view mode can be changed (2D
north up/2D heading up/3D).
Switches to the Settings screen
where you change navigation settings.
NOTE Some functions are not available
depending on some countries and
regions.
NAVIGATING ON THE MAP
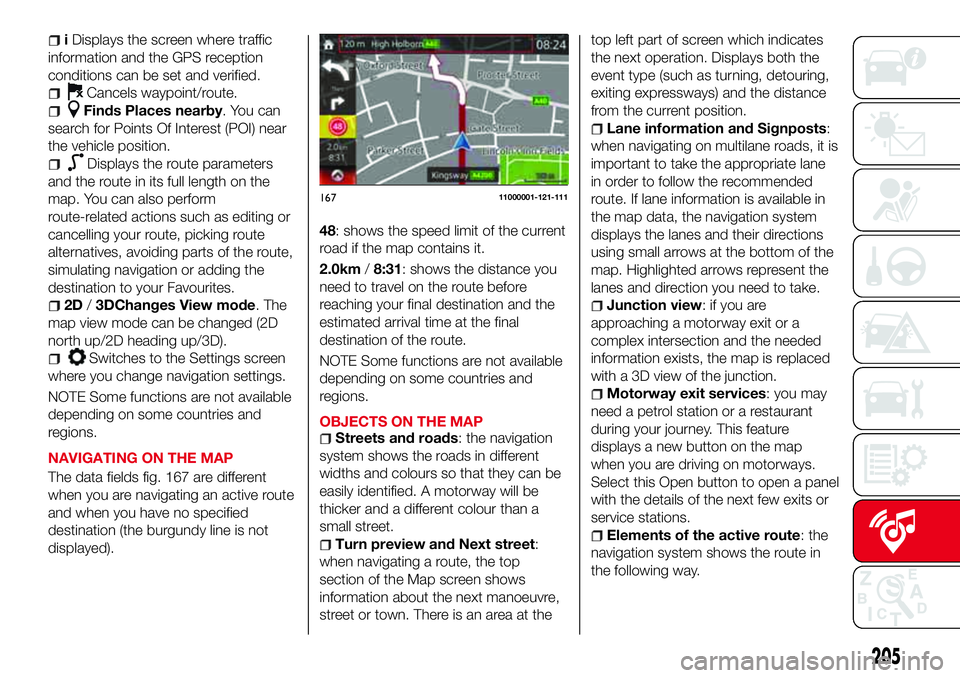
The data fields fig. 167 are different
when you are navigating an active route
and when you have no specified
destination (the burgundy line is not
displayed).48: shows the speed limit of the current
road if the map contains it.
2.0km/8:31: shows the distance you
need to travel on the route before
reaching your final destination and the
estimated arrival time at the final
destination of the route.
NOTE Some functions are not available
depending on some countries and
regions.
OBJECTS ON THE MAP
Streets and roads: the navigation
system shows the roads in different
widths and colours so that they can be
easily identified. A motorway will be
thicker and a different colour than a
small street.
Turn preview and Next street:
when navigating a route, the top
section of the Map screen shows
information about the next manoeuvre,
street or town. There is an area at thetop left part of screen which indicates
the next operation. Displays both the
event type (such as turning, detouring,
exiting expressways) and the distance
from the current position.
Lane information and Signposts:
when navigating on multilane roads, it is
important to take the appropriate lane
in order to follow the recommended
route. If lane information is available in
the map data, the navigation system
displays the lanes and their directions
using small arrows at the bottom of the
map. Highlighted arrows represent the
lanes and direction you need to take.
Junction view: if you are
approaching a motorway exit or a
complex intersection and the needed
information exists, the map is replaced
with a 3D view of the junction.
Motorway exit services: you may
need a petrol station or a restaurant
during your journey. This feature
displays a new button on the map
when you are driving on motorways.
Select this Open button to open a panel
with the details of the next few exits or
service stations.
Elements of the active route: the
navigation system shows the route in
the following way.
16711000001-121-111
205
Page 220 of 224
Jump starting..............153
Jump starting (procedure).......154
Key battery replacement........10
Keyless Entry System...........9
Keys......................9
Lane change signals...........27
Load limiter (pretensioner)........80
Maintaining the finish.........174
Manual climate control system.....32
Manual transmission..........112
Mechanical Limited Slip
Differential................74
Message indicated on display.....66
Mirrors....................22
Multimedia.................192
Navigation................204
Occupant protection systems.....76
Odometer/Trip meter...........49
Outside mirrors...............22
Owner maintenance precautions . . .160
Paintwork (preserving).........173
Parking...................110
Parking brake...............111
Parking Sensor System.........123
Passenger Air Bag............96
Passenger occupant classification
system.................101
Performance...............188Periodic checks (scheduled
servicing)................160
Power mirrors...............23
Power window lock switch.......37
Power windows..............36
Prescriptions for handling the
vehicle at the end of its life.....191
Pretensioners................80
Push button start positions.......11
Radio 3”.................194
Radio 7”..................199
Read this carefully..............2
Rear camera (ParkView rear
backup camera)...........126
Rear fog lights...............26
Refuelling procedure..........125
Refuelling the vehicle..........125
Replacing a bulb.............133
Replacing a tire..............171
Replacing exterior light bulbs.....136
Replacing fuses.............141
Rims and tires..............180
Rims and tires provided........181
SBA system (Seat Belt Alert)......79
Scheduled servicing plan.......162
Seat belt precautions...........77
Seat belt pretensioner and load
limiting systems.............80
Seat Belt pretensioners.........96
Seat belts..................77Seat belts (fastening/unfastening)}.......................77
Seats.....................19
Seats (manual adjustment).......19
Seats and fabric parts (cleaning) . . .175
Shift-lock override (automatic
gearbox)................114
Shift-lock system (automatic
gearbox)................114
Side Air Bags................96
Snow chains...............172
Speed limiter...............120
SPORT mode...............116
Starting the engine.........11,110
Steering wheel...............21
Supplementary restraint system
(SRS) - Air bag.............94
Symbols....................3
TCS (Traction Control System).....68
Theft deterrent system..........15
Tips, controls and general
information...............193
Tire service kit..............148
Tires rotation (recommendations) . .172
Tool storage................148
Towing the vehicle............156
Towing trailers..............130
TPMS (Tire Pressure Monitoring
System)..................72
Turn signals.................27
Turning the engine off...........13
INDEX