ECU Abarth 124 Spider 2020 Owner handbook (in English)
[x] Cancel search | Manufacturer: ABARTH, Model Year: 2020, Model line: 124 Spider, Model: Abarth 124 Spider 2020Pages: 224, PDF Size: 3.9 MB
Page 150 of 224

pull the fuse straight out with the fuse
puller provided on the fuse block
located in the engine compartment
fig. 129;
inspect the fuse and replace it if it is
blown;
insert a new fuse of the same
amperage rating, and make sure it fits
tightly. If it does not fit tightly, contact an
Abarth Dealership. If you have no spare
fuses, borrow one of the same rating
from a circuit not essential to vehicle
operation, such as the AUDIO or
OUTLET circuit;
reinstall the cover and make sure that
it is securely installed.
IMPORTANT Always replace a fuse with
a genuine FCA fuse or equivalent of the
same rating. Otherwise you may
damage the electric system.
FUSES UNDER THE
BONNET
Make sure the ignition is switched off,
and other switches are off and remove
the fuse block cover. If the lock is
forcefully opened, the fuse block cover
may come in contact with the frame
when it is removed and become
scratched.
When removing the cover, remove it
slowly according to the following
procedure:
disengage the rear lock 1 fig. 130 by
pressing down on the front tab with
your fingers;
remove the front tab while slightly
lifting the front of the cover 2;
remove the cover while lifting it and
sliding it to the rear;
if any fuse but the MAIN fuse is
blown, replace it with a new one of the
same amperage rating;
reinstall the cover and make sure that
it is securely installed.
12907031601-122-001AB
13007031601-123-001AB
148
IN CASE OF EMERGENCY
Page 162 of 224

IMPORTANT Do not attempt jump
starting if the battery is wet. The battery
could break and explode!
JUMP-STARTING
PROCEDURE
IMPORTANT If the procedure below is
carried out incorrectly can cause severe
injuries to people or damage the
recharging system of one or both
vehicles. Carefully follow the
instructions given below.
Proceed as follows to carry out a jump
starting:
remove the battery cover fig. 146;
make sure the booster battery is
12 V and that its negative terminal is
grounded;
if the booster battery is in another
vehicle, do not allow both vehicles to
touch. Turn off the engine of the vehicle
with the booster battery and all
unnecessary electrical loads in both
vehicles;
connect the jumper leads in the
exact sequence as in “Preparations for
jump starting” paragraph:
– connect one end of a lead to the
positive terminal on the discharged
battery;
– attach the other end to the positive
terminal on the booster battery;
– connect one end of the other lead
to the negative terminal of the
booster battery;
– connect the other end to the
ground point indicated in the
illustration away from the
discharged battery.
start the engine of the booster
vehicle and run it a few minutes. Then
start the engine of the other vehicle;
when finished, carefully disconnect
the leads in the reverse order as
previously described;
if the battery cover has been
removed, install it in the reverse order of
removal.
IMPORTANT Verify that the covers are
securely installed.
IMPORTANT Perform the phonic wheel
learning procedure described in the
“Battery maintenance” section (see the
“Maintenance and care” chapter).
WARNING
181)Before opening the bonnet, make
sure that the engine is off and that the
ignition switch is in OFF position. During
refuelling, make sure that the engine is off
(and that the ignition switch is in OFF
position).
182)Do not get too close to the radiator
cooling fan: the electric fan may start;
danger of injury. Pay attention to scarves,
ties and other loose clothing which might
be pulled by moving parts.
183)Remove any metal objects (e.g. rings,
watches, bracelets), that might cause an
accidental electrical contact and cause
serious injury.
184)Batteries contain acid which may
burn skin and eyes. Batteries produce
hydrogen, which is easily flammable and
explosive. Thus keep away flames or
devices which may cause sparks.
14608030100-122-001AB
160
IN CASE OF EMERGENCY
Page 164 of 224

IMPORTANT Do not use excessive
force as it may damage the cap or
scratch the painted bumper surface.
NOTE Remove the cap completely and
store it so as not to lose it.
securely install the towing eyelet
using the wheel brace or equivalent
front fig. 149 and rear fig. 150;
hook the towing rope to the towing
eyelet.
IMPORTANT If the towing eyelet is not
securely tightened, it may loosen or
disengage from the bumper when
towing the vehicle. Make sure that the
towing eyelet is securely tightened to
the bumper.
IMPORTANT Be careful not to damage
the towing eyelet and towing hook,
vehicle body, or transmission system
when towing under the following
conditions:
do not tow a vehicle heavier than yours;do not suddenly accelerate your vehicle
as it will apply a severe shock to the towing
eyelet and towing hook or rope;
do not attach any rope other than to the
towing eyelet and towing hook.
IMPORTANT The towing eyelet should
be used in an emergency (to get the
vehicle out of a ditch or a snow bank,
for example).IMPORTANT When using the towing
eyelets, always pull the lead or chain in
a straight direction with respect to the
eyelet. Never apply a sideways force.
IMPORTANT When towing with chain
or lead, wrap the chain or lead with a
soft cloth near the bumper to prevent
damage to the bumper.
IMPORTANT
35)Before starting towing operations, put
the ignition switch to OFF position.
36)Before tightening the tow hook, clean
the threaded housing thoroughly. Make
sure that the tow hook is fully fastened in
the housing before towing the vehicle.
37)The front and rear tow hooks should be
used only for emergencies on the road. You
are allowed to tow the vehicle for short
distances using an appropriate device in
accordance with the highway code (a rigid
bar), to move the vehicle on the road in
readiness for towing or transport via a
breakdown vehicle. Tow hooks MUST NOT
be used to tow vehicles off the road or
where there are obstacles and/or for
towing operations using ropes or other
non-rigid devices. Respecting the above
conditions, towing must take place with
two vehicles (one towing, the other towed)
aligned as much as possible along the
same center line.
14808060203-122-001AB
14908060201-121-001AB
15008060201-122-001AB
162
IN CASE OF EMERGENCY
Page 174 of 224
ENGINE OIL
196)
40)
4)
Inspecting engine oil level
Proceed as follows:
be sure the vehicle is on a level
surface;
warm up the engine to normal
operating temperature;
turn it off and wait at least 5 minutes
for the oil to return to the sump;
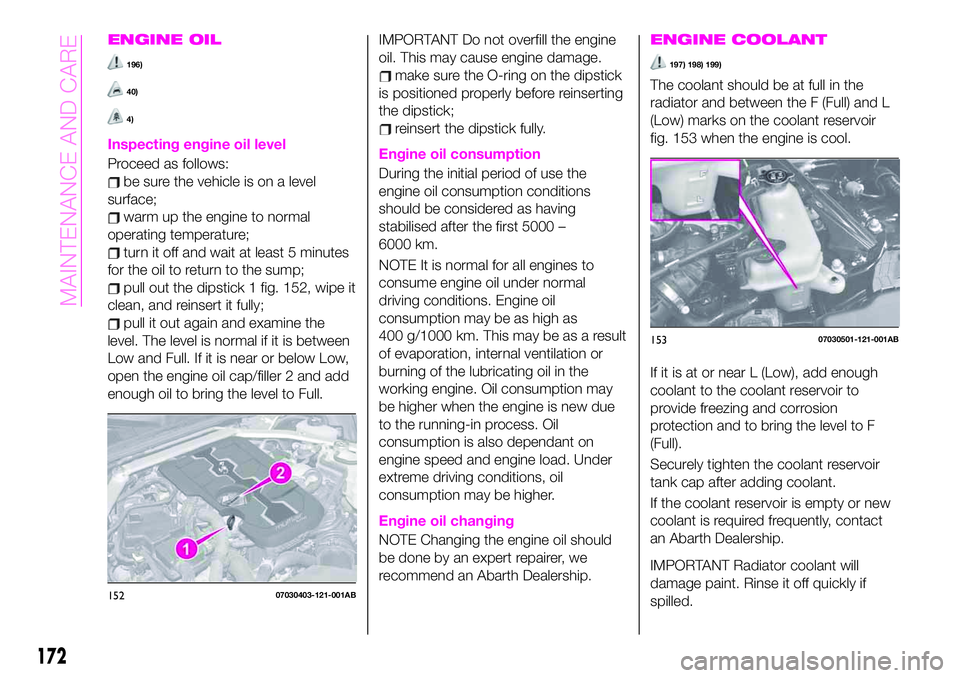
pull out the dipstick 1 fig. 152, wipe it
clean, and reinsert it fully;
pull it out again and examine the
level. The level is normal if it is between
Low and Full. If it is near or below Low,
open the engine oil cap/filler 2 and add
enough oil to bring the level to Full.
IMPORTANT Do not overfill the engine
oil. This may cause engine damage.
make sure the O-ring on the dipstick
is positioned properly before reinserting
the dipstick;
reinsert the dipstick fully.
Engine oil consumption
During the initial period of use the
engine oil consumption conditions
should be considered as having
stabilised after the first 5000 –
6000 km.
NOTE It is normal for all engines to
consume engine oil under normal
driving conditions. Engine oil
consumption may be as high as
400 g/1000 km. This may be as a result
of evaporation, internal ventilation or
burning of the lubricating oil in the
working engine. Oil consumption may
be higher when the engine is new due
to the running-in process. Oil
consumption is also dependant on
engine speed and engine load. Under
extreme driving conditions, oil
consumption may be higher.
Engine oil changing
NOTE Changing the engine oil should
be done by an expert repairer, we
recommend an Abarth Dealership.
ENGINE COOLANT
197) 198) 199)
The coolant should be at full in the
radiator and between the F (Full) and L
(Low) marks on the coolant reservoir
fig. 153 when the engine is cool.
If it is at or near L (Low), add enough
coolant to the coolant reservoir to
provide freezing and corrosion
protection and to bring the level to F
(Full).
Securely tighten the coolant reservoir
tank cap after adding coolant.
If the coolant reservoir is empty or new
coolant is required frequently, contact
an Abarth Dealership.
IMPORTANT Radiator coolant will
damage paint. Rinse it off quickly if
spilled.
15207030403-121-001AB
15307030501-121-001AB
172
MAINTENANCE AND CARE
Page 175 of 224
IMPORTANT Use only soft
(demineralised) water in the coolant
mixture. Water that contains minerals
will cut down on the coolant's
effectiveness.
IMPORTANT Do not add only water.
Always add a proper coolant mixture.
IMPORTANT The engine has aluminium
parts and must be protected by an
ethylene-glycol-based coolant to
prevent corrosion and freezing.
IMPORTANT DO NOT USE coolants
Containing Alcohol, methanol, Borate
or Silicate. These coolants could
damage the cooling system.
IMPORTANT DO NOT MIX alcohol or
methanol with the coolant. This could
damage the cooling system.
IMPORTANT Do not use a solution that
contains more than 60% antifreeze.
This would reduce effectiveness.
IMPORTANT If the “FL22” mark is
shown on or near the cooling system
cap, use of FL-22 is recommended
when replacing engine coolant. Using
engine coolant other than FL-22 may
cause serious damage to the engine
and cooling system.BRAKE / CLUTCH FLUID
202) 207)
41)
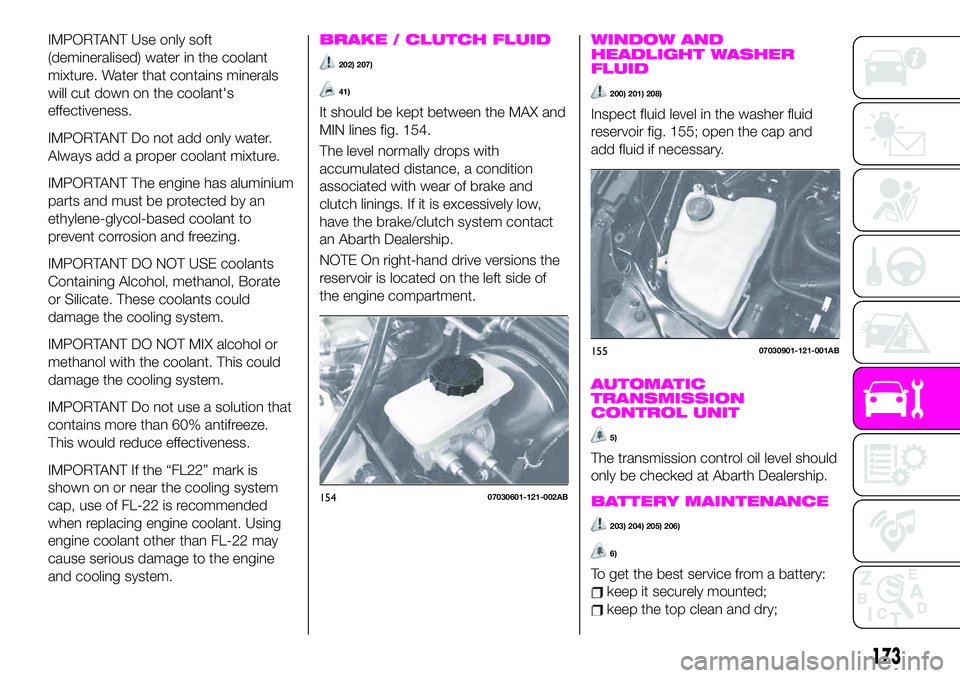
It should be kept between the MAX and
MIN lines fig. 154.
The level normally drops with
accumulated distance, a condition
associated with wear of brake and
clutch linings. If it is excessively low,
have the brake/clutch system contact
an Abarth Dealership.
NOTE On right-hand drive versions the
reservoir is located on the left side of
the engine compartment.
WINDOW AND
HEADLIGHT WASHER
FLUID
200) 201) 208)
Inspect fluid level in the washer fluid
reservoir fig. 155; open the cap and
add fluid if necessary.
AUTOMATIC
TRANSMISSION
CONTROL UNIT
5)
The transmission control oil level should
only be checked at Abarth Dealership.
BATTERY MAINTENANCE
203) 204) 205) 206)
6)
To get the best service from a battery:
keep it securely mounted;
keep the top clean and dry;
15407030601-121-002AB
15507030901-121-001AB
173
Page 178 of 224

BATTERY
RECHARGING
209) 210)
CAUTIONS
IMPORTANT The battery recharging
procedure is given as information only.
You are advised to contact an Abarth
Dealership to have this operation
carried out.
IMPORTANT Before recharging the
battery, turn off all accessories and stop
the engine.
IMPORTANT Charging should be slow
at a low ampere rating for
approximately 24 hours. Charging for a
longer time may damage the battery.
IMPORTANT Make sure that the cables
of the electrical system are correctly
reconnected to the battery, i.e. the
positive cable (+) to the positive
terminal and the negative cable (-) to
the negative terminal. The battery
terminals are marked with the positive
(+) and negative (-) symbols, and are
shown on the battery cover. The battery
terminals must also be corrosion-free
and firmly secured to the terminals. If a
“quick-type” battery charger is used
with the battery fitted on the vehicle,before connecting it disconnect both
cables of the battery itself. Do not use a
“quick-type” battery charger to provide
the starting voltage.
IMPORTANT After reconnecting the
battery, perform the phonic wheel
learning procedure described in the
“Battery maintenance” in this chapter.
BATTERY CHARGING
PROCEDURE
Charge battery as follows:
remove the caps before recharging
the battery;
connect the charger cables to the
battery terminals, observing the polarity;
turn on the charger;
when finished, turn the charger off
before disconnecting the battery;
reconnect the negative battery
terminal.
WARNING
209)Battery fluid is poisonous and
corrosive: avoid contact with skin and
eyes. The battery recharging operation
must be performed in a ventilated place,
away from naked flames or possible
sources of sparks to avoid the risk of
explosion and fire.
210)Do not try to recharge a frozen
battery: it must be thawed first, otherwise it
may explode. If the battery was frozen,
have it inspected by specialized personnel
before recharging to check that the internal
elements are not damaged and that the
casing is not cracked, which causes the
risk of leakage of poisonous, corrosive
acid.
176
MAINTENANCE AND CARE
Page 214 of 224
IMPORTANT INFORMATION AND RECOMMENDATIONS
WARNING
BRAKE SYSTEMDo not coast with the engine stalled or turned off, find a safe place to stop. Coasting with the engine stalled or turned off is
dangerous. Braking will require more effort, and the brake's power-assist could be depleted if you pump the brake. This will
cause longer stopping distances or even an accident.
Shift to a lower gear when going down steep hills. Driving with your foot continuously on the brake pedal or steadily applying
the brakes for long distances is dangerous. This causes overheated brakes, resulting in longer stopping distances or even
total brake failure. This could cause loss of vehicle control and a serious accident. Avoid continuous application of the brakes.
INTERNAL EQUIPMENT
Never use a cup holder to hold hot liquids while the vehicle is moving. Using a cup holder to hold hot liquids while the
vehicle is moving is dangerous. If the contents spill, you could be scalded.
Do not put anything other than plastic bottles, cups or drink cans in cup holders. Putting objects other than plastic bottles,
cups or drink cans in a cup holder is dangerous. During sudden braking or manoeuvring, occupants could be hit and injured,
or objects could be thrown around the vehicle, causing interference with the driver and the possibility of an accident. Only use
a cup holder for plastic bottles, cups or drink cans.
Keep storage boxes closed when driving. Driving with the storage boxes open is dangerous. To reduce the possibility of
injury in an accident or a sudden stop, keep the storage boxes closed when driving.
Do not put articles in storage spaces with no lid. Putting articles in storage spaces with no lid is dangerous as they could be
thrown around the cabin if the vehicle is suddenly accelerated and cause injury depending on how the article is stored.
Never stop the engine when going down a hill: stopping the engine when going down a hill is dangerous. This causes the
loss of power steering and power brake control, and may cause damage to the drivetrain. Any loss of steering or braking
control could cause an accident.
Be extremely careful if it is necessary to downshift on slippery surfaces: downshifting into lower gear while driving on
slippery surfaces is dangerous. The sudden change in tyre speed could cause the tyres to skid. This could lead to loss of
vehicle control and an accident.
Make sure the floor mats are secured with the grommets or the retainers to prevent them from bunching up under the foot
DRIVING TIPS
Page 215 of 224
pedals (driver's side): using a floor mat that is not secured is dangerous as it will interfere with the accelerator and brake pedal
operation (driver's side), which could result in an accident.
Only use a floor mat which conforms to the shape of the floor on the driver's side and make sure it is oriented correctly.
Secure the floor mat using the grommets or retainers. There are various ways to secure floor mats depending on the type
used, therefore secure the mat according to the type. After installing the floor mat, make sure that it does not slide from side to
side or back and forth, and that there is sufficient clearance with the accelerator and brake pedals on the driver's side.
After removing the floor mat for cleaning or some other reason, always securely reinstall it while paying attention to the
precautions just mentioned.
Do not install two floor mats, one on top of the other, on the driver's side: installing two floor mats, one on top of the other,
on the driver's side is dangerous as the retention pins can only keep one floor mat from sliding forward.
Loose floor mat(s) will interfere with the foot pedals and could result in an accident. If using an all-weather mat for winter use
always remove the original floor mat.
When using a heavy duty floor mat for winter, always remove the original floor mat.
Do not spin the wheels at high speed, and do not allow anyone to stand behind a wheel when pushing the vehicle: when
the vehicle is stuck, spinning the wheels at high speed is dangerous. The spinning tyre could overheat and explode. This could
cause serious injuries.
Use only the same size and type tyres (snow, radial, or non-radial) on all four wheels: using tyres different in size or type is
dangerous. Your vehicle's handling could be greatly affected and result in an accident.
Page 221 of 224
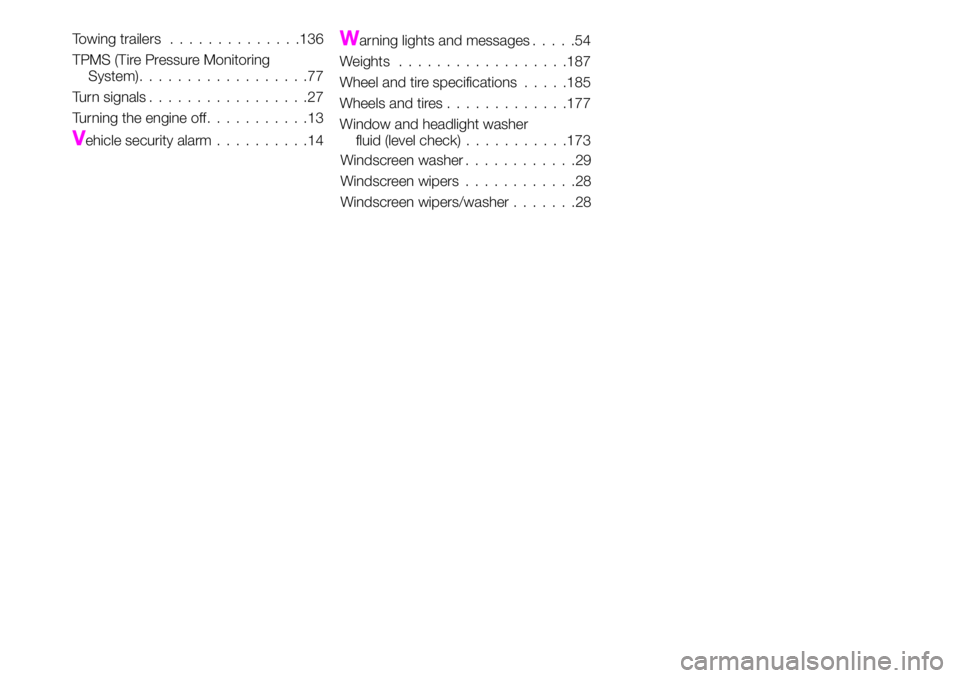
Towing trailers..............136
TPMS (Tire Pressure Monitoring
System)..................77
Turn signals.................27
Turning the engine off...........13
Vehicle security alarm..........14
Warning lights and messages.....54
Weights..................187
Wheel and tire specifications.....185
Wheels and tires.............177
Window and headlight washer
fluid (level check)...........173
Windscreen washer............29
Windscreen wipers............28
Windscreen wipers/washer.......28