ignition Abarth 124 Spider 2020 Owner handbook (in English)
[x] Cancel search | Manufacturer: ABARTH, Model Year: 2020, Model line: 124 Spider, Model: Abarth 124 Spider 2020Pages: 224, PDF Size: 3.9 MB
Page 167 of 224
SCHEDULED
SERVICING
INTRODUCTION
Be careful not to hurt yourself when
inspecting your vehicle, replacing a tyre,
or doing some kind of maintenance
such as car washing. In particular, wear
thick work gloves such as cotton gloves
when touching areas that are difficult to
see while inspecting or working on your
vehicle. Doing inspections or
procedures with your bare hands could
cause injury.
If you are unsure about any procedure it
describes, we strongly urge you to have
a reliable and qualified service shop
perform the work, preferably at Abarth
Dealership.
Factory-trained FCA technicians and
genuine FCA parts are best for your
vehicle. Without this expertise and the
parts that have been designed and
made especially for your vehicle,
inadequate, incomplete, and insufficient
servicing may result in problems. This
could lead to vehicle damage or an
accident and injuries.
For expert advice and quality service,
contact an Abarth Dealership.
The owner should retain evidence that
proper maintenance has been
performed as prescribed.A claim against a warranty will not
qualify if it results from lack of
maintenance and not from defective
material or authorised workmanship.
Claims against the warranty resulting
from lack of maintenance, as opposed
to defective materials or authorized FCA
workmanship, will not be honored.
The malfunction diagnosis connector is
designed exclusively for connecting the
specially designed device to perform
on-board diagnosis. Do not connect
any devices other than the specially
designed malfunction diagnosis devices
for servicing. If any device other than
the malfunction diagnosis device is
connected, it may affect the vehicle's
electrical devices or lead to damage
such as battery depletion
Scheduled maintenance
NOTE After the prescribed period,
continue to follow the described
maintenance at the recommended
intervals.
Emission control and related
systems
The ignition and fuel systems are highly
important to the emission control
system and to efficient engine
operation. Do not tamper with them.
All inspections and adjustments must
be made by Abarth Dealership.
OWNER MAINTENANCE
PRECAUTIONS
191) 192) 193)
38)
Routine service
We highly recommend that these items
be inspected daily, or at least every
week:
Engine oil level
Engine coolant level
Brake and clutch fluid Level
Washer fluid level
Battery maintenance
Tire inflation pressure
Improper or incomplete service may
result in problems. This section gives
instructions only for items that are easy
to perform.
As explained in the “Introduction”
paragraph, several procedures can be
done only by a qualified service
technician with special tools.
Improper do-it yourself maintenance
during the warranty period may affect
warranty coverage. For details, read the
separate Warranty statement provided
with the vehicle. If you are unsure about
any servicing or maintenance
procedure, have it done by Abarth
Dealership.
There are strict environmental laws
regarding the disposal of waste oil and
165
Page 172 of 224

WARNING
191)Do not perform maintenance work if
you lack sufficient knowledge and
experience or the proper tools and
equipment to do the work. Have
maintenance work done by a qualified
technician. Performing maintenance work
on a vehicle is dangerous if not done
properly. You can be seriously injured while
performing some maintenance procedures.
192)If you must run the engine while
working under the bonnet, make certain
that you remove all jewelry (especially
rings, bracelets, watches, and necklaces)
and all neckties, scarves, and similar loose
clothing before getting near the engine or
cooling fan which may turn on
unexpectedly. Either can become
entangled in moving parts and result in
injury.
193)Switch the ignition to off and make
sure the fan is not running before
attempting to work near the cooling fan.
Working near the cooling fan when it is
running is dangerous. The fan could
continue running indefinitely even if the
engine has stopped and the engine
compartment temperature is high. You
could be hit by the fan and seriously
injured.
IMPORTANT
38)Do not leave items in the engine
compartment. After you have finished
checking or doing servicing in the engine
compartment, do not forget and leave
items such as tools or rags in the engine
compartment. Tools or other items left in
the engine compartment could cause
engine damage or a fire leading to an
unexpected accident.
170
MAINTENANCE AND CARE
Page 181 of 224

left in the sun or with the bonnet hot:
this may alter the shine of the
paintwork.
Exterior plastic parts must be cleaned
in the same way as the rest of the
vehicle.
IMPORTANT Avoid parking under trees;
the resin dropped by trees makes the
paintwork go opaque and increases the
possibility of corrosion.
IMPORTANT Bird droppings must be
washed off immediately and thoroughly
as the acid they contain is particularly
aggressive.
Paint chipping
Paint chipping occurs when gravel
thrown in the air by another vehicle's
tires hits your vehicle.
Keeping a safe distance between you
and the vehicle ahead reduces the
chances of having your paint chipped
by flying gravel.
IMPORTANT In low temperatures a
vehicle's finish hardens. This increases
the chance of paint chipping.
IMPORTANT Chipped paint can lead to
rust forming on your vehicle. Before this
happens, repair the damage by using
FCA touch-up paint according to the
instructions in this section. Failure torepair the affected area could lead to
serious rusting and expensive repairs.
Versions with opaque paint
(where provided)
Your vehicle could be equipped with an
exclusive opaque paint needing special
care for its preservation.
To correctly wash the vehicle, proceed
as follows:
wash the body using a low pressure
jet of water. Remember that the build
up of water can damage the car over a
period of time;
wipe a sponge with a slightly soapy
solution over the bodywork, frequently
rinsing the sponge;
rinse well with water and dry with a
jet of air or chamois leather, without
wiping localised areas repeatedly.
MAINTAINING THE
FINISH
Washing
To help protect the finish from rust and
deterioration, wash your vehicle
thoroughly and frequently, at least once
a month, with lukewarm or cold water.
IMPORTANT FCA is not responsible for
scratches caused by automatic car
washes or improper washing.
Scratches are more noticeable on
vehicles with darker paint finishes.IMPORTANT Keep hands and scrapers
clear of the windscreen when the wiper
lever is in the AUTO position and the
ignition is switched ON as fingers could
be pinched or the wipers and wiper
blades damaged when the wipers
activate automatically. If you are going
to clean the windscreen, be sure the
wipers are turned off completely (when
it is most likely that the engine is left
running) this is particularly important
when clearing ice and snow.
IMPORTANT Do not spray water in the
engine compartment. Otherwise, it
could result in engine-starting problems
or damage to electrical parts.
IMPORTANT When washing and
waxing the vehicle, be careful not to
apply excessive force to any single area
of the vehicle bonnet. Otherwise, you
could dent the vehicle.
IMPORTANT Do not use automatic car
washing machines and car washing
devices using high water pressure.
IMPORTANT Make sure that the fuel
flap is closed and lock the doors.
Otherwise, the fuel flap may be
forcefully opened by water pressure
causing damage to the vehicle or fuel
flap.
179
Page 200 of 224
STEERING WHEEL
CONTROLS
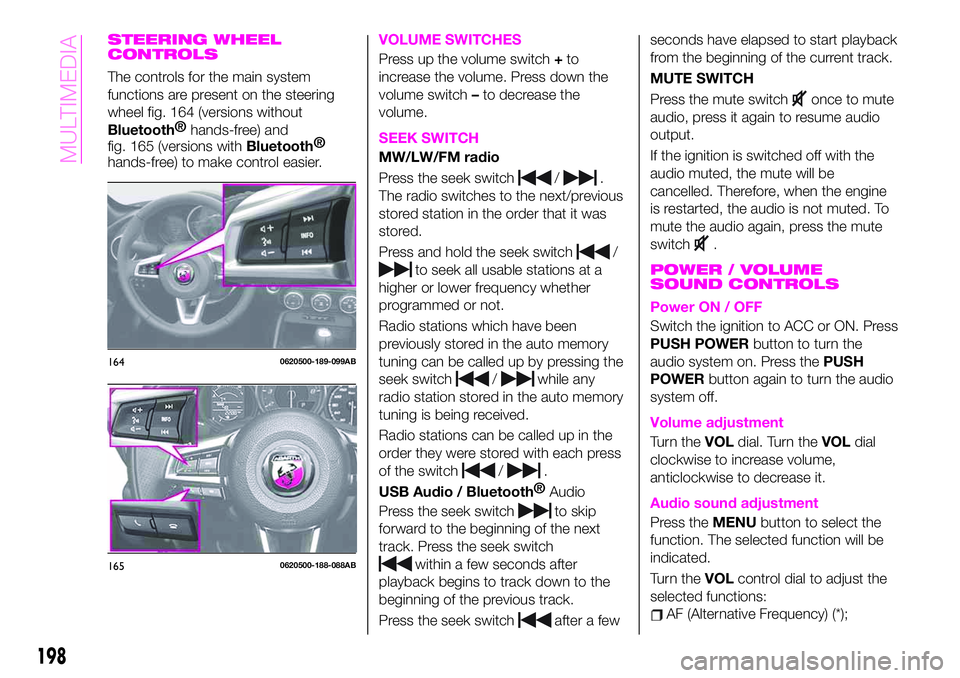
The controls for the main system
functions are present on the steering
wheel fig. 164 (versions without
Bluetooth®
hands-free) and
fig. 165 (versions with
Bluetooth®
hands-free) to make control easier.
VOLUME SWITCHES
Press up the volume switch+to
increase the volume. Press down the
volume switch–to decrease the
volume.
SEEK SWITCH
MW/LW/FM radio
Press the seek switch
/.
The radio switches to the next/previous
stored station in the order that it was
stored.
Press and hold the seek switch
/
to seek all usable stations at a
higher or lower frequency whether
programmed or not.
Radio stations which have been
previously stored in the auto memory
tuning can be called up by pressing the
seek switch
/while any
radio station stored in the auto memory
tuning is being received.
Radio stations can be called up in the
order they were stored with each press
of the switch
/.
USB Audio /
Bluetooth®
Audio
Press the seek switch
to skip
forward to the beginning of the next
track. Press the seek switch
within a few seconds after
playback begins to track down to the
beginning of the previous track.
Press the seek switch
after a fewseconds have elapsed to start playback
from the beginning of the current track.
MUTE SWITCH
Press the mute switch
once to mute
audio, press it again to resume audio
output.
If the ignition is switched off with the
audio muted, the mute will be
cancelled. Therefore, when the engine
is restarted, the audio is not muted. To
mute the audio again, press the mute
switch
.
POWER / VOLUME
SOUND CONTROLS
Power ON / OFF
Switch the ignition to ACC or ON. Press
PUSH POWERbutton to turn the
audio system on. Press thePUSH
POWERbutton again to turn the audio
system off.
Volume adjustment
Turn theVOLdial. Turn theVOLdial
clockwise to increase volume,
anticlockwise to decrease it.
Audio sound adjustment
Press theMENUbutton to select the
function. The selected function will be
indicated.
Turn theVOLcontrol dial to adjust the
selected functions:
AF (Alternative Frequency) (*);
1640620500-189-099AB
1650620500-188-088AB
198
MULTIMEDIA
Page 201 of 224
REG (Regional Programme) (*);
ALC (Automatic volume adjustment);
BASS (Low pitch sound);
TREB (Treble sound);
FADE (Front/back volume balance);
BAL (Left/right volume balance);
BEEP (Audio operation sound);
BT SETUP (**);
12Hr < > 24Hr (12 Hr/24 Hr time
adjustment).
(*) With Radio Data System (RDS)
(where provided).
(**) Depending on the model, this
function may not be available.
CLOCK
Setting the time
The clock can be set at any time when
the ignition is switched to ACC or ON.
To adjust the time, press the clock
buttonFM/AMfor about 2 seconds
until a beep is heard. The clock's
current time will flash.
Time adjustment
To adjust the time, press the
hour/minute set button
/
while the clock's current time is
flashing.
The hours advance while the hour set
button
is pressed. The minutes
advance while the minute
set
button is pressed.Press the clock buttonFM/AMagain
to start the clock.
OPERATING THE RADIO
Radio ON: press a band selector
button FM/AM to turn the radio on.
Band selection: press the band
selector buttonFM/AMto switch the
bands as follows: FM1–FM2–AM
(without Radio Data System RDS) /
MW/LW (with Radio Data System RDS).
Manual tuning: select the station by
pressing the tuning button
/
lightly.
Seek tuning: press tuning button
/. The search stops when a
station is found.
Scan tuning: press and hold the scan
buttonMEDIAto automatically sample
strong stations. Scanning stops at each
station for about 5 seconds. To hold a
station, press and hold the scan button
MEDIA again during this interval.
Preset channel tuning
The 6 preset channels can be used to
store 6 AM (without Radio Data System
RDS), MW/LW (with Radio Data System
RDS) and 12 FM stations.
To set a channel first select AM
(without Radio Data System RDS),
MW/LW (with Radio Data System RDS),
FM1, or FM2. Tune to the desired
station.
Press a channel preset button for
about 2 seconds until a beep is heard.
The preset channel number or station
frequency will be displayed. The station
is now held in the memory.
Repeat this operation for the other
stations and bands you want to store.
To tune one in the memory, select AM
(without Radio Data System RDS),
MW/LW (with Radio Data System RDS),
FM1, or FM2 and then press its channel
preset button. The station frequency or
the channel number will be displayed.
AUX / USB / iPod MODE
Auxiliary jack / USB port
Audio can be heard from the vehicle's
speakers by connecting a commercially
available portable audio unit to the
auxiliary jack. A commercially-available,
non-impedance (3.5 Ø) stereo mini plug
lead is required. In addition, audio can
be played from the vehicle audio device
by connecting a USB device or an iPod
to the USB port.
How to use AUX mode
Switch the ignition to ACC or ON, press
the power/volume dial to turn the audio
system on and press theMEDIA
button of the audio unit to change to
the AUX mode.
199
Page 202 of 224
How to use USB mode
This unit does not support a USB
3.0 device. In addition, other devices
may not be supported depending on
the model or OS version.
Playback
Switch the ignition to ACC or ON, press
the power/volume dial to turn the audio
system on and press theMEDIA
button to switch to the USB mode and
start playback.
Track search
Press the track up buttononce to
skip forward to the beginning of the
next track.
Press the track down button
within a few seconds after
playback begins to track down to the
beginning of the previous track.
Press the track down button
after
a few seconds have elapsed to start
playback from the beginning of the
current track.
How to use iPod mode
An iPod may not be compatible
depending on the model or OS version.
In this case, an error message is
displayed.
NOTE The iPod functions on the iPod
cannot be operated while it is
connected to the unit because the unit
controls the iPod functions.
Track search
Press the track up buttononce to
skip forward to the beginning of the
next track.
Press the track down button
within a few seconds (depends
on iPod software version) after playback
begins to track down to the beginning
of the previous track.
Press the track down button
after
a few seconds (depends on iPod
software version) have elapsed to start
playback from the beginning of the
current track.
Category search: press the category
down button5to select the previous
category and press the category up
button6to select the next category.
The types of categories include Playlist,
Artist, Album, Song, Podcast, Genre,
Composer, and Audio book.
List search: press the list down button
to select the previous list and press
the list up button
to select the next
list. When the selected category is
Song or Audio book, there is no list.
Bluetooth® HANDS FREE
Device pairing
To useBluetooth®
audio and
Hands-Free, the device equipped with
Bluetooth®
has to be paired to the
unit using the following procedure. A
maximum of seven devices including
Bluetooth®
audio devices and
hands-free mobile phones can be
paired.
NOTE The
Bluetooth®
system may
not operate for 1 or 2 minutes after the
ignition is switched to ACC or ON.
However, this does not indicate a
problem. If the
Bluetooth®
system
does not connect automatically after
1 or 2 minutes have elapsed, make
sure that the
Bluetooth®
setting on
the device is normal and attempt to
reconnect the
Bluetooth®
device from
the vehicle side.
Pairing code setting
The 4-digit pairing code setting for
registration of your cell phone (pairing)
can be set beforehand. The initial
setting value is “0000”.
Proceed as follows:
1: press the pick-up button or talk
button with a short press;
2Say: [Beep] “Setup”
3Prompt: “Select one of the
following: Pairing options, confirmation
prompts, language, passcode, select
phone or select music player.”
4Say: [Beep] “Pairing options”
5Prompt: “Select one of the
following: Pair, Edit, Delete, List, or Set
Pairing Code.”
6Say: [Beep] “Set pairing code”
7Prompt: “Your current pairing code
is XXXX. Do you want to change it to a
200
MULTIMEDIA
Page 204 of 224
RADIO 7”
STEERING WHEEL
CONTROLS
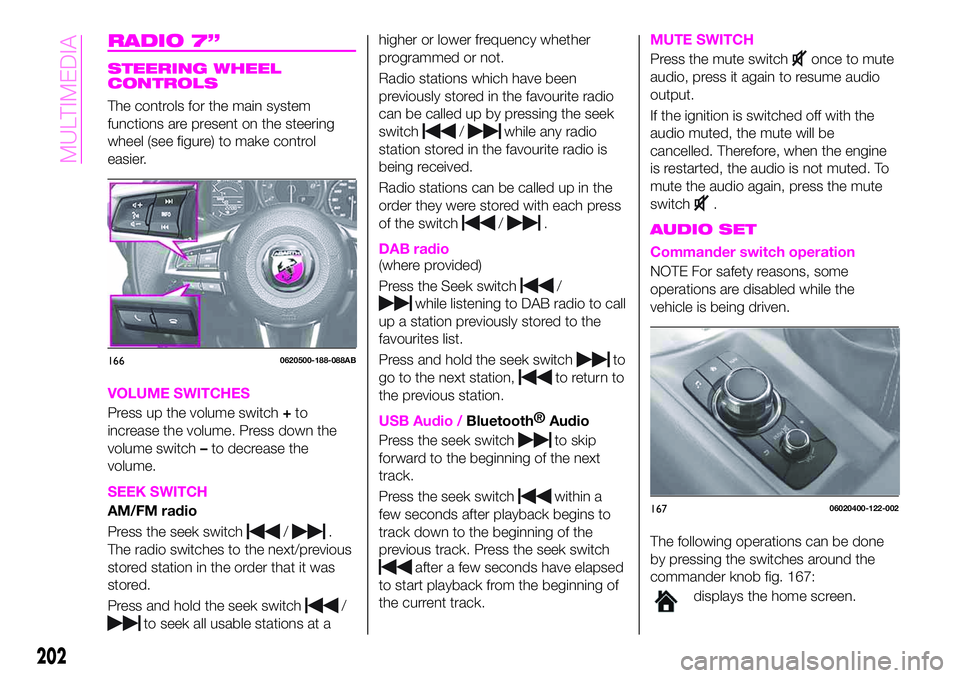
The controls for the main system
functions are present on the steering
wheel (see figure) to make control
easier.
VOLUME SWITCHES
Press up the volume switch+to
increase the volume. Press down the
volume switch–to decrease the
volume.
SEEK SWITCH
AM/FM radio
Press the seek switch
/.
The radio switches to the next/previous
stored station in the order that it was
stored.
Press and hold the seek switch
/
to seek all usable stations at ahigher or lower frequency whether
programmed or not.
Radio stations which have been
previously stored in the favourite radio
can be called up by pressing the seek
switch
/while any radio
station stored in the favourite radio is
being received.
Radio stations can be called up in the
order they were stored with each press
of the switch
/.
DAB radio(where provided)
Press the Seek switch
/
while listening to DAB radio to call
up a station previously stored to the
favourites list.
Press and hold the seek switch
to
go to the next station,
to return to
the previous station.
USB Audio /Bluetooth®
Audio
Press the seek switch
to skip
forward to the beginning of the next
track.
Press the seek switch
within a
few seconds after playback begins to
track down to the beginning of the
previous track. Press the seek switch
after a few seconds have elapsed
to start playback from the beginning of
the current track.
MUTE SWITCH
Press the mute switchonce to mute
audio, press it again to resume audio
output.
If the ignition is switched off with the
audio muted, the mute will be
cancelled. Therefore, when the engine
is restarted, the audio is not muted. To
mute the audio again, press the mute
switch
.
AUDIO SET
Commander switch operation
NOTE For safety reasons, some
operations are disabled while the
vehicle is being driven.
The following operations can be done
by pressing the switches around the
commander knob fig. 167:
displays the home screen.
1660620500-188-088AB
16706020400-122-002
202
MULTIMEDIA
Page 208 of 224
How to use AUX mode
Select theicon on the home screen
to display the Entertainment screen.
SelectAUXto switch to the AUX mode.
Playable data: MP3/WMA/AAC/OGG
file.
NOTE If a device is not connected to
the auxiliary jack, the mode does not
switch to the AUX mode.
NOTE Adjust the audio volume using
the portable audio device, commander
switch, or audio control switch. Audio
adjustments can also be made using
the portable audio device's volume
setting.
NOTE If the connection plug is pulled
out from the auxiliary jack while in AUX
mode, noise may occur.
NOTE This unit does not support a
USB 3.0 device. In addition, other
devices may not be supported
depending on the model or OS version.
USB devices formatted to FAT32 are
supported (USB devices formatted to
other formats such as NTFS are not
supported).
Bluetooth® HANDS FREE
Device pairing
To useBluetooth®
audio and
Hands-Free, the device equipped with
Bluetooth®
has to be paired to the
unit using the following procedure. A
maximum of seven devices including
Bluetooth®
audio devices and
hands-free mobile phones can be
paired.
NOTE The
Bluetooth®
system may
not operate for 1 or 2 minutes after the
ignition is switched to ACC or ON.
However, this does not indicate a
problem. If the
Bluetooth®
system
does not connect automatically after
1 or 2 minutes have elapsed, make
sure that the
Bluetooth®
setting on
the device is normal and attempt to
reconnect the
Bluetooth®
device from
the vehicle side.
NOTE If
Bluetooth®
enabled devices
are used in the following locations or
conditions connection via
Bluetooth®
may not be possible: the device is in a
location hidden from the centre display
such as behind or under a seat, or
inside the glove compartment / the
device contacts or is covered by a
metal object or body / The device is set
to power-saving mode.
NOTE To consult the list of compatibles
mobile phones visit the
http://124spiderinfotainment.com
website.
Pairing procedure
Proceed as follows:
select theicon on the home
screen to display the “Settings” screen;
select theDevicestab;
selectBluetooth®
and turn the
Bluetooth®
setting on;
selectAdd New Deviceto display
the message and switch to the device
operation. Using your device, perform a
search for the
Bluetooth®
device
(peripheral device);
select “124 Spider” from the device
list searched by the device;
Device withBluetooth®
version
2.0 input the displayed 4-digit pairing
code into the device. Device with
Bluetooth®
version 2.1 or higher make
sure the displayed 6-digit code on the
audio is also displayed on the device,
and touch theYes. Connection
permission and phonebook access
permission for your mobile device may
be required depending on the mobile
device. If pairing is successful, the
functions of the device connected to
Bluetooth®
are displayed;
devices compatible with SMS
function SMS messages is downloaded
automatically. A download permission
operation for your device may be
required depending on the device.
After a device is registered, the system
automatically identifies the device.
206
MULTIMEDIA
Page 209 of 224
Device selection
If several devices have been paired, the
Bluetooth®
unit links the device last
paired. If you would like to link a
different paired device, it is necessary to
change the link. The order of device
priority after the link has been changed
is maintained even when the ignition is
switched off.
Connecting other devices
Proceed as follows:
select theicon on the home
screen to display the “Settings” screen;
select theDevicestab then select
Bluetooth®
. Turn theBluetooth®
setting on and select the name of the
device you would like to connect;
Phone And Audio selection
connects both devices as hands-free
and
Bluetooth®
audio.Phone Only
selectionconnects as a hands-free
device.Audio Only selection
connects as
Bluetooth®
audio.
Making a call
Making calls is possible using any of the
following six methods:
Phonebook downloaded from
Bluetooth®
device (mobile phone)
(voice recognition function can be
used);
Favourites;
Call record;
Dialing a telephone number (voice
recognition function can be used);
“Redial” - voice recognition
command for making a call to the latest
outgoing call record;
“Call back” - voice recognition
command for making a call to the latest
incoming call record.
Telephone calls can be made by saying
the contact name in the downloaded
phonebook or the name of a person
whose phone number has been
registered in the
Bluetooth®
hands-free.
Proceed as follows:
press the talk button;
wait for the beep sound;
say: “Call XXXXX... (Ex. “John”)
Mobile” (you can also say, “Home”,
“Work”, or “Other” instead of “Mobile”,
depending on how you set up your
contact information);
follow the voice guidance to make
the call, or simple press the pick-up
button on the steering switch during or
after the guidance to make the call.
Import contact (download
Phonebook)
Phonebook data from your device
(Mobile phone) can be sent and
registered to your
Bluetooth®
hands-free phonebook using
Bluetooth®
.
Automatic downloading: the “Auto
Download Contacts” setting must beon. When hands-free is connected to
the device, the phonebook is
downloaded automatically.
Manually downloading: if the “Auto
Download Contacts” setting is off,
download the phonebook using the
following procedure:
select theicon on the home
screen to display the “Communication”
screen;
selectContactsto display the
contact list;
selectEdit Contacts;
selectImport All Contactsor
Import Selected Contactto switch to
the device operation. IfImport All
Contactsis selected, select
Download. Download will be started
from the mobile phone.
NOTE A maximum of 1000 contacts
can be registered to the phonebook.
Receiving an incoming call
When an incoming call is received, the
incoming call notification screen is
displayed. The “Incoming Call
Notifications” setting must be on.
To accept the callpress steering
wheel button on the audio control
switch or selectAnsweron the screen.
To reject the callpress the hang-up
button on the audio control switch or
selectIgnoreon the screen.
207
Page 219 of 224
INDEX
ABS system................73
Accessory socket.............38
Active bonnet................74
Active safety systems...........73
Advanced Keyless Entry System....14
AFS (Adaptive Front Lighting
System)..................27
Attaching the tow hooks........161
Auto-wiper control............29
Automatic climate control system.......................34
Automatic lighting.............25
Automatic transmission.........119
Auxiliary driving systems.........77
Battery (maintenance).........173
Battery charging procedure......176
Battery recharging............176
Bodywork (care and
maintenance).............178
Bonnet....................41
Boot lid...................38
Boot lid (opening).............38
Brake Assist................117
Brake/clutch fluid (level check). . . .173
Checking levels.............171
Child seat installation position.....90
Child-restraint precautions.......86
Child-restraint system suitability
for various seat position.......91Child-restraint system types......89
Climate control system..........31
Coming Home light system.......25
Constant monitoring..........114
Control panel and instruments.....48
Convertible Top (lowering)........42
Convertible Top (Soft Top)........42
Cruise Control..............123
Dashboard..................8
Dead lock device.............16
Dimensions................188
Doors.....................16
Drive selection..............123
Driver Air Bag...............102
DRL (Daytime Running Lights).....24
DSC system................73
Emergency flap opening.......131
Emergency stop signal system. . . .138
Emergency towing............163
Engine...................184
Engine compartment..........171
Engine coolant (level check)......172
Engine oil (level check).........172
Essential information............3
Exterior lights................24
Flash to pass...............25
Fluid capacities..............189
Fluids and lubricants..........190Front fog lights...............25
Fuel consumption and
CO2 emissions............193
Fuel filler cap...............131
Fuse block (engine compartment)......................149
Fuse block (left side of the vehicle)......................152
Fuses (under the bonnet)........148
Fuses (vehicle's left side)........147
Gear lever positions..........119
Gear Shift Indicator............52
Hazard warning lights.........138
Hazard warning lights (control). . . .138
Head restraints...............21
Headlight washer.............30
Headlights..................24
Heated seats................19
Heavy-dute use of the vehicle
(scheduled servicing)........166
High beams.................25
HLA function................80
How the SRS Air bags work......102
How to use this manual..........3
Identification data............183
Ignition switch...............11
Immobilizer system............14
INFO switch.................51
Installing child-restraint systems....95
Interior care................180
Interiors..................180