odometer Abarth 124 Spider 2021 Owner handbook (in English)
[x] Cancel search | Manufacturer: ABARTH, Model Year: 2021, Model line: 124 Spider, Model: Abarth 124 Spider 2021Pages: 224, PDF Size: 3.9 MB
Page 50 of 224

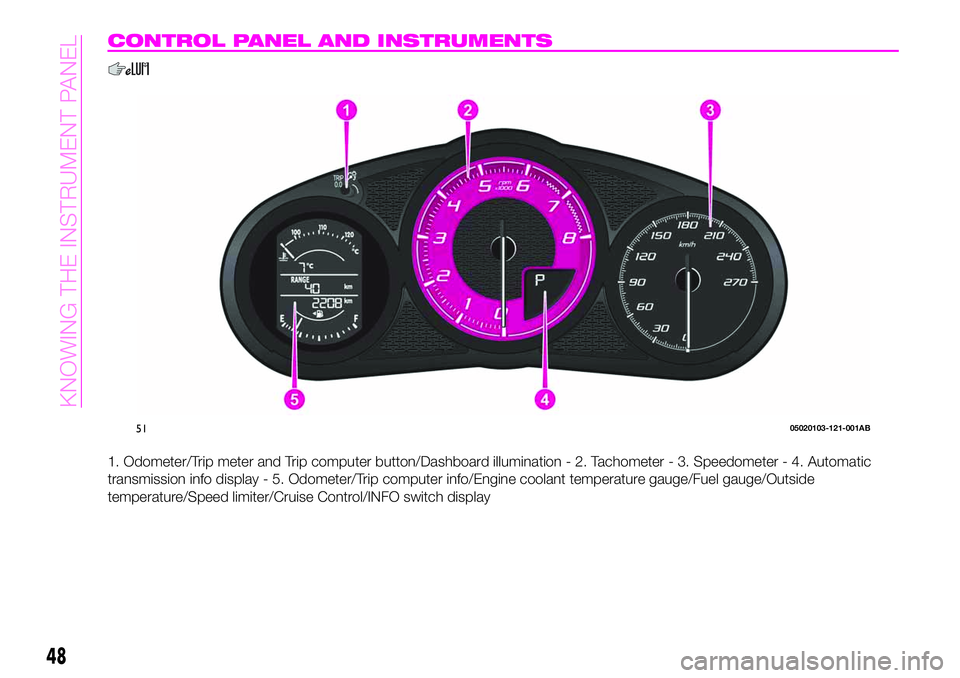
CONTROL PANEL AND INSTRUMENTS
1. Odometer/Trip meter and Trip computer button/Dashboard illumination - 2. Tachometer - 3. Speedometer - 4. Automatic
transmission info display - 5. Odometer/Trip computer info/Engine coolant temperature gauge/Fuel gauge/Outside
temperature/Speed limiter/Cruise Control/INFO switch display
5105020103-121-001AB
48
KNOWING THE INSTRUMENT PANEL
Page 51 of 224

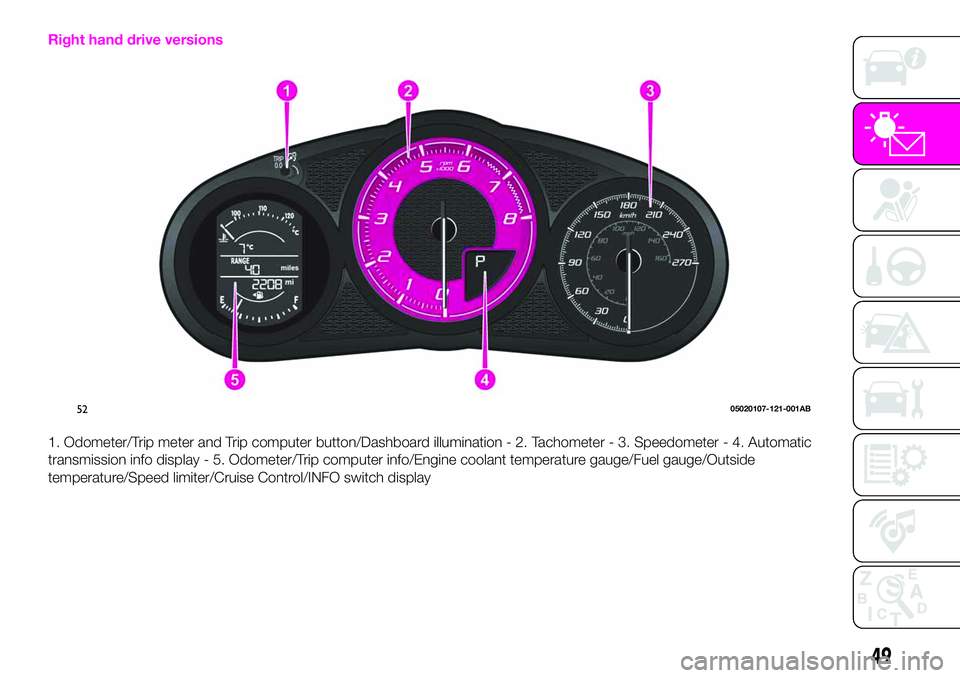
Right hand drive versions
1. Odometer/Trip meter and Trip computer button/Dashboard illumination - 2. Tachometer - 3. Speedometer - 4. Automatic
transmission info display - 5. Odometer/Trip computer info/Engine coolant temperature gauge/Fuel gauge/Outside
temperature/Speed limiter/Cruise Control/INFO switch display
5205020107-121-001AB
49
Page 52 of 224

ODOMETER / TRIP METER
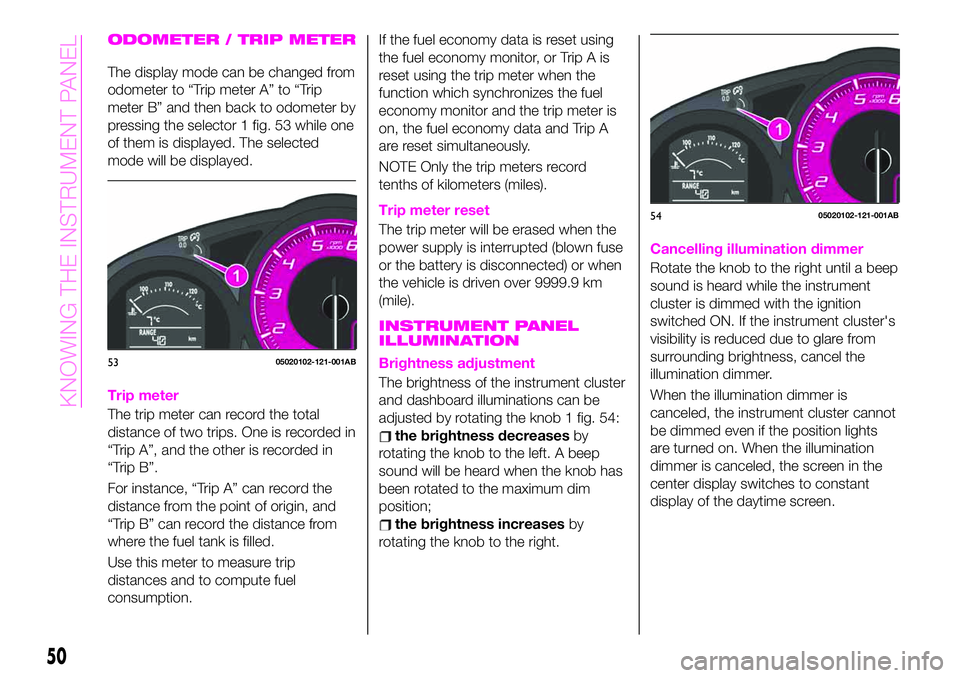
The display mode can be changed from
odometer to “Trip meter A” to “Trip
meter B” and then back to odometer by
pressing the selector 1 fig. 53 while one
of them is displayed. The selected
mode will be displayed.
Trip meter
The trip meter can record the total
distance of two trips. One is recorded in
“Trip A”, and the other is recorded in
“Trip B”.
For instance, “Trip A” can record the
distance from the point of origin, and
“Trip B” can record the distance from
where the fuel tank is filled.
Use this meter to measure trip
distances and to compute fuel
consumption.If the fuel economy data is reset using
the fuel economy monitor, or Trip A is
reset using the trip meter when the
function which synchronizes the fuel
economy monitor and the trip meter is
on, the fuel economy data and Trip A
are reset simultaneously.
NOTE Only the trip meters record
tenths of kilometers (miles).
Trip meter reset
The trip meter will be erased when the
power supply is interrupted (blown fuse
or the battery is disconnected) or when
the vehicle is driven over 9999.9 km
(mile).
INSTRUMENT PANEL
ILLUMINATION
Brightness adjustment
The brightness of the instrument cluster
and dashboard illuminations can be
adjusted by rotating the knob 1 fig. 54:
the brightness decreasesby
rotating the knob to the left. A beep
sound will be heard when the knob has
been rotated to the maximum dim
position;
the brightness increasesby
rotating the knob to the right.
Cancelling illumination dimmer
Rotate the knob to the right until a beep
sound is heard while the instrument
cluster is dimmed with the ignition
switched ON. If the instrument cluster's
visibility is reduced due to glare from
surrounding brightness, cancel the
illumination dimmer.
When the illumination dimmer is
canceled, the instrument cluster cannot
be dimmed even if the position lights
are turned on. When the illumination
dimmer is canceled, the screen in the
center display switches to constant
display of the daytime screen.
5305020102-121-001AB
5405020102-121-001AB
50
KNOWING THE INSTRUMENT PANEL
Page 220 of 224

Internal equipment............38
Jump starting..............159
Jump starting (procedure).......160
Key battery replacement........10
Keyless Entry System...........9
Keys......................9
Lane change signals...........27
Leaving Home Light system.......27
Load limiter (pretensioner)........85
Maintaining the finish.........179
Maintenance monitor...........53
Manual climate control system.....32
Manual transmission..........118
Mechanical Limited Slip
Differential................79
Message indicated on display.....71
Mirrors....................22
Multimedia.................195
Navigation................208
Occupant protection systems.....81
Odometer/Trip meter...........50
Outside mirrors...............22
Owner maintenance precautions . . .165
Paintwork (preserving).........178
Parking...................116
Parking brake...............117
Parking Sensor System.........129
Passenger Air Bag............102Passenger occupant classification
system.................107
Passive Entry................17
Performance...............192
Periodic checks (scheduled
servicing)................166
Power mirrors...............23
Power window lock switch.......37
Power windows..............36
Prescriptions for handling the
vehicle at the end of its life.....194
Pretensioners................85
Push button start positions.......11
Radio 3”.................197
Radio 7”..................202
Read this carefully..............2
Rear camera (ParkView rear
backup camera)...........133
Rear fog lights...............26
Refuelling procedure..........131
Refuelling the vehicle..........131
Replacing a bulb.............139
Replacing a tire..............177
Replacing exterior light bulbs.....142
Replacing fuses.............147
Rims and tires..............185
Rims and tires provided........186
SBA system (Seat Belt Alert)......84
Scheduled servicing plan.......167Seat belt precautions...........82
Seat belt pretensioner and load
limiting systems.............85
Seat Belt pretensioners.........102
Seat belts..................82
Seat belts (fastening/unfastening)}.......................82
Seats.....................19
Seats (manual adjustment).......19
Seats and fabric parts (cleaning) . . .181
Shift-lock override (automatic
gearbox)................120
Shift-lock system (automatic
gearbox)................120
Side Air Bags...............103
Snow chains...............177
Speed limiter...............126
SPORT mode...............123
Starting the engine.........11,116
Steering wheel...............21
Supplementary restraint system
(SRS) - Air bag............100
Symbols....................3
TCS (Traction Control System).....73
Theft deterrent system..........15
Tips, controls and general
information...............196
Tire service kit..............154
Tires rotation (recommendations) . .177
Tool storage................154
Towing the vehicle............161
INDEX