tow Abarth 500 2011 Owner handbook (in English)
[x] Cancel search | Manufacturer: ABARTH, Model Year: 2011, Model line: 500, Model: Abarth 500 2011Pages: 170, PDF Size: 3.5 MB
Page 9 of 170
8
SAFETY
DEVICES
CORRECT USE
OF THE
CAR
WARNING
LIGHTS AND
MESSAGES
IN AN
EMERGENCY
CAR
MAINTENANCE
TECHNICAL
SPECIFICATIONS
INDEX
YOUR CAR
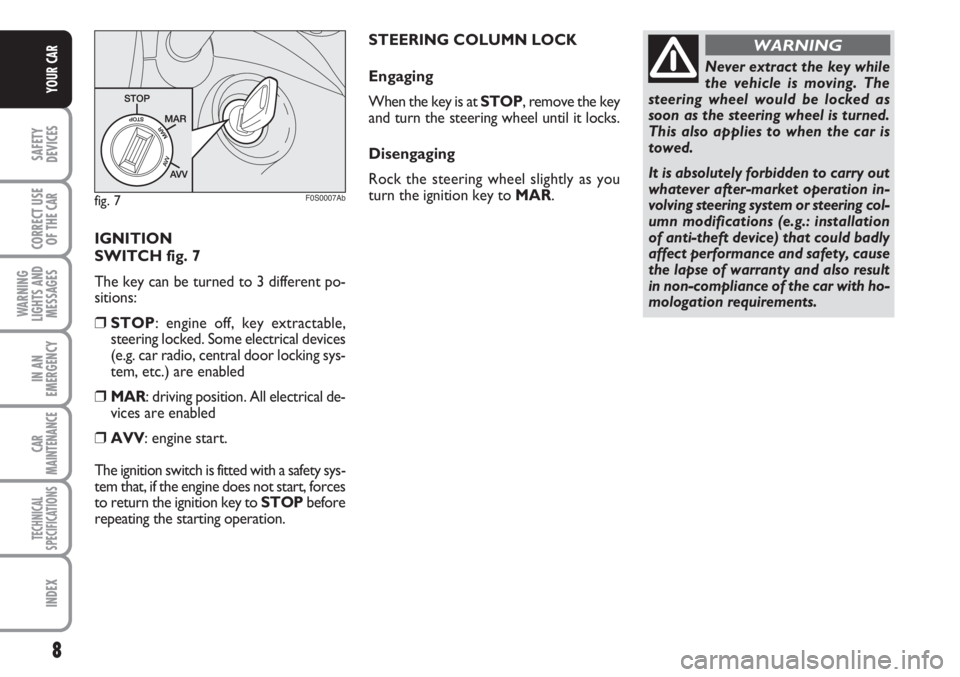
IGNITION
SWITCH fig. 7
The key can be turned to 3 different po-
sitions:
❒STOP: engine off, key extractable,
steering locked. Some electrical devices
(e.g. car radio, central door locking sys-
tem, etc.) are enabled
❒MAR: driving position. All electrical de-
vices are enabled
❒AVV: engine start.
The ignition switch is fitted with a safety sys-
tem that, if the engine does not start, forces
to return the ignition key to STOPbefore
repeating the starting operation.
Never extract the key while
the vehicle is moving. The
steering wheel would be locked as
soon as the steering wheel is turned.
This also applies to when the car is
towed.
It is absolutely forbidden to carry out
whatever after-market operation in-
volving steering system or steering col-
umn modifications (e.g.: installation
of anti-theft device) that could badly
affect performance and safety, cause
the lapse of warranty and also result
in non-compliance of the car with ho-
mologation requirements.
WARNING
fig. 7F0S0007Ab
STEERING COLUMN LOCK
Engaging
When the key is at STOP, remove the key
and turn the steering wheel until it locks.
Disengaging
Rock the steering wheel slightly as you
turn the ignition key to MAR.
Page 25 of 170
24
SAFETY
DEVICES
CORRECT USE
OF THE
CAR
WARNING
LIGHTS AND
MESSAGES
IN AN
EMERGENCY
CAR
MAINTENANCE
TECHNICAL
SPECIFICATIONS
INDEX
YOUR CAR
Driver side and passenger side where
position memory is provided
To return the seat to its initial position,
slide the seat backward pushing the back-
rest until the seat locks (movement d)
operate the lever D(movement e) and
lift the backrest (movement f) until you
hear it snapping in position.
WARNING Using the lever Dbefore
locking the seat in the initial position caus-
es the loss of the seat initial position. In
that case, it is necessary to adjust the seat
position by means of the longitudinal ad-
justment fig. 16.
Passenger side where position
memory is not provided
To return the seat to its initial position,
slide the seat backward pushing the back-
rest to the desired position (movement
d); operate the lever D(movement e)
and lift the backrest (movement f) until
you hear it snapping in position.
All adjustments must be
made with the car stationary.
WARNING
fig. 20F0S020Ab
The type of reattachment manoeuvre has
been chosen to guarantee the safety of the
occupant. In effect, if the mechanism de-
tects an obstacle (e.g. a bag) and cannot
restore the seat to its original position, it
allows the reattachment of the actual seat,
positioning the backrest only, ensuring
that the guides are attached.
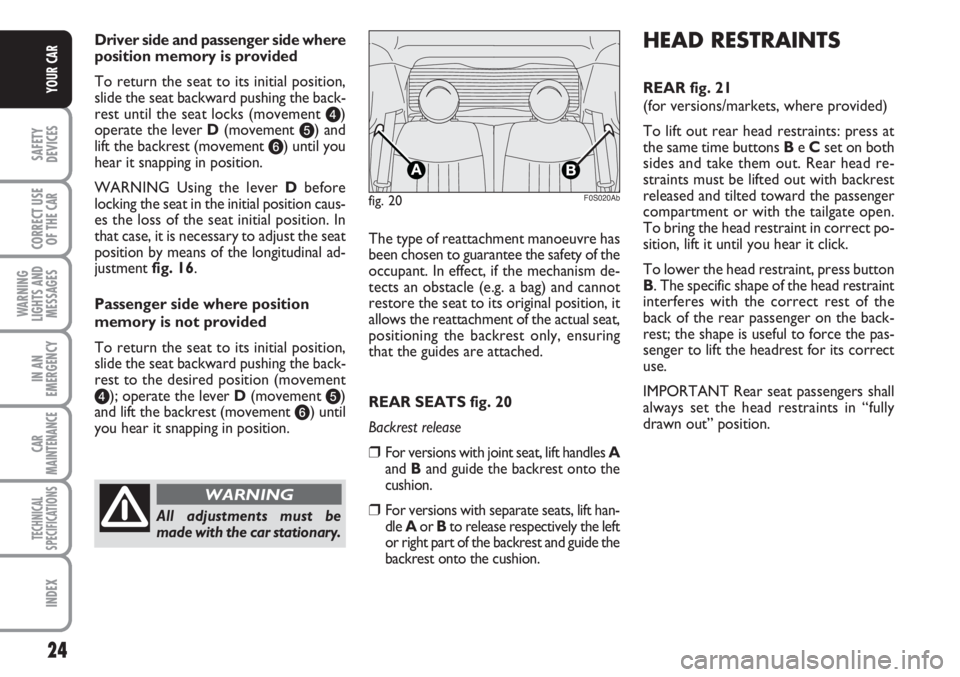
REAR SEATS fig. 20
Backrest release
❒For versions with joint seat, lift handles A
and Band guide the backrest onto the
cushion.
❒For versions with separate seats, lift han-
dle Aor Bto release respectively the left
or right part of the backrest and guide the
backrest onto the cushion.
HEAD RESTRAINTS
REAR fig. 21
(for versions/markets, where provided)
To lift out rear head restraints: press at
the same time buttons Be Cset on both
sides and take them out. Rear head re-
straints must be lifted out with backrest
released and tilted toward the passenger
compartment or with the tailgate open.
To bring the head restraint in correct po-
sition, lift it until you hear it click.
To lower the head restraint, press button
B. The specific shape of the head restraint
interferes with the correct rest of the
back of the rear passenger on the back-
rest; the shape is useful to force the pas-
senger to lift the headrest for its correct
use.
IMPORTANT Rear seat passengers shall
always set the head restraints in “fully
drawn out” position.
Page 29 of 170
28
SAFETY
DEVICES
CORRECT USE
OF THE
CAR
WARNING
LIGHTS AND
MESSAGES
IN AN
EMERGENCY
CAR
MAINTENANCE
TECHNICAL
SPECIFICATIONS
INDEX
YOUR CAR
fig. 27F0S027Ab
TTC
A
E
BCDHEATING
AND VENTILATION
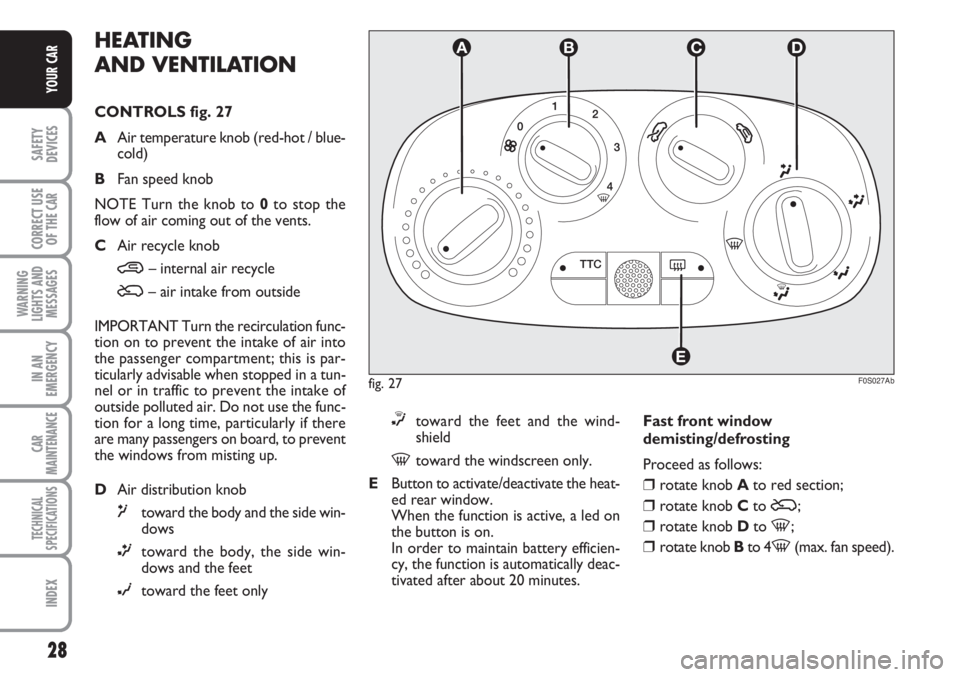
CONTROLS fig. 27
AAir temperature knob (red-hot / blue-
cold)
BFan speed knob
NOTE Turn the knob to 0to stop the
flow of air coming out of the vents.
CAir recycle knob
…– internal air recycle
Ú– air intake from outside
IMPORTANT Turn the recirculation func-
tion on to prevent the intake of air into
the passenger compartment; this is par-
ticularly advisable when stopped in a tun-
nel or in traffic to prevent the intake of
outside polluted air. Do not use the func-
tion for a long time, particularly if there
are many passengers on board, to prevent
the windows from misting up.
DAir distribution knob
μtoward the body and the side win-
dows
∑toward the body, the side win-
dows and the feet
∂toward the feet only
∏toward the feet and the wind-
shield
-toward the windscreen only.
EButton to activate/deactivate the heat-
ed rear window.
When the function is active, a led on
the button is on.
In order to maintain battery efficien-
cy, the function is automatically deac-
tivated after about 20 minutes.Fast front window
demisting/defrosting
Proceed as follows:
❒ rotate knob Ato red section;
❒ rotate knob Cto Ú;
❒ rotate knob Dto -;
❒ rotate knob Bto 4-(max. fan speed).
Page 30 of 170
29
SAFETY
DEVICES
CORRECT USE
OF THE
CAR
WARNING
LIGHTS AND
MESSAGES
IN AN
EMERGENCY
CAR
MAINTENANCE
TECHNICAL
SPECIFICATIONS
INDEX
YOUR CAR
MANUAL CLIMATE
CONTROL SYSTEM
(for versions/markets, where provided)
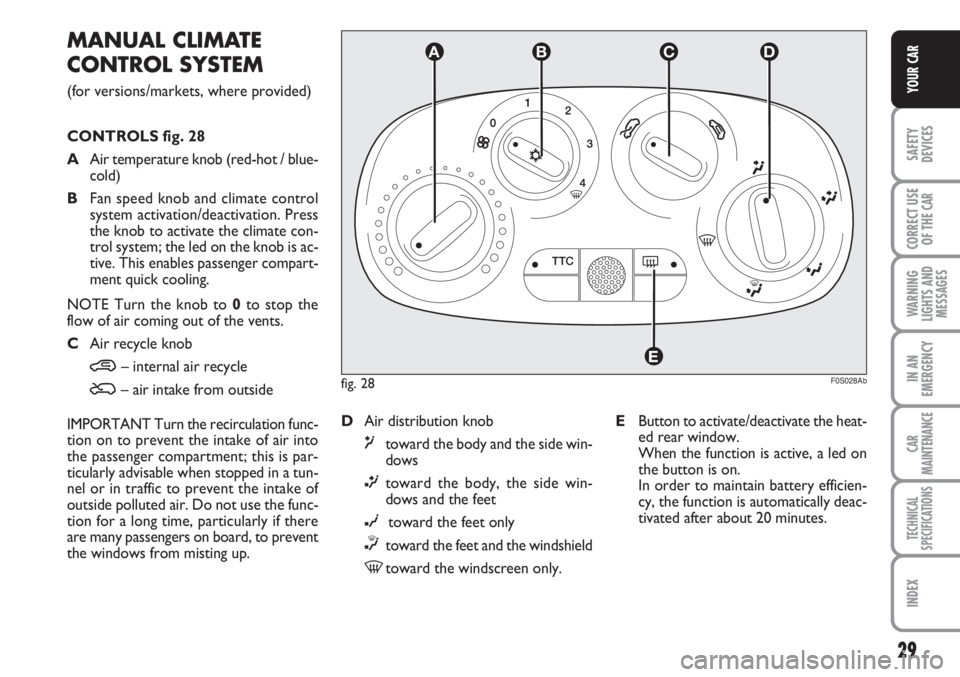
CONTROLS fig. 28
AAir temperature knob (red-hot / blue-
cold)
BFan speed knob and climate control
system activation/deactivation. Press
the knob to activate the climate con-
trol system; the led on the knob is ac-
tive. This enables passenger compart-
ment quick cooling.
NOTE Turn the knob to 0to stop the
flow of air coming out of the vents.
CAir recycle knob
…– internal air recycle
Ú– air intake from outside
IMPORTANT Turn the recirculation func-
tion on to prevent the intake of air into
the passenger compartment; this is par-
ticularly advisable when stopped in a tun-
nel or in traffic to prevent the intake of
outside polluted air. Do not use the func-
tion for a long time, particularly if there
are many passengers on board, to prevent
the windows from misting up.fig. 28F0S028Ab
TTC
A
E
BCD
DAir distribution knob
μtoward the body and the side win-
dows
∑toward the body, the side win-
dows and the feet
∂toward the feet only
∏toward the feet and the windshield
-toward the windscreen only.EButton to activate/deactivate the heat-
ed rear window.
When the function is active, a led on
the button is on.
In order to maintain battery efficien-
cy, the function is automatically deac-
tivated after about 20 minutes.
Page 34 of 170

33
SAFETY
DEVICES
CORRECT USE
OF THE
CAR
WARNING
LIGHTS AND
MESSAGES
IN AN
EMERGENCY
CAR
MAINTENANCE
TECHNICAL
SPECIFICATIONS
INDEX
YOUR CAR
∂to the vents in the feet area (front
seats). The natural tendency of hot
air to spread upwards, allows to
warm the passenger compartment
up as quickly as possible, providing
an immediate feeling of warmth.
∂+μdistribution between feet area
vents (warmer air) and dashboard
vents (cooler air).
∂+´distribution between feet area
vents and windscreen and front
side window vents). This distribu-
tion allows an adequate warming of
the passenger compartment and
prevents the windows from mist-
ing up.
The set distribution is shown by the LEDs
on the selected buttons.
To restore automatic air distribution con-
trol, press button AUTO.
Button
-- L
Front window fast
demisting/defrosting button
Pressing the button
-the system acti-
vates all the functions required for fast
demisting/defrosting:
❒compressor switch on (if climatic con-
ditions are suitable);
❒air recycle off;
❒air temperature set to maximum (HI);
❒fan speed selection depending on
coolant temperature;
❒air flow toward the windshield and the
front side windows;
❒heated rear window on.
IMPORTANT The function remains active
for about 3 minutes since the engine
coolant temperature exceeds 50°C (for
petrol versions) or 35°C (for Diesel ver-
sions).
LOOKING AFTER THE SYSTEM
Run the climate control system for at least
10 minutes every month during the win-
ter.
Have the system inspected at a Abarth
Dealership before the summer.The system uses R134a
coolant which, in the event of
accidental leaks, is not dan-
gerous for the environment.
Do not use R12 coolant, not suitable
for the components of the system.
HEATED REAR WINDOW
DEMISTER/DEFROSTER
Press the button Mto activate this func-
tion; its activation is shown by a warning
light on the instrument panel.
The function is automatically deactivated
after about 20 minutes. To turn off the
function beforehand, press again the but-
ton
(.
IMPORTANT Do not apply stickers on
the internal side of the rear window over
the filaments of the heated rear window,
to avoid damaging it.
Page 35 of 170
34
SAFETY
DEVICES
CORRECT USE
OF THE
CAR
WARNING
LIGHTS AND
MESSAGES
IN AN
EMERGENCY
CAR
MAINTENANCE
TECHNICAL
SPECIFICATIONS
INDEX
YOUR CAR
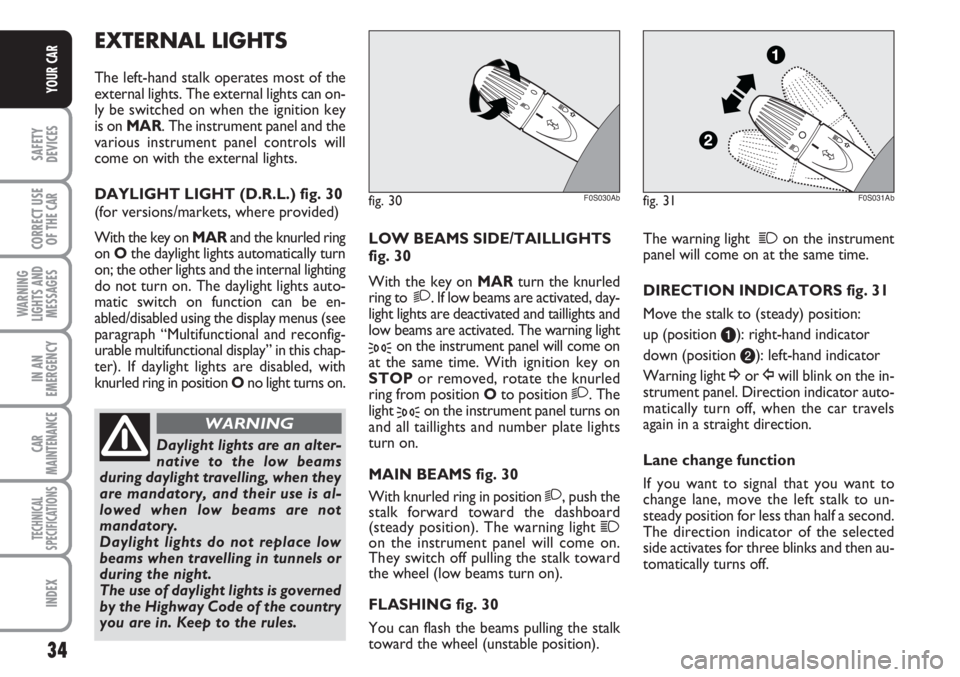
LOW BEAMS SIDE/TAILLIGHTS
fig. 30
With the key on MAR turn the knurled
ring to
2. If low beams are activated, day-
light lights are deactivated and taillights and
low beams are activated. The warning light
3on the instrument panel will come on
at the same time. With ignition key on
STOPor removed, rotate the knurled
ring from position Oto position
2. The
light
3on the instrument panel turns on
and all taillights and number plate lights
turn on.
MAIN BEAMS fig. 30
With knurled ring in position
2, push the
stalk forward toward the dashboard
(steady position). The warning light
1on the instrument panel will come on.
They switch off pulling the stalk toward
the wheel (low beams turn on).
FLASHING fig. 30
You can flash the beams pulling the stalk
toward the wheel (unstable position). The warning light
1on the instrument
panel will come on at the same time.
DIRECTION INDICATORS fig. 31
Move the stalk to (steady) position:
up (position a): right-hand indicator
down (position b): left-hand indicator
Warning light ¥or Îwill blink on the in-
strument panel. Direction indicator auto-
matically turn off, when the car travels
again in a straight direction.
Lane change function
If you want to signal that you want to
change lane, move the left stalk to un-
steady position for less than half a second.
The direction indicator of the selected
side activates for three blinks and then au-
tomatically turns off.
EXTERNAL LIGHTS
The left-hand stalk operates most of the
external lights. The external lights can on-
ly be switched on when the ignition key
is on MAR. The instrument panel and the
various instrument panel controls will
come on with the external lights.
DAYLIGHT LIGHT (D.R.L.) fig. 30
(for versions/markets, where provided)
With the key on MARand the knurled ring
on Othe daylight lights automatically turn
on; the other lights and the internal lighting
do not turn on. The daylight lights auto-
matic switch on function can be en-
abled/disabled using the display menus (see
paragraph “Multifunctional and reconfig-
urable multifunctional display” in this chap-
ter). If daylight lights are disabled, with
knurled ring in position Ono light turns on.
fig. 30F0S030Abfig. 31F0S031Ab
Daylight lights are an alter-
native to the low beams
during daylight travelling, when they
are mandatory, and their use is al-
lowed when low beams are not
mandatory.
Daylight lights do not replace low
beams when travelling in tunnels or
during the night.
The use of daylight lights is governed
by the Highway Code of the country
you are in. Keep to the rules.
WARNING
Page 36 of 170
35
SAFETY
DEVICES
CORRECT USE
OF THE
CAR
WARNING
LIGHTS AND
MESSAGES
IN AN
EMERGENCY
CAR
MAINTENANCE
TECHNICAL
SPECIFICATIONS
INDEX
YOUR CAR
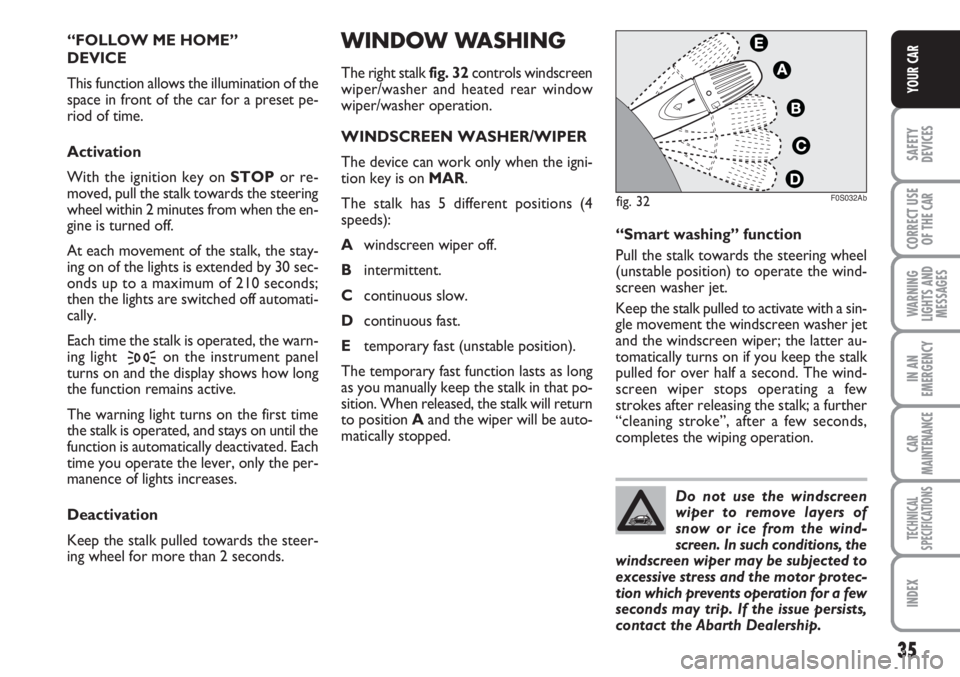
WINDOW WASHING
The right stalk fig. 32controls windscreen
wiper/washer and heated rear window
wiper/washer operation.
WINDSCREEN WASHER/WIPER
The device can work only when the igni-
tion key is on MAR.
The stalk has 5 different positions (4
speeds):
Awindscreen wiper off.
Bintermittent.
Ccontinuous slow.
Dcontinuous fast.
Etemporary fast (unstable position).
The temporary fast function lasts as long
as you manually keep the stalk in that po-
sition. When released, the stalk will return
to position Aand the wiper will be auto-
matically stopped.“Smart washing” function
Pull the stalk towards the steering wheel
(unstable position) to operate the wind-
screen washer jet.
Keep the stalk pulled to activate with a sin-
gle movement the windscreen washer jet
and the windscreen wiper; the latter au-
tomatically turns on if you keep the stalk
pulled for over half a second. The wind-
screen wiper stops operating a few
strokes after releasing the stalk; a further
“cleaning stroke”, after a few seconds,
completes the wiping operation. “FOLLOW ME HOME”
DEVICE
This function allows the illumination of the
space in front of the car for a preset pe-
riod of time.
Activation
With the ignition key on STOPor re-
moved, pull the stalk towards the steering
wheel within 2 minutes from when the en-
gine is turned off.
At each movement of the stalk, the stay-
ing on of the lights is extended by 30 sec-
onds up to a maximum of 210 seconds;
then the lights are switched off automati-
cally.
Each time the stalk is operated, the warn-
ing light
3on the instrument panel
turns on and the display shows how long
the function remains active.
The warning light turns on the first time
the stalk is operated, and stays on until the
function is automatically deactivated. Each
time you operate the lever, only the per-
manence of lights increases.
Deactivation
Keep the stalk pulled towards the steer-
ing wheel for more than 2 seconds.
F0S032Abfig. 32
Do not use the windscreen
wiper to remove layers of
snow or ice from the wind-
screen. In such conditions, the
windscreen wiper may be subjected to
excessive stress and the motor protec-
tion which prevents operation for a few
seconds may trip. If the issue persists,
contact the Abarth Dealership.
Page 37 of 170

36
SAFETY
DEVICES
CORRECT USE
OF THE
CAR
WARNING
LIGHTS AND
MESSAGES
IN AN
EMERGENCY
CAR
MAINTENANCE
TECHNICAL
SPECIFICATIONS
INDEX
YOUR CAR
Ceiling light timing (central
position of the lens)
Three different switch on modes are fore-
seen:
❒when opening one door, a three minute
timing is set;
❒when removing the key from the igni-
tion switch within two minutes from
engine switch off, a 10 second timing
is set;
❒when doors are unlocked (either with
remote control or with key on driver
side door), a 10 second timing is set.
Three modes are foreseen for switch off:
❒when closing all doors, a three minute
timing is set; The timing is disabled if the
key is moved to MAR;
❒when doors are locked (either with re-
mote control or with key on driver side
door), the ceiling light turns off.
❒the internal lights turn off after 15 min-
utes to avoid battery drain
BOOT LIGHT
The lamp comes on automatically when the
luggage compartment is opened and goes
out when it is closed.
CEILING LIGHTS
FRONT CEILING LIGHT
The lens can be set to three positions:
❒right side pressed: light always on
❒left side pressed: light always off
❒central position (neutral): the light turns
on and off when the doors are opened
or closed.
IMPORTANT Before getting out of the
car, make sure the switch is on the cen-
tral position: ensure that lights are off with
doors closed in order to avoid draining
the battery.
On same versions, light switch on and off
occur only when the front driver side door
is opened or closed.
When the doors are unlocked using the re-
mote control, a 10 second timing turns on.
When the doors are locked using the re-
mote control, the ceiling light turns off. REAR WINDOW WIPER/
REAR WINDOW WASHER
The device can work only when the igni-
tion key is on MAR.
Turn the knurled ring to
'to operate
the rear window wiper.
With the windscreen wiper active, rotate
the knurled ring to
'to activate the rear
window wiper which, in this case, oper-
ates (in the different positions) in synch
with the windscreen wiper, yet with half
its frequency. With windscreen wiper ac-
tive, engaging reverse gear, the rear win-
dow wiper automatically turns on in slow
continuous mode.
It stops when the reverse gear is disen-
gaged.
“Smart washing” function
Pushing the stalk towards the dashboard
(unstable position) will activate the rear
window washer.
Keep the stalk pushed to activate with a
single movement the rear window wash-
er jet and the rear window wiper; the lat-
ter automatically turns on if you keep the
stalk pushed for over half a second.
The rear window wiper stops operating
a few strokes after releasing the stalk; a
further “cleaning stroke”, after a few sec-
onds, completes the wiping operation.
Do not use the rear window
wiper to remove layers of
snow or ice from the rear win-
dow. In such conditions, the
rear window wiper may be subjected to
excessive stress and the motor protec-
tion which prevents operation for a few
seconds may trip. If the issue persists,
contact the Abarth Dealership.
Page 45 of 170
44
SAFETY
DEVICES
CORRECT USE
OF THE
CAR
WARNING
LIGHTS AND
MESSAGES
IN AN
EMERGENCY
CAR
MAINTENANCE
TECHNICAL
SPECIFICATIONS
INDEX
YOUR CAR
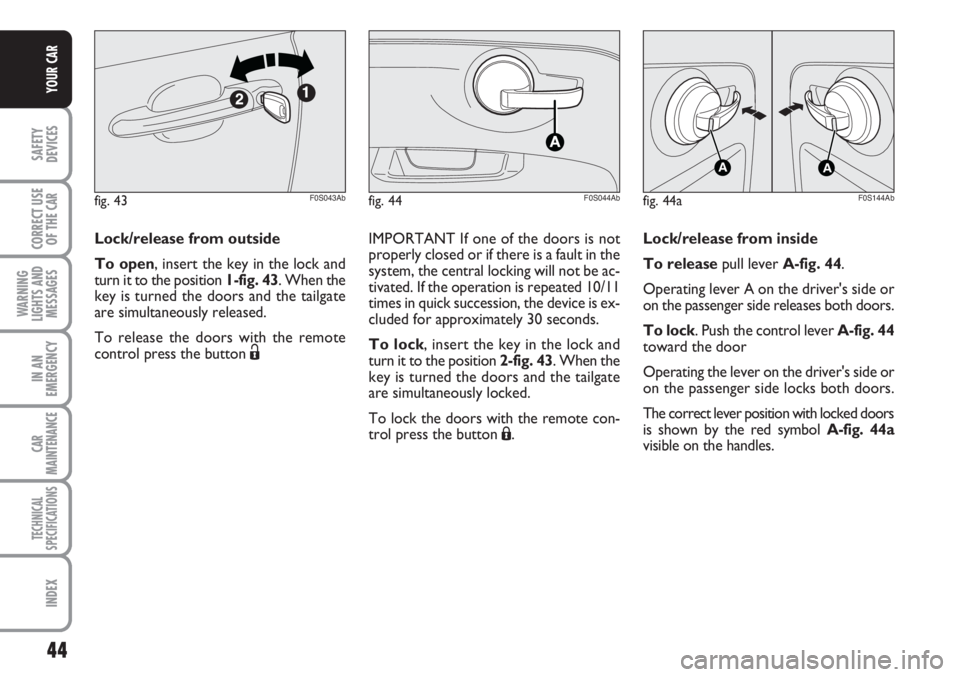
Lock/release from outside
To open, insert the key in the lock and
turn it to the position 1-fig. 43. When the
key is turned the doors and the tailgate
are simultaneously released.
To release the doors with the remote
control press the button Ë
fig. 43F0S043Abfig. 44F0S044Ab
IMPORTANT If one of the doors is not
properly closed or if there is a fault in the
system, the central locking will not be ac-
tivated. If the operation is repeated 10/11
times in quick succession, the device is ex-
cluded for approximately 30 seconds.
To lock, insert the key in the lock and
turn it to the position 2-fig. 43. When the
key is turned the doors and the tailgate
are simultaneously locked.
To lock the doors with the remote con-
trol press the button Á.Lock/release from inside
To releasepull lever A-fig. 44.
Operating lever A on the driver's side or
on the passenger side releases both doors.
To lock. Push the control lever A-fig. 44
toward the door
Operating the lever on the driver's side or
on the passenger side locks both doors.
The correct lever position with locked doors
is shown by the red symbol A-fig. 44a
visible on the handles.
fig. 44a
A
A
F0S144Ab
Page 59 of 170
58
SAFETY
DEVICES
CORRECT USE
OF THE
CAR
WARNING
LIGHTS AND
MESSAGES
IN AN
EMERGENCY
CAR
MAINTENANCE
TECHNICAL
SPECIFICATIONS
INDEX
YOUR CAR
FAILURE INDICATIONS
Any failure is indicated by instrument pan-
el warning light
gcoming on together
with the message on the reconfigurable
multifunction display (for versions/mar-
kets, where provided) (see section
“Warning lights and messages”).
In the event of electric power steering sys-
tem failure, the car can be driven with me-
chanical steering.
IMPORTANT In some circumstances, fac-
tors independent from the electric pow-
er steering could cause the illumination of
the warning light
gon the instrument
panel.
“DUALDRIVE” ELECTRIC
POWER STEERING
SYSTEM
The car has an electrically operated pow-
er assisted system, that only works with
the ignition key in the MARposition and
the engine started, known as Dualdrive.
The electric power steering reduces the
effort on the steering wheel making town
driving and parking manoeuvres particu-
larly easy.
IMPORTANT In case of quick rotation of
the ignition switch, full power steering
functionality can be achieved after 1-2 sec-
onds.
When the SPORT function is turned on
(see “Controls” paragraph in this chapter)
the electric power steering assistance is
altered, increasing the sensitivity of the
steering wheel.
It is absolutely forbidden to
carry out whatever after-
market operation involving steering
system or steering column modifica-
tions (e.g.: installation of anti-theft
device) that could badly affect per-
formance and safety, cause the lapse
of warranty and also result in non-
compliance of the car with homolo-
gation requirements.
WARNING
Before servicing the car,
switch off the engine and re-
move the key from the ignition de-
vice, activating the steering lock, es-
pecially when car wheels do not
touch the ground. If this is not possi-
ble (if the key must be on MAR or the
engine must be running), remove the
main fuse which protects the electric
power steering.
WARNING
In this case, immediately stop the car, turn
off the engine for about 20 seconds and
then turn on again the engine. If the warn-
ing light
gis still on, along with the mes-
sage on the reconfigurable multifunction-
al display (for versions/markets, where
provided), contact Abarth Dealership.
IMPORTANT The steering may become
slightly stiff following parking manoeuvres
including a great deal of steering. This is
normal and caused by a system to prevent
motor overheating. No servicing is re-
quired. The power steering system will re-
turn to normal operation the next time
the car is used.