Abarth 500 2015 Owner handbook (in English)
Manufacturer: ABARTH, Model Year: 2015, Model line: 500, Model: Abarth 500 2015Pages: 215, PDF Size: 19.08 MB
Page 131 of 215
SNOW TYRES
Use snow tyres of the same size as the
standard tyres provided with the car.
An Abarth Dealership will be happy to
provide advice concerning the most
suitable type of tyre for the Customer's
requirements.
103)
For the type of tyre to be used, inflation
pressures and the specifications of
snow tyres, follow the instructions given
in the "Wheels" paragraph in the
"Technical specifications" chapter.
The winter features of these tyres are
reduced considerably when the tread
depth is below 4 mm. Replace them in
this case.
Due to the specific characteristics of
snow tyres, in normal weather
conditions or on long motorway
journeys, the performance of these
tyres is lower than that of standard
tyres. Their usage should therefore be
restricted in accordance with their
type approval.IMPORTANT When using snow tyres
with a maximum speed index below the
one that can be reached by the car
(increased by 5%), place a notice in the
passenger compartment, plainly in
view, which states the maximum speed
allowed by the snow tyres (as per EC
Directive).
All four tyres should be the same (brand
and track) to ensure greater safety
when driving and braking as well as a
good manoeuvrability.
Remember that you should not change
the rotation direction of the tyres.
WARNING
103) The max. speed for snow tyres
with "Q" marking is 160 km/h. The
Highway Code speed limits must
however be always strictly
observed.
SNOW CHAINS
The use of snow chains should be in
compliance with local regulations of
each country.
Snow chains can be fitted to the tyres
of the front wheels (drive wheels) only.
Check the tension of the snow chains
after the first few metres have been
driven.
22)
IMPORTANT
22) Keep your speed down when
snow chains are fitted; do not
exceed 50 km/h. Avoid potholes,
steps and pavements and avoid
driving for long distances on
roads not covered with snow to
prevent damaging the car and the
roadbed.
127
Page 132 of 215
CAR INACTIVITY
If the car is to be left inactive for longer
than a month, the following precautions
should be noted:
❒park the car in covered, dry and if
possible well-ventilated premises and
slightly open the windows;
❒check that the handbrake is not
engaged;
❒engage a gear;
❒disconnect the negative battery
terminal and check the battery
charge. Repeat this check once
every three months during storage;
❒if the battery is not disconnected
from the electrical system, check
its state of charge every thirty days;
❒clean and protect the painted parts
using protective wax;
❒clean and protect the shiny metal
parts using special compounds
available commercially;
❒sprinkle talcum powder on the
windscreen and rear window wiper
rubber blades and lift them off the
glass;❒cover the car with a cloth or
perforated plastic sheet. Do not use
compact plastic sheets which do
not allow humidity to evaporate from
the surface of the car;
❒inflate tyres to +0.5 bar above the
standard prescribed pressure and
check it periodically;
❒do not drain the engine cooling
system;
128
STARTING AND DRIVING
Page 133 of 215
IN AN EMERGENCY
A punctured tyre or a burnt-out bulb?
At times, a problem may interfere
with our journey.
The pages on emergencies can help
you to deal with critical situations
independently and with calm.
In an emergency we recommend that
you call the freephone number found in
the Warranty Booklet.
It is also possible to call the 00 800
3428 0000 freephone number to
search the nearest Abarth Authorised
Dealership.STARTING THE ENGINE .................130
"FIX&GO AUTOMATIC" KIT .............131
REPLACING A BULB .....................135
REPLACING AN EXTERIOR BULB ..139
REPLACING AN INTERIOR BULB ...142
REPLACING FUSES........................144
BATTERY RECHARGING ................149
LIFTING THE CAR...........................149
TOWING THE CAR .........................150
129
Page 134 of 215
STARTING THE
ENGINE
If thesymbol on the display turns
on constantly, contact an Abarth
Dealership immediately.
JUMP STARTING
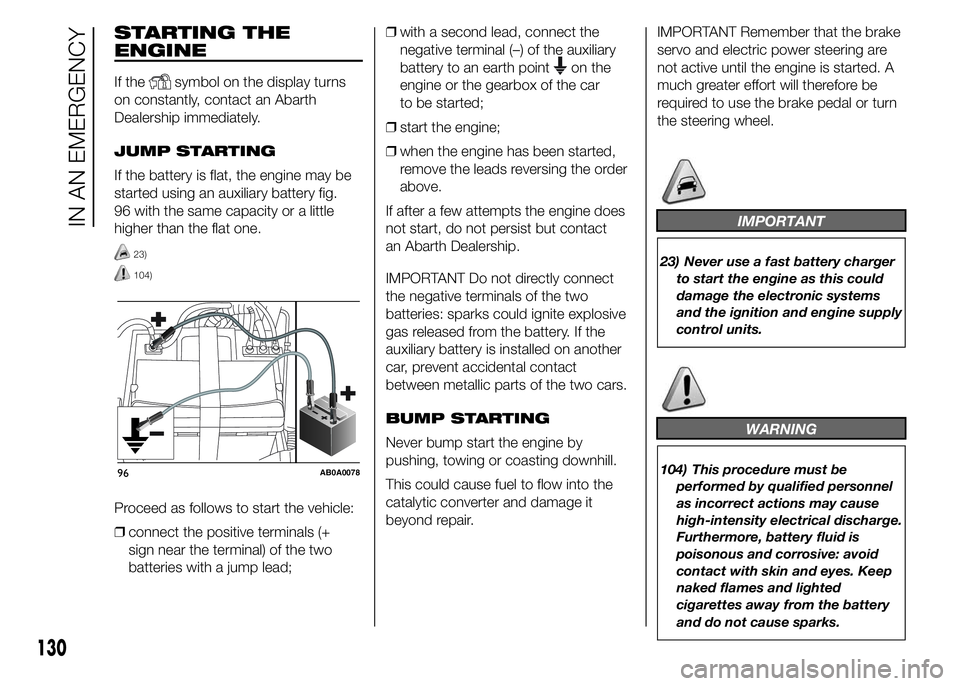
If the battery is flat, the engine may be
started using an auxiliary battery fig.
96 with the same capacity or a little
higher than the flat one.
23)
104)
Proceed as follows to start the vehicle:
❒connect the positive terminals (+
sign near the terminal) of the two
batteries with a jump lead;❒with a second lead, connect the
negative terminal (–) of the auxiliary
battery to an earth point
on the
engine or the gearbox of the car
to be started;
❒start the engine;
❒when the engine has been started,
remove the leads reversing the order
above.
If after a few attempts the engine does
not start, do not persist but contact
an Abarth Dealership.
IMPORTANT Do not directly connect
the negative terminals of the two
batteries: sparks could ignite explosive
gas released from the battery. If the
auxiliary battery is installed on another
car, prevent accidental contact
between metallic parts of the two cars.
BUMP STARTING
Never bump start the engine by
pushing, towing or coasting downhill.
This could cause fuel to flow into the
catalytic converter and damage it
beyond repair.IMPORTANT Remember that the brake
servo and electric power steering are
not active until the engine is started. A
much greater effort will therefore be
required to use the brake pedal or turn
the steering wheel.
IMPORTANT
23) Never use a fast battery charger
to start the engine as this could
damage the electronic systems
and the ignition and engine supply
control units.
WARNING
104) This procedure must be
performed by qualified personnel
as incorrect actions may cause
high-intensity electrical discharge.
Furthermore, battery fluid is
poisonous and corrosive: avoid
contact with skin and eyes. Keep
naked flames and lighted
cigarettes away from the battery
and do not cause sparks.96AB0A0078
130
IN AN EMERGENCY
Page 135 of 215

"Fix&Go Automatic"
kit
The kit (see fig. 97) in the luggage
compartment consists of:
❒a spray bottle A with the sealant,
equipped with filling pipe B,
separated by the compressor C;
❒compressor C with pressure gauge,
fitting valve to couple the bottle A,
cable with supply socket D and pipe
N to restore pressure (this is inside
the body as shown);
❒adhesive label under the spray bottle
A, with the message "max. 80 km/h"
to be placed where the driver can
easily see it (for example on the
dashboard) after repairing the tyre;
❒instruction booklet fig. 98, for using
the Fix&Go quickly and correctly;
❒a pair of protective gloves.
24)
105) 106) 107)
IMPORTANT
INFORMATION
The sealant of the Fix&Go kit is effective
at external temperatures of between
-20°C and +50°C.
The sealant has an expiry date.
108) 109)
2)
INFLATION PROCEDURE
110)
Proceed as follows:
❒engage the handbrake;
❒place the Fix&Go kit close to the tyre
to be repaired;
❒locate the fig. 100 filling pipe B
already connected to the spray bottle
A;
❒open the side lid E then connect the
spray bottle A to the fitting, following
the direction of the arrow;
❒undo the cap of the tyre valve F and
connect the filling pipe B, tightening
the relevant ring nut on the tyre valve;
❒make sure that the switch G fig. 101
is in position0(off), then start the
engine;
❒place the electric plug H fig. 102 in
the cigar lighter socket of the car
(12 V);
97AB0A0079
98AB0A0080
ON
OFF
99AB0A0081
131
Page 136 of 215

❒switch on the compressor, bringing
the switch G to position1(on);
❒inflate the tyre to the pressure
specified (see the "Cold tyre inflation
pressure" paragraph in the "Technical
specifications" chapter).IMPORTANT To get a more precise
reading, it is advisable to check the
value with compressor off.
❒if the pressure does not reach at least
1.5 bar in 5 minutes, switch the
compressor off and disconnect the
filling pipe B from the tyre valve, then
remove the plug H;
❒move the car by about 10 m, to
distribute the sealant inside the tyre,
then inflate again.
IMPORTANT If after this operation it is
still impossible after 5 minutes to reach
at least 1.5 bar, do not start driving
since the tyre is excessively damaged
and the Fix&Go kit cannot guarantee
proper seal; contact an Abarth
Dealership.
❒If the tyre was inflated to the
prescribed pressure, start driving
immediately.
111)
❒after having driven for about 10
minutes, stop, apply the handbrake
and recheck the tyre pressure.
112) 113)
100AB0A0083
101AB0A0084
102AB0A0085
132
IN AN EMERGENCY
Page 137 of 215
CHECKING AND
RESTORING TYRE
PRESSURE
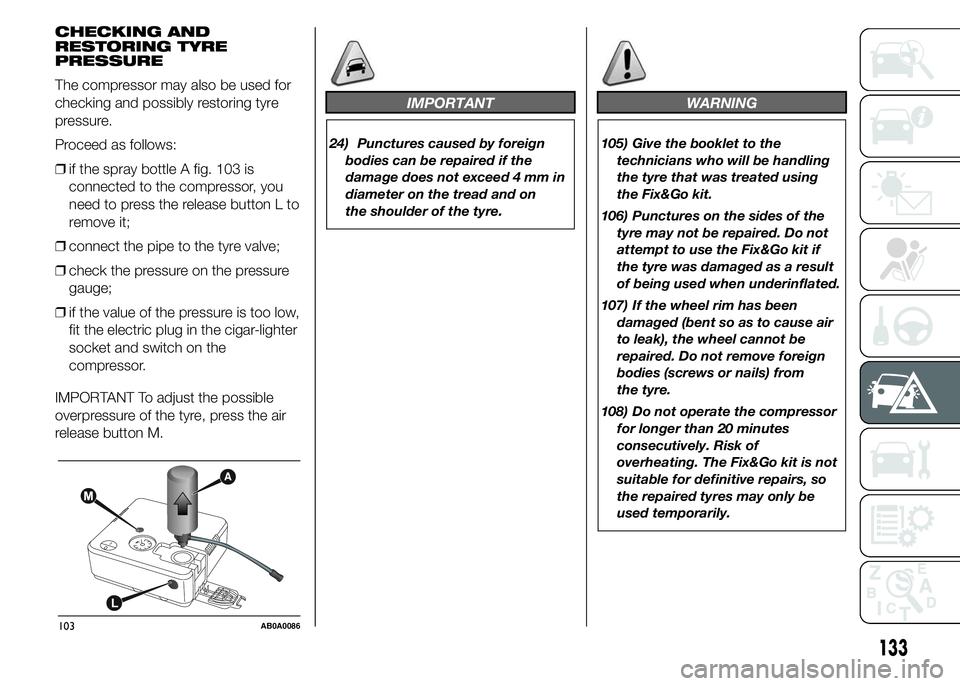
The compressor may also be used for
checking and possibly restoring tyre
pressure.
Proceed as follows:
❒if the spray bottle A fig. 103 is
connected to the compressor, you
need to press the release button L to
remove it;
❒connect the pipe to the tyre valve;
❒check the pressure on the pressure
gauge;
❒if the value of the pressure is too low,
fit the electric plug in the cigar-lighter
socket and switch on the
compressor.
IMPORTANT To adjust the possible
overpressure of the tyre, press the air
release button M.
IMPORTANT
24) Punctures caused by foreign
bodies can be repaired if the
damage does not exceed 4 mm in
diameter on the tread and on
the shoulder of the tyre
.
WARNING
105) Give the booklet to the
technicians who will be handling
the tyre that was treated using
the Fix&Go kit.
106) Punctures on the sides of the
tyre may not be repaired. Do not
attempt to use the Fix&Go kit if
the tyre was damaged as a result
of being used when underinflated.
107) If the wheel rim has been
damaged (bent so as to cause air
to leak), the wheel cannot be
repaired. Do not remove foreign
bodies (screws or nails) from
the tyre.
108) Do not operate the compressor
for longer than 20 minutes
consecutively. Risk of
overheating. The Fix&Go kit is not
suitable for definitive repairs, so
the repaired tyres may only be
used temporarily.
103AB0A0086
133
Page 138 of 215

109) The spray bottle contains
ethylene glycol. It contains latex
that might cause allergic
reactions. It is harmful if
swallowed. Eye irritant. It may
cause sensitisation if inhaled or
on contact. Avoid contact with
eyes, skin and clothes. In the case
of contact, wash immediately
with plenty of water. In the event
that it is swallowed, do not induce
vomiting. Rinse out your mouth,
drink large quantities of water and
seek immediate medical attention.
Keep out of the reach of children.
The product must not be used
by asthmatics. Do not inhale the
vapours during insertion and
suction. Call a doctor immediately
if allergic reactions are noted.
Store the spray bottle away from
heat sources. The sealant has
an expiry date.
110) Wear the protective gloves
provided with the Fix&Go kit.
111) Apply the adhesive label where
it can be easily seen by the driver
as a reminder that the tyre has
been treated with the Fix&Go kit.
Drive carefully, particularly on
bends. Do not exceed 80 km/h. Do
not accelerate or brake suddenly.112) If the pressure falls below 1.5
bar, do not drive any further: the
kit cannot guarantee proper seal
because the tyre is too damaged.
Contact an Abarth Dealership. If
instead a pressure value of at
least 1.5 bar is detected, restore
the correct pressure (with the
engine running and the
handbrake engaged), resume
driving and drive with great care
to the nearest Abarth Dealership.
113) You must always indicate that
the tyre was repaired using the
kit. Give the booklet to the
technicians who will be handling
the tyre that was treated using
the kit.
IMPORTANT
2) Replace the spray bottle
containing the sealant after the
expiry date. Dispose of the bottle
and the sealant properly. Have
them disposed of in compliance
with national and local
regulations.
134
IN AN EMERGENCY
Page 139 of 215

REPLACING A BULB
GENERAL
INSTRUCTIONS
❒Before replacing a bulb check the
contacts for oxidation;
❒burnt bulbs must be replaced by
others of the same type and power;
❒always check the headlight beam
alignment after replacing a bulb;
❒when a light is not working, check
that the corresponding fuse is intact
before replacing a bulb. For the
location of fuses, refer to the
paragraph "Replacing fuses" in this
chapter.
114) 115)
25) 26)
IMPORTANT When the weather is cold
or damp or after heavy rain or washing,
the surface of headlights or rear lights
may steam up and/or form drops of
condensation on the inside. This is
a natural phenomenon due to the
difference in temperature and humidity
between the inside and the outside
of the glass which does not indicate a
fault and does not compromise the
normal operation of lighting devices.
The mist disappears quickly when the
lights are turned on, starting from
the centre of the diffuser, extending
progressively towards the edges.
135
Page 140 of 215
TYPES OF BULBS
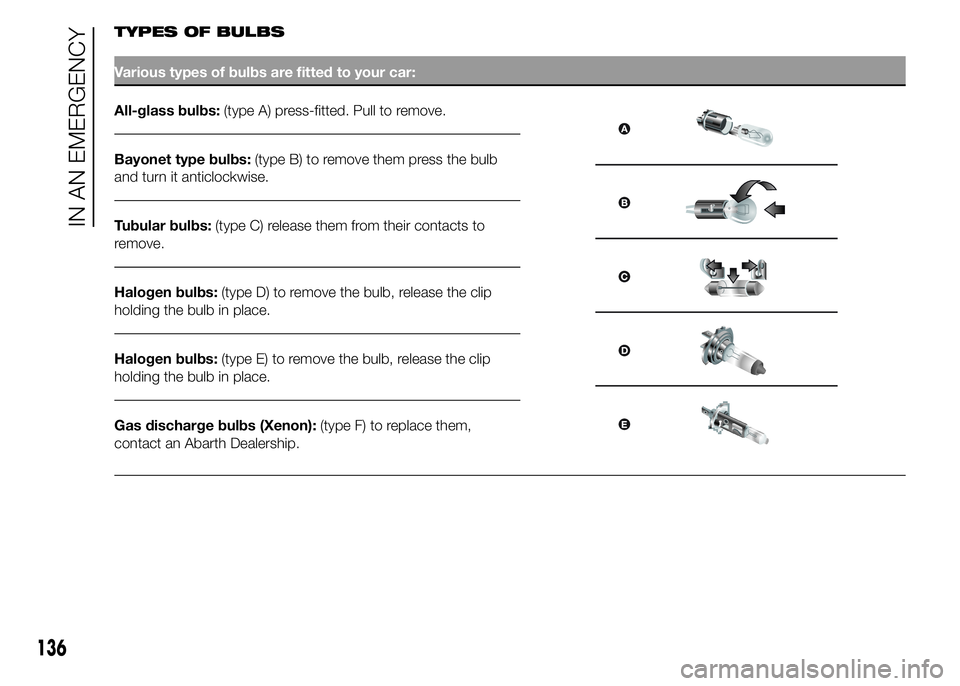
Various types of bulbs are fitted to your car:
All-glass bulbs:(type A) press-fitted. Pull to remove.
Bayonet type bulbs:(type B) to remove them press the bulb
and turn it anticlockwise.
Tubular bulbs:(type C) release them from their contacts to
remove.
Halogen bulbs:(type D) to remove the bulb, release the clip
holding the bulb in place.
Halogen bulbs:(type E) to remove the bulb, release the clip
holding the bulb in place.
Gas discharge bulbs (Xenon):(type F) to replace them,
contact an Abarth Dealership.
136
IN AN EMERGENCY