Abarth 500 2016 Owner handbook (in English)
Manufacturer: ABARTH, Model Year: 2016,
Model line: 500,
Model: Abarth 500 2016
Pages: 215, PDF Size: 19.08 MB
Abarth 500 2016 Owner handbook (in English)
500 2016
Abarth
Abarth
https://www.carmanualsonline.info/img/40/31143/w960_31143-0.png
Abarth 500 2016 Owner handbook (in English)
Trending: reset, coolant, jump start terminals, remote start, cooling, heater, set clock
Page 21 of 215
Backrest angle
adjustment
Turn knob B fig. 11 until the desired
position is reached.
Backrest folding
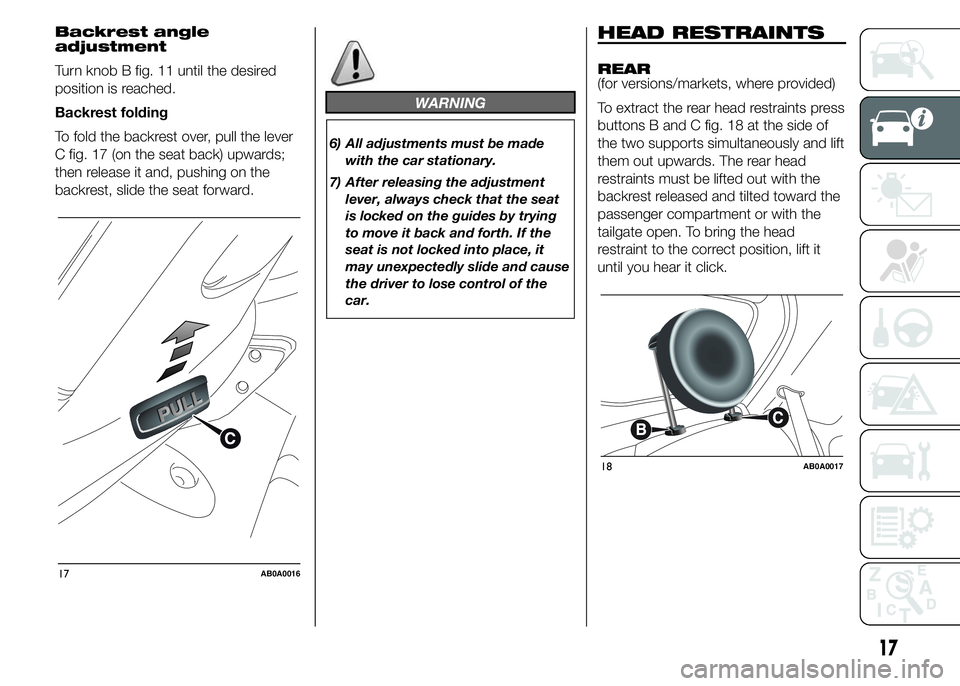
To fold the backrest over, pull the lever
C fig. 17 (on the seat back) upwards;
then release it and, pushing on the
backrest, slide the seat forward.
WARNING
6) All adjustments must be made
with the car stationary.
7) After releasing the adjustment
lever, always check that the seat
is locked on the guides by trying
to move it back and forth. If the
seat is not locked into place, it
may unexpectedly slide and cause
the driver to lose control of the
car.
HEAD RESTRAINTS
REAR
(for versions/markets, where provided)
To extract the rear head restraints press
buttons B and C fig. 18 at the side of
the two supports simultaneously and lift
them out upwards. The rear head
restraints must be lifted out with the
backrest released and tilted toward the
passenger compartment or with the
tailgate open. To bring the head
restraint to the correct position, lift it
until you hear it click.
17AB0A0016
18AB0A0017
17
Page 22 of 215
To lower the head restraint, press
button B fig. 18. The particular shape of
the head restraint deliberately interferes
with the correct support of the rear
passenger’s back on the backrest in
order to force them to lift the head
restraint for correct use.
IMPORTANT If the rear seats are used,
always set the head restraints in the
"completely raised" position.STEERING WHEEL
The steering wheel can be adjusted
vertically.
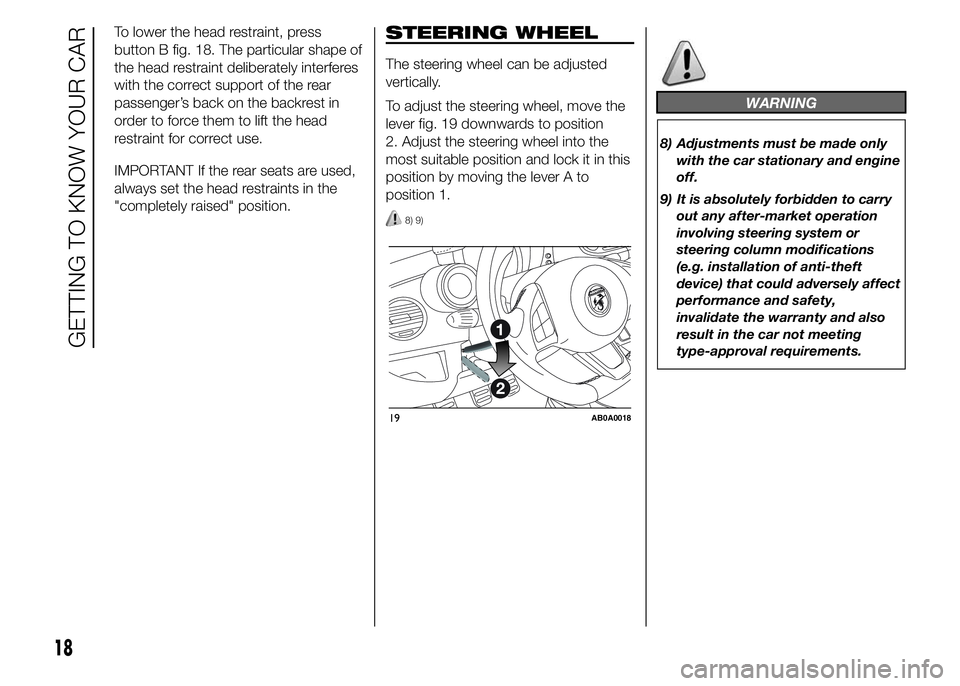
To adjust the steering wheel, move the
lever fig. 19 downwards to position
2. Adjust the steering wheel into the
most suitable position and lock it in this
position by moving the lever A to
position 1.
8) 9)
WARNING
8) Adjustments must be made only
with the car stationary and engine
off.
9) It is absolutely forbidden to carry
out any after-market operation
involving steering system or
steering column modifications
(e.g. installation of anti-theft
device) that could adversely affect
performance and safety,
invalidate the warranty and also
result in the car not meeting
type-approval requirements.
19AB0A0018
18
GETTING TO KNOW YOUR CAR
Page 23 of 215
REAR VIEW
MIRRORS
INTERIOR MIRROR
The mirror is fitted with a safety device
that causes its release in the event of
a violent impact with the passenger.
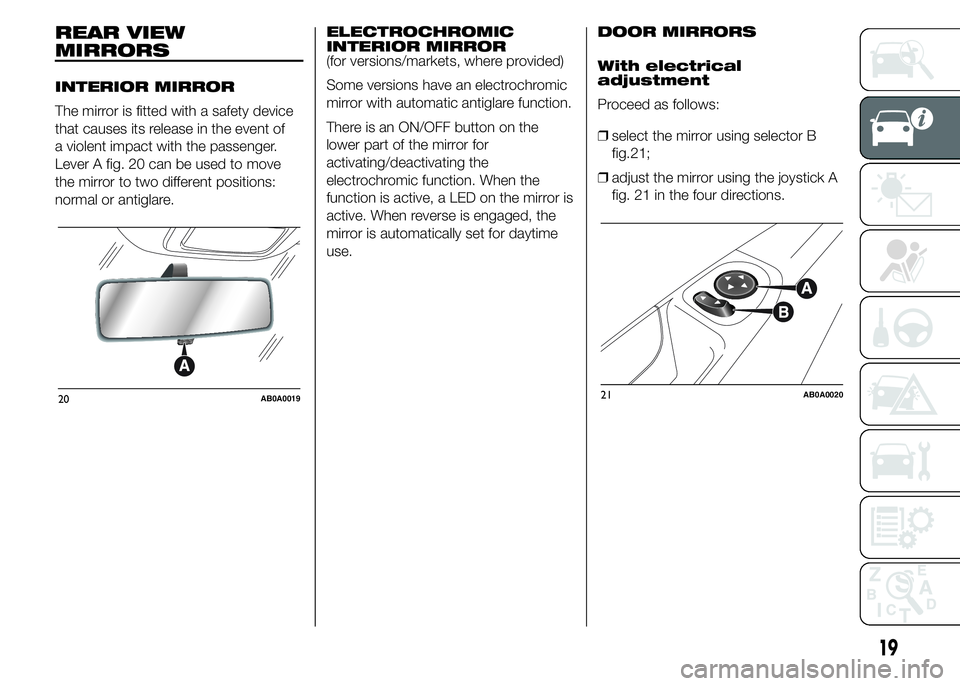
Lever A fig. 20 can be used to move
the mirror to two different positions:
normal or antiglare.ELECTROCHROMIC
INTERIOR MIRROR
(for versions/markets, where provided)
Some versions have an electrochromic
mirror with automatic antiglare function.
There is an ON/OFF button on the
lower part of the mirror for
activating/deactivating the
electrochromic function. When the
function is active, a LED on the mirror is
active. When reverse is engaged, the
mirror is automatically set for daytime
use.DOOR MIRRORS
With electrical
adjustment
Proceed as follows:
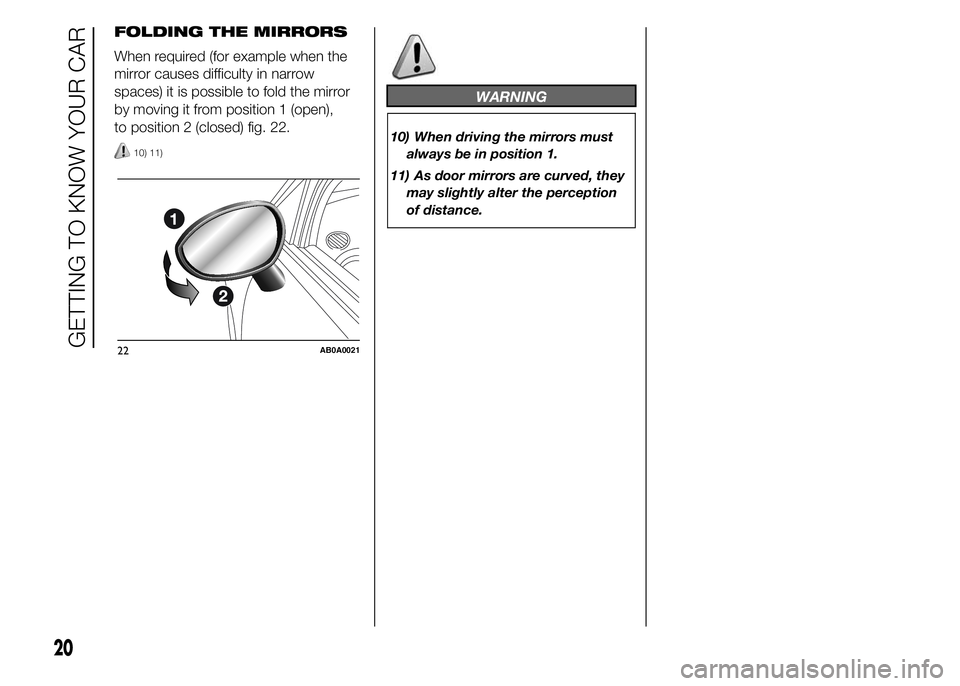
❒select the mirror using selector B
fig.
21;
❒adjust the mirror using the joystick A
fig. 21 in the four directions.
20AB0A001921AB0A0020
19
Page 24 of 215
FOLDING THE MIRRORS
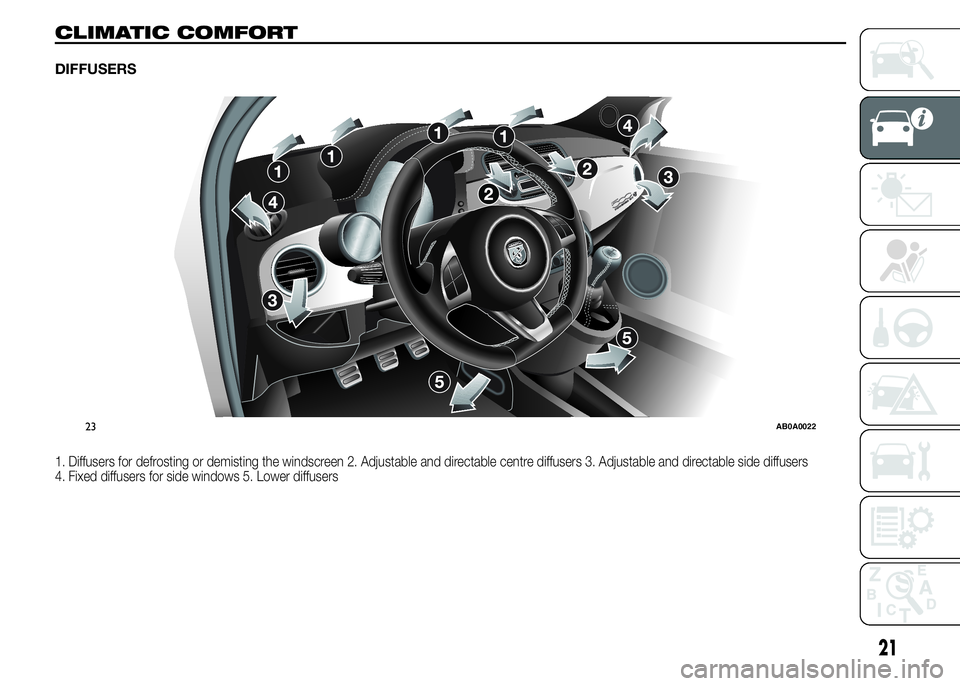
When required (for example when the
mirror causes difficulty in narrow
spaces) it is possible to fold the mirror
by moving it from position 1 (open),
to position 2 (closed) fig. 22.
10) 11)
WARNING
10) When driving the mirrors must
always be in position 1.
11) As door mirrors are curved, they
may slightly alter the perception
of distance.
22AB0A0021
20
GETTING TO KNOW YOUR CAR
Page 25 of 215
CLIMATIC COMFORT
DIFFUSERS
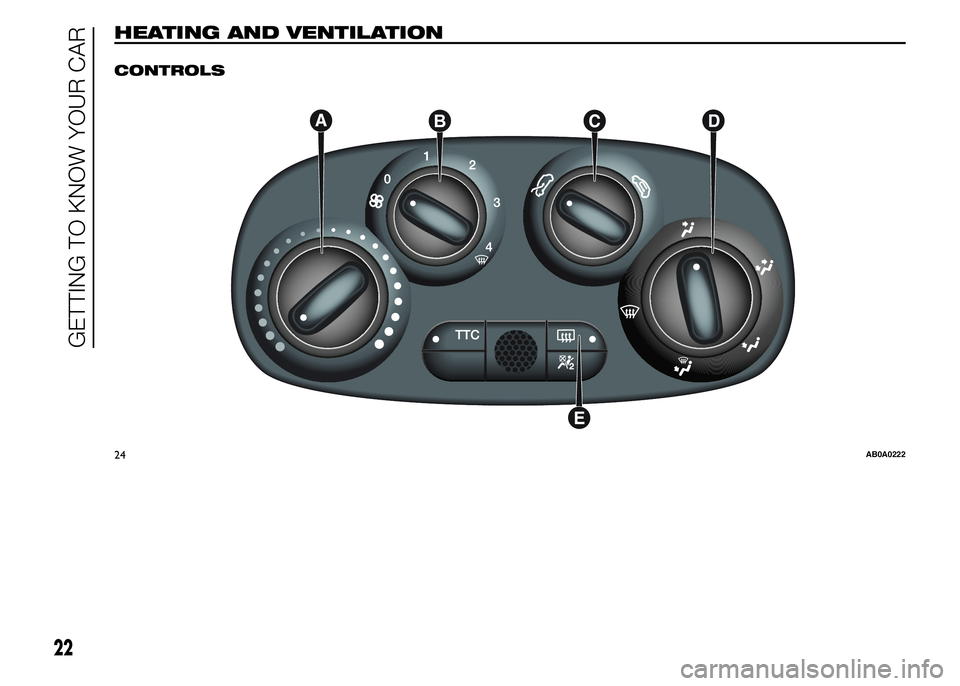
1. Diffusers for defrosting or demisting the windscreen 2. Adjustable and directable centre diffusers 3. Adjustable and directable side diffusers
4. Fixed diffusers for side windows 5. Lower diffusers
23AB0A0022
21
Page 26 of 215
HEATING AND VENTILATION.
CONTROLS
24AB0A0222
22
GETTING TO KNOW YOUR CAR
Page 27 of 215
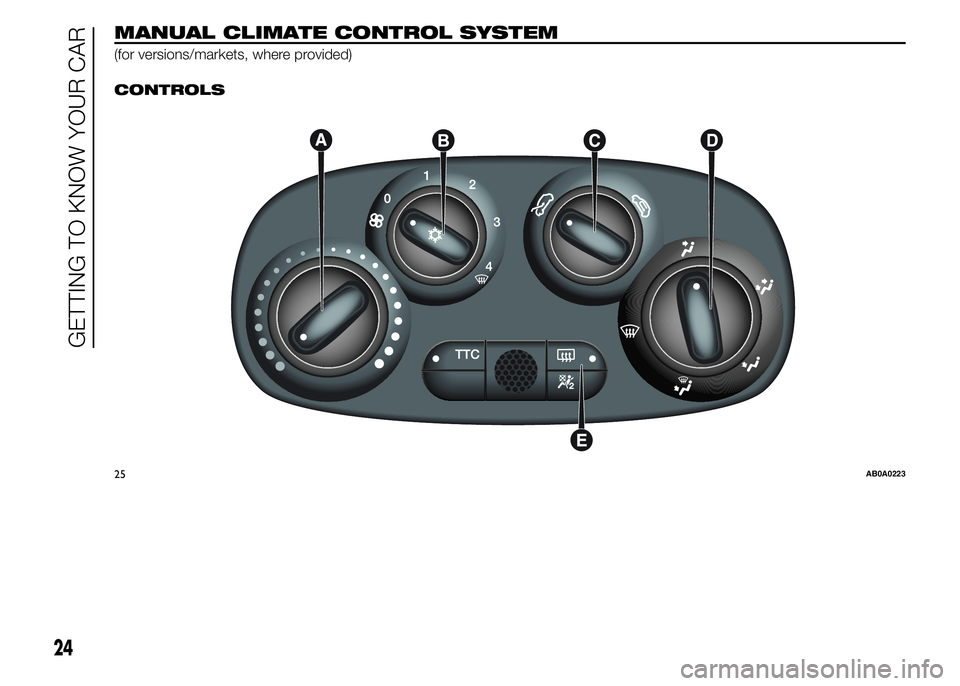
AAir temperature knob (red = hot,
blue = cold)
BFan speed knob
NoteTo stop the air flow from the
vents, turn the knob to 0.
CAir recirculation knob:(internal
air recirculation) or
(air intake
from outside)
IMPORTANT It is advisable to switch
the air recirculation on whilst queuing or
in tunnels to prevent the introduction
of polluted air. However, it is better not
to use the function for long periods,
particularly if there are many people on
board, to prevent the windows from
misting.
DAir distribution knob
toward the body and the side
windows
toward the body, the side windows
and the feet
toward the feet only
toward the feet and the windscreen
toward the windscreen only.
EHeated rear window activation/
deactivation button. The LED on the
button switches on to indicate
activation. In order to maintain battery
efficiency, the function is timed and
automatically deactivated after about
20 minutes.
Fast front window
demisting/defrosting
Proceed as follows:
❒turn knob A to the red section;
❒turn knob C to
;
❒turn knob D to
;
❒turn knob B to 4
(maximum fan
speed).
23
Page 28 of 215
MANUAL CLIMATE CONTROL SYSTEM
(for versions/markets, where provided).
CONTROLS
25AB0A0223
24
GETTING TO KNOW YOUR CAR
Page 29 of 215
AAir temperature knob (red = hot,
blue = cold) fig. 25
BFan speed and climate control
system activation/deactivation knob
fig. 25. Press the knob to activate the
climate control system; the LED on
the knob switches on. This enables
rapid cooling of the passenger
compartment.
NoteTo stop the air flow from the
vents, turn the knob to 0.
CAir recirculation knob fig. 25
internal air recirculation
air intake from outside
IMPORTANT It is advisable to switch
the air recirculation on whilst queuing or
in tunnels to prevent the introduction
of polluted air. However, it is better not
to use the function for long periods,
particularly if there are many people on
board, to prevent the windows from
misting.
DAir distribution knob fig. 25
towards the body and the side
windows
towards the body, the side
windows and the feet
towards the feet only
towards the feet and the
windscreen
towards the windscreen only
E
Heated rear window activation/
deactivation button fig. 25.
The LED on the button switches on to
indicate activation.
In order to maintain battery efficiency,
the function is automatically deactivated
after about 20 minutes.
Fast windscreen and
front side window
demisting/defrosting
(MAX-DEF)
Proceed as follows:
❒turn knob A to the red section;
❒turn knob C to
;
❒turn knob D to
;
❒turn knob B to 4
(maximum fan
speed).
IMPORTANT The climate control
system is very useful for speeding up
demisting since it dehumidifies the
air. Adjust the controls as described
above and press knob B to switch the
climate control system on: the LED
on the knob will light up.SYSTEM SERVICING
In winter, the climate control system
must be turned on at least once a
month for about 10 minutes. Have the
system inspected at an Abarth
Dealership before the summer.
25
Page 30 of 215
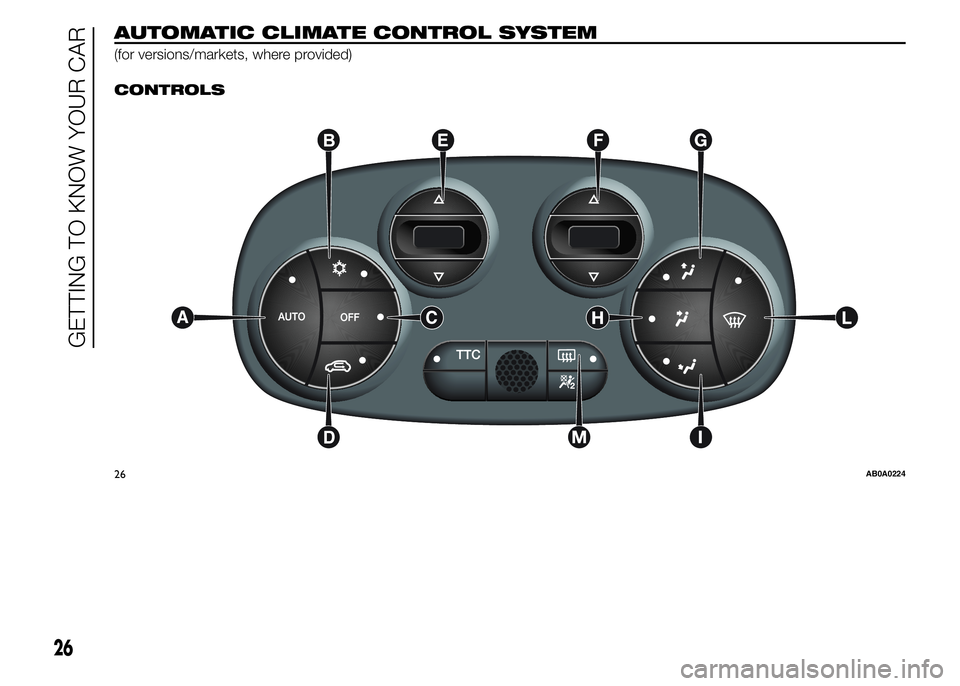
AUTOMATIC CLIMATE CONTROL SYSTEM
(for versions/markets, where provided).
CONTROLS
26AB0A0224
26
GETTING TO KNOW YOUR CAR
Trending: steering, deactivate airbag, oil additives, TPMS, check transmission fluid, traction control, length


