brake Abarth 500 2017 Owner handbook (in English)
[x] Cancel search | Manufacturer: ABARTH, Model Year: 2017, Model line: 500, Model: Abarth 500 2017Pages: 192, PDF Size: 6.46 MB
Page 62 of 192

Maximum assistance of the PBA
system is obtained pressing the brake
pedal very quickly; in addition, the
brake pedal should be pressed
continuously during braking, avoiding
intermittent presses, to obtain benefits
from the system.
Do not reduce pressure on the brake
pedal until braking is no longer
necessary.
The PBA system is deactivated when
the brake pedal is released.
62) 63) 64) 65)
TTC (Torque Transfer
Control) SYSTEM
It is an integral part of the ESC system.
This system improves the transfer of
drive torque to the wheels,
guaranteeing safer and more sporty
driving, especially when cornering, far
more able to prevent understeer.
Switching the system on
The system is activated by pressing the
button in the dashboard 1 fig. 49.
Activation is signalled by the LED in the
TTC button lighting up.
WARNING
39)When the ABS intervenes and you feel
the brake pedal pulsating, do not reduce
the pressure, but hold it down firmly and
confidently; in doing so you will brake
in the shortest distance possible,
depending on the current road conditions.
40)To obtain the maximum efficiency of
the braking system, a bedding-in period of
about 500 km is needed: during this period
it is better to avoid sharp, repeated and
prolonged braking.
41)If the ABS system intervenes, this
indicates that the traction of the tyres on
the road is about to reach its limit. You
must slow down to a speed.
42)The ABS cannot overrule the natural
laws of physics, and cannot increase
the grip available according to the
condition of the road.43)The ABS cannot prevent accidents,
including those due to excessive speed on
corners, driving on low-grip surfaces or
aquaplaning.
44)The capability of the ABS must never
be tested irresponsibly and dangerously, in
such a way as to compromise personal
safety and the safety of others.
45)For the correct operation of the ABS,
the tyres must of necessity be the same
make and type on all wheels, in perfect
condition and, above all, of the prescribed
type and dimensions.
46)If the space-saver wheel (where
provided) is used, the ABS system keeps
operating. Always remember that the
space-saver wheel, being smaller than the
original wheel, provides less grip.
47)The ABS gets the most from the
available grip, but it cannot improve it; you
should therefore take every care when
driving on slippery surfaces and not take
unnecessary risks.
48)For the correct operation of the ESC
system, the tyres must necessarily be
of the same make and type on all wheels,
in perfect condition and, above all, of
the prescribed type and size.
49)The ESC functions even when the
space-saver wheel is being used. Always
remember that the space-saver wheel,
being smaller than the original wheel,
provides less grip.
50)ESC performance features must not
induce the driver to take unnecessary
or unfounded risks. Your driving style must
always be suited to the road conditions,
visibility and traffic. The driver is always
responsible for road safety.
1
1
49AB0A0226C
60
SAFETY
Page 63 of 192

51)The ESC system cannot alter the
natural laws of physics, and cannot
increase grip, which depends on the
condition of the road.
52)The ESC system cannot prevent
accidents, including those due to excessive
speed on corners, driving on low-grip
surfaces or aquaplaning.
53)The capability of the ESC system must
never be tested irresponsibly and
dangerously, in such a way as to
compromise personal safety and the safety
of others.
54)The HH system is not a parking brake,
therefore do not leave the vehicle without
activating the handbrake, switching off
the engine, and engaging first gear, with
the vehicle parked in safe conditions.
55)There may be situations on small
gradients (less than 8%), with car laden or
a trailer attached to it (where provided),
in which the HH system may not activate,
causing a slight reversing motion and
increasing the risk of collision with another
vehicle or object. The driver is, in any
case, responsible for safe driving.
56)For the correct operation of the ASR
system, it is essential that the tyres are
of the same make and type on all wheels,
in perfect condition and, above all, of
the specified type and dimensions.
57)If the space-saver wheel (where
provided) is used, the ASR system keeps
operating. Always remember that the
space-saver wheel, being smaller than the
original wheel, provides less grip.58)The ASR cannot overrule the natural
laws of physics, and cannot increase
the grip available according to the
condition of the road.
59)The ASR system cannot prevent
accidents, including those due to excessive
speed on corners, driving on low-grip
surfaces or aquaplaning.
60)The capability of the ASR must never
be tested irresponsibly and dangerously, in
such a way as to compromise personal
safety and the safety of others.
61)Do not take unnecessary risks, even if
your vehicle is fitted with an ASR system.
Your driving style must always be suited to
the road conditions, visibility and traffic.
The driver is always responsible for road
safety.
62)The PBA system cannot increase tyre
grip on the road over the limits imposed by
laws of physics: always drive carefully
according to the conditions of the road
surface.
63)The PBA system cannot prevent
accidents, including those due to excessive
speed on bends, travelling on low-grip
surfaces or aquaplaning.
64)The PBA system is an aid for the driver,
who must always pay full attention while
driving. The responsibility always rests with
the driver.
65)The capability of the PBA system must
never be tested irresponsibly and
dangerously, in such a way as to
compromise the safety of the driver, the
other occupants of the vehicle or any other
road user.iTPMS System
(indirect Tyre
Pressure
Monitoring System)
(where provided)
DESCRIPTION
The vehicle can be equipped with the
iTPMS (indirect Tyre Pressure
Monitoring System) which monitors the
tyre inflation status thanks to wheel
speed sensors.
To access the iTPMS screens ( fig. 50 -
fig. 51), press the TRIP button.
The fig. 51 screen will be displayed only
if one or more tyres are flat.
Correct tyre pressure
If the pressure of all the tyres
corresponds to the correct value, the
display shows the fig. 50 screen.
50AB0A0123C
61
Page 84 of 192

STARTING THE
ENGINE
The car is fitted with an electronic
engine lock device: if the engine fails to
start, see the paragraph "Fiat CODE
system" in the "Knowing your car"
chapter.
PROCEDURE
Proceed as follows:
engage the handbrake and place
the gearbox lever in neutral;
fully depress the clutch pedal
without touching the accelerator;
turn the ignition key to AVV and
release it as soon as the engine starts.
If the engine does not start at the
first attempt, return the ignition key to
STOP before repeating the starting
procedure.
If, with key at MAR, the
symbol on
the display stays on together with
the
warning light on the instrument
panel, it is advisable to turn the key to
STOP and then back to MAR. If the
warning light remains on, try with the
other keys provided with the car.
Contact an Abarth Dealership if you still
cannot start the engine.
15) 16)
110) 111)
WARMING UP THE
ENGINE JUST AFTER IT
HAS STARTED
Proceed as follows:
drive off slowly, letting the engine
turn at medium revs. Do not accelerate
abruptly;
do not demand full performance at
first. It is advisable to wait until the
engine coolant temperature indicator
starts moving.
17)
SWITCHING OFF THE
ENGINE
Turn the ignition key to STOP while the
engine is idling.
IMPORTANT After a taxing drive, you
should allow the engine to "catch
its breath" before turning it off by letting
it idle to allow the temperature in the
engine compartment to fall.
18)
WARNING
15)It is advisable not to demand maximum
performance from your car (e.g. excessive
acceleration, long distances at maximum
rpm, excessively intense braking, etc.)
when it is first used.16)When the engine is switched off never
leave the key turned to MAR-ON to prevent
useless current absorption from draining
the battery.
17)Never, under any circumstances, jump
start the engine by pushing, towing or
coasting downhill. This could cause fuel to
flow into the catalytic converter and
damage it beyond repair.
18)A quick burst on the accelerator before
stopping the engine serves no practical
purpose; it wastes fuel and is especially
damaging to turbocharged engines.
WARNING
110)It is dangerous to run the engine in
enclosed areas. The engine takes in
oxygen and releases carbon dioxide,
carbon monoxide and other toxic gases.
111)Remember that the brake servo
and power steering are not operational until
the engine has been started, therefore
much effort than usual is required on the
brake pedal and steering wheel.
82
STARTING AND DRIVING
Page 85 of 192
PARKING THE
VEHICLE
When parking and leaving the car,
proceed as follows:
engage a gear (1st gear if facing
uphill or reverse if facing downhill) and
leave the wheels turned;
stop the engine and engage the
handbrake;
always remove the ignition key.
Block the wheels with a wedge or a
stone if the car is parked on a steep
slope.
On versions equipped with sequential
robotised transmission, wait for letter P
to be displayed before releasing the
brake pedal.
IMPORTANT NEVER leave the car with
the gearbox in neutral (or, on versions
equipped with sequential robotised
transmission, before placing the gear
lever at P).
112)
HANDBRAKE
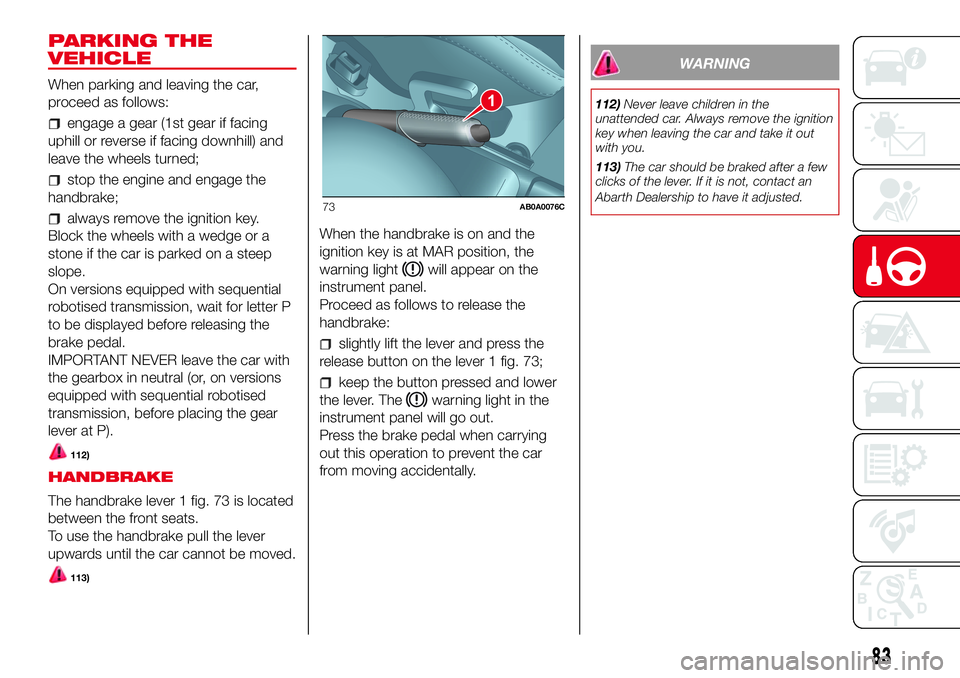
The handbrake lever 1 fig. 73 is located
between the front seats.
To use the handbrake pull the lever
upwards until the car cannot be moved.
113)
When the handbrake is on and the
ignition key is at MAR position, the
warning light
will appear on the
instrument panel.
Proceed as follows to release the
handbrake:
slightly lift the lever and press the
release button on the lever 1 fig. 73;
keep the button pressed and lower
the lever. The
warning light in the
instrument panel will go out.
Press the brake pedal when carrying
out this operation to prevent the car
from moving accidentally.
WARNING
112)Never leave children in the
unattended car. Always remove the ignition
key when leaving the car and take it out
with you.
113)The car should be braked after a few
clicks of the lever. If it is not, contact an
Abarth Dealership to have it adjusted.1
73AB0A0076C
83
Page 87 of 192
STARTING THE CAR
REMARKS
On starting, the system sets itself to
AUTO mode.
Using the 1, N, R buttons with the
brake pedal pressed, 1stgear, neutral
(N) or reverse (R) can be engaged.
Using the 1, N, R buttons without
pressing the brake pedal, the system
does not change gear.
The levers on the steering wheel will
not engage any gear, even with the
brake pedal pressed.
If the car is switched off with SPORT
or NORMAL modes active, the mode
previously set is kept when the engine
is restarted.
OPERATING MODE
The gearbox/transmission can function
in two operating modes:
the first is manual (MANUAL). In this
mode the driver decides directly when
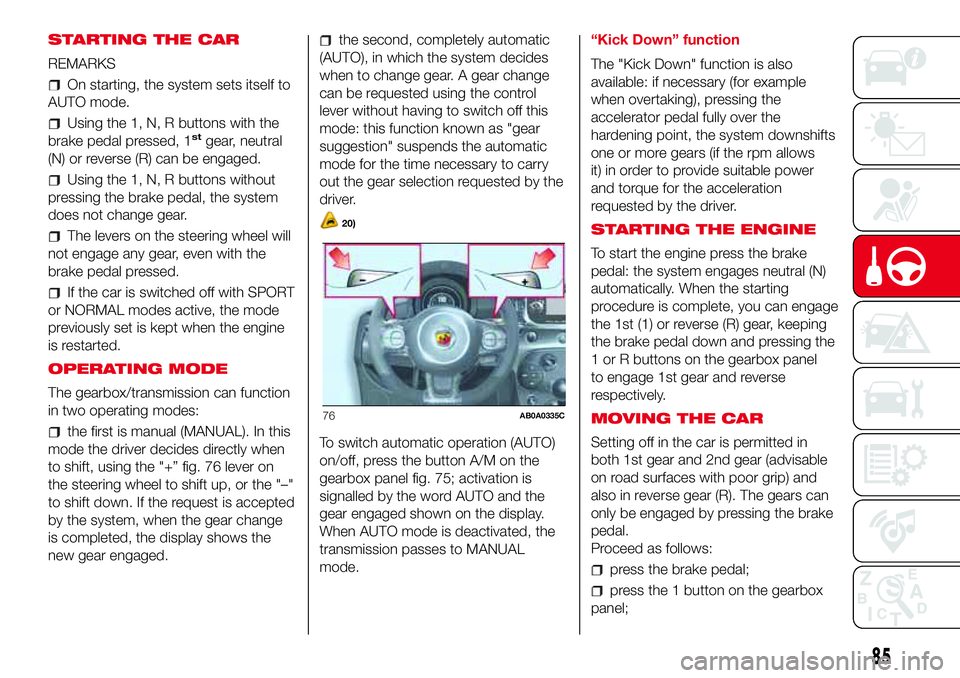
to shift, using the "+” fig. 76 lever on
the steering wheel to shift up, or the "–"
to shift down. If the request is accepted
by the system, when the gear change
is completed, the display shows the
new gear engaged.
the second, completely automatic
(AUTO), in which the system decides
when to change gear. A gear change
can be requested using the control
lever without having to switch off this
mode: this function known as "gear
suggestion" suspends the automatic
mode for the time necessary to carry
out the gear selection requested by the
driver.
20)
To switch automatic operation (AUTO)
on/off, press the button A/M on the
gearbox panel fig. 75; activation is
signalled by the word AUTO and the
gear engaged shown on the display.
When AUTO mode is deactivated, the
transmission passes to MANUAL
mode.“Kick Down” function
The "Kick Down" function is also
available: if necessary (for example
when overtaking), pressing the
accelerator pedal fully over the
hardening point, the system downshifts
one or more gears (if the rpm allows
it) in order to provide suitable power
and torque for the acceleration
requested by the driver.
STARTING THE ENGINE
To start the engine press the brake
pedal: the system engages neutral (N)
automatically. When the starting
procedure is complete, you can engage
the 1st (1) or reverse (R) gear, keeping
the brake pedal down and pressing the
1 or R buttons on the gearbox panel
to engage 1st gear and reverse
respectively.
MOVING THE CAR
Setting off in the car is permitted in
both 1st gear and 2nd gear (advisable
on road surfaces with poor grip) and
also in reverse gear (R). The gears can
only be engaged by pressing the brake
pedal.
Proceed as follows:
press the brake pedal;
press the 1 button on the gearbox
panel;
76AB0A0335C
85
Page 88 of 192
operate the “+” lever on the steering
wheel keeping the brake pedal
depressed (only for setting off in 2nd
gear);
release the brake pedal and press
the accelerator pedal (fully depressing
the pedal quickly to its end of travel and
switching off the ASR, if fitted, results
in a “lively” departure).
Engaging reverse (R)
To engage reverse gear, press the R
button on the gearbox panel instead of
the 1 button. When reverse is engaged,
the system emits an acoustic signal.
Engaging neutral (N)
Press the (N) button to engage neutral.
Neutral (N) can only be engaged with
accelerator pedal released, regardless
of the brake pedal’s state (pressed
or not). In any case, pressing the brake
pedal is recommended.
ACOUSTIC SIGNAL
For safety reasons, there is a buzzer
warning when parking the car with the
gearbox in neutral (N) (the warning is
heard when the ignition key is turned to
the STOP position).
With the car stationary, the engine
started and (1st), (2nd) or (R)
gear engaged, the system activates the
acoustic signal and automatically
places the transmission in neutral (N)
when:
the accelerator and/or brake pedal
are not operated for at least 3 minutes;
the brake pedal is pressed for longer
than 10 minutes;
the driver's door is opened and the
accelerator pedal or the brake pedal
are not operated for at least 1.5
seconds;
a fault has been detected in the
transmission.
PARKING THE CAR
The 1st or reverse gear must be
engaged with the foot on the brake
pedal and, if on a slope, the handbrake
must be operated in order to park
safely. Wait until the indication of the
gear engaged disappears on the
display before releasing the brake
pedal.
IMPORTANT NEVER leave the car with
the gearbox in neutral (N).
IMPORTANT NOTES
With car stationary and gear
engaged, always keep the brake pedal
pressed until you decide to set off,
then release the brake and accelerate
gradually.
During prolonged stops with the
engine running, it is advisable to keep
the gearbox in neutral (N).
In order to safeguard the efficiency
of the clutch, do not use the
accelerator to keep the car stationary
(e.g. when stopped on an incline); if the
clutch overheats it could be damaged.
Use the brake pedal or the handbrake
instead and use the accelerator pedal
only when you decide to set off.
Only use 2nd gear when you need
greater control when setting off for
manoeuvres on surfaces with poor grip.
If, with reverse gear (R) engaged,
you have to engage 1st gear or vice
versa, only do this when the car is
completely stationary and with
the brake pedal pressed.
Although it is strongly unadvisable, if
you are driving downhill and, for
unexpected reasons, you let the car
move forward with the transmission in
neutral (N), when there is a request
to engage a gear, depending on the
actual speed of the car, the system will
automatically engage the best gear
for the correct transmission of drive
torque to the wheels.
86
STARTING AND DRIVING
Page 89 of 192
When necessary, it is possible to
engage 1st gear, reverse (R) or neutral
(N) with the engine off, the key at
MAR-ON and the brake pressed. In this
case, it is advisable to change allowing
at least 5 seconds to elapse between
one gear change and the next to
safeguard the operation of the hydraulic
system and the pump in particular.
Fully and quickly depressing the
accelerator pedal activates a function
that allows a "lively" departure.
For departures on a hill, accelerating
gradually but fully immediately after
having released the handbrake or the
brake pedal allows the engine to greatly
increase the rpm and tackle the
steepest gradients with more torque to
the wheels.
WARNING
20)Using the levers incorrectly (levers
pushed towards the dashboard) could
break them.
SPORT FUNCTION
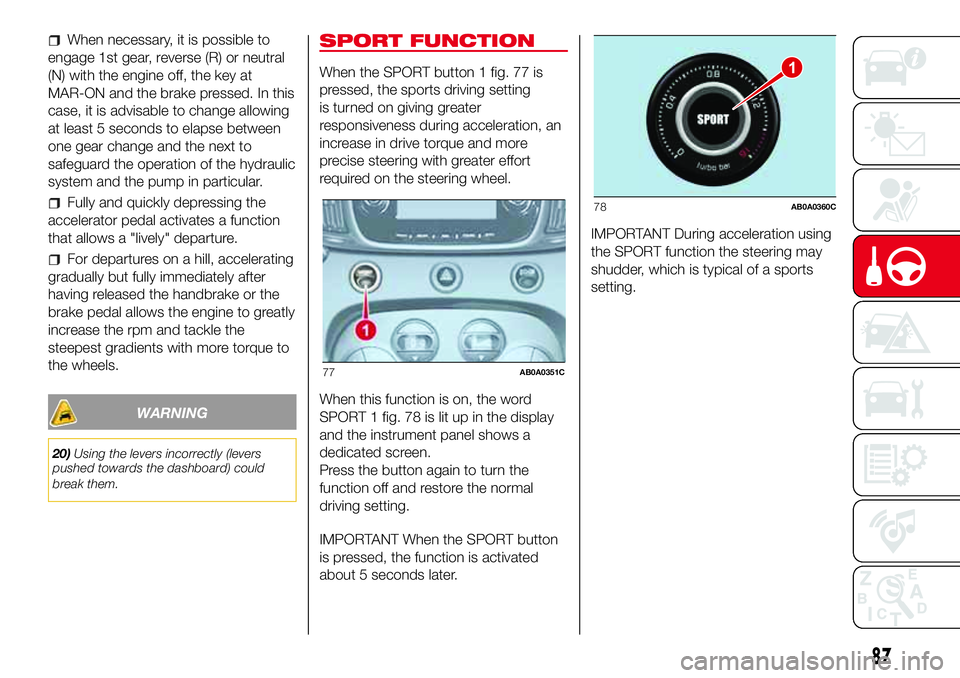
When the SPORT button 1 fig. 77 is
pressed, the sports driving setting
is turned on giving greater
responsiveness during acceleration, an
increase in drive torque and more
precise steering with greater effort
required on the steering wheel.
When this function is on, the word
SPORT 1 fig. 78 is lit up in the display
and the instrument panel shows a
dedicated screen.
Press the button again to turn the
function off and restore the normal
driving setting.
IMPORTANT When the SPORT button
is pressed, the function is activated
about 5 seconds later.IMPORTANT During acceleration using
the SPORT function the steering may
shudder, which is typical of a sports
setting.
77AB0A0351C
1
78AB0A0360C
87
Page 92 of 192
TOWING TRAILERS
IMPORTANT NOTES
For towing caravans or trailers the
vehicle must be fitted with an approved
tow hook and an adequate electrical
system. Installation should be carried
out by specialised personnel who
will issue the required papers for
travelling on roads.
Install any specific and/or additional
door mirrors as specified by the
Highway Code.
Remember that, when towing a trailer,
steep hills are harder to climb, braking
distances increase and overtaking
takes longer depending on the overall
weight of the trailer.
Engage a low gear when driving
downhill, rather than constantly using
the brake.
The weight the trailer exerts on the
vehicle tow hook reduces the vehicle's
loading capacity by the same amount.
To make sure that the maximum
towable weight is not exceeded (given
in the vehicle registration document)
account should be taken of the fully
laden trailer, including accessories and
luggage.
Respect the speed limits specific to
each country for vehicles towing
trailers.In any case, the top speed must not
exceed 100 km/h.117) 118)
WARNING
117)The ABS with which the car is
equipped will not control the braking
system of the trailer. Particular caution is
required on slippery roads.
118)Never modify the braking system of
the vehicle to control the trailer brake. The
trailer braking system must be fully
independent of the car’s hydraulic system.
90
STARTING AND DRIVING
Page 96 of 192
Light bulbs
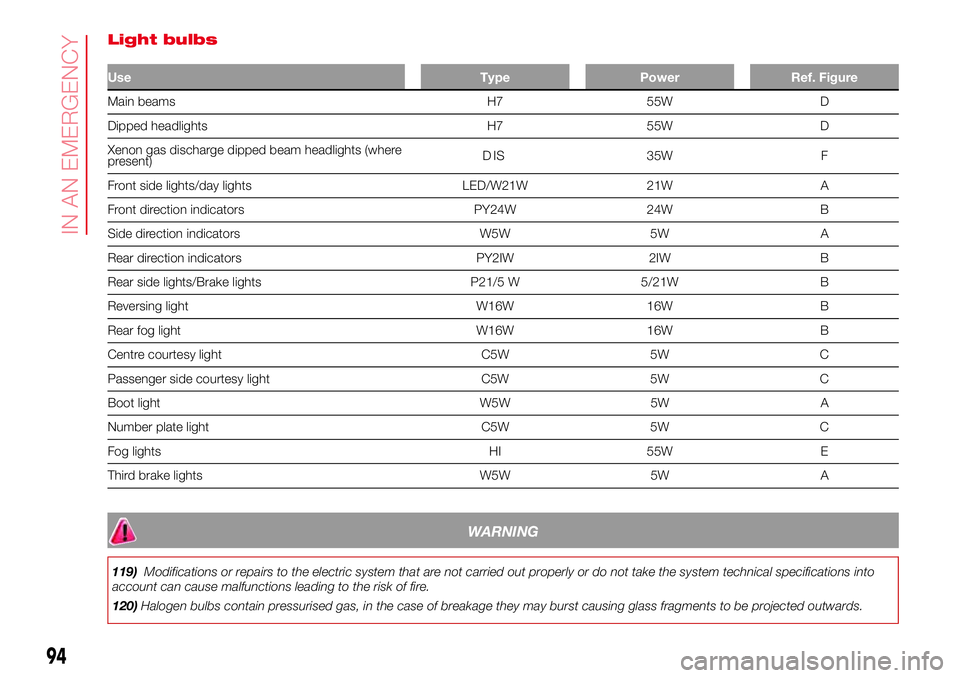
Use Type Power Ref. Figure
Main beams H7 55W D
Dipped headlights H7 55W D
Xenon gas discharge dipped beam headlights (where
present)DSI 35W F
Front side lights/day lights LED/W21W 21W A
Front direction indicators PY24W 24W B
Side direction indicators W5W 5W A
Rear direction indicators PY2IW 2IW B
Rear side lights/Brake lights P21/5 W 5/21W B
Reversing light W16W 16W B
Rear fog light W16W 16W B
Centre courtesy light C5W 5W C
Passenger side courtesy light C5W 5W C
Boot light W5W 5W A
Number plate light C5W 5W C
Fog lights HI 55W E
Third brake lights W5W 5W A
WARNING
119)Modifications or repairs to the electric system that are not carried out properly or do not take the system technical specifications into
account can cause malfunctions leading to the risk of fire.
120)Halogen bulbs contain pressurised gas, in the case of breakage they may burst causing glass fragments to be projected outwards.
94
IN AN EMERGENCY
Page 100 of 192
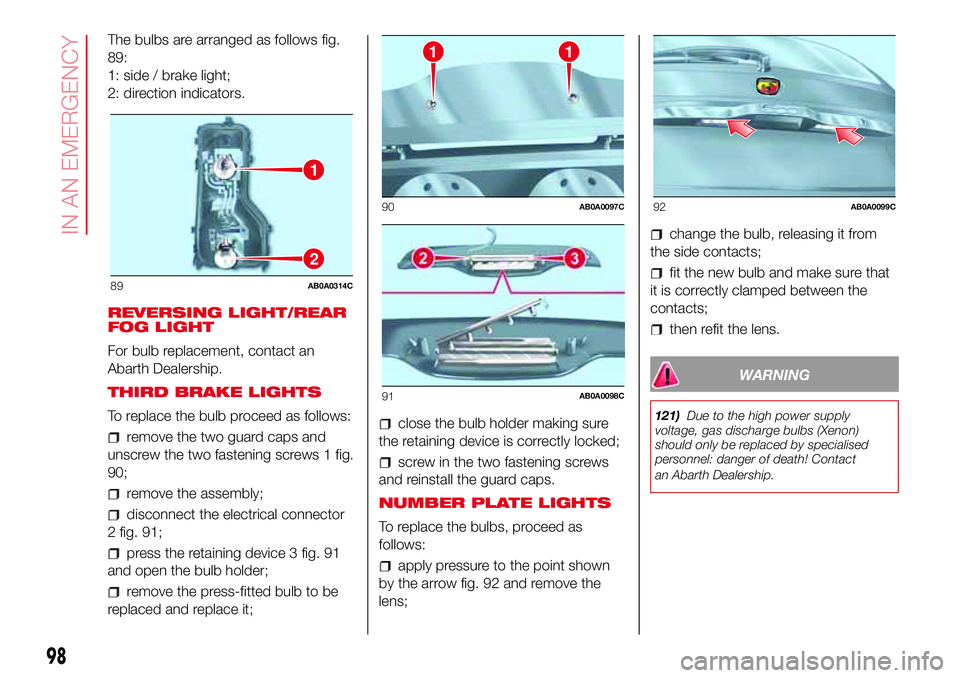
The bulbs are arranged as follows fig.
89:
1: side / brake light;
2: direction indicators.
REVERSING LIGHT/REAR
FOG LIGHT
For bulb replacement, contact an
Abarth Dealership.
THIRD BRAKE LIGHTS
To replace the bulb proceed as follows:
remove the two guard caps and
unscrew the two fastening screws 1 fig.
90;
remove the assembly;
disconnect the electrical connector
2 fig. 91;
press the retaining device 3 fig. 91
and open the bulb holder;
remove the press-fitted bulb to be
replaced and replace it;
close the bulb holder making sure
the retaining device is correctly locked;
screw in the two fastening screws
and reinstall the guard caps.
NUMBER PLATE LIGHTS
To replace the bulbs, proceed as
follows:
apply pressure to the point shown
by the arrow fig. 92 and remove the
lens;
change the bulb, releasing it from
the side contacts;
fit the new bulb and make sure that
it is correctly clamped between the
contacts;
then refit the lens.
WARNING
121)Due to the high power supply
voltage, gas discharge bulbs (Xenon)
should only be replaced by specialised
personnel: danger of death! Contact
an Abarth Dealership.
1
2
89AB0A0314C
11
90AB0A0097C
91AB0A0098C
92AB0A0099C
98
IN AN EMERGENCY