roof Abarth 500 2020 Owner handbook (in English)
[x] Cancel search | Manufacturer: ABARTH, Model Year: 2020, Model line: 500, Model: Abarth 500 2020Pages: 196, PDF Size: 3.53 MB
Page 107 of 196
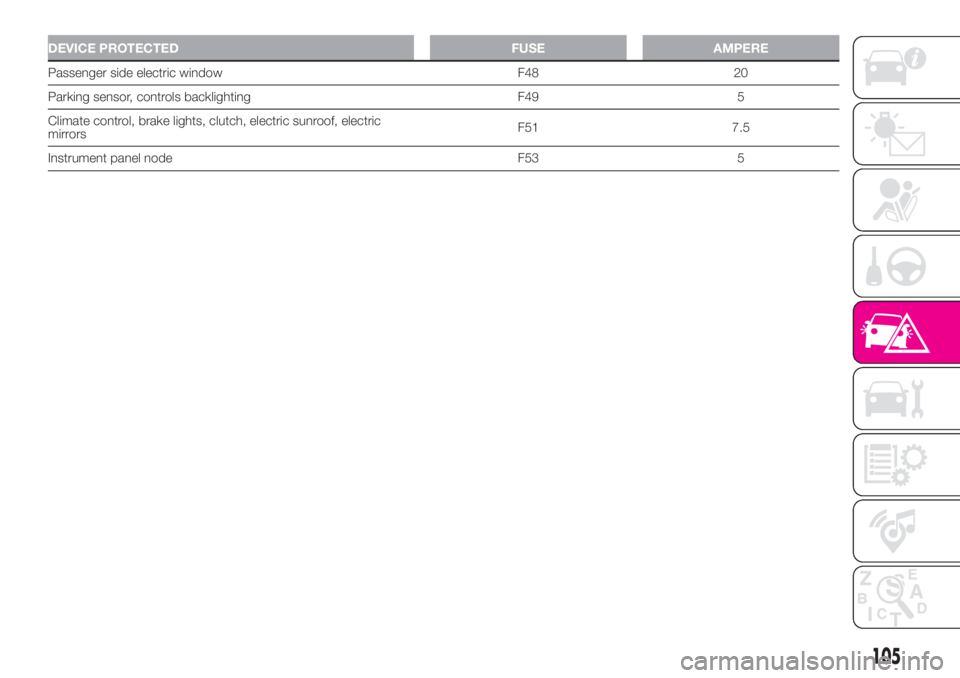
DEVICE PROTECTED FUSE AMPERE
Passenger side electric window F48 20
Parking sensor, controls backlighting F49 5
Climate control, brake lights, clutch, electric sunroof, electric
mirrorsF51 7.5
Instrument panel node F53 5
105
Page 108 of 196

ENGINE COMPARTMENT JUNCTION BOX
DEVICE PROTECTEDFUSE AMPERE
HI-FIF02 20
Climate control electric fanF08 30
Headlight washersF09 30
HornsF10 10
Main-beam headlightsF14
10/15
(*)
Electric roof motorF15 20
(*) Only for versions equipped with Xenon gas discharge lamps
99AB0A0319C
106
IN AN EMERGENCY
Page 127 of 196
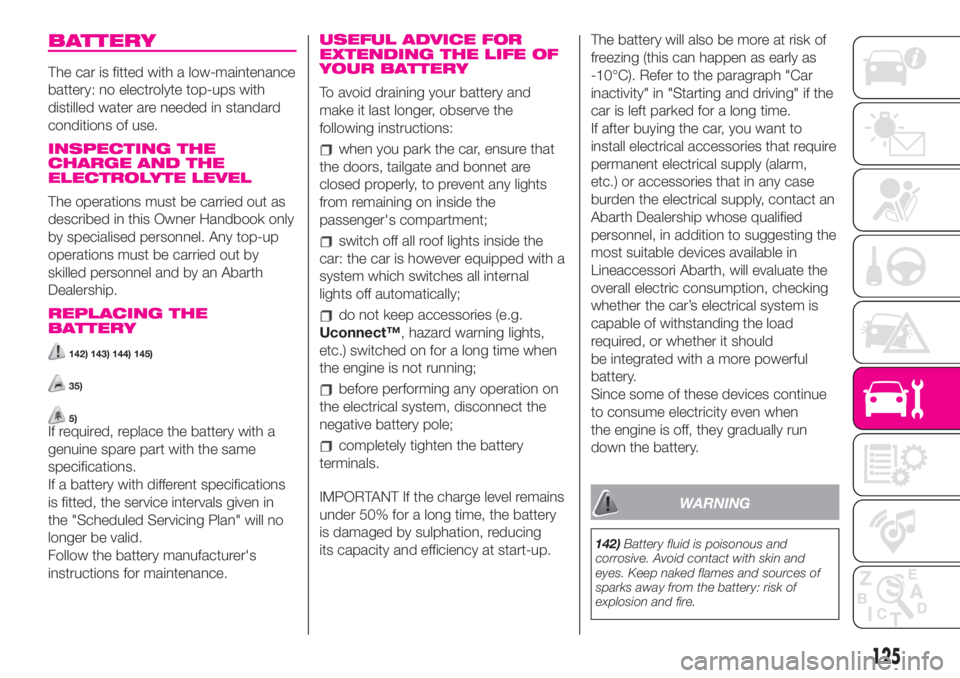
BATTERY
The car is fitted with a low-maintenance
battery: no electrolyte top-ups with
distilled water are needed in standard
conditions of use.
INSPECTING THE
CHARGE AND THE
ELECTROLYTE LEVEL
The operations must be carried out as
described in this Owner Handbook only
by specialised personnel. Any top-up
operations must be carried out by
skilled personnel and by an Abarth
Dealership.
REPLACING THE
BATTERY
142) 143) 144) 145)
35)
5)If required, replace the battery with a
genuine spare part with the same
specifications.
If a battery with different specifications
is fitted, the service intervals given in
the "Scheduled Servicing Plan" will no
longer be valid.
Follow the battery manufacturer's
instructions for maintenance.
USEFUL ADVICE FOR
EXTENDING THE LIFE OF
YOUR BATTERY
To avoid draining your battery and
make it last longer, observe the
following instructions:
when you park the car, ensure that
the doors, tailgate and bonnet are
closed properly, to prevent any lights
from remaining on inside the
passenger's compartment;
switch off all roof lights inside the
car: the car is however equipped with a
system which switches all internal
lights off automatically;
do not keep accessories (e.g.
Uconnect™, hazard warning lights,
etc.) switched on for a long time when
the engine is not running;
before performing any operation on
the electrical system, disconnect the
negative battery pole;
completely tighten the battery
terminals.
IMPORTANT If the charge level remains
under 50% for a long time, the battery
is damaged by sulphation, reducing
its capacity and efficiency at start-up.The battery will also be more at risk of
freezing (this can happen as early as
-10°C). Refer to the paragraph "Car
inactivity" in "Starting and driving" if the
car is left parked for a long time.
If after buying the car, you want to
install electrical accessories that require
permanent electrical supply (alarm,
etc.) or accessories that in any case
burden the electrical supply, contact an
Abarth Dealership whose qualified
personnel, in addition to suggesting the
most suitable devices available in
Lineaccessori Abarth, will evaluate the
overall electric consumption, checking
whether the car’s electrical system is
capable of withstanding the load
required, or whether it should
be integrated with a more powerful
battery.
Since some of these devices continue
to consume electricity even when
the engine is off, they gradually run
down the battery.
WARNING
142)Battery fluid is poisonous and
corrosive. Avoid contact with skin and
eyes. Keep naked flames and sources of
sparks away from the battery: risk of
explosion and fire.
125
Page 129 of 196

WINDSCREEN /
REAR WINDOW
WIPERS
BLADES
Replace the blades if the rubber edge is
deformed or worn. In any case, it is
advisable to replace them
approximately once a year.
148)
A few simple precautions can reduce
the possibility of damage to the blades:
if the temperature falls below zero,
make sure that ice has not frozen
the rubber to the glass. Use a de-icing
product to release it if required;
remove any snow from the glass: in
addition to protecting the blades, this
prevents effort on the motor and
overheating;
do not operate the windscreen and
rear window wipers on dry glass.
REPLACING THE
WINDSCREEN WIPER
BLADES
Proceed as follows:
lift up the windscreen wiper arm 1
fig. 111 and position the blade so that it
forms a 90° angle with the arm;
press the button 1 and extract the
blade 3 from the arm 2;
insert the new blade making sure it
is locked into place.
REPLACING THE REAR
WINDOW WIPER BLADE
Proceed as follows:
raise the cover 1 fig. 112 and
remove the arm from the car, undoing
the nut 2 fig. 112 that fixes it to the
pivot pin;
correctly position the new arm and
tighten the nut fully;
lower the cover.
NOZZLES
Windscreen washer
If there is no jet, first check that there is
fluid in the reservoir (see the "Checking
fluid levels" paragraph in this chapter).
Then check that the nozzle holes are
not clogged; use a needle to unblock
them if necessary.The screen washer jets can be oriented
by adjusting the nozzle angles.
The jets should be directed at about
1/3 of the height from the top edge of
the windscreen fig. 113.
IMPORTANT In versions with a sunroof,
make sure that the sunroof is closed
before operating the front jets.
111AB0A0112C
112AB0A0113C
113AB0A0114C
127
Page 131 of 196
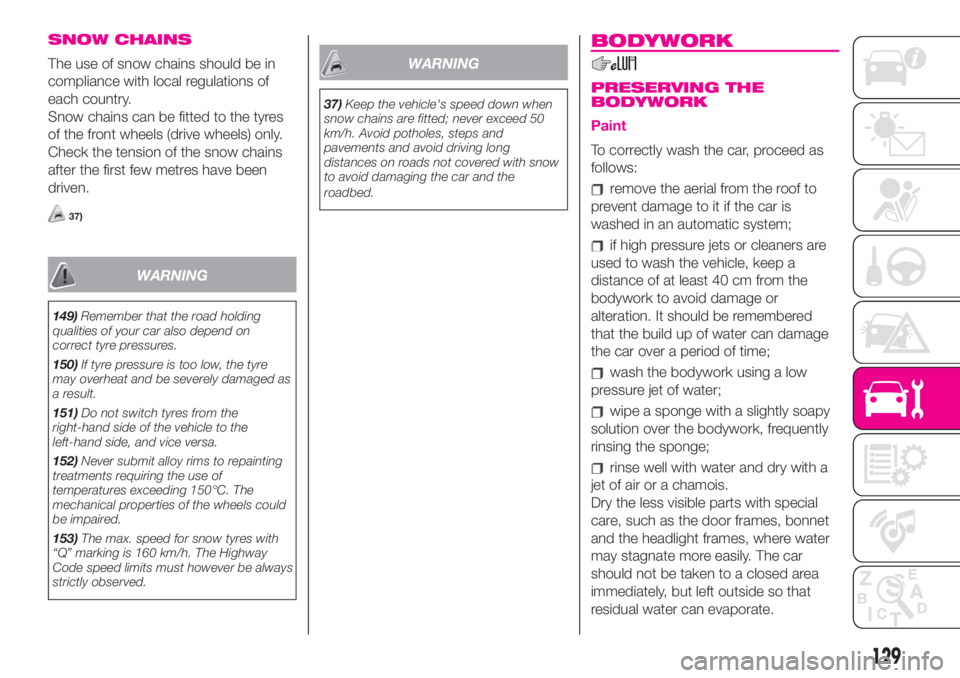
SNOW CHAINS
The use of snow chains should be in
compliance with local regulations of
each country.
Snow chains can be fitted to the tyres
of the front wheels (drive wheels) only.
Check the tension of the snow chains
after the first few metres have been
driven.
37)
WARNING
149)Remember that the road holding
qualities of your car also depend on
correct tyre pressures.
150)If tyre pressure is too low, the tyre
may overheat and be severely damaged as
a result.
151)Do not switch tyres from the
righthand side of the vehicle to the
lefthand side, and vice versa.
152)Never submit alloy rims to repainting
treatments requiring the use of
temperatures exceeding 150°C. The
mechanical properties of the wheels could
be impaired.
153)The max. speed for snow tyres with
“Q” marking is 160 km/h. The Highway
Code speed limits must however be always
strictly observed.
WARNING
37)Keep the vehicle's speed down when
snow chains are fitted; never exceed 50
km/h. Avoid potholes, steps and
pavements and avoid driving long
distances on roads not covered with snow
to avoid damaging the car and the
roadbed.
BODYWORK
PRESERVING THE
BODYWORK
Paint
To correctly wash the car, proceed as
follows:
remove the aerial from the roof to
prevent damage to it if the car is
washed in an automatic system;
if high pressure jets or cleaners are
used to wash the vehicle, keep a
distance of at least 40 cm from the
bodywork to avoid damage or
alteration. It should be remembered
that the build up of water can damage
the car over a period of time;
wash the bodywork using a low
pressure jet of water;
wipe a sponge with a slightly soapy
solution over the bodywork, frequently
rinsing the sponge;
rinse well with water and dry with a
jet of air or a chamois.
Dry the less visible parts with special
care, such as the door frames, bonnet
and the headlight frames, where water
may stagnate more easily. The car
should not be taken to a closed area
immediately, but left outside so that
residual water can evaporate.
129
Page 133 of 196

Washing and cleaning the soft top
Use of specific products is
recommended for washing the soft top
cloth.
The soft top fabric is treated with a
special water-repellent, waterproof
product. The water-repellent properties
will degrade in time with exposure to
the weather elements.
43) 44) 45) 46) 47)
Remove as much dirt from the surface
of the soft top with a soft brush or
vacuum cleaning before washing it. This
operation will considerably improve
the final result.
In lack of specific products, use water
and mild soap applied with a sponge
(preferably in the shade) for washing.
Rinse the soft top with clean water after
having eliminated all the stains.
Hand washing is recommended;
modern automatic washing systems
equipped with soft brushes which
do not apply excessive pressure and
employ specific soft top products may
be used.
48)
Leave the car in the shade after
washing avoiding direct sunlight.
Waterproofing the top
Use specific waterproofing products for
fabric soft-tops.
49) 50)
Interior top fabric
Remove dust with a soft brush. Avoid
using hard brushes made of synthetic
material to prevent damaging the fabric
beyond repair.
Clean the surface with a microfiber
cloth or soft sponge dipped in a
solution of water and mild soap. Clean
the entire surface, including the zones
where cleaning is not needed, to
prevent staining.
Use common, car care mild stain
removers for more stubborn stains.
Apply by blotting (never rubbing)
directly on the area of the stain.
WARNING
6)Detergents pollute the environment.
Only wash your vehicle in areas equipped
to collect and treat wastewater from this
type of activity.
WARNING
38)Avoid washing with rollers and/or
brushes in washing stations. Then, wash
the vehicle, only by hand, using pH-neutral
detergents; dry it with a wet chamois
leather. In order to preserve the aesthetic
appearance of the paint, abrasive products
and/or polishes should not be used for
cleaning the vehicle.
39)Bird droppings must be washed off
immediately and thoroughly as the acid
they contain is particularly aggressive.
40)Avoid (if at all possible) parking the
vehicle under trees; remove vegetable
resins immediately as, when dried, it may
only be possible to remove them with
abrasive products and/or polishes, which is
highly inadvisable as they could alter the
typical opaqueness of the paint.
41)It is not advisable to wash with
pressure washer or, in case of use, it is
necessary to maintain at least a minimum
distance of 40 cm with water at room
temperature.
42)Do not use pure windscreen washer
fluid for cleaning the front windscreen and
rear window - dilute it at least 50% with
water.
43)Bird droppings and plant resins must
be washed off immediately and thoroughly
as the acid they contain is particularly
aggressive.
44)Never use high-pressure washing
systems.
131
Page 134 of 196
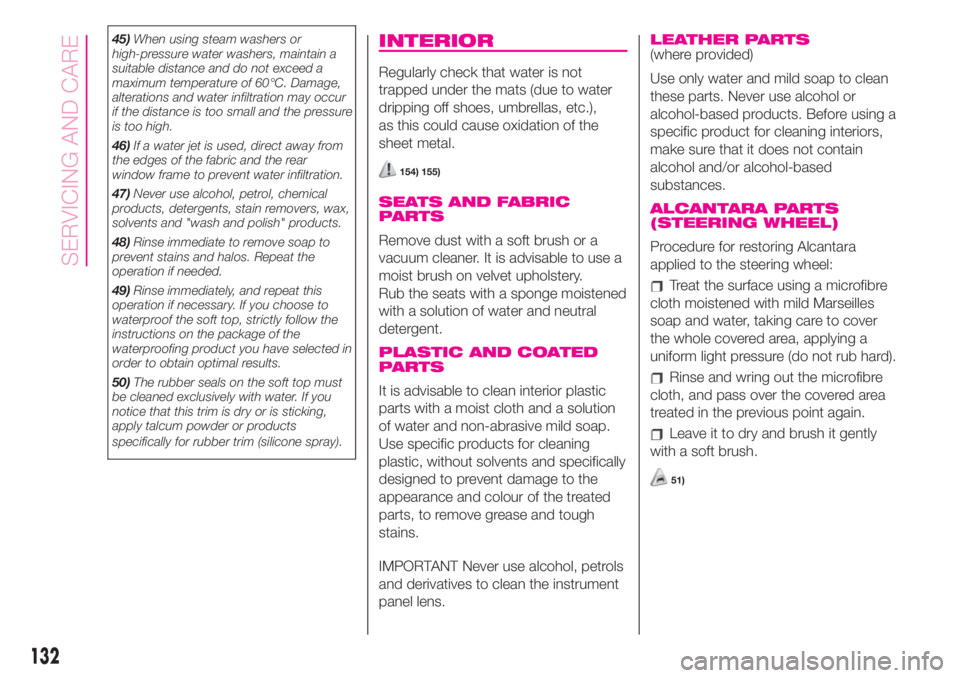
45)When using steam washers or
high-pressure water washers, maintain a
suitable distance and do not exceed a
maximum temperature of 60°C. Damage,
alterations and water infiltration may occur
if the distance is too small and the pressure
is too high.
46)If a water jet is used, direct away from
the edges of the fabric and the rear
window frame to prevent water infiltration.
47)Never use alcohol, petrol, chemical
products, detergents, stain removers, wax,
solvents and "wash and polish" products.
48)Rinse immediate to remove soap to
prevent stains and halos. Repeat the
operation if needed.
49)Rinse immediately, and repeat this
operation if necessary. If you choose to
waterproof the soft top, strictly follow the
instructions on the package of the
waterproofing product you have selected in
order to obtain optimal results.
50)The rubber seals on the soft top must
be cleaned exclusively with water. If you
notice that this trim is dry or is sticking,
apply talcum powder or products
specifically for rubber trim (silicone spray).INTERIOR
Regularly check that water is not
trapped under the mats (due to water
dripping off shoes, umbrellas, etc.),
as this could cause oxidation of the
sheet metal.
154) 155)
SEATS AND FABRIC
PARTS
Remove dust with a soft brush or a
vacuum cleaner. It is advisable to use a
moist brush on velvet upholstery.
Rub the seats with a sponge moistened
with a solution of water and neutral
detergent.
PLASTIC AND COATED
PARTS
It is advisable to clean interior plastic
parts with a moist cloth and a solution
of water and non-abrasive mild soap.
Use specific products for cleaning
plastic, without solvents and specifically
designed to prevent damage to the
appearance and colour of the treated
parts, to remove grease and tough
stains.
IMPORTANT Never use alcohol, petrols
and derivatives to clean the instrument
panel lens.
LEATHER PARTS(where provided)
Use only water and mild soap to clean
these parts. Never use alcohol or
alcohol-based products. Before using a
specific product for cleaning interiors,
make sure that it does not contain
alcohol and/or alcohol-based
substances.
ALCANTARA PARTS
(STEERING WHEEL)
Procedure for restoring Alcantara
applied to the steering wheel:
Treat the surface using a microfibre
cloth moistened with mild Marseilles
soap and water, taking care to cover
the whole covered area, applying a
uniform light pressure (do not rub hard).
Rinse and wring out the microfibre
cloth, and pass over the covered area
treated in the previous point again.
Leave it to dry and brush it gently
with a soft brush.
51)
132
SERVICING AND CARE
Page 142 of 196
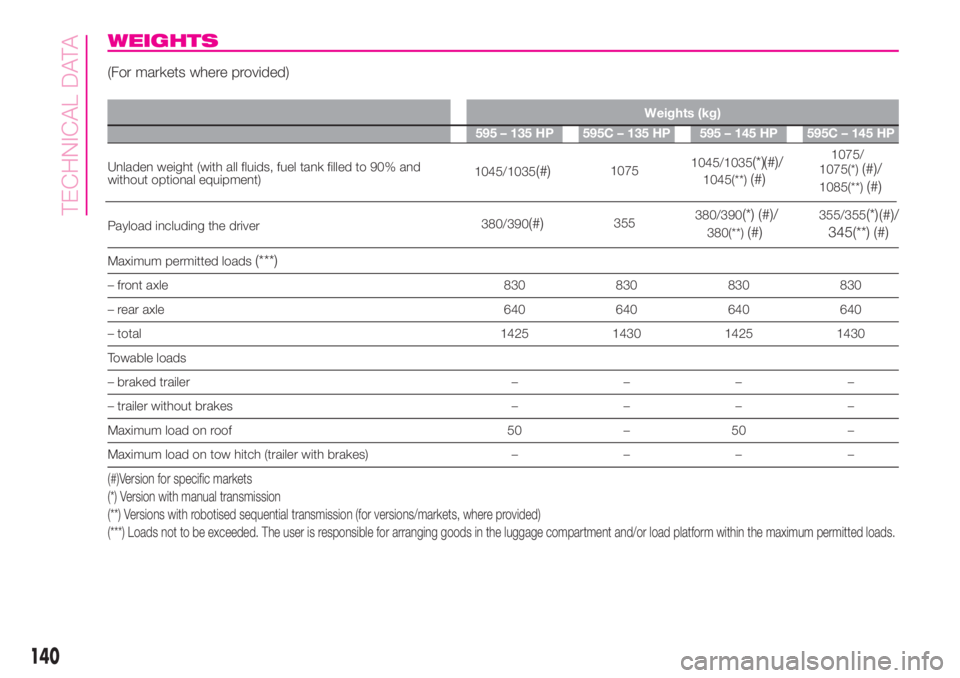
WEIGHTS
(For markets where provided)
Weights (kg)
595 – 135 HP 595C – 135 HP 595 – 145 HP 595C – 145 HP
Unladen weight (with all fluids, fuel tank filled to 90% and
without optional equipment)
Payload including the driver
Maximum permitted loads
(***)
– front axle 830 830 830 830
– rear axle 640 640 640 640
– total 1425 1430 1425 1430
Towable loads
– braked trailer––––
– trailer without brakes––––
Maximum load on roof 50 – 50 –
Maximum load on tow hitch (trailer with brakes)––––
(#)Version for specific markets
(*) Version with manual transmission
(**) Versions with robotised sequential transmission (for versions/markets, where provided)
(***) Loads not to be exceeded. The user is responsible for arranging goods in the luggage compartment and/or load platform within the maximum permitted loads.
140
TECHNICAL DATA
1045/1035(#)10751045/1035(*)
(#)/
1045(**)(#)
1075/
1075(*)(#)/
1085(**)(#)
380/390(#)355380/390(*) (#)/
380(**)(#)
355/355(*)
(#)/
345(**) (#)
Page 143 of 196
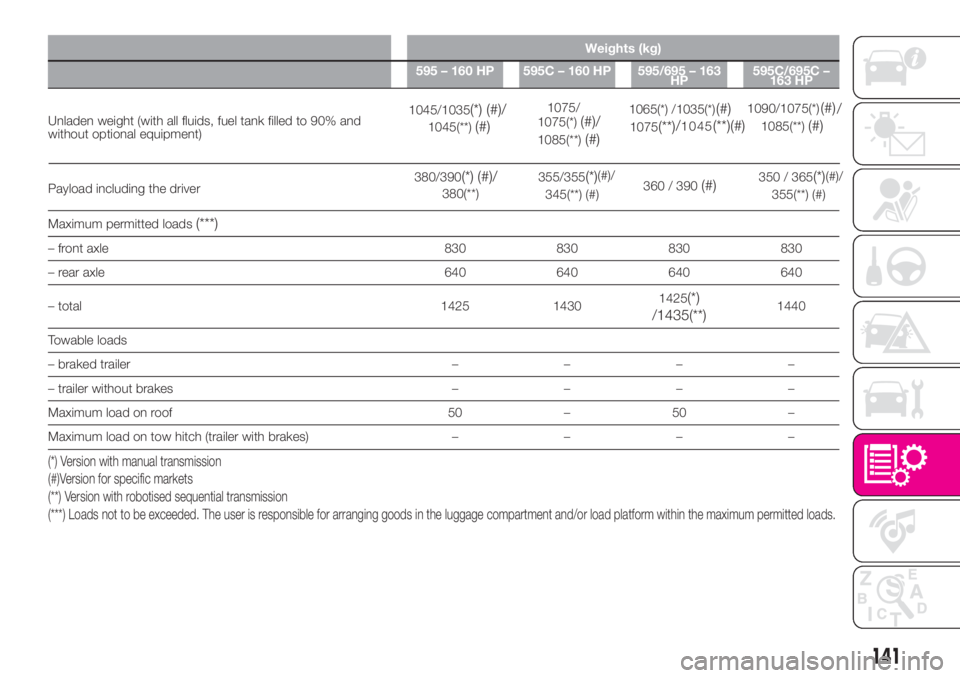
Weights (kg)
595 – 160 HP 595C – 160 HP595/695 – 163
HP595C/695C –
163 HP
Unladen weight (with all fluids, fuel tank filled to 90% and
without optional equipment)
Payload including the driver
Maximum permitted loads
(***)
– front axle 830 830 830 830
– rear axle 640 640 640 640
– total 1425 14301425
(*)
/1435(**)1440
Towable loads
– braked trailer––––
– trailer without brakes––––
Maximum load on roof 50 – 50 –
Maximum load on tow hitch (trailer with brakes)––––
(*) Version with manual transmission
(#)Version for specific markets
(**) Version with robotised sequential transmission
(***) Loads not to be exceeded. The user is responsible for arranging goods in the luggage compartment and/or load platform within the maximum permitted loads.
141
1045/1035(*) (#)
/
1045(**)(#)
1075/
1075(*)(#)/
1085(**)(#)
1065(*) /1035(*)(#)
1075(**)/1045(**)(#)
1090/1075(*)(#)
/
1085(**)(#)
380/390(*) (#)/
380(**)355/355
(*)(#)/
345(**) (#)360 / 390(#)350 / 365(*)(#)/
355(**) (#)
Page 144 of 196
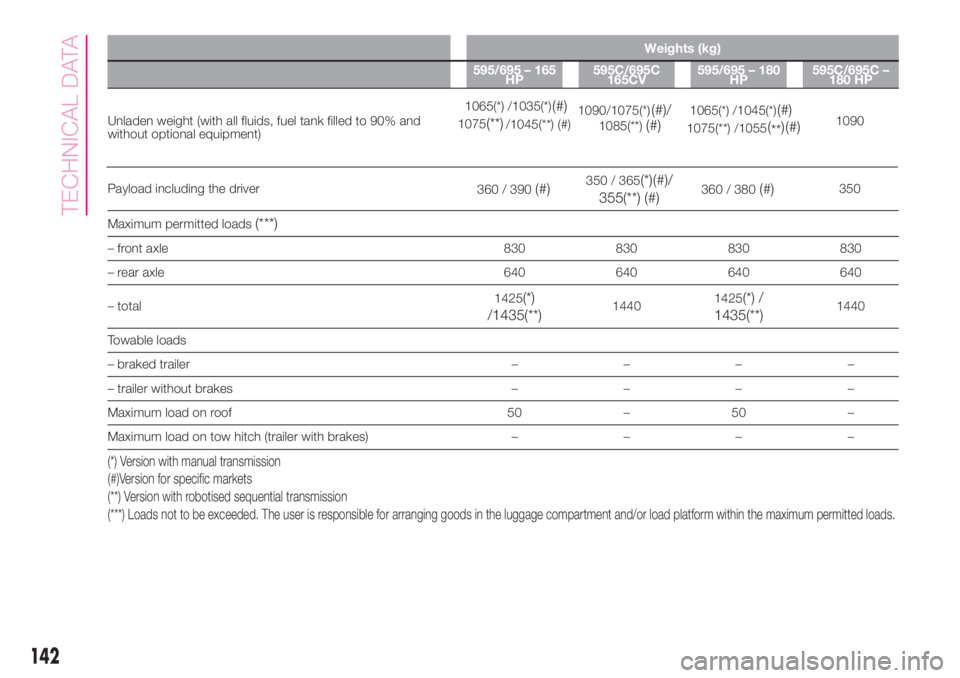
Weights (kg)
595/695 – 165
HP595C/695C
165CV595/695 – 180
HP595C/695C –
180 HP
Unladen weight (with all fluids, fuel tank filled to 90% and
without optional equipment)
Payload including the driver
Maximum permitted loads
(***)
– front axle 830 830 830 830
– rear axle 640 640 640 640
– total1425
(*)
/1435(**)14401425(*) /
1435(**)1440
Towable loads
– braked trailer––––
– trailer without brakes––––
Maximum load on roof 50 – 50 –
Maximum load on tow hitch (trailer with brakes)––––
(*) Version with manual transmission
(#)Version for specific markets
(**) Version with robotised sequential transmission
(***) Loads not to be exceeded. The user is responsible for arranging goods in the luggage compartment and/or load platform within the maximum permitted loads.
142
TECHNICAL DATA
1065(*) /1035(*)(#)
1075(**)/1045(**) (#)1090/1075(*)(#)
/1085(**)(#)1065(*) /1045(*)(#)
1075(**) /1055(
**) (#)1090
360 / 390
(#)350 / 365(*)
(#)/
355(**) (#)360 / 380(#)350