dashboard Abarth 500 2020 Owner handbook (in English)
[x] Cancel search | Manufacturer: ABARTH, Model Year: 2020, Model line: 500, Model: Abarth 500 2020Pages: 196, PDF Size: 3.53 MB
Page 23 of 196
DIPPED HEADLIGHTS/
SIDE LIGHTS
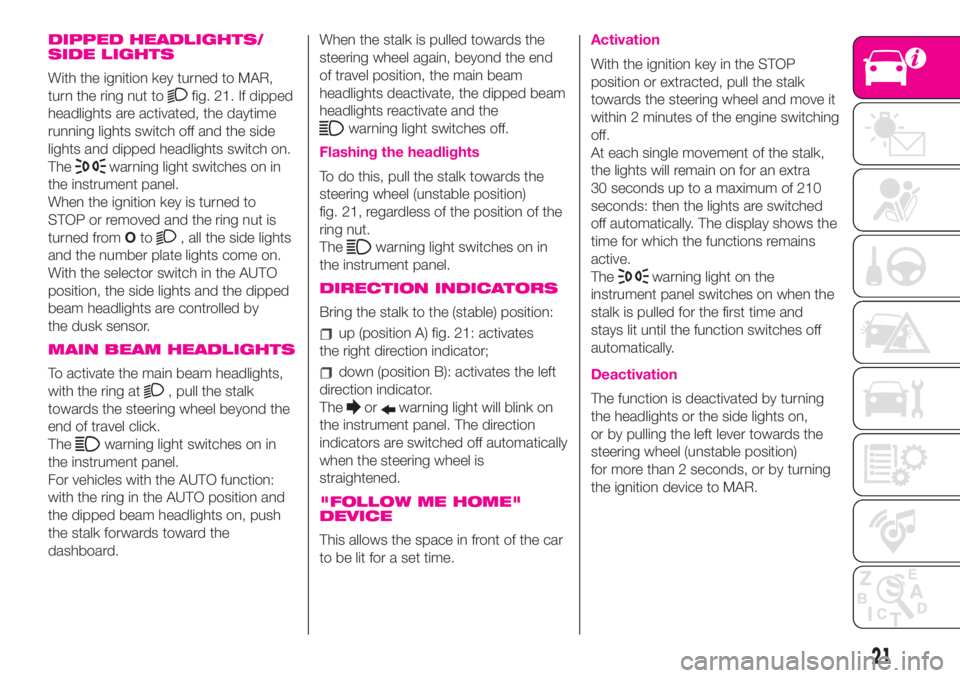
With the ignition key turned to MAR,
turn the ring nut to
fig. 21. If dipped
headlights are activated, the daytime
running lights switch off and the side
lights and dipped headlights switch on.
The
warning light switches on in
the instrument panel.
When the ignition key is turned to
STOP or removed and the ring nut is
turned fromOto
, all the side lights
and the number plate lights come on.
With the selector switch in the AUTO
position, the side lights and the dipped
beam headlights are controlled by
the dusk sensor.
MAIN BEAM HEADLIGHTS
To activate the main beam headlights,
with the ring at
, pull the stalk
towards the steering wheel beyond the
end of travel click.
The
warning light switches on in
the instrument panel.
For vehicles with the AUTO function:
with the ring in the AUTO position and
the dipped beam headlights on, push
the stalk forwards toward the
dashboard.When the stalk is pulled towards the
steering wheel again, beyond the end
of travel position, the main beam
headlights deactivate, the dipped beam
headlights reactivate and the
warning light switches off.
Flashing the headlights
To do this, pull the stalk towards the
steering wheel (unstable position)
fig. 21, regardless of the position of the
ring nut.
The
warning light switches on in
the instrument panel.
DIRECTION INDICATORS
Bring the stalk to the (stable) position:
up (position A) fig. 21: activates
the right direction indicator;
down (position B): activates the left
direction indicator.
The
orwarning light will blink on
the instrument panel. The direction
indicators are switched off automatically
when the steering wheel is
straightened.
"FOLLOW ME HOME"
DEVICE
This allows the space in front of the car
to be lit for a set time.
Activation
With the ignition key in the STOP
position or extracted, pull the stalk
towards the steering wheel and move it
within 2 minutes of the engine switching
off.
At each single movement of the stalk,
the lights will remain on for an extra
30 seconds up to a maximum of 210
seconds: then the lights are switched
off automatically. The display shows the
time for which the functions remains
active.
The
warning light on the
instrument panel switches on when the
stalk is pulled for the first time and
stays lit until the function switches off
automatically.
Deactivation
The function is deactivated by turning
the headlights or the side lights on,
or by pulling the left lever towards the
steering wheel (unstable position)
for more than 2 seconds, or by turning
the ignition device to MAR.
21
Page 27 of 196
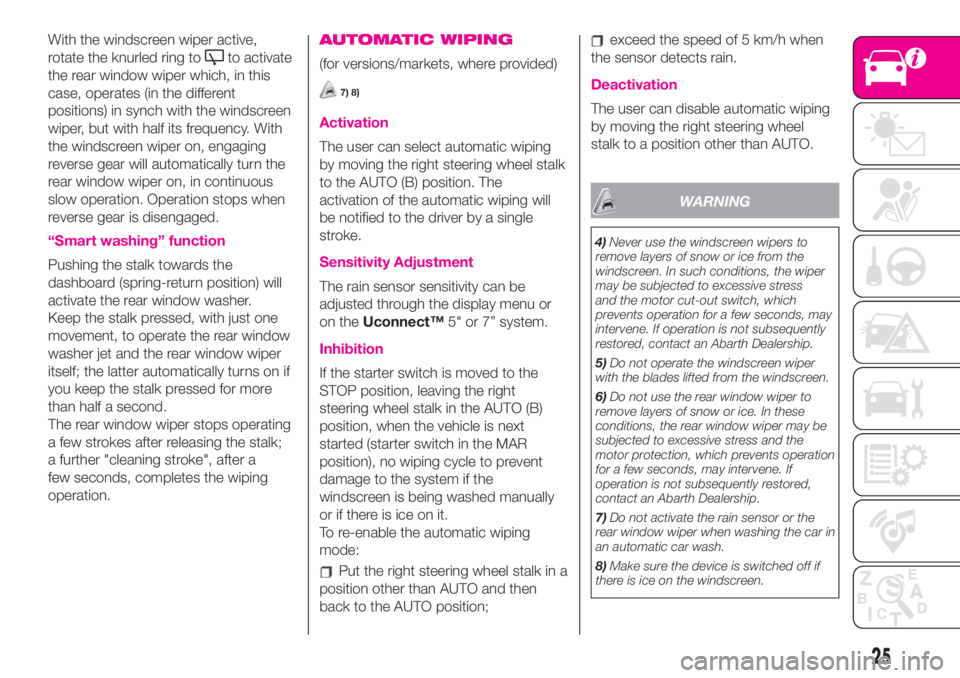
With the windscreen wiper active,
rotate the knurled ring to
to activate
the rear window wiper which, in this
case, operates (in the different
positions) in synch with the windscreen
wiper, but with half its frequency. With
the windscreen wiper on, engaging
reverse gear will automatically turn the
rear window wiper on, in continuous
slow operation. Operation stops when
reverse gear is disengaged.
“Smart washing” function
Pushing the stalk towards the
dashboard (spring-return position) will
activate the rear window washer.
Keep the stalk pressed, with just one
movement, to operate the rear window
washer jet and the rear window wiper
itself; the latter automatically turns on if
you keep the stalk pressed for more
than half a second.
The rear window wiper stops operating
a few strokes after releasing the stalk;
a further "cleaning stroke", after a
few seconds, completes the wiping
operation.
AUTOMATIC WIPING
(for versions/markets, where provided)
7) 8)
Activation
The user can select automatic wiping
by moving the right steering wheel stalk
to the AUTO (B) position. The
activation of the automatic wiping will
be notified to the driver by a single
stroke.
Sensitivity Adjustment
The rain sensor sensitivity can be
adjusted through the display menu or
on theUconnect™5" or 7” system.
Inhibition
If the starter switch is moved to the
STOP position, leaving the right
steering wheel stalk in the AUTO (B)
position, when the vehicle is next
started (starter switch in the MAR
position), no wiping cycle to prevent
damage to the system if the
windscreen is being washed manually
or if there is ice on it.
To re-enable the automatic wiping
mode:
Put the right steering wheel stalk in a
position other than AUTO and then
back to the AUTO position;
exceed the speed of 5 km/h when
the sensor detects rain.
Deactivation
The user can disable automatic wiping
by moving the right steering wheel
stalk to a position other than AUTO.
WARNING
4)Never use the windscreen wipers to
remove layers of snow or ice from the
windscreen. In such conditions, the wiper
may be subjected to excessive stress
and the motor cut-out switch, which
prevents operation for a few seconds, may
intervene. If operation is not subsequently
restored, contact an Abarth Dealership.
5)Do not operate the windscreen wiper
with the blades lifted from the windscreen.
6)Do not use the rear window wiper to
remove layers of snow or ice. In these
conditions, the rear window wiper may be
subjected to excessive stress and the
motor protection, which prevents operation
for a few seconds, may intervene. If
operation is not subsequently restored,
contact an Abarth Dealership.
7)Do not activate the rain sensor or the
rear window wiper when washing the car in
an automatic car wash.
8)Make sure the device is switched off if
there is ice on the windscreen.
25
Page 30 of 196
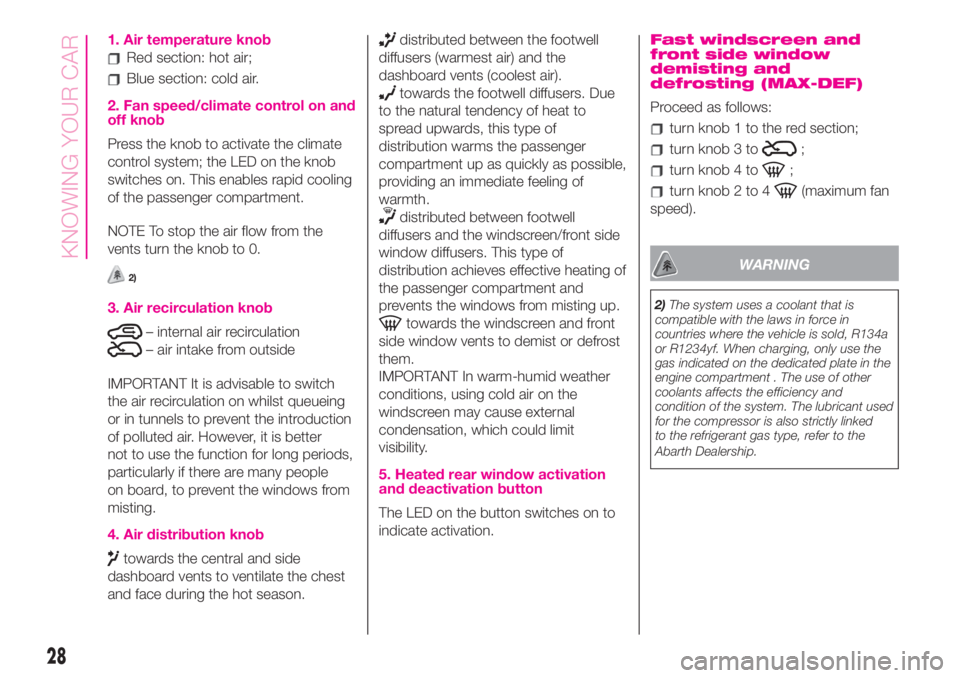
1. Air temperature knob
Red section: hot air;
Blue section: cold air.
2. Fan speed/climate control on and
off knob
Press the knob to activate the climate
control system; the LED on the knob
switches on. This enables rapid cooling
of the passenger compartment.
NOTE To stop the air flow from the
vents turn the knob to 0.
2)
3. Air recirculation knob
– internal air recirculation
– air intake from outside
IMPORTANT It is advisable to switch
the air recirculation on whilst queueing
or in tunnels to prevent the introduction
of polluted air. However, it is better
not to use the function for long periods,
particularly if there are many people
on board, to prevent the windows from
misting.
4. Air distribution knob
towards the central and side
dashboard vents to ventilate the chest
and face during the hot season.
distributed between the footwell
diffusers (warmest air) and the
dashboard vents (coolest air).
towards the footwell diffusers. Due
to the natural tendency of heat to
spread upwards, this type of
distribution warms the passenger
compartment up as quickly as possible,
providing an immediate feeling of
warmth.
distributed between footwell
diffusers and the windscreen/front side
window diffusers. This type of
distribution achieves effective heating of
the passenger compartment and
prevents the windows from misting up.
towards the windscreen and front
side window vents to demist or defrost
them.
IMPORTANT In warm-humid weather
conditions, using cold air on the
windscreen may cause external
condensation, which could limit
visibility.
5. Heated rear window activation
and deactivation button
The LED on the button switches on to
indicate activation.
Fast windscreen and
front side window
demisting and
defrosting (MAX-DEF)
Proceed as follows:
turn knob 1 to the red section;
turn knob 3 to;
turn knob 4 to;
turn knob 2 to 4(maximum fan
speed).
WARNING
2)The system uses a coolant that is
compatible with the laws in force in
countries where the vehicle is sold, R134a
or R1234yf. When charging, only use the
gas indicated on the dedicated plate in the
engine compartment . The use of other
coolants affects the efficiency and
condition of the system. The lubricant used
for the compressor is also strictly linked
to the refrigerant gas type, refer to the
Abarth Dealership.
28
KNOWING YOUR CAR
Page 32 of 196
3)
Depending on the temperature set by
the user, the automatic climate control
system automatically regulates the
temperature, flow and distribution of the
passenger compartment air, as well as
the recirculation function. These
settings can be changed by the user,
putting the climate control system
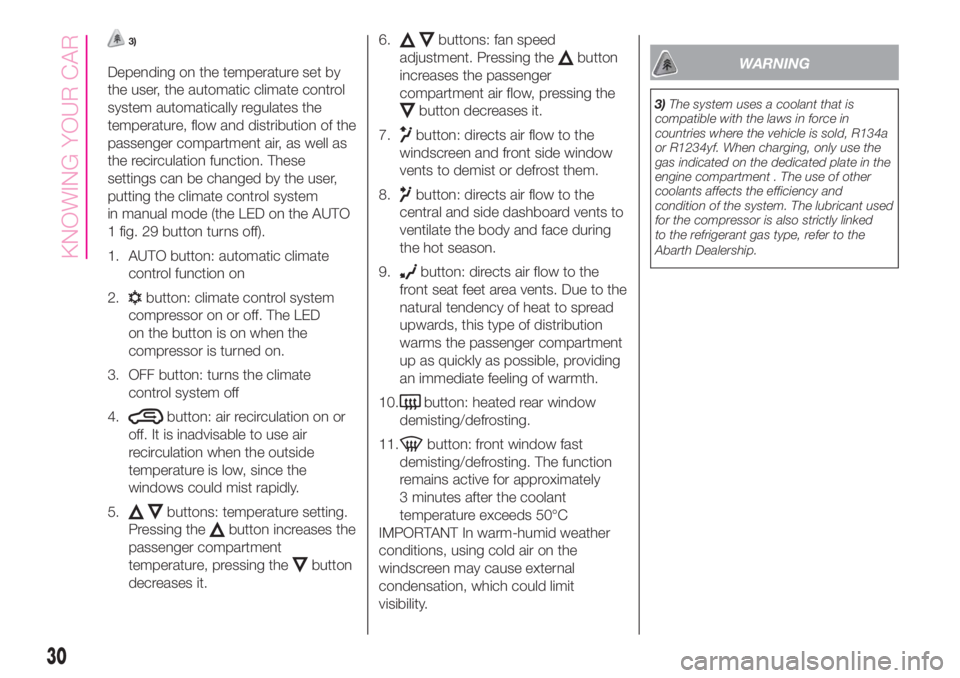
in manual mode (the LED on the AUTO
1 fig. 29 button turns off).
1. AUTO button: automatic climate
control function on
2.
button: climate control system
compressor on or off. The LED
on the button is on when the
compressor is turned on.
3. OFF button: turns the climate
control system off
4.
button: air recirculation on or
off. It is inadvisable to use air
recirculation when the outside
temperature is low, since the
windows could mist rapidly.
5.
buttons: temperature setting.
Pressing the
button increases the
passenger compartment
temperature, pressing the
button
decreases it.6.
buttons: fan speed
adjustment. Pressing the
button
increases the passenger
compartment air flow, pressing the
button decreases it.
7.
button: directs air flow to the
windscreen and front side window
vents to demist or defrost them.
8.
button: directs air flow to the
central and side dashboard vents to
ventilate the body and face during
the hot season.
9.
button: directs air flow to the
front seat feet area vents. Due to the
natural tendency of heat to spread
upwards, this type of distribution
warms the passenger compartment
up as quickly as possible, providing
an immediate feeling of warmth.
10.
button: heated rear window
demisting/defrosting.
11.
button: front window fast
demisting/defrosting. The function
remains active for approximately
3 minutes after the coolant
temperature exceeds 50°C
IMPORTANT In warm-humid weather
conditions, using cold air on the
windscreen may cause external
condensation, which could limit
visibility.
WARNING
3)The system uses a coolant that is
compatible with the laws in force in
countries where the vehicle is sold, R134a
or R1234yf. When charging, only use the
gas indicated on the dedicated plate in the
engine compartment . The use of other
coolants affects the efficiency and
condition of the system. The lubricant used
for the compressor is also strictly linked
to the refrigerant gas type, refer to the
Abarth Dealership.
30
KNOWING YOUR CAR
Page 46 of 196
NOTE Buttons+and–activate different
functions according to the following
situations:
within the menu, they allow you to
scroll up or down through the options;
during setting operations, they
increase or decrease values.
The menu comprises the following
functions:
LIGHTING: adjusts the dashboard
and instrument panel lighting
SPEED BEEP: sets the vehicle
speed limit (km/h or mph). The driver is
alerted when this speed is exceeded.
TRIP B ACTIVATION/DATA: activates
(”On”) and deactivates (”Off”) the Trip
B display (partial trip counter)
SET TIME: set the display clock
SET DATE: sets the display date
AUTOCLOSE: enables or disables
automatic door locking on exceeding a
speed of 20 km/h
MEASUREMENT UNITS: sets the
measurement units for distance and
fuel consumption
LANGUAGE: sets the display
language
WARNING VOLUME: sets the
volume (on 8 levels) of the audible
warning (buzzer) that accompanies the
failure/warning display
SEAT BELT BUZZER: reactivation of
the SBR buzzer (displayed only if the
SBR system was disabled by the
Abarth Dealership)
SERVICE: displays mileage intervals
for scheduled servicing
AIRBAG/PASSENGER BAG:
enables/disables the passenger side
airbag
DAYTIME RUNNING LIGHTS:
enables/disables daytime running lights
ITPMS RESET: resets the iTPMS
system (”self-learning”, see the “iTPMS
System” paragraph)
SEE RADIO (if present): enables/
disables duplicating some of the radio
information shown on theUconnect™
system display on the instrument panel
display.
SEE PHONE (if present): enables/
disables duplicating some of the call
information shown on theUconnect™
system display on the instrument panel
display.
SEE NAVIGATION (if present):
enables/disables duplicating some of
the navigation information shown on
theUconnect™system display on the
instrument panel display.
EXIT MENU
TRIP COMPUTER
The Trip computer is used to display
information on car operation when the
key is turned to MAR.
This function is characterised by two
separate memories, called "Trip A" and
"Trip B", where the car's "complete
missions" (journeys) are recorded in a
reciprocally independent manner, as
well as, for versions where present,
"Instant info" and "Best average
consumption".
Both memories can be reset: i.e. start
of a new journey.
"Trip A" can be used to display the
values relating to:
Range (where present)
Distance travelled A
Average consumption A
Instantaneous fuel consumption
(where present)
Average speed A
Trip time A (driving time)
Reset Trip A.
“Best average consumption": in ECO
mode, displays a screen summarising
the best average consumption (where
provided). The
icon indicates the
best performance. This information can
be reset by resetting Trip A.
"Trip B" allows the display of the
following parameters:
44
KNOWING THE INSTRUMENT PANEL
Page 65 of 196
Maximum assistance of the PBA
system is obtained pressing the brake
pedal very quickly; in addition, the
brake pedal should be pressed
continuously during braking, avoiding
intermittent presses, to obtain benefits
from the system.
Do not reduce pressure on the brake
pedal until braking is no longer
necessary.
The PBA system is deactivated when
the brake pedal is released.
63) 64) 65) 66)
TTC (Torque Transfer
Control) SYSTEM
It is an integral part of the ESC system.
This system improves the transfer of
drive torque to the wheels,
guaranteeing safer and more sporty
driving, especially when cornering, far
more able to prevent understeer.
Switching the system on
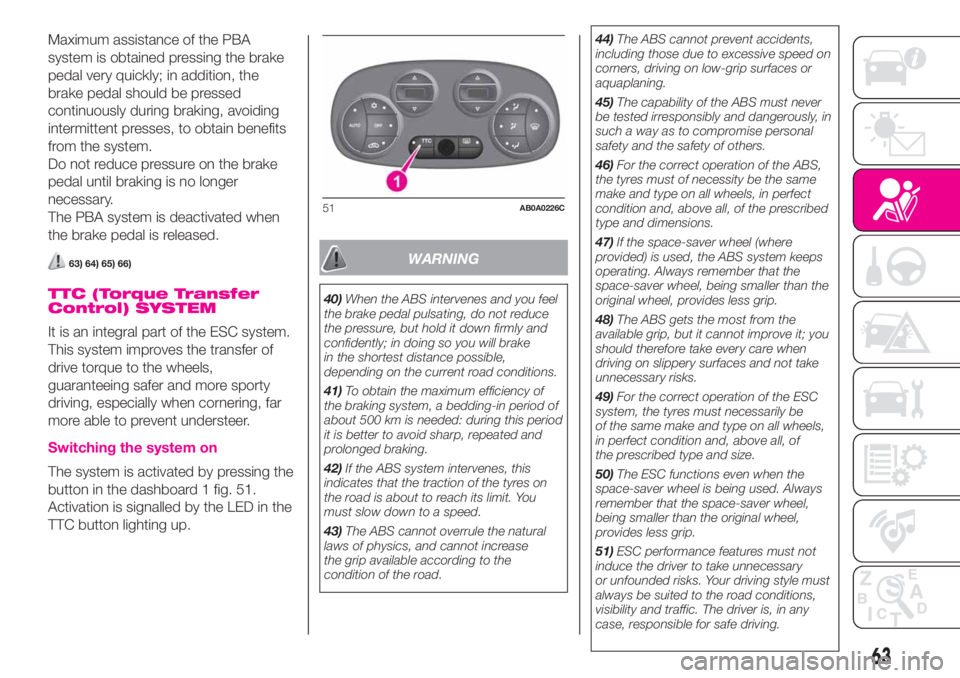
The system is activated by pressing the
button in the dashboard 1 fig. 51.
Activation is signalled by the LED in the
TTC button lighting up.
WARNING
40)When the ABS intervenes and you feel
the brake pedal pulsating, do not reduce
the pressure, but hold it down firmly and
confidently; in doing so you will brake
in the shortest distance possible,
depending on the current road conditions.
41)To obtain the maximum efficiency of
the braking system, a bedding-in period of
about 500 km is needed: during this period
it is better to avoid sharp, repeated and
prolonged braking.
42)If the ABS system intervenes, this
indicates that the traction of the tyres on
the road is about to reach its limit. You
must slow down to a speed.
43)The ABS cannot overrule the natural
laws of physics, and cannot increase
the grip available according to the
condition of the road.44)The ABS cannot prevent accidents,
including those due to excessive speed on
corners, driving on low-grip surfaces or
aquaplaning.
45)The capability of the ABS must never
be tested irresponsibly and dangerously, in
such a way as to compromise personal
safety and the safety of others.
46)For the correct operation of the ABS,
the tyres must of necessity be the same
make and type on all wheels, in perfect
condition and, above all, of the prescribed
type and dimensions.
47)If the space-saver wheel (where
provided) is used, the ABS system keeps
operating. Always remember that the
space-saver wheel, being smaller than the
original wheel, provides less grip.
48)The ABS gets the most from the
available grip, but it cannot improve it; you
should therefore take every care when
driving on slippery surfaces and not take
unnecessary risks.
49)For the correct operation of the ESC
system, the tyres must necessarily be
of the same make and type on all wheels,
in perfect condition and, above all, of
the prescribed type and size.
50)The ESC functions even when the
space-saver wheel is being used. Always
remember that the space-saver wheel,
being smaller than the original wheel,
provides less grip.
51)ESC performance features must not
induce the driver to take unnecessary
or unfounded risks. Your driving style must
always be suited to the road conditions,
visibility and traffic. The driver is, in any
case, responsible for safe driving.
51AB0A0226C
63
Page 78 of 196
Main recommendations to carry
children safely
Install the child restraint systems on
the rear seat, which is the most
protected position in the event of an
impact.
Keep children in rearward facing
child restraint systems for as long as
possible, ideally until they are 2 years
old.
Should a rearward facing child
restraint system be installed on the rear
seats, it is advisable to position it as
far forward as the position of the front
seat allows.
If the passenger's front airbag is
deactivated always check the
permanent switching on of the
warning light to make sure that it
has actually been deactivated.
Carefully follow the instructions
supplied with the child restraint system.
Keep the instructions in the vehicle
along with the other documents and
this handbook. Do not use second-
hand child seats without instructions.
Only one child is to be strapped into
each restraint system; never carry two
children simultaneously.
Always check that the seat belts do
not rest on the child’s neck.
Always check that the seat belt is
well fastened by pulling on it.
While travelling, do not let the child
sit incorrectly or unfasten the belts.
Never allow a child to put the belt's
diagonal section under an arm or
behind their back.
Never carry children on your lap,
even newborns. No-one can hold
a child in the case of a crash.
In the event of an accident, replace
the child restraint system with a new
one. In addition, and depending on the
type of child restraint system installed,
replace the ISOFIX anchors or the
seat belt with which the child restraint
system was connected.
The rear headrest (where provided)
can be removed if needed to install
a child restraint system. The headrest
must always be fitted in the car if the
seat is used by an adult passenger or a
child sitting in a restraint system without
a backrest.
WARNING
79)SERIOUS DANGER. When an active
passenger airbag is fitted, DO NOT install
rear facing child restraint systems on
the front seat. Deployment of the airbag in
an accident could cause fatal injuries to
the child regardless of the severity of
the impact. It is advisable to always carry
children in a child restraint system on
the rear seat, which is the most protected
position in the event of a collision.
80)On the sun visor there is a label with
suitable symbols reminding the user that it
is compulsory to deactivate the airbag if
a rearward facing child restraint system is
fitted. Always comply with the instructions
on the passenger side sun visor (see the
"Front airbags" paragraph).
81)Should it be necessary to carry a child
on the passenger side front seat in a rear
facing child restraint system, the passenger
side front and side airbags must be
deactivated through the display main
menu, verifying deactivation by checking
that the warning light
located in the
central part of the dashboard has switched
on. Move the passenger's seat as far
back as possible to avoid contact between
the child seat and the dashboard.
82)Do not move the front or rear seat if a
child is seated on it or on the dedicated
child restraint system.
76
SAFETY
Page 79 of 196
83)Child restraint systems with ISOFIX
attachments are available for safely
anchoring to the seat without using the car
seat belts. See paragraph "Installing an
ISOFIX child restraint system" for the
installation instructions.
84)Incorrect fitting of the child restraint
system may result in an inefficient
protection system. In the event of an
accident the child restraint system may
become loose and the child may be
injured, even fatally. When fitting a restraint
system for newborns or children, strictly
comply with the instructions provided
by the Manufacturer.
85)When the child restraint system is not
used, secure it with the seat belt or with
the ISOFIX anchorages, or remove it from
the vehicle. Do not leave it unsecured
inside the passenger compartment. This
way, in the case of sudden braking or
an accident, it will not cause injuries to the
occupants.
86)After installing a child restraint system,
do not move the seat: always remove
the child restraint system before making
any adjustment.
87)If a Universal ISOFIX child seat system
is not fixed to all three anchorages, it will
not be able to protect the child correctly. In
a crash, the child could be seriously or
fatally injured.
88)Fit the child restraint system when the
car is stationary. The child restraint system
is correctly fixed to the brackets when
you hear the click. Follow the instructions
for assembly, disassembly and positioning
that the Manufacturer must supply with
the child restraint system.89)Always make sure that the chest
section of the seat belt does not pass
under the arms or behind the back of the
child. In the event of an accident the seat
belt will not be able to secure the child,
with the risk of injury, including fatal injury.
Therefore the child must always wear
the seat belt correctly.
90)Do not use the same lower anchoring
to install more than one child restraint
system.SUPPLEMENTARY
RESTRAINT SYSTEM
(SRS) – AIRBAG
The car may be equipped with:
front driver airbag;
front passenger airbag;
driver's side knee bag;
driver and passenger front side bags
for pelvis, chest and shoulder
protection (Side bags);
side bags for head protection of
front seat passengers and rear side
seat passengers (window bag).
FRONT AIRBAGS
91) 108)
The front driver/passenger airbags and
the driver knee bag (where provided)
protect the front seat occupants in the
event of frontal impacts of medium/high
severity, by placing the bag between
the occupant and the steering wheel or
dashboard.
Therefore non-activation of airbags in
other types of collisions (side impacts,
rear shunts, roll-overs, etc.) does not
indicate a system malfunction.
An electronic control unit will make the
bag inflate in the event of a frontal
impact.
77
Page 80 of 196
The bag will inflate instantaneously
placing itself between the front
occupants body and the structures
which could cause injury. It will deflate
immediately afterwards.
Front airbags are not a replacement of
but complementary to the seat belts,
which you are recommended to always
wear, as specified by law in Europe
and most non-European countries.
In the event of an impact, someone not
wearing a seat belt could move forward
and come into contact with a bag
which is still opening. The protection
offered by the bag is compromised
in these circumstances.
Front airbags may not activate in the
following situations:
frontal impacts against highly
deformable objects not involving the
front surface of the car (e.g. wing
collision against guard rail);
vehicle wedging under other vehicles
or protective barriers (e.g. trucks or
guard rails).
Failure to deploy in the conditions
described above is due to the fact that
the airbags may not provide any
additional protection compared with
seat belts, so their activation would be
inappropriate. In these cases,
non-deployment does not indicate a
system malfunction.The front airbags (driver, passenger,
driver's knee bags) are designed and
calibrated to protect front seat
passengers wearing seat belts.
Their volume at the moment of
maximum inflation fills most of the
space between the steering wheel and
the driver, between the lower post
guard and the knees on passenger side
and between the dashboard and the
passenger.
The airbags are not deployed in the
event of minor frontal impacts (for
which the restraining action of the seat
belts is sufficient). Seat belts must
always be worn. In the event of a frontal
collision, they ensure the correct
positioning of the occupant.
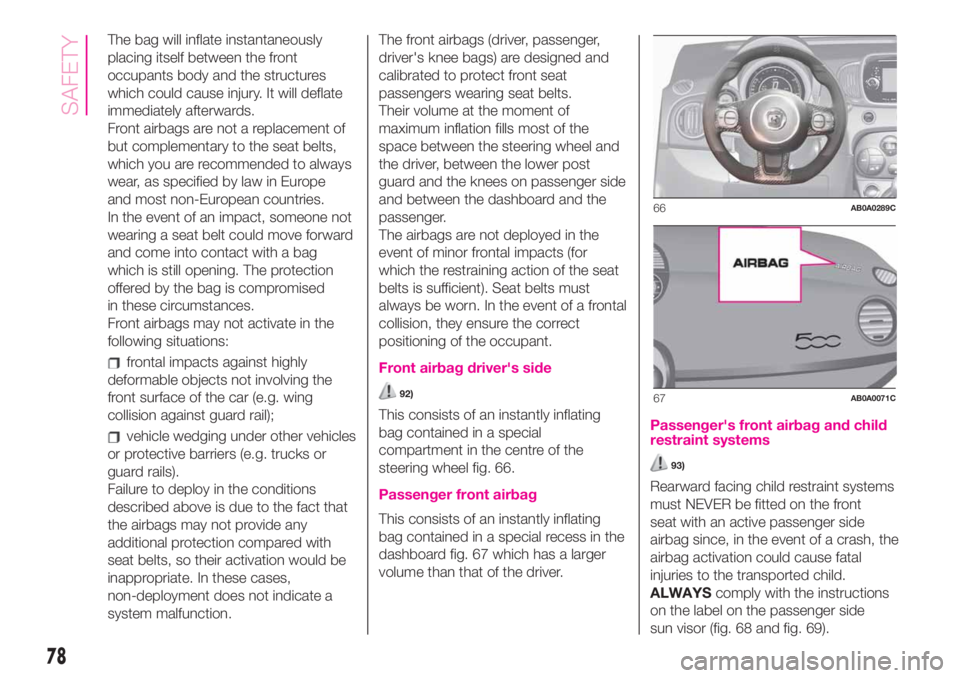
Front airbag driver's side
92)
This consists of an instantly inflating
bag contained in a special
compartment in the centre of the
steering wheel fig. 66.
Passenger front airbag
This consists of an instantly inflating
bag contained in a special recess in the
dashboard fig. 67 which has a larger
volume than that of the driver.
Passenger's front airbag and child
restraint systems
93)
Rearward facing child restraint systems
must NEVER be fitted on the front
seat with an active passenger side
airbag since, in the event of a crash, the
airbag activation could cause fatal
injuries to the transported child.
ALWAYScomply with the instructions
on the label on the passenger side
sun visor (fig. 68 and fig. 69).
66AB0A0289C
67AB0A0071C
78
SAFETY
Page 84 of 196
WARNING
91)Do not apply stickers or other objects
on the steering wheel, on the dashboard in
the passenger side airbag area, on the
side upholstery on the roof and on the
seats. Never put objects (e.g. mobile
phones) on the passenger's side
dashboard since they could interfere with
correct inflation of the airbag and also
cause serious injury to the passengers.
92)Always drive with your hands on the
rim of the steering wheel so that the airbag
can inflate freely if required. Do not drive
bent over the steering wheel, but rather sit
upright with your back firmly resting against
the seat back.
93)When there is an active passenger
airbag, DO NOT install rearward facing
child restraint systems on the front seat.
Deployment of the airbag in a crash could
cause fatal injuries to the child regardless
of the severity of the collision. Therefore,
always deactivate the passenger side
airbag when a rearward facing child
restraint system is installed on the front
passenger seat. The front passenger seat
must also be positioned back as far as
possible in order to prevent the child
restraint system from coming into contact
with the dashboard. Immediately reactivate
the passenger airbag as soon as the child
restraint system has been removed.94)A failure of the
warning light is
indicated by thesymbol on the display.
In this case, thewarning light may
not indicate a possible problem with the
airbag restraint system. Before driving off,
contact an Abarth Dealership to have
the system checked immediately.
95)The
warning light indicates the
passenger side airbag protection status. If
the warning light is off, passenger side
protection is active: to deactivate it, use the
Setup Menu (in this case the LED lights
up). When the vehicle is started (ignition
key turned to MAR position), the warning
light turns on for about 8 seconds,
provided that at least 5 seconds have
elapsed from when it was switched off. If
not, contact an Abarth Dealership. If the
engine is switched off/on again in less than
5 seconds the warning light may remain
off. In this case, to check correct warning
light operation, switch the engine off,
wait for at least 5 seconds and switch the
engine on again. The warning light may
light up with various intensity levels
depending on the vehicle conditions. The
intensity may also vary during the same key
cycle.
96)If, when turning the key to MAR, the
warning light does not switch on or if it
stays on when travelling, there could be
a fault in the restraint systems; in this event
airbags or pretensioners may not be
deployed in the event of impact or, in a
lower number of cases, they may deploy
accidentally. Before driving off, contact
an Abarth Dealership to have the system
checked immediately.97)In some versions, in case of a LED
failure (located on the plate of the
instrument panel), thewarning light on
the instrument panel turns on and the
passenger side airbags are deactivated.
98)Do not cover the front seat backrests
with extra covers if they are equipped
with side bags.
99)If the car has been subject to theft,
attempted theft, vandalism, or flooding,
have the airbag system inspected at an
Abarth Dealership.
100)The airbags may also be deployed
when the car is not moving, if the key is in
the ignition and turned to MAR-ON or
when the engine is off, if the car is hit by
another moving vehicle. Therefore, even if
the vehicle is stationary, when an active
front passenger airbag is fitted, DO NOT
install rearward facing child restraint
systems on the front passenger seat.
Deployment of the airbag following an
impact could cause fatal injuries to the
child. Therefore, always deactivate the
passenger side airbag when a rearward
facing child restraint system is installed on
the front passenger seat. The front
passenger seat must also be positioned
back as far as possible in order to prevent
the child restraint system from coming
into contact with the dashboard.
Immediately reactivate the passenger
airbag as soon as the child restraint system
has been removed. Also remember that, if
the key is turned to STOP, none of the
safety devices (airbags or pretensioners)
will be deployed in the event of collision.
Non-deployment in such cases does
not indicate a system malfunction.
82
SAFETY