display Abarth Grande Punto 2007 Owner handbook (in English)
[x] Cancel search | Manufacturer: ABARTH, Model Year: 2007, Model line: Grande Punto, Model: Abarth Grande Punto 2007Pages: 207, PDF Size: 3.01 MB
Page 6 of 207
4
SAFETY
DEVICES
CORRECT USE
OF THE CAR
WARNING
LIGHTS AND
MESSAGES
IN AN
EMERGENCY
CAR
MAINTENANCE
TECHNICAL
SPECIFICATIONS
INDEX
DASHBOARD
AND CONTROLSDASHBOARD ...................................................................... 5
SYMBOLS ............................................................................... 7
THE FIAT CODE SYSTEM.................................................. 7
THE KEYS .............................................................................. 8
ALARM ................................................................................... 11
IGNITION DEVICE .............................................................. 12
INSTRUMENT PANEL ........................................................ 13
INSTRUMENTS..................................................................... 14
RECONFIGURABLE MULTIFUNCTION DISPLAY .... 16
TRIP COMPUTER ................................................................ 25
FRONT SEATS ..................................................................... 28
REAR SEATS .......................................................................... 29
HEAD RESTRAINTS............................................................. 30
STEERING WHEEL .............................................................. 31
REARVIEW MIRRORS......................................................... 31
CLIMATE CONTROL.......................................................... 33
MANUAL CLIMATE CONTROL SYSTEM .................... 34
AUTOMATIC TWO-ZONE CLIMATE
CONTROL SYSTEM ........................................................... 40
EXTERNAL LIGHTS............................................................. 47
WINDOW WASHING....................................................... 49
CRUISE CONTROL ............................................................ 52CEILING LIGHTS.................................................................. 54
CONTROLS ........................................................................... 55
FUEL CUT-OFF SWITCH .................................................. 57
INTERIOR FITTINGS........................................................... 58
SKY-DOME SUNROOF ..................................................... 62
DOORS .................................................................................. 64
POWER WINDOWS/WINDOW WINDERS .............. 66
BOOT ...................................................................................... 68
BONNET................................................................................. 71
ROOF RACK/SKI RACK .................................................... 73
HEADLIGHTS........................................................................ 74
ABS SYSTEM ......................................................................... 76
ESP SYSTEM .......................................................................... 78
EOBD SYSTEM ..................................................................... 83
TYRE PRESSURE MONITORING SYSTEM - T.P.M.S. . 84
SPORT BOOST..................................................................... 87
WIRING FOR NAVIGATION SYSTEM ......................... 88
ACCESSORIES PURCHASED BY THE OWNER .......... 88
AT THE FILLING STATION ............................................. 89
PROTECTING THE ENVIRONMENT............................. 90
D D
A A
S S
H H
B B
O O
A A
R R
D D
A A
N N
D D
C C
O O
N N
T T
R R
O O
L L
S S
Page 7 of 207
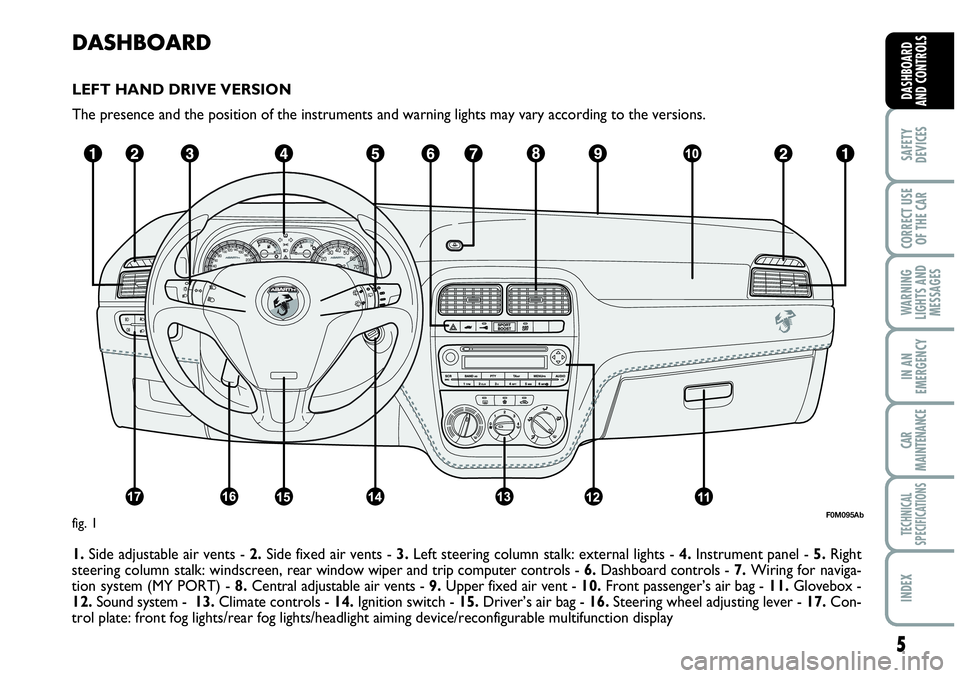
DASHBOARD
LEFT HAND DRIVE VERSION
The presence and the position of the instruments and warning lights may vary according to the versions.
1. Side adjustable air vents - 2.Side fixed air vents - 3.Left steering column stalk: external lights - 4.Instrument panel - 5.Right
steering column stalk: windscreen, rear window wiper and trip computer controls - 6.Dashboard controls -7.Wiring for naviga-
tion system (MY PORT) - 8.Central adjustable air vents - 9.Upper fixed air vent - 10.Front passenger’s air bag - 11.Glovebox -
12.Sound system - 13.Climate controls - 14.Ignition switch - 15.Driver’s air bag - 16.Steering wheel adjusting lever - 17.Con-
trol plate: front fog lights/rear fog lights/headlight aiming device/reconfigurable multifunction display
5
SAFETY
DEVICES
CORRECT USE
OF THE CAR
WARNING
LIGHTS AND
MESSAGES
IN AN
EMERGENCY
CAR
MAINTENANCE
TECHNICAL
SPECIFICATIONS
INDEX
DASHBOARD
AND CONTROLS
F0M095Abfig. 1
Page 8 of 207
6
SAFETY
DEVICES
CORRECT USE
OF THE CAR
WARNING
LIGHTS AND
MESSAGES
IN AN
EMERGENCY
CAR
MAINTENANCE
TECHNICAL
SPECIFICATIONS
INDEX
DASHBOARD
AND CONTROLS
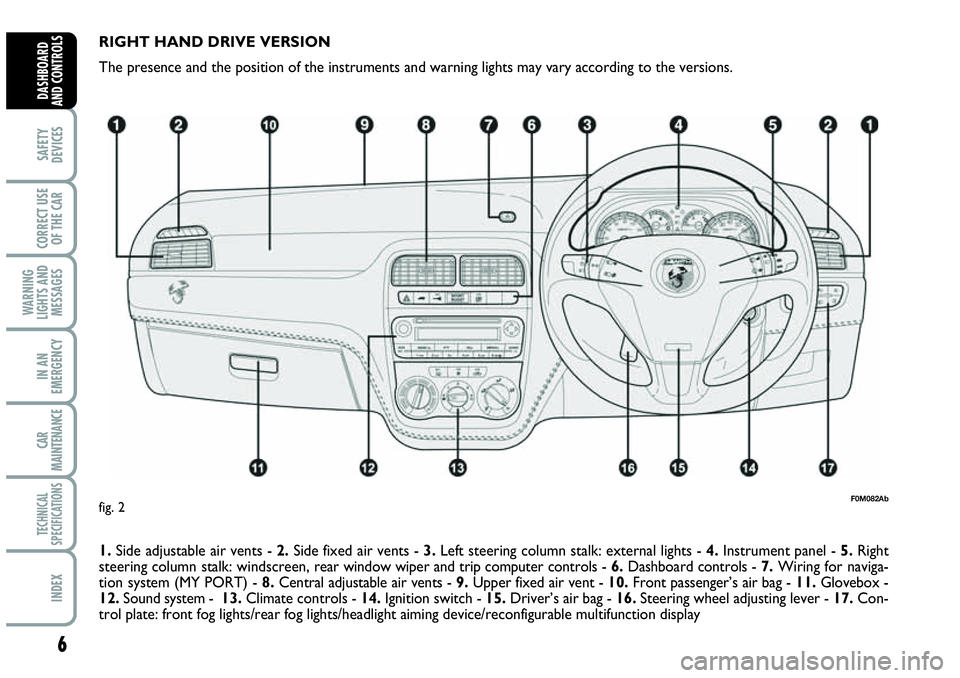
RIGHT HAND DRIVE VERSION
The presence and the position of the instruments and warning lights may vary according to the versions.
1. Side adjustable air vents - 2.Side fixed air vents - 3.Left steering column stalk: external lights - 4.Instrument panel - 5.Right
steering column stalk: windscreen, rear window wiper and trip computer controls - 6.Dashboard controls -7.Wiring for naviga-
tion system (MY PORT) - 8.Central adjustable air vents - 9.Upper fixed air vent - 10.Front passenger’s air bag - 11.Glovebox -
12.Sound system - 13.Climate controls - 14.Ignition switch - 15.Driver’s air bag - 16.Steering wheel adjusting lever - 17.Con-
trol plate: front fog lights/rear fog lights/headlight aiming device/reconfigurable multifunction display
F0M082Abfig. 2
Page 9 of 207
7
SAFETY
DEVICES
CORRECT USE
OF THE CAR
WARNING
LIGHTS AND
MESSAGES
IN AN
EMERGENCY
CAR
MAINTENANCE
TECHNICAL
SPECIFICATIONS
INDEX
DASHBOARD
AND CONTROLS
THE FIAT CODE SYSTEM
To further protect you car from theft, it
has been fitted with an engine immobilis-
ing system. This system is automatically ac-
tivated when the ignition key is removed.
An electronic device, in fact, is fitted in
each ignition key grip. The device trans-
mits a radio-frequency signal when the en-
gine is started through a special aerial built
into the ignition switch. The modulate sig-
nal, which changes each time the engine is
started, is the “password”, by means of
which the control unit recognises the key
and enables to start the engine.
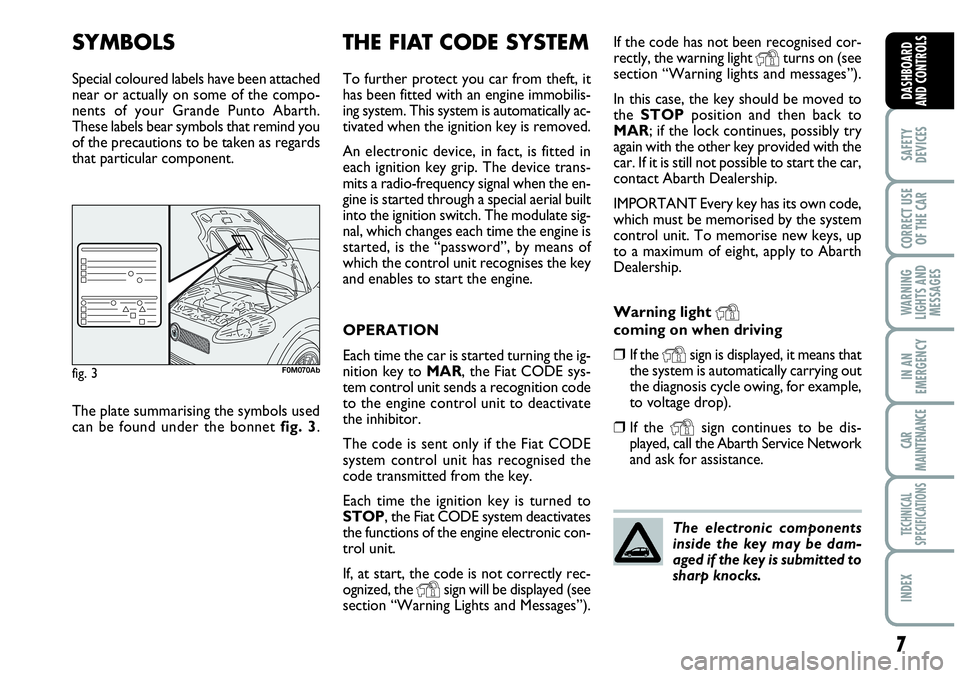
SYMBOLS
Special coloured labels have been attached
near or actually on some of the compo-
nents of your Grande Punto Abarth.
These labels bear symbols that remind you
of the precautions to be taken as regards
that particular component.
fig. 3F0M070Ab
The plate summarising the symbols used
can be found under the bonnet fig. 3.OPERATION
Each time the car is started turning the ig-
nition key to MAR, the Fiat CODE sys-
tem control unit sends a recognition code
to the engine control unit to deactivate
the inhibitor.
The code is sent only if the Fiat CODE
system control unit has recognised the
code transmitted from the key.
Each time the ignition key is turned to
STOP, the Fiat CODE system deactivates
the functions of the engine electronic con-
trol unit.
If, at start, the code is not correctly rec-
ognized, the
Ysign will be displayed (see
section “Warning Lights and Messages”).If the code has not been recognised cor-
rectly, the warning light
Yturns on (see
section “Warning lights and messages”).
In this case, the key should be moved to
the STOPposition and then back to
MAR; if the lock continues, possibly try
again with the other key provided with the
car. If it is still not possible to start the car,
contact Abarth Dealership.
IMPORTANT Every key has its own code,
which must be memorised by the system
control unit. To memorise new keys, up
to a maximum of eight, apply to Abarth
Dealership.
Warning light
Ycoming on when driving
❒If the Ysign is displayed, it means that
the system is automatically carrying out
the diagnosis cycle owing, for example,
to voltage drop).
❒If the Ysign continues to be dis-
played, call the Abarth Service Network
and ask for assistance.
The electronic components
inside the key may be dam-
aged if the key is submitted to
sharp knocks.
Page 15 of 207
13
SAFETY
DEVICES
CORRECT USE
OF THE CAR
WARNING
LIGHTS AND
MESSAGES
IN AN
EMERGENCY
CAR
MAINTENANCE
TECHNICAL
SPECIFICATIONS
INDEX
DASHBOARD
AND CONTROLS
INSTRUMENT PANEL
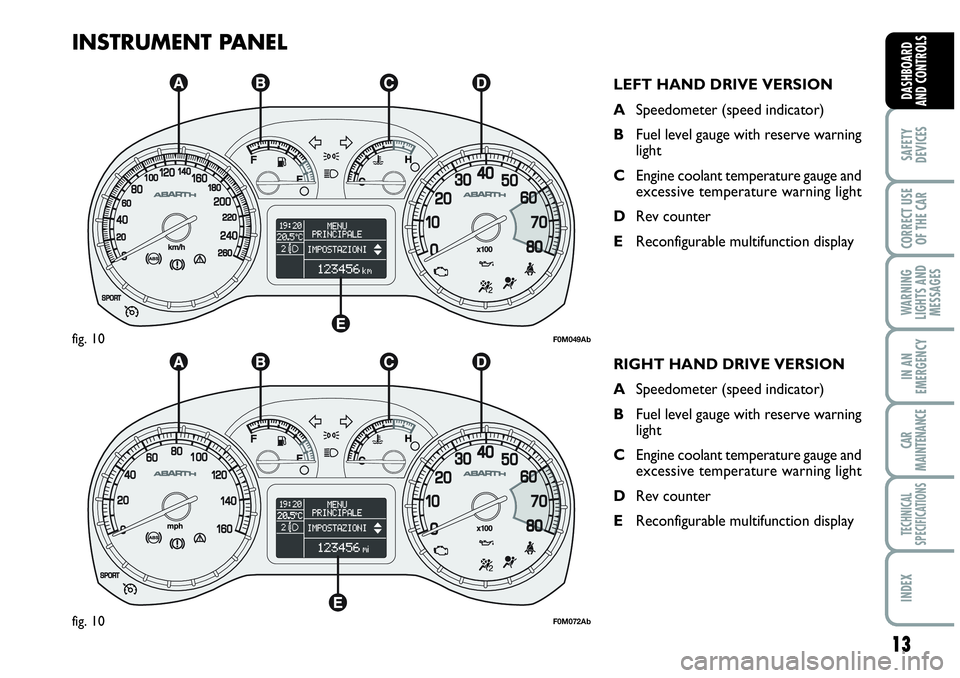
LEFT HAND DRIVE VERSION
ASpeedometer (speed indicator)
BFuel level gauge with reserve warning
light
CEngine coolant temperature gauge and
excessive temperature warning light
DRev counter
EReconfigurable multifunction display
F0M049Abfig. 10
RIGHT HAND DRIVE VERSION
ASpeedometer (speed indicator)
BFuel level gauge with reserve warning
light
CEngine coolant temperature gauge and
excessive temperature warning light
DRev counter
EReconfigurable multifunction display
F0M072Abfig. 10
Page 17 of 207
15
SAFETY
DEVICES
CORRECT USE
OF THE CAR
WARNING
LIGHTS AND
MESSAGES
IN AN
EMERGENCY
CAR
MAINTENANCE
TECHNICAL
SPECIFICATIONS
INDEX
DASHBOARD
AND CONTROLS
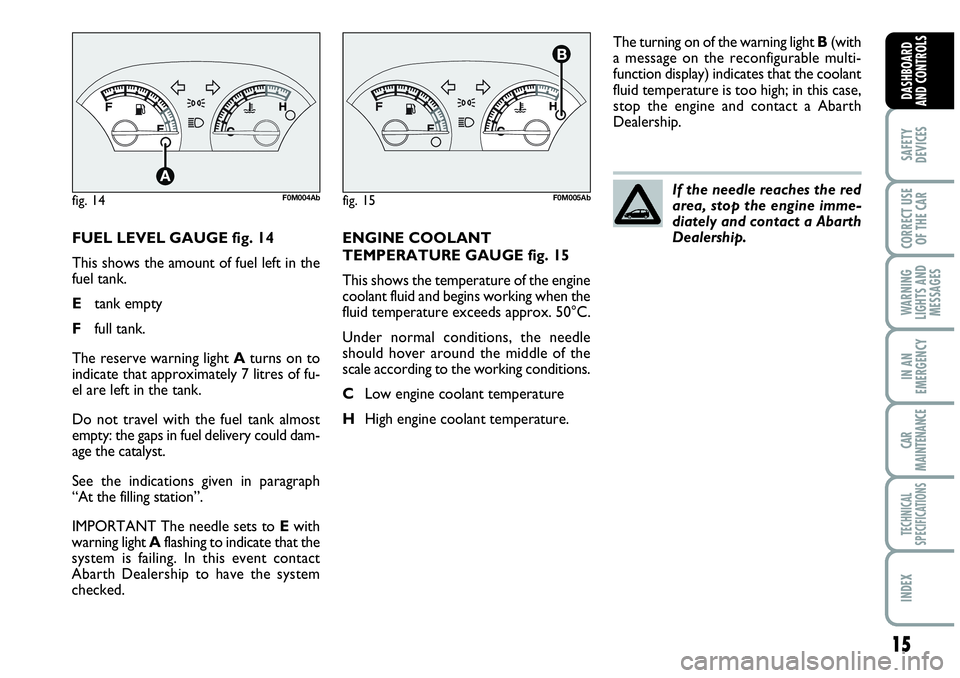
FUEL LEVEL GAUGE fig. 14
This shows the amount of fuel left in the
fuel tank.
Etank empty
Ffull tank.
The reserve warning light Aturns on to
indicate that approximately 7 litres of fu-
el are left in the tank.
Do not travel with the fuel tank almost
empty: the gaps in fuel delivery could dam-
age the catalyst.
See the indications given in paragraph
“At the filling station”.
IMPORTANT The needle sets to Ewith
warning light Aflashing to indicate that the
system is failing. In this event contact
Abarth Dealership to have the system
checked.ENGINE COOLANT
TEMPERATURE GAUGE fig. 15
This shows the temperature of the engine
coolant fluid and begins working when the
fluid temperature exceeds approx. 50°C.
Under normal conditions, the needle
should hover around the middle of the
scale according to the working conditions.
CLow engine coolant temperature
HHigh engine coolant temperature.The turning on of the warning light B(with
a message on the reconfigurable multi-
function display) indicates that the coolant
fluid temperature is too high; in this case,
stop the engine and contact a Abarth
Dealership.
If the needle reaches the red
area, stop the engine imme-
diately and contact a Abarth
Dealership.
fig. 14F0M004Abfig. 15F0M005Ab
Page 18 of 207
16
SAFETY
DEVICES
CORRECT USE
OF THE CAR
WARNING
LIGHTS AND
MESSAGES
IN AN
EMERGENCY
CAR
MAINTENANCE
TECHNICAL
SPECIFICATIONS
INDEX
DASHBOARD
AND CONTROLS
fig. 18F0R0019m
fig. 16F0M2006gfig. 17F0M050Ab
RECONFIGURABLE
MULTIFUNCTION
DISPLAY
The car may be equipped with reconfig-
urable a multifunctional display that, ac-
cording to the settings made, will show
useful driving information.
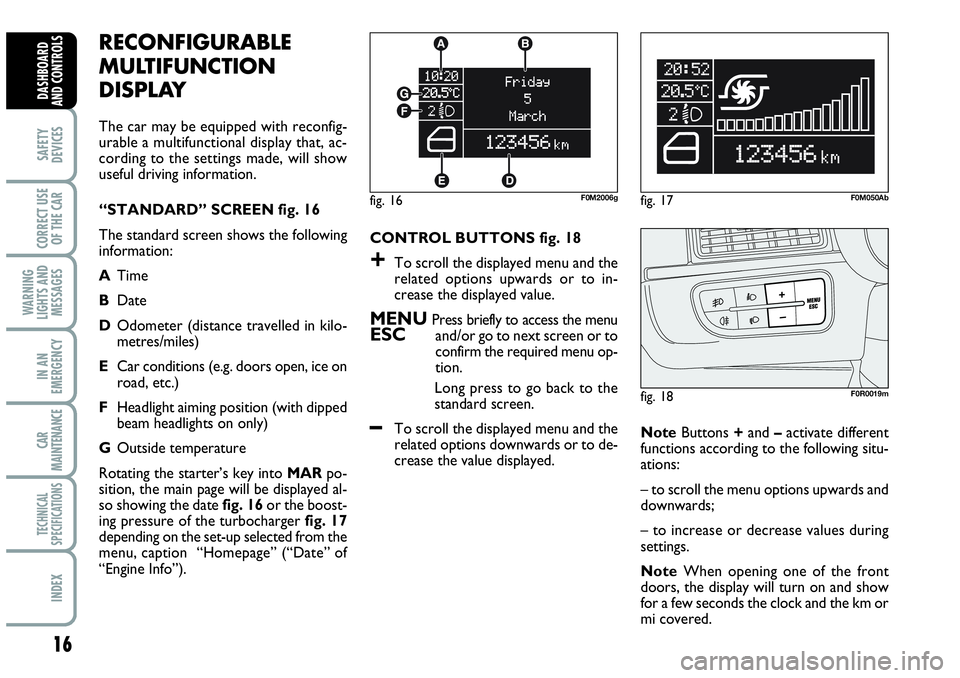
“STANDARD” SCREEN fig. 16
The standard screen shows the following
information:
ATime
BDate
DOdometer (distance travelled in kilo-
metres/miles)
ECar conditions (e.g. doors open, ice on
road, etc.)
FHeadlight aiming position (with dipped
beam headlights on only)
GOutside temperature
Rotating the starter’s key into MARpo-
sition, the main page will be displayed al-
so showing the date fig. 16or the boost-
ing pressure of the turbocharger fig. 17
depending on the set-up selected from the
menu, caption “Homepage” (“Date” of
“Engine Info”).CONTROL BUTTONS fig. 18
+To scroll the displayed menu and the
related options upwards or to in-
crease the displayed value.
MENU Press briefly to access the menuESCand/or go to next screen or to
confirm the required menu op-
tion.
Long press to go back to the
standard screen.
–To scroll the displayed menu and the
related options downwards or to de-
crease the value displayed. NoteButtons +and –activate different
functions according to the following situ-
ations:
– to scroll the menu options upwards and
downwards;
– to increase or decrease values during
settings.
NoteWhen opening one of the front
doors, the display will turn on and show
for a few seconds the clock and the km or
mi covered.
Page 19 of 207
17
SAFETY
DEVICES
CORRECT USE
OF THE CAR
WARNING
LIGHTS AND
MESSAGES
IN AN
EMERGENCY
CAR
MAINTENANCE
TECHNICAL
SPECIFICATIONS
INDEX
DASHBOARD
AND CONTROLS
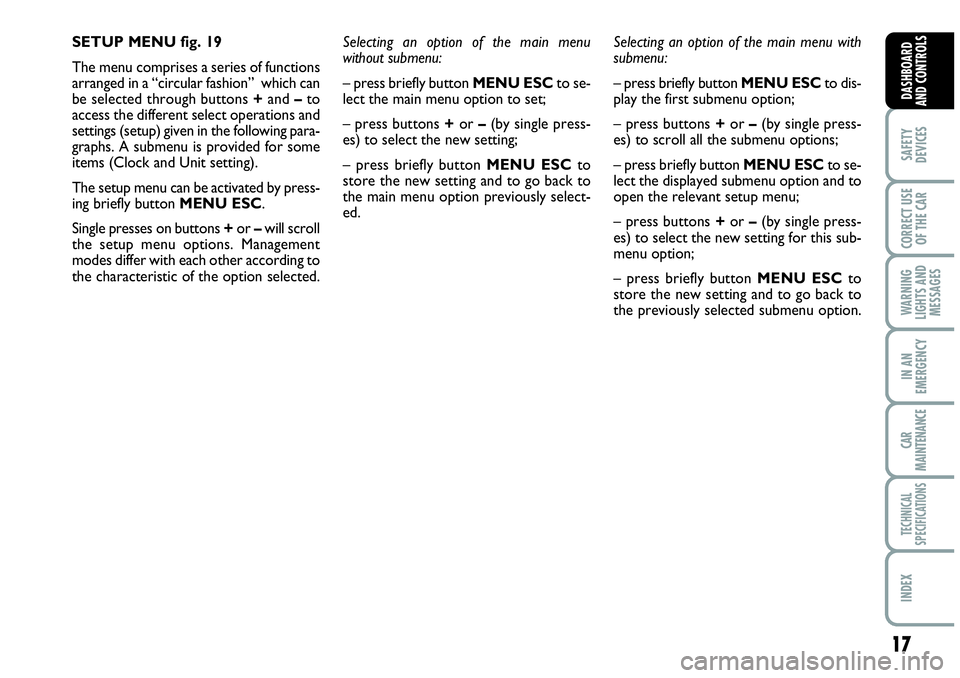
SETUP MENU fig. 19
The menu comprises a series of functions
arranged in a “circular fashion” which can
be selected through buttons +and –to
access the different select operations and
settings (setup) given in the following para-
graphs. A submenu is provided for some
items (Clock and Unit setting).
The setup menu can be activated by press-
ing briefly button MENU ESC.
Single presses on buttons +or –will scroll
the setup menu options. Management
modes differ with each other according to
the characteristic of the option selected.Selecting an option of the main menu
without submenu:
– press briefly button MENU ESCto se-
lect the main menu option to set;
– press buttons +or –(by single press-
es) to select the new setting;
– press briefly button MENU ESCto
store the new setting and to go back to
the main menu option previously select-
ed.Selecting an option of the main menu with
submenu:
– press briefly button MENU ESCto dis-
play the first submenu option;
– press buttons +or –(by single press-
es) to scroll all the submenu options;
– press briefly button MENU ESCto se-
lect the displayed submenu option and to
open the relevant setup menu;
– press buttons +or –(by single press-
es) to select the new setting for this sub-
menu option;
– press briefly button MENU ESC to
store the new setting and to go back to
the previously selected submenu option.
Page 21 of 207
19
SAFETY
DEVICES
CORRECT USE
OF THE CAR
WARNING
LIGHTS AND
MESSAGES
IN AN
EMERGENCY
CAR
MAINTENANCE
TECHNICAL
SPECIFICATIONS
INDEX
DASHBOARD
AND CONTROLS
NoteThe speed may be set in the range
from 30 to 200 km/h, or from 20 to 125
mph according to the previously chosen
unit (see “Setting the distance unit”) de-
scribed below. The setting will in-
crease/decrease by five units each time
button +/–is pressed. Hold button +/–
pressed to increase/decrease the setting
rapidly. Complete the setting by briefly
pressing the button when you approach
the required setting.
– briefly press button MENU ESCto go
back to the menu screen or press the but-
ton for long to go back to the standard
screen without storing settings.To cancel the setting, proceed as follows:
– briefly press button MENU ESC: (On)
will blink on the display;
– press button –: (Off) will flash on the dis-
play;
– briefly press button MENU ESCto go
back to the menu screen or press the but-
ton for long to go back to the standard
screen without storing settings. Speed beep (Speed limit)
This function is used to set the car speed
limit (km/h or mph); when this limit is ex-
ceeded the driver is immediately alerted
(see section “Warning lights and mes-
sages”).
To set the speed limit, proceed as follows:
– briefly press button MENU ESC, the
display will show the wording (Speed
Buzz);
– press button +or –to select speed lim-
it activation (On) or deactivation (Off);
– if the function has been activated (On),
press buttons +or –to select the re-
quired speed limit and then press MENU
ESCto confirm;
Page 22 of 207
20
SAFETY
DEVICES
CORRECT USE
OF THE CAR
WARNING
LIGHTS AND
MESSAGES
IN AN
EMERGENCY
CAR
MAINTENANCE
TECHNICAL
SPECIFICATIONS
INDEX
DASHBOARD
AND CONTROLS
Rain sensor sensitivity adjustment
(Rain sensor) (for versions/
markets, where provided)
With this function it is possible to adjust
the rain sensor sensitivity according to 4
levels.
To set the required sensitivity level pro-
ceed as follows:
– briefly press button MENU ESC, the
previously set sensitivity “level” will flash
on the display;
– press button +or –for setting;
– briefly press button MENU ESCto go
back to the menu screen or press the but-
ton for long to go back to the standard
screen without storing settings.
Trip B data (Trip B on)
This function may be used to activate (On)
or deactivate (Off) the Trip B (partial trip).
For further information see “Trip com-
puter”.
Proceed as follows to switch the function
on and off:
– briefly press button MENU ESC: (On)
or (Off) will flash on the display (accord-
ing to previous setting);– press button +or –for setting;
– briefly press button MENU ESCto go
back to the menu screen or press the but-
ton for long to go back to the standard
screen without storing settings.
Setting the time (Clock)
This function allows to set the clock
through two sub-menus: “Time” and
“Mode”.
Proceed as follows:
– briefly press button MENU ESC, the
display will show the two submenus
“Time” and “Mode”;
– press button +or –to switch between
the two submenus;
– select the required option and then
press button MENU ESCbriefly;
- when accessing the “Time” submenu: –
briefly press button MENU ESC,
“hours” will flash on the display;
– press button +or –for setting;
– briefly press button MENU ESC, “min-
utes” will flash on the display;
– press button +or –for setting;Note The setting will increase or de-
crease by one unit each time +or –is
pressed. Hold the button pressed to in-
crease/decrease the setting rapidly. Com-
plete the setting by briefly pressing the
button when you approach the required
setting.
– when accessing the “Format” submenu:
briefly press button MENU ESC: the
previously set display format will flash on
the display;
– press button +or –to select “24h” or
“12h”.
When you have made the required set-
tings, briefly press button MENU ESCto
go back to the menu screen or press the
button for long to go back to the standard
screen without storing settings:
– hold MENU ESC
pressed to go back
to the standard screen or main menu ac-
cording to the points of the menu where
you are at.