key battery Abarth Grande Punto 2010 Owner handbook (in English)
[x] Cancel search | Manufacturer: ABARTH, Model Year: 2010, Model line: Grande Punto, Model: Abarth Grande Punto 2010Pages: 207, PDF Size: 3.01 MB
Page 12 of 207
10
SAFETY
DEVICES
CORRECT USE
OF THE CAR
WARNING
LIGHTS AND
MESSAGES
IN AN
EMERGENCY
CAR
MAINTENANCE
TECHNICAL
SPECIFICATIONS
INDEX
DASHBOARD
AND CONTROLS
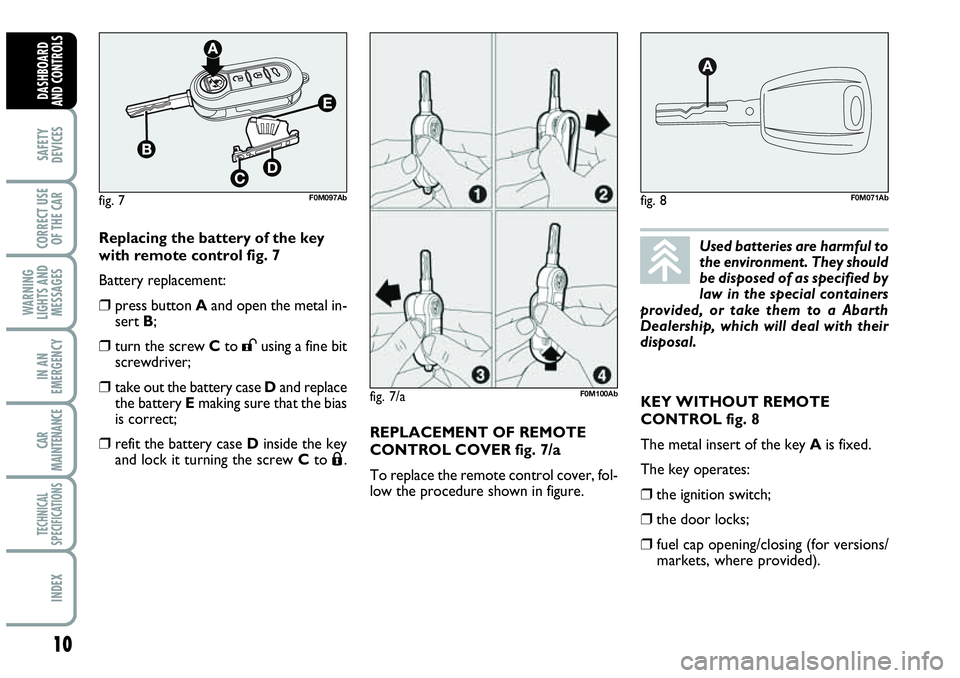
Replacing the battery of the key
with remote control fig. 7
Battery replacement:
❒press button Aand open the metal in-
sert B;
❒turn the screw Cto :using a fine bit
screwdriver;
❒take out the battery case Dand replace
the battery Emaking sure that the bias
is correct;
❒refit the battery case Dinside the key
and lock it turning the screw Cto Á.Used batteries are harmful to
the environment. They should
be disposed of as specified by
law in the special containers
provided, or take them to a Abarth
Dealership, which will deal with their
disposal.
fig. 8F0M071Abfig. 7F0M097Ab
KEY WITHOUT REMOTE
CONTROL fig. 8
The metal insert of the key Ais fixed.
The key operates:
❒the ignition switch;
❒the door locks;
❒fuel cap opening/closing (for versions/
markets, where provided). REPLACEMENT OF REMOTE
CONTROL COVER fig. 7/a
To replace the remote control cover, fol-
low the procedure shown in figure.
fig. 7/aF0M100Ab
Page 29 of 207
27
SAFETY
DEVICES
CORRECT USE
OF THE CAR
WARNING
LIGHTS AND
MESSAGES
IN AN
EMERGENCY
CAR
MAINTENANCE
TECHNICAL
SPECIFICATIONS
INDEX
DASHBOARD
AND CONTROLS
New mission
Reset can be:
– “manual” resetting by the user, by press-
ing the relevant button;
– “automatic” resetting, when the “Trip dis-
tance” reaches 3999.9 km or 9999.9 km
(according to the type of display) or when
the “Travel time” reaches 99.59 (99 hours
and 59 minutes);
– after disconnecting/reconnecting the
battery.
IMPORTANT The reset operation in the
presence of the screens concerning the
“Trip A” makes it possible to reset only
the information associated with this func-
tion.
IMPORTANT The reset operation in the
presence of the screens concerning the
“Trip B” makes it possible to reset only
the information associated with this func-
tion.Start of journey procedure
With ignition key at MAR, press and keep
button TRIPpressed for over 2 seconds
to reset.
Exit Trip
To quit the Trip function: keep button
MENU ESCpressed for over 2 seconds.
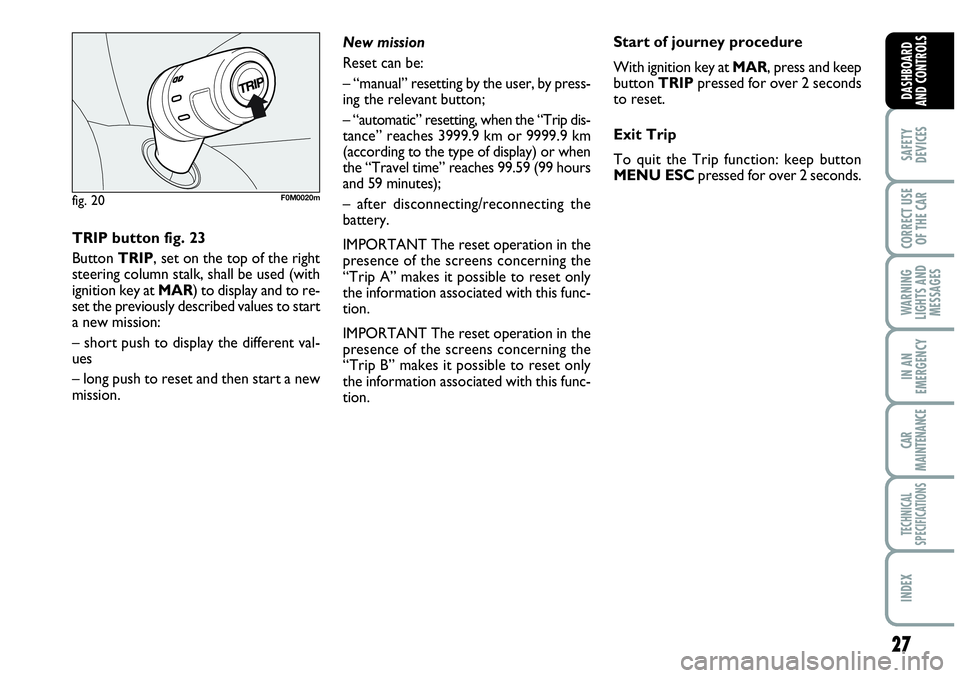
TRIP button fig. 23
Button TRIP, set on the top of the right
steering column stalk, shall be used (with
ignition key at MAR) to display and to re-
set the previously described values to start
a new mission:
– short push to display the different val-
ues
– long push to reset and then start a new
mission.
fig. 20F0M0020m
Page 48 of 207

46
SAFETY
DEVICES
CORRECT USE
OF THE CAR
WARNING
LIGHTS AND
MESSAGES
IN AN
EMERGENCY
CAR
MAINTENANCE
TECHNICAL
SPECIFICATIONS
INDEX
DASHBOARD
AND CONTROLS
Heated rear window and door
mirror demisting/defrosting button
(for versions/markets,
where provided) G
Press this button to activate heated rear
window demisting/defrosting.
When this function is on, the button led
is on.
This function is timed and switches off au-
tomatically after about 20 minutes or by
pressing again the button or by turning the
engine off. It will not be switched on au-
tomatically when restarting the engine.
IMPORTANT Do not apply stickers on the
inside of the rear window over the heat-
ing filaments to avoid damage that might
cause it to stop working properly.
Switching the climate control
system off (OFF) E
Press button Eto turn the system off.
When turned off the system conditions
are the following:
❒set temperature displays off;
❒air recirculation is on;
❒conditioner compressor off;
❒fan off.
Heated rear window can be turned on or
off also when the system is off.
IMPORTANT The system will store the
temperatures set before turning off and
will resume them when pressing any but-
ton (except heated rear window); if the
function corresponding to the button
pressed is off it will be turned on; if on it
will be kept active.
Press AUTOto turn the system in au-
tomatic mode.ADDITIONAL HEATER
(for versions/markets,
where provided)
This device shall be used to speed up pas-
senger compartment warming when it is
very cold.
The additional heater turns off automati-
cally after reaching the required comfort
conditions.
Automatic two-zone climate
control system
The additional heater will switch on au-
tomatically after turning the ignition key
to ON.
Manual Heater and Climate
control system
The additional heater will switch on au-
tomatically by turning knob Ato the last
red sector and turning the fan on (knob
B) to the first speed at least.
IMPORTANT Heater works only with
low outside temperature and engine
coolant temperature.
IMPORTANT Heater will not turn on if
the battery voltage is not sufficient.
Page 56 of 207
54
SAFETY
DEVICES
CORRECT USE
OF THE CAR
WARNING
LIGHTS AND
MESSAGES
IN AN
EMERGENCY
CAR
MAINTENANCE
TECHNICAL
SPECIFICATIONS
INDEX
DASHBOARD
AND CONTROLS
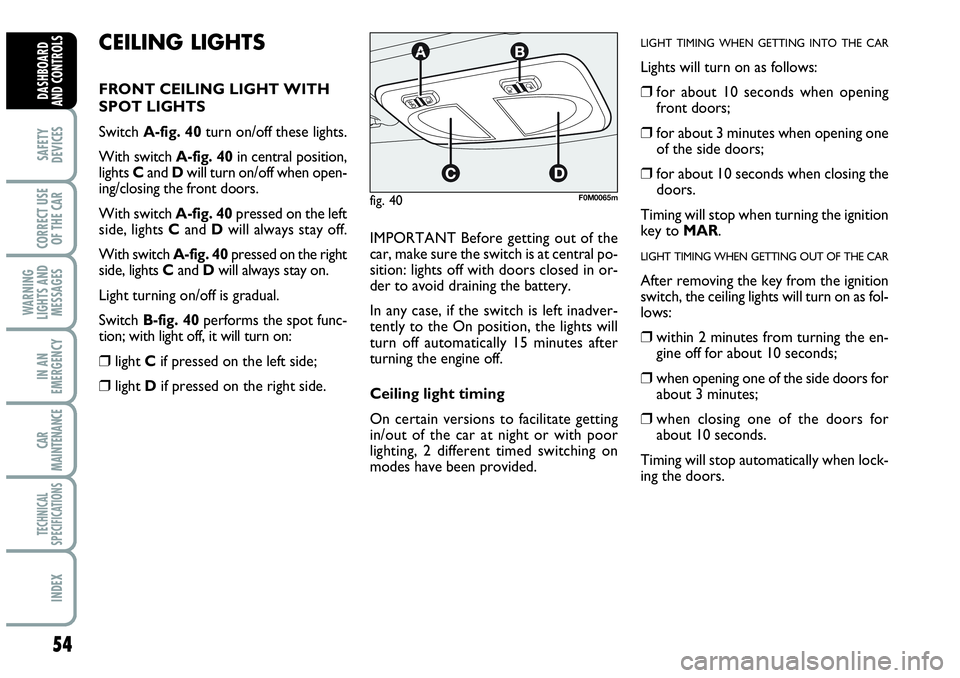
CEILING LIGHTS
FRONT CEILING LIGHT WITH
SPOT LIGHTS
Switch A-fig. 40turn on/off these lights.
With switch A-fig. 40in central position,
lights Cand Dwill turn on/off when open-
ing/closing the front doors.
With switch A-fig. 40pressed on the left
side, lights Cand Dwill always stay off.
With switch A-fig. 40pressed on the right
side, lights Cand Dwill always stay on.
Light turning on/off is gradual.
Switch B-fig. 40performs the spot func-
tion; with light off, it will turn on:
❒light Cif pressed on the left side;
❒light Dif pressed on the right side.IMPORTANT Before getting out of the
car, make sure the switch is at central po-
sition: lights off with doors closed in or-
der to avoid draining the battery.
In any case, if the switch is left inadver-
tently to the On position, the lights will
turn off automatically 15 minutes after
turning the engine off.
Ceiling light timing
On certain versions to facilitate getting
in/out of the car at night or with poor
lighting, 2 different timed switching on
modes have been provided.
LIGHT TIMING WHEN GETTING INTO THE CAR
Lights will turn on as follows:
❒for about 10 seconds when opening
front doors;
❒for about 3 minutes when opening one
of the side doors;
❒for about 10 seconds when closing the
doors.
Timing will stop when turning the ignition
key to MAR.
LIGHT TIMING WHEN GETTING OUT OF THE CAR
After removing the key from the ignition
switch, the ceiling lights will turn on as fol-
lows:
❒within 2 minutes from turning the en-
gine off for about 10 seconds;
❒when opening one of the side doors for
about 3 minutes;
❒when closing one of the doors for
about 10 seconds.
Timing will stop automatically when lock-
ing the doors.
fig. 40F0M0065m
Page 59 of 207
57
SAFETY
DEVICES
CORRECT USE
OF THE CAR
WARNING
LIGHTS AND
MESSAGES
IIN AN
EMERGENCY
CAR
MAINTENANCE
TECHNICAL
SPECIFICATIONS
INDEX
DASHBOARD
AND CONTROLS
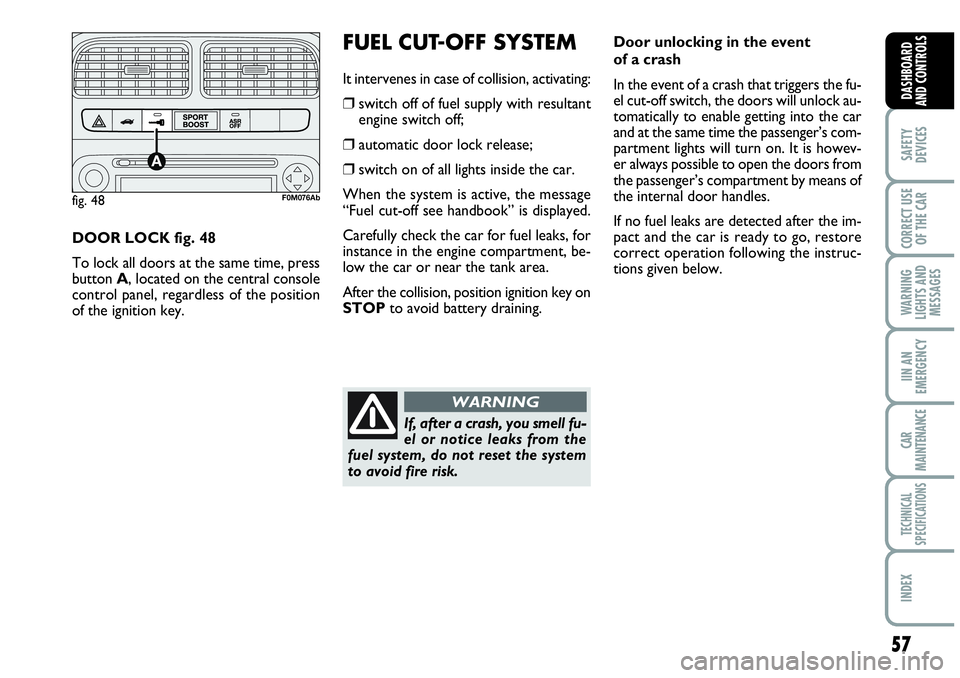
DOOR LOCK fig. 48
To lock all doors at the same time, press
button A, located on the central console
control panel, regardless of the position
of the ignition key.
FUEL CUT-OFF SYSTEM
It intervenes in case of collision, activating:
❒switch off of fuel supply with resultant
engine switch off;
❒automatic door lock release;
❒switch on of all lights inside the car.
When the system is active, the message
“Fuel cut-off see handbook” is displayed.
Carefully check the car for fuel leaks, for
instance in the engine compartment, be-
low the car or near the tank area.
After the collision, position ignition key on
STOPto avoid battery draining.
fig. 48F0M076Ab
Door unlocking in the event
of a crash
In the event of a crash that triggers the fu-
el cut-off switch, the doors will unlock au-
tomatically to enable getting into the car
and at the same time the passenger’s com-
partment lights will turn on. It is howev-
er always possible to open the doors from
the passenger’s compartment by means of
the internal door handles.
If no fuel leaks are detected after the im-
pact and the car is ready to go, restore
correct operation following the instruc-
tions given below.
If, after a crash, you smell fu-
el or notice leaks from the
fuel system, do not reset the system
to avoid fire risk.
WARNING
Page 65 of 207

63
SAFETY
DEVICES
CORRECT USE
OF THE CAR
WARNING
LIGHTS AND
MESSAGES
IIN AN
EMERGENCY
CAR
MAINTENANCE
TECHNICAL
SPECIFICATIONS
INDEX
DASHBOARD
AND CONTROLS
ANTI-CRUSHING SAFETY
SYSTEM
Sunroof is fitted with anti-crushing safety
system that detects the presence of an ob-
stacle during sunroof closing stroke and
that cuts in by stopping and reversing the
sunroof stroke.
INITIALISATION PROCEDURE
Sunroof shall be re-initialised after dis-
connecting the battery or if the relevant
protection fuse is blown.
Proceed as follows:
❒press button A-fig. 68at close posi-
tion;
❒keep the button pressed to close com-
pletely by steps the sunroof;
❒after full closing, wait for sunroof mo-
tor stopping.When leaving the car, the ignition key
should be removed to prevent the sun-
roof from being operated inadvertently
and harming anyone remaining in the car.
Improper use of the sunroof can be dan-
gerous. Before and during its operation
ensure that any passengers are not at risk
from the moving roof either by personal
objects getting caught in the mechanism
or by being injured by it directly.
EMERGENCY OPERATION
If the switch does not work, the sunroof
can be operated manually as follows:
❒remove the protection cap set between
the two sun curtains;
❒take the setscrew wrench (provided as
standard) from the tool bag in the boot;
❒fit the wrench into A-fig. 69and turn
it:
– clockwise to open the sunroof;
– counter-clockwise to close the sun-
roof.
fig. 69F0M0088m
Page 67 of 207

65
SAFETY
DEVICES
CORRECT USE
OF THE CAR
WARNING
LIGHTS AND
MESSAGES
IIN AN
EMERGENCY
CAR
MAINTENANCE
TECHNICAL
SPECIFICATIONS
INDEX
DASHBOARD
AND CONTROLS
After locking doors by:
❒remote control;
❒door revolving plug;
it will not be possible to unlock the doors
by pressing button
A-fig. 72set on the
dashboard.
IMPORTANT With central locking system
on, pulling the internal door handle of one
of the front doors will unlock that door.
Pulling the internal door handle of one of the
rear doors will unlock the relevant door.
Lacking power (blown fuse, battery discon-
nected, etc.) it is however possible to lock
the doors manually.
After exceeding 20 km/h speed, doors will
be locked automatically if the set up menu
function has been selected (see paragraph
“Multifunction display” in this section).
Once the dead lock device
has been actuated, doors
cannot be opened from the passen-
ger’s compartment in any way what-
soever. For this reason, make sure
there are no person left inside the car.
If the battery of the key with remote
control is down, the dead lock device
can be deactivated only by fitting the
metal insert of the key in both front
door revolving plugs as described pre-
viously. DEAD LOCK DEVICE
(for versions/markets,
where provided)
This safety device enables to inhibit:
❒door internal handles;
❒locking/unlocking button A-fig. 72;
thus hindering doors opening from inside
the passenger’s compartment in case of at-
tempt to break-into (e.g.: window breaking).
The dead lock device guarantees the best
protection against unwanted access.
Therefore, it should be actuated every
time the car is parked and left unattended.Device activation
The dead lock device is automatically ac-
tivated on every door when pressing twice
briefly the remote control button
Á,
fig. 70.
Device activation is indicated by 3 flashing
of direction indicators and flashing of the
button led A-fig. 72located on the dash-
board.
If one of the doors is not perfectly closed,
the dead lock device will not activate, thus
preventing that a person getting into the car
from the open door remains blocked inside
the passenger’s compartment when she/he
closes the door.
Device deactivation
The device is deactivated automatically on
every door in the following cases:
❒when opening the driver’s door using the
key without remote control;
❒when unlocking doors using the remote
control;
❒turning the ignition key to MAR.
WARNING
Page 69 of 207

67
SAFETY
DEVICES
CORRECT USE
OF THE CAR
WARNING
LIGHTS AND
MESSAGES
IIN AN
EMERGENCY
CAR
MAINTENANCE
TECHNICAL
SPECIFICATIONS
INDEX
DASHBOARD
AND CONTROLS
fig. 74F0M018Ab
Front and rear passenger door
windows (for versions/markets,
where provided)
Front passenger door armrest and rear
door armrests feature the switches A-
fig. 74to be used for controlling the cor-
responding window.
Improper use of the power
windows can be dangerous.
Before and during its operation en-
sure that any passengers are not at
risk from the moving glass either by
personal objects getting caught in the
mechanism or by being injured by it
directly. Always remove the ignition
key when getting out of the car to
prevent the power windows being op-
erated accidentally and constituting
a danger to the passengers in the car.
WARNINGWindow safety system initialisation
Safety system shall be re-initialised after
disconnecting the battery or if the rele-
vant protection fuse is blown.
Initialisation procedure:
❒fully close manually the window to ini-
tialise;
❒after window stopping, keep on press-
ing the closing control for at least 1 sec-
ond.
Page 112 of 207

110
WARNING
LIGHTS AND
MESSAGES
IN AN
EMERGENCY
CAR
MAINTENANCE
TECHNICAL
SPECIFICATIONS
INDEX
DASHBOARD
AND CONTROLS
SAFETY
DEVICES
CORRECT USE
OF THE CAR
ENGINE STARTING
The car is fitted with an electronic engine
lock device: if the engine fails to start, see
the paragraph “The Fiat CODE system” in
section “Dashboard and controls”.
The engine may be noisier than usual dur-
ing the first seconds of operation, espe-
cially after it has not been used for a while.
This characteristic feature does not com-
promise functionality or reliability of the
hydraulic tappets: the timing system de-
vised to limit servicing.
We recommend that during
the initial period you do not
drive to full car performance
(e.g.: excessive acceleration,
long journeys at top speed, sharp brak-
ing, etc.).
When the engine is switched
off never leave the key into
the ignition switch to prevent
pointless current absorption
from draining the battery.
Running the engine in con-
fined areas is extremely dan-
gerous. The engine consumes oxygen
and produces carbon monoxide
which is a highly toxic and lethal gas.
WARNING
Remember that the servo-
brake and power steering
are not operational until the engine
has been started, therefore much ef-
fort than usual is required on the
brake pedal and steering wheel.
WARNING
Proceed as follows:
❒ensure that the handbrake is up;
❒put the gear lever into neutral;
❒ press the clutch pedal down to the
floor without touching the accelerator;
❒turn the ignition key to AVVand let
it go the moment the engine starts.
If the engine does not start at the first at-
tempt, return the ignition key to STOP
before repeating starting.
If, when the ignition key is at MAR, warn-
ing light
Yremains lit together with
warning light Uturn the key to STOP
STOP and then back to MAR; if the warn-
ing light remains on, try with the other
keys provided with the car.
IMPORTANT If the instrument panel
warning light Ystays on glowing steadi-
ly, contact immediately Abarth Dealership.
IMPORTANT Never leave the ignition key
to MARwhen the engine is off.
Page 114 of 207
112
WARNING
LIGHTS AND
MESSAGES
IN AN
EMERGENCY
CAR
MAINTENANCE
TECHNICAL
SPECIFICATIONS
INDEX
DASHBOARD
AND CONTROLS
SAFETY
DEVICES
CORRECT USE
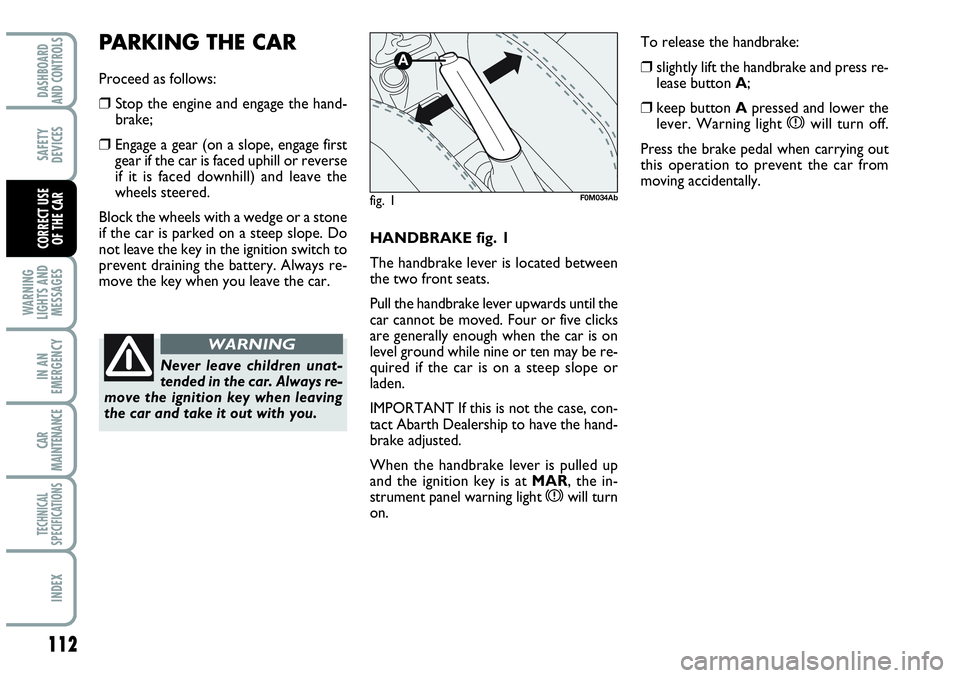
OF THE CARHANDBRAKE fig. 1
The handbrake lever is located between
the two front seats.
Pull the handbrake lever upwards until the
car cannot be moved. Four or five clicks
are generally enough when the car is on
level ground while nine or ten may be re-
quired if the car is on a steep slope or
laden.
IMPORTANT If this is not the case, con-
tact Abarth Dealership to have the hand-
brake adjusted.
When the handbrake lever is pulled up
and the ignition key is at MAR, the in-
strument panel warning light
xwill turn
on.
PARKING THE CAR
Proceed as follows:
❒ Stop the engine and engage the hand-
brake;
❒Engage a gear (on a slope, engage first
gear if the car is faced uphill or reverse
if it is faced downhill) and leave the
wheels steered.
Block the wheels with a wedge or a stone
if the car is parked on a steep slope. Do
not leave the key in the ignition switch to
prevent draining the battery. Always re-
move the key when you leave the car.
Never leave children unat-
tended in the car. Always re-
move the ignition key when leaving
the car and take it out with you.
WARNING
To release the handbrake:
❒slightly lift the handbrake and press re-
lease button A;
❒keep button Apressed and lower the
lever. Warning light xwill turn off.
Press the brake pedal when carrying out
this operation to prevent the car from
moving accidentally.
fig. 1
A
F0M034Ab