stop start Abarth Grande Punto 2010 Owner handbook (in English)
[x] Cancel search | Manufacturer: ABARTH, Model Year: 2010, Model line: Grande Punto, Model: Abarth Grande Punto 2010Pages: 207, PDF Size: 3.01 MB
Page 9 of 207
7
SAFETY
DEVICES
CORRECT USE
OF THE CAR
WARNING
LIGHTS AND
MESSAGES
IN AN
EMERGENCY
CAR
MAINTENANCE
TECHNICAL
SPECIFICATIONS
INDEX
DASHBOARD
AND CONTROLS
THE FIAT CODE SYSTEM
To further protect you car from theft, it
has been fitted with an engine immobilis-
ing system. This system is automatically ac-
tivated when the ignition key is removed.
An electronic device, in fact, is fitted in
each ignition key grip. The device trans-
mits a radio-frequency signal when the en-
gine is started through a special aerial built
into the ignition switch. The modulate sig-
nal, which changes each time the engine is
started, is the “password”, by means of
which the control unit recognises the key
and enables to start the engine.
SYMBOLS
Special coloured labels have been attached
near or actually on some of the compo-
nents of your Grande Punto Abarth.
These labels bear symbols that remind you
of the precautions to be taken as regards
that particular component.
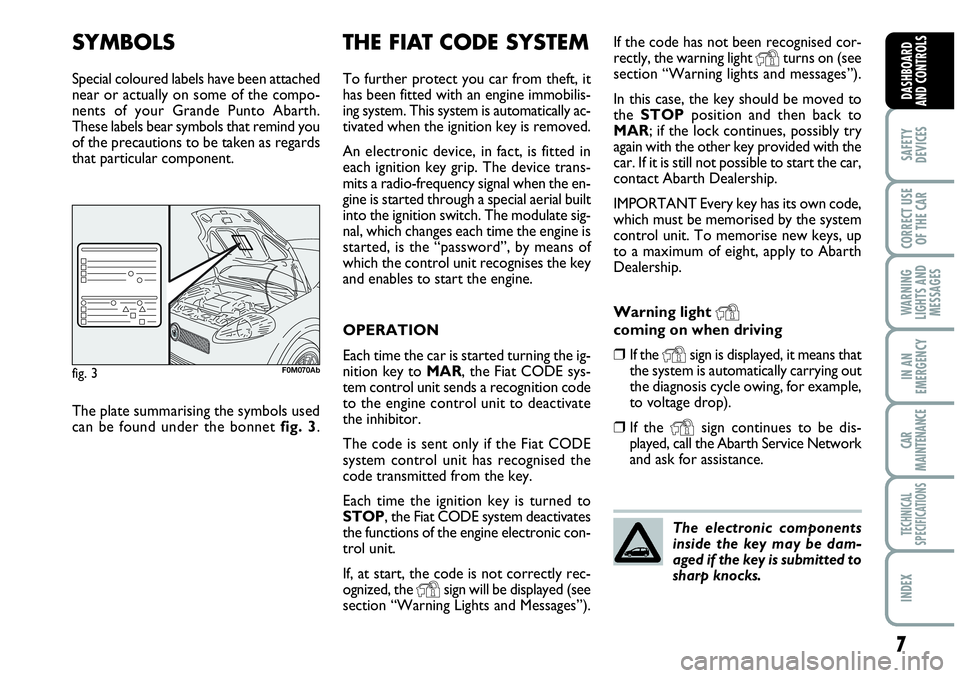
fig. 3F0M070Ab
The plate summarising the symbols used
can be found under the bonnet fig. 3.OPERATION
Each time the car is started turning the ig-
nition key to MAR, the Fiat CODE sys-
tem control unit sends a recognition code
to the engine control unit to deactivate
the inhibitor.
The code is sent only if the Fiat CODE
system control unit has recognised the
code transmitted from the key.
Each time the ignition key is turned to
STOP, the Fiat CODE system deactivates
the functions of the engine electronic con-
trol unit.
If, at start, the code is not correctly rec-
ognized, the
Ysign will be displayed (see
section “Warning Lights and Messages”).If the code has not been recognised cor-
rectly, the warning light
Yturns on (see
section “Warning lights and messages”).
In this case, the key should be moved to
the STOPposition and then back to
MAR; if the lock continues, possibly try
again with the other key provided with the
car. If it is still not possible to start the car,
contact Abarth Dealership.
IMPORTANT Every key has its own code,
which must be memorised by the system
control unit. To memorise new keys, up
to a maximum of eight, apply to Abarth
Dealership.
Warning light
Ycoming on when driving
❒If the Ysign is displayed, it means that
the system is automatically carrying out
the diagnosis cycle owing, for example,
to voltage drop).
❒If the Ysign continues to be dis-
played, call the Abarth Service Network
and ask for assistance.
The electronic components
inside the key may be dam-
aged if the key is submitted to
sharp knocks.
Page 14 of 207
12
SAFETY
DEVICES
CORRECT USE
OF THE CAR
WARNING
LIGHTS AND
MESSAGES
IN AN
EMERGENCY
CAR
MAINTENANCE
TECHNICAL
SPECIFICATIONS
INDEX
DASHBOARD
AND CONTROLS
IGNITION DEVICE
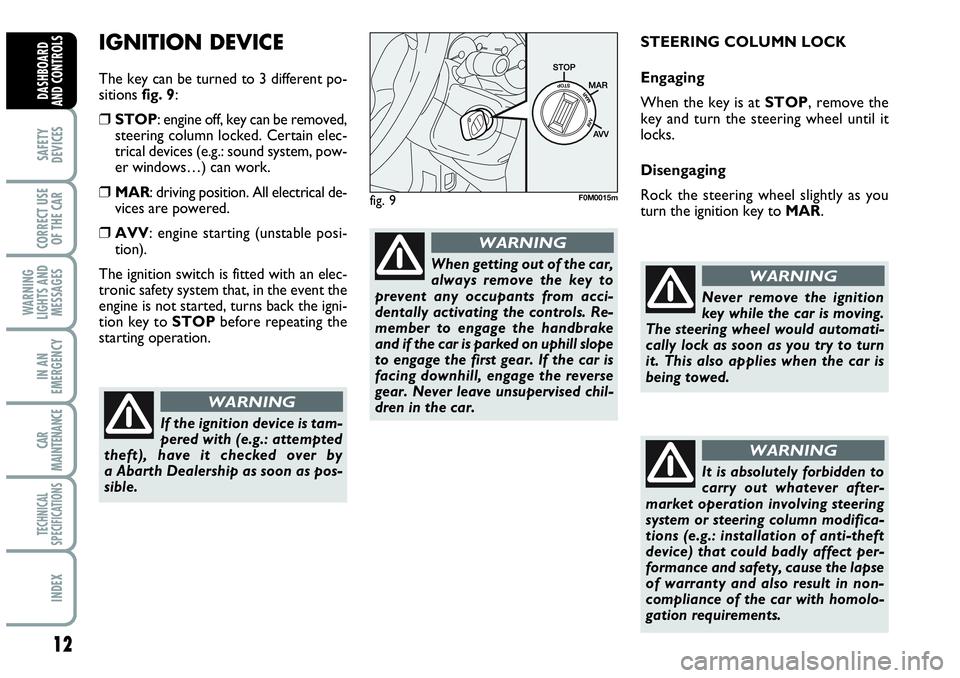
The key can be turned to 3 different po-
sitions fig. 9:
❒STOP: engine off, key can be removed,
steering column locked. Certain elec-
trical devices (e.g.: sound system, pow-
er windows…) can work.
❒MAR: driving position. All electrical de-
vices are powered.
❒AVV: engine starting (unstable posi-
tion).
The ignition switch is fitted with an elec-
tronic safety system that, in the event the
engine is not started, turns back the igni-
tion key to STOPbefore repeating the
starting operation.STEERING COLUMN LOCK
Engaging
When the key is at STOP, remove the
key and turn the steering wheel until it
locks.
Disengaging
Rock the steering wheel slightly as you
turn the ignition key to MAR.
If the ignition device is tam-
pered with (e.g.: attempted
theft), have it checked over by
a Abarth Dealership as soon as pos-
sible.
WARNING
When getting out of the car,
always remove the key to
prevent any occupants from acci-
dentally activating the controls. Re-
member to engage the handbrake
and if the car is parked on uphill slope
to engage the first gear. If the car is
facing downhill, engage the reverse
gear. Never leave unsupervised chil-
dren in the car.
WARNING
fig. 9F0M0015m
Never remove the ignition
key while the car is moving.
The steering wheel would automati-
cally lock as soon as you try to turn
it. This also applies when the car is
being towed.
WARNING
It is absolutely forbidden to
carry out whatever after-
market operation involving steering
system or steering column modifica-
tions (e.g.: installation of anti-theft
device) that could badly affect per-
formance and safety, cause the lapse
of warranty and also result in non-
compliance of the car with homolo-
gation requirements.
WARNING
Page 40 of 207

38
SAFETY
DEVICES
CORRECT USE
OF THE CAR
WARNING
LIGHTS AND
MESSAGES
IN AN
EMERGENCY
CAR
MAINTENANCE
TECHNICAL
SPECIFICATIONS
INDEX
DASHBOARD
AND CONTROLS
Window demisting
In the event of considerable outside mois-
ture and/or rain and/or considerable dif-
ferences in temperature inside and outside
the passenger compartment, perform the
following preventive demisting procedure:
❒knob Aturned to red section;
❒turn air recirculation off by pressing
button D, button led off;
❒turn knob Cto -or to ®if the win-
dows do not demist;
❒turn knob Bto 2ndspeed.
IMPORTANT The climate control system
is very useful to prevent window misting
up in presence of high humidity since it de-
humidifies the air.HEATED REAR WINDOW
AND DOOR MIRROR
DEMISTING/DEFROSTING
(for versions/markets, where
provided) fig. 33
Press button Ato start this function;
when this function is on the button led is
on.
This function is timed and switches off au-
tomatically after 20 minutes. To cut out
this function press again button A.
IMPORTANT Do not apply stickers on
the inside of the rear window over the
heating filaments to avoid damage that
might cause it to stop working properly. After demisting/defrosting, operate the
controls to keep the required comfort.
IMPORTANT The climate control system
is very useful to speed up demisting since
it dehumidifies the air. Set controls to
demisting function and switch on the cli-
mate control system by pressing button
E; the knob led will turn on.
fig. 33F0M0038m
Page 47 of 207

45
SAFETY
DEVICES
CORRECT USE
OF THE CAR
WARNING
LIGHTS AND
MESSAGES
IIN AN
EMERGENCY
CAR
MAINTENANCE
TECHNICAL
SPECIFICATIONS
INDEX
DASHBOARD
AND CONTROLS
Climate control compressor on/off
button B
Pressing button
√when the button led
is on, will deactivate compressor and turn
the button led off. Pressing the button
when the led is off will activate compres-
sor and turn the button led on. When
turning the compressor off, the system will
deactivate air recirculation to prevent win-
dow misting up.
In this event, although the system is able
to keep the required temperature, the
wording FULLwill disappear from the
display. If the system is no longer able to
keep the required temperature, temper-
ature value will flash and the wording
AUTOwill disappear from the display.
IMPORTANT With the climate control
compressor off, it is not possible to admit
air to the passenger compartment with a
temperature below the outside tempera-
ture; moreover, under certain environ-
mental conditions, windows could mist up
fastly since air is not dehumidified.
The switching off of the climate control
compressor remains in storage even when
the engine has been stopped.
To restore automatic control for switch-
ing on the climate control compressor,
press again button
√or press button AU-
TO.
With climate control compressor off if
outside temperature is higher than the set
one the system will not be able to keep
the required condition, the temperaturevalue will then start to flash on the display
for a few seconds and wording AUTO
will then go off.
With climate control compressor off, the
fan speed can be set to zero manually.
With compressor on and engine running,
the fan speed cannot be lower that one
bar on the display.
Fast window demisting/defrosting
button F
Press this button: the climate control sys-
tem will automatically switch on all the
functions required for fast windscreen and
front side window demisting/defrosting,
that is:
❒ switches on climate control compres-
sor when climatic conditions are suit-
able;
❒air recirculation off;
❒maximum air temperature HIon both
areas;
❒activates proper fan speed according to
engine coolant temperature to limit the
flow into the passenger compartment of
air not warm enough to demist the win-
dows;
❒ directs air flow to windscreen and front
side windows vents;
❒turns heated rear window on.IMPORTANT Fast demisting/defrosting
function stays on for about 3 minutes,
since engine coolant temperature reach-
es the proper temperature.
When the max. demisting/defrosting func-
tion is on, the button led and the heated
rear window button led are on.
FULL AUTOwording on the display is
off.
When the max. demisting/defrosting func-
tion is on, the only manual operations pos-
sible are manual adjustment of the fan
speed and switching heated rear window
off. Pressing the max. demisting/defrosting
button or the air recirculation buttons or
compressor off button or the AUTO
button, the system switches off the max.
demisting/defrosting function and restores
the operating conditions of the system pri-
or to turning it on.
Page 48 of 207

46
SAFETY
DEVICES
CORRECT USE
OF THE CAR
WARNING
LIGHTS AND
MESSAGES
IN AN
EMERGENCY
CAR
MAINTENANCE
TECHNICAL
SPECIFICATIONS
INDEX
DASHBOARD
AND CONTROLS
Heated rear window and door
mirror demisting/defrosting button
(for versions/markets,
where provided) G
Press this button to activate heated rear
window demisting/defrosting.
When this function is on, the button led
is on.
This function is timed and switches off au-
tomatically after about 20 minutes or by
pressing again the button or by turning the
engine off. It will not be switched on au-
tomatically when restarting the engine.
IMPORTANT Do not apply stickers on the
inside of the rear window over the heat-
ing filaments to avoid damage that might
cause it to stop working properly.
Switching the climate control
system off (OFF) E
Press button Eto turn the system off.
When turned off the system conditions
are the following:
❒set temperature displays off;
❒air recirculation is on;
❒conditioner compressor off;
❒fan off.
Heated rear window can be turned on or
off also when the system is off.
IMPORTANT The system will store the
temperatures set before turning off and
will resume them when pressing any but-
ton (except heated rear window); if the
function corresponding to the button
pressed is off it will be turned on; if on it
will be kept active.
Press AUTOto turn the system in au-
tomatic mode.ADDITIONAL HEATER
(for versions/markets,
where provided)
This device shall be used to speed up pas-
senger compartment warming when it is
very cold.
The additional heater turns off automati-
cally after reaching the required comfort
conditions.
Automatic two-zone climate
control system
The additional heater will switch on au-
tomatically after turning the ignition key
to ON.
Manual Heater and Climate
control system
The additional heater will switch on au-
tomatically by turning knob Ato the last
red sector and turning the fan on (knob
B) to the first speed at least.
IMPORTANT Heater works only with
low outside temperature and engine
coolant temperature.
IMPORTANT Heater will not turn on if
the battery voltage is not sufficient.
Page 51 of 207

49
SAFETY
DEVICES
CORRECT USE
OF THE CAR
WARNING
LIGHTS AND
MESSAGES
IIN AN
EMERGENCY
CAR
MAINTENANCE
TECHNICAL
SPECIFICATIONS
INDEX
DASHBOARD
AND CONTROLS
WINDOW WASHING
The right stalk fig. 37controls windscreen
wiper/washer and heated rear window
wiper/washer operation.
WINDSCREEN WASHER/
WIPER
The device can only work when the igni-
tion key is atMAR.
The stalk ring nut can be moved to four
different positions:
Owindscreen wiper off;
≤intermittent;
≥continuous slow;
¥continuos fast.
Moving the stalk to A(unstable position)
operation is limited to the time the stalk
is held in this position. When the stalk is
released it returns to its original position
automatically stopping the wiper.Never use the window wiper
to remove ice or snow from
the windscreen. In these con-
ditions, the wiper is submitted
to excessive effort that results in motor
protection cutting in and wiper opera-
tion inhibition for few seconds as a con-
sequence. If operation is not restored
(also after restarting the car by the ig-
nition key) contact Abarth Dealership.
With ring nut at
≤, wiping speed is au-
tomatically adapted to the car speed.
IMPORTANT Replace wiper blades as
specified in section “Car maintenance”.
fig. 37F0M0062m
Page 52 of 207
50
SAFETY
DEVICES
CORRECT USE
OF THE CAR
WARNING
LIGHTS AND
MESSAGES
IN AN
EMERGENCY
CAR
MAINTENANCE
TECHNICAL
SPECIFICATIONS
INDEX
DASHBOARD
AND CONTROLS
RAIN SENSOR (for versions/
markets, where provided)
The rain sensor is located behind the dri-
ving mirror in contact with the windscreen
and has the purpose of automatically ad-
just, during the intermittent operation, the
frequency of the windscreen wiper
strokes as to the rain intensity.
IMPORTANT Keep clean the glass in the
sensor area.
Activation
Move the right-hand stalk knurled ring to
≤fig. 37.
The activation of the rain sensor is sig-
nalled by a control acquisition “stroke”.
Through the set up menu it is possible to
increase the sensitivity of the rain sensor.
The increase of the sensitivity of the rain
sensor is signalled by a control and acqui-
sition “stroke”.
Operating the windscreen washer with
the rain sensor activated the normal wash-
ing cycle is performed at the end of which
the rain sensor resumes its normal auto-
matic function.Deactivation
Change the stalk knurled ring position
from
≤fig. 37or turn the ignition key
to STOP.
At next engine starting (key at MAR), the
sensor will not be reactivated even if the
knurled ring is still at
≤fig. 37. To ac-
tivate the rain sensor you have to move
the knurled ring from
≤to another po-
sition and then again to
≤.
Rain sensor activation will be indicated by
at least one wiper “stroke” even if the
windscreen is dry.
The rain sensor is able to recognize and
automatically adjust itself in the presence
of the following particular conditions:
❒ impurities on the controlled surface
(salt, dirt, etc.);
❒difference between day and night.
IMPORTANT Streaks of water may cause
unrequired blade moving. “Smart washing” function
Pulling the stalk towards the steering wheel
(unstable position) operates the wind-
screen washer.
Keeping the stalk pulled for more than half
a second, with just one movement it is
possible to operate the washer jet and the
wiper at the same time.
The wiper stops working three strokes af-
ter releasing the stalk.
A further stroke after 6 seconds com-
pletes the wiping operation.
Page 58 of 207

56
SAFETY
DEVICES
CORRECT USE
OF THE CAR
WARNING
LIGHTS AND
MESSAGES
IN AN
EMERGENCY
CAR
MAINTENANCE
TECHNICAL
SPECIFICATIONS
INDEX
DASHBOARD
AND CONTROLS
HEATED REAR WINDOW fig. 47
Press button Ato turn on this function.
This function will turn off automatically af-
ter about 20 minutes. REAR FOG LIGHT fig. 45
Press button 4, to turn these lights on it
is necessary to have the dipped beam head-
lights or the front fog lights (for versions/
markets, where provided) switched on.
Warning light 4on the instrument panel
will turn on.
Press the button again to turn the light off
or turn off dipped beams and/or front fog
lights (for versions/markets, where pro-
vided).
The use of rear fog lights is governed by the
Highway Code of the country you are in.
Keep to the rules.
PARKING LIGHTS
These lights can only be turned on with ig-
nition key at STOP or removed, by mov-
ing the left stalk knurled ring first to Oand
then to
6or 2.
The warning light
3on the instrument
cluster will come on at the same time.SPORT BOOST fig. 46
Press the Abutton to start the “SPORT
BOOST” function (see “SPORT BOO-
ST” paragraph in the herein section). On-
ce this function has been started, the
“SPORT” warning light on the instru-
ment board panel turns on. Press the A
button again to switch this function off.
fig. 45F0M0071mfig. 47F0M0038mfig. 46F0M074Ab
Page 68 of 207
66
SAFETY
DEVICES
CORRECT USE
OF THE CAR
WARNING
LIGHTS AND
MESSAGES
IN AN
EMERGENCY
CAR
MAINTENANCE
TECHNICAL
SPECIFICATIONS
INDEX
DASHBOARD
AND CONTROLS
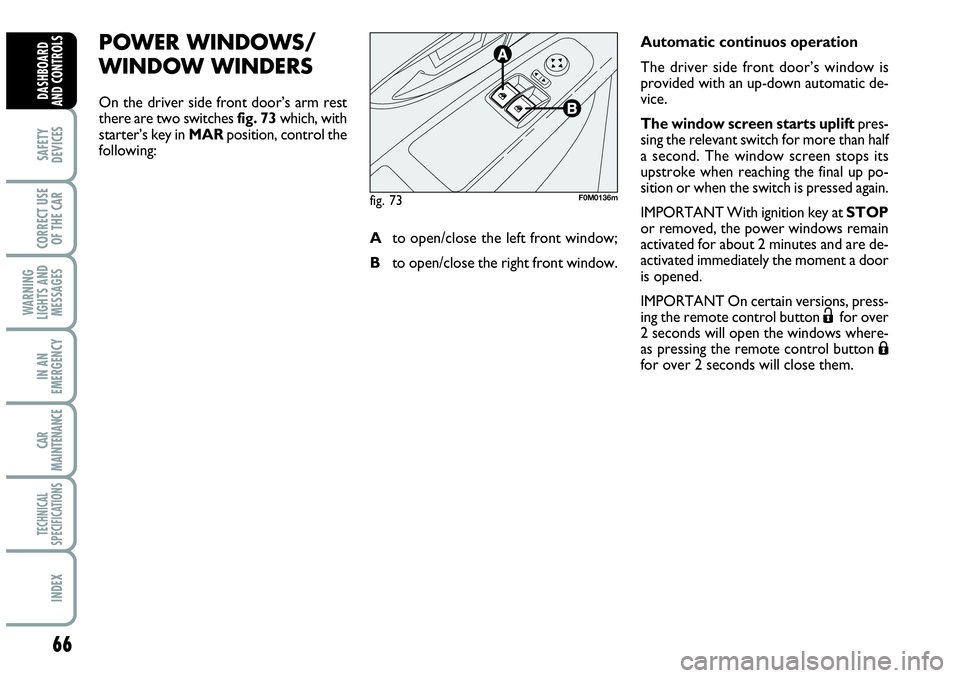
POWER WINDOWS/
WINDOW WINDERS
On the driver side front door’s arm rest
there are two switches fig. 73which, with
starter’s key in MARposition, control the
following: Automatic continuos operation
The driver side front door’s window is
provided with an up-down automatic de-
vice.
The window screen starts upliftpres-
sing the relevant switch for more than half
a second. The window screen stops its
upstroke when reaching the final up po-
sition or when the switch is pressed again.
IMPORTANT With ignition key at STOP
or removed, the power windows remain
activated for about 2 minutes and are de-
activated immediately the moment a door
is opened.
IMPORTANT On certain versions, press-
ing the remote control button
Ëfor over
2 seconds will open the windows where-
as pressing the remote control button
Áfor over 2 seconds will close them. Ato open/close the left front window;
Bto open/close the right front window.
fig. 73F0M0136m
Page 97 of 207
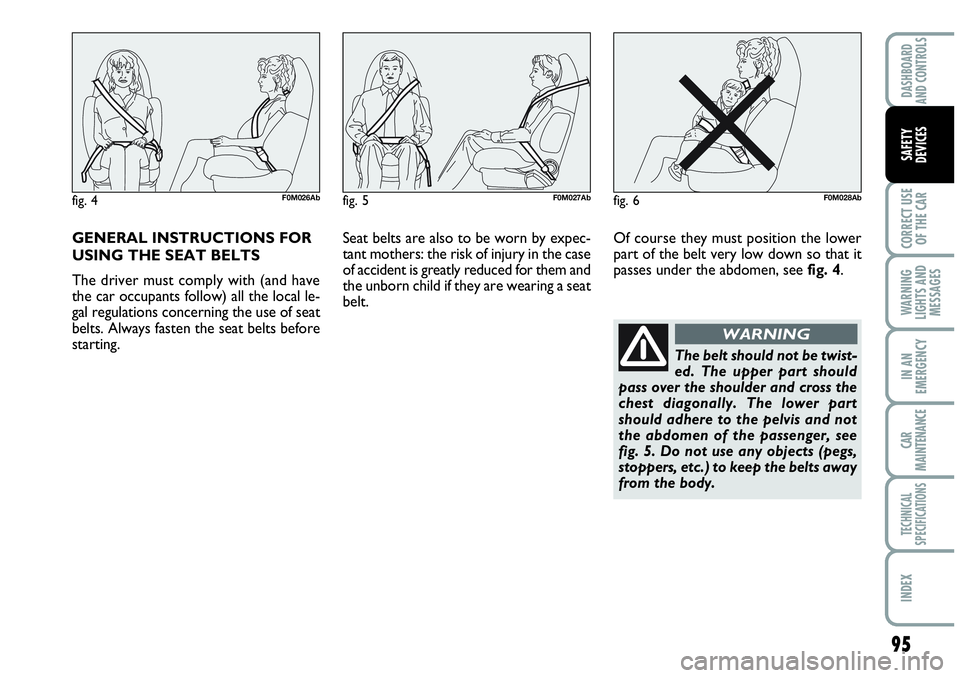
GENERAL INSTRUCTIONS FOR
USING THE SEAT BELTS
The driver must comply with (and have
the car occupants follow) all the local le-
gal regulations concerning the use of seat
belts. Always fasten the seat belts before
starting.Seat belts are also to be worn by expec-
tant mothers: the risk of injury in the case
of accident is greatly reduced for them and
the unborn child if they are wearing a seat
belt.Of course they must position the lower
part of the belt very low down so that it
passes under the abdomen, see fig. 4.
95
CORRECT USE
OF THE CAR
WARNING
LIGHTS AND
MESSAGES
IN AN
EMERGENCY
CAR
MAINTENANCE
TECHNICAL
SPECIFICATIONS
INDEX
DASHBOARD
AND CONTROLS
SAFETY
DEVICES
The belt should not be twist-
ed. The upper part should
pass over the shoulder and cross the
chest diagonally. The lower part
should adhere to the pelvis and not
the abdomen of the passenger, see
fig. 5. Do not use any objects (pegs,
stoppers, etc.) to keep the belts away
from the body.
WARNING
fig. 4F0M026Abfig. 5F0M027Abfig. 6F0M028Ab