USB port Acura ILX 2014 Navigation Manual
[x] Cancel search | Manufacturer: ACURA, Model Year: 2014, Model line: ILX, Model: Acura ILX 2014Pages: 234, PDF Size: 8.8 MB
Page 33 of 234
32
Interface SettingsWallpapers Setting
System Setup
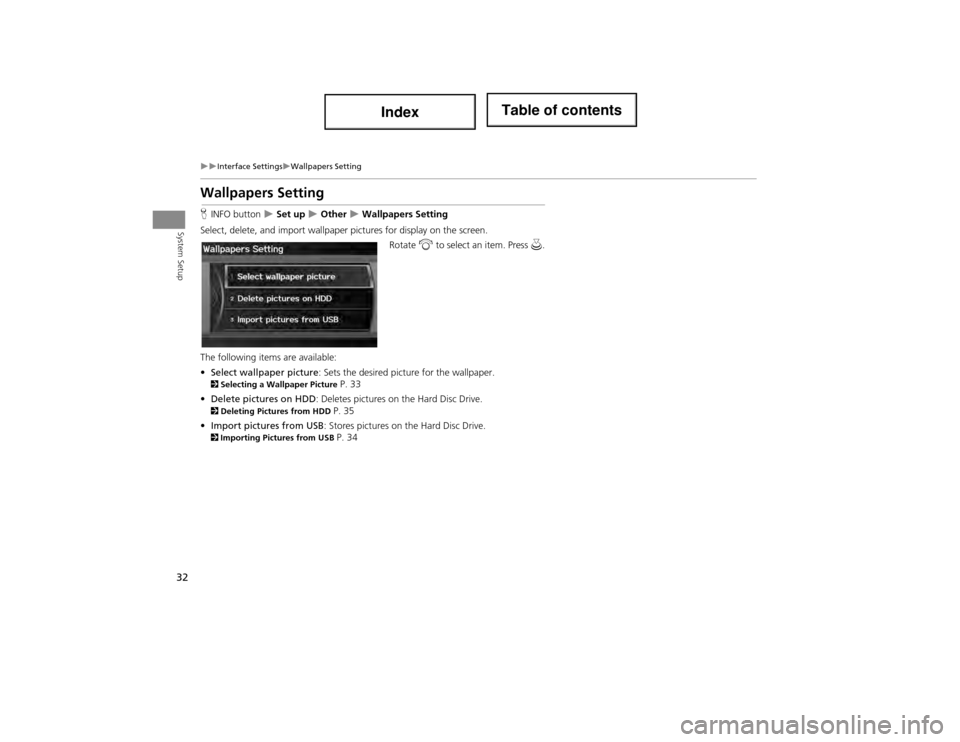
Wallpapers Setting
HINFO button Set up Other Wallpapers Setting
Select, delete, and import wallpaper pictures for display on the screen. Rotate i to select an item. Press u.
The following items are available:
• Select wallpaper picture : Sets the desired picture for the wallpaper.
2Selecting a Wallpaper Picture P. 33
• Delete pictures on HDD : Deletes pictures on the Hard Disc Drive.
2Deleting Pictures from HDD P. 35
• Import pictures from USB : Stores pictures on the Hard Disc Drive.
2Importing Pictures from USB P. 34
Page 35 of 234
34
Interface SettingsWallpapers Setting
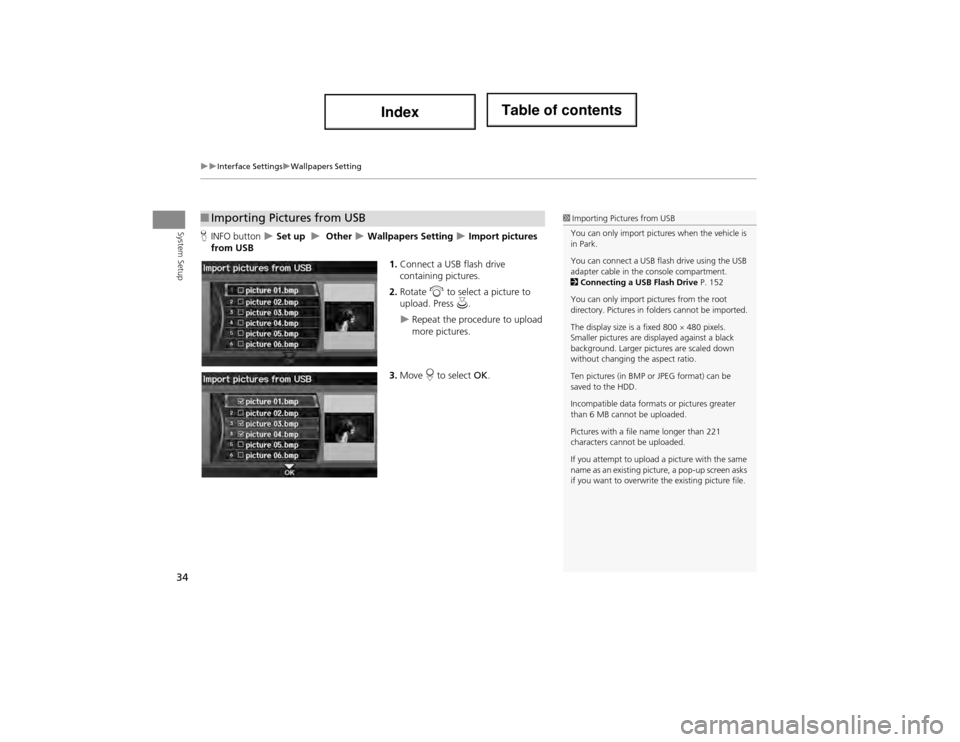
System SetupHINFO button Set up Other Wallpapers Setting Import pictures
from USB
1.Connect a USB flash drive
containing pictures.
2. Rotate i to select a picture to
upload. Press u.
Repeat the procedure to upload
more pictures.
3. Move r to select OK.
■Importing Pictures from USB1 Importing Pictures from USB
You can only import pictures when the vehicle is
in Park.
You can connect a USB flash drive using the USB
adapter cable in the console compartment.
2 Connecting a USB Flash Drive P. 152
You can only import pictures from the root
directory. Pictures in folders cannot be imported.
The display size is a fixed 800 480 pixels.
Smaller pictures are displayed against a black
background. Larger pictures are scaled down
without changing the aspect ratio.
Ten pictures (in BMP or JPEG format) can be
saved to the HDD.
Incompatible data formats or pictures greater
than 6 MB cannot be uploaded.
Pictures with a file name longer than 221
characters cannot be uploaded.
If you attempt to upload a picture with the same
name as an existing picture, a pop-up screen asks
if you want to overwrite the existing picture file.
Page 125 of 234
124
Audio
Audio System
About Your Audio System
The audio system features FM/AM radio and XM® Radio. It can also play audio discs,
WMA/MP3/AAC tracks, iPod®, USB flash drives, and Bluetooth® devices.
The audio system is operable from the butt ons and switches on the panel, or the
remote controls on the steering wheel.
2 Audio Remote Controls P. 1592Audio System P. 6
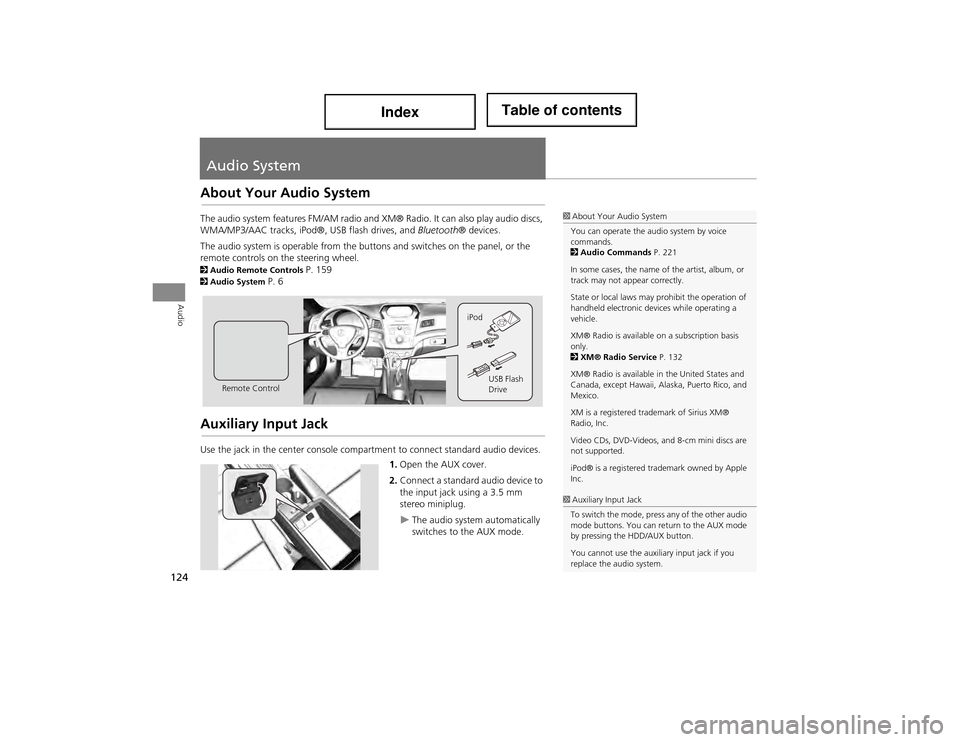
Auxiliary Input Jack
Use the jack in the center console compartment to connect standard audio devices.
1.Open the AUX cover.
2. Connect a standard audio device to
the input jack using a 3.5 mm
stereo miniplug.
The audio system automatically
switches to the AUX mode.
1About Your Audio System
You can operate the audio system by voice
commands.
2 Audio Commands P. 221
In some cases, the name of the artist, album, or
track may not appear correctly.
State or local laws may prohibit the operation of
handheld electronic de vices while operating a
vehicle.
XM® Radio is available on a subscription basis
only.
2 XM® Radio Service P. 132
XM® Radio is available in the United States and
Canada, except Hawaii, Al aska, Puerto Rico, and
Mexico.
XM is a registered trademark of Sirius XM®
Radio, Inc.
Video CDs, DVD-Videos, and 8-cm mini discs are
not supported.
iPod® is a registered trademark owned by Apple
Inc.
Remote Control iPod
USB Flash
Drive
1Auxiliary Input Jack
To switch the mode, press any of the other audio
mode buttons. You can return to the AUX mode
by pressing the HDD/AUX button.
You cannot use the auxiliary input jack if you
replace the audio system.
Page 153 of 234
152
Audio
Playing a USB Flash Drive
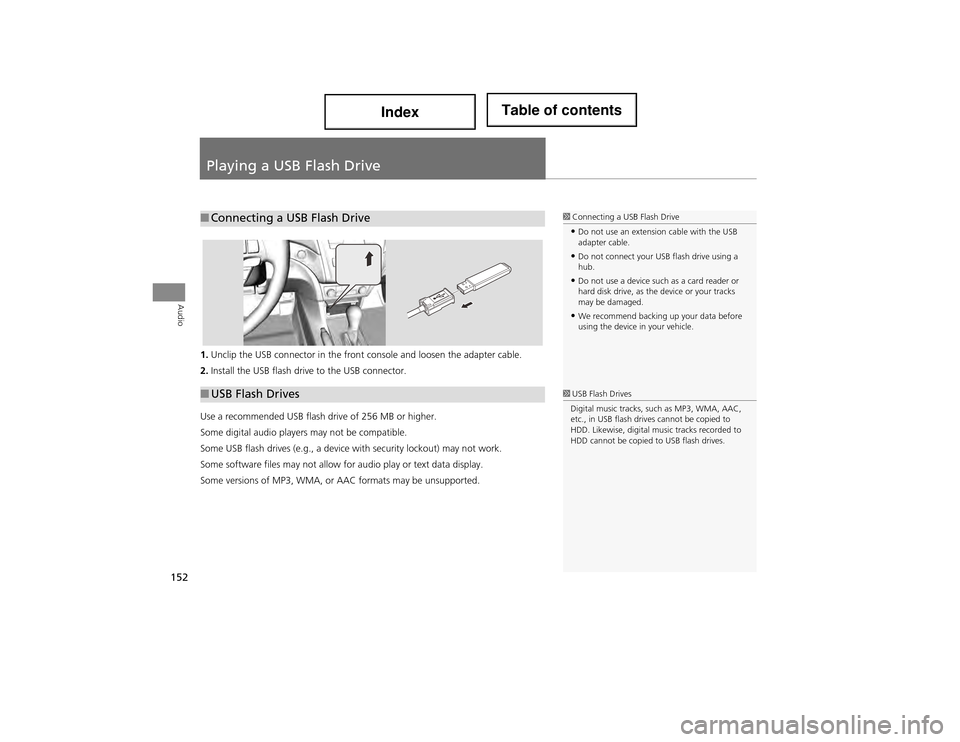
1.Unclip the USB connector in the front console and loosen the adapter cable.
2. Install the USB flash driv e to the USB connector.
Use a recommended USB flash drive of 256 MB or higher.
Some digital audio players may not be compatible.
Some USB flash drives (e.g., a device with security lockout) may not work.
Some software files may not allow for audio play or text data display.
Some versions of MP3, WMA, or AAC formats may be unsupported.
■ Connecting a USB Flash Drive1 Connecting a USB Flash Drive
•Do not use an extension cable with the USB
adapter cable.
•Do not connect your USB flash drive using a
hub.
•Do not use a device such as a card reader or
hard disk drive, as the device or your tracks
may be damaged.
•We recommend backing up your data before
using the device in your vehicle.
■USB Flash Drives1 USB Flash Drives
Digital music tracks, such as MP3, WMA, AAC,
etc., in USB flash drives cannot be copied to
HDD. Likewise, digital mu sic tracks recorded to
HDD cannot be copied to USB flash drives.
Page 154 of 234
153
Playing a USB Flash DriveSelecting USB Mode
Audio
Selecting USB Mode
1.Connect the USB flash drive to the USB adapter cable in the console
compartment.
2. Press the HDD/AUX button until you get to USB mode.
3. Select a track using skip, scan , folder list, or track list.
The current track number and folder number are displayed on the display.
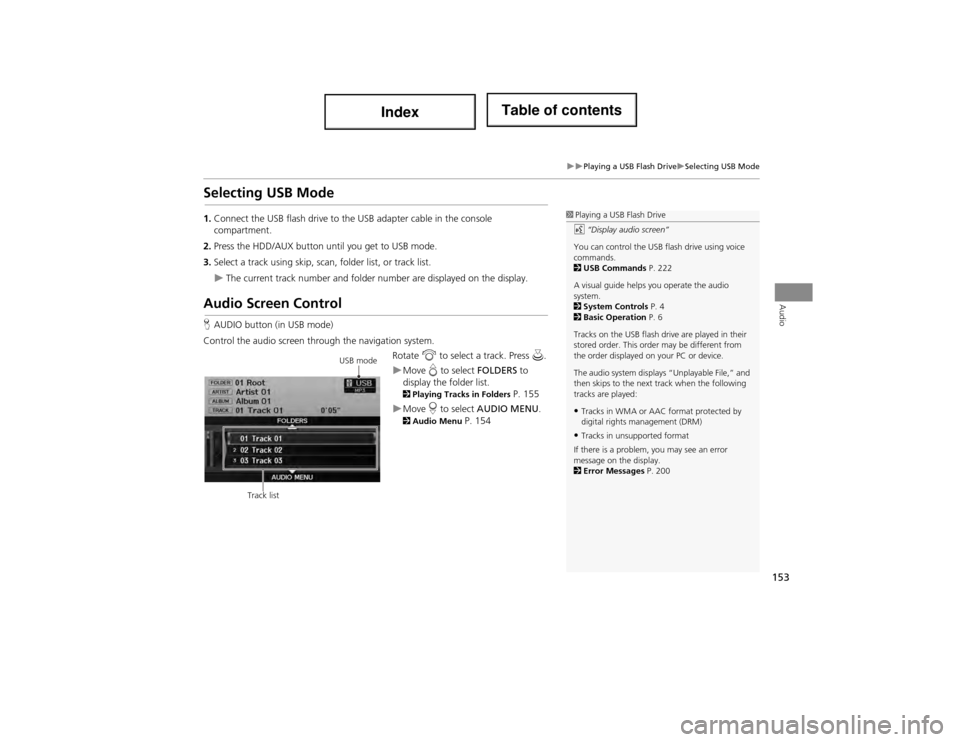
Audio Screen Control
HAUDIO button (in USB mode)
Control the audio screen through the navigation system. Rotate i to select a track. Press u.
Move e to select FOLDERS to
display the folder list.
2 Playing Tracks in Folders P. 155
Move r to select AUDIO MENU . 2Audio Menu P. 154
1Playing a USB Flash Drive
d “Display audio screen”
You can control the USB flash drive using voice
commands.
2 USB Commands P. 222
A visual guide helps you operate the audio
system.
2 System Controls P. 4
2 Basic Operation P. 6
Tracks on the USB flash dr ive are played in their
stored order. This order may be different from
the order displayed on your PC or device.
The audio system displays “Unplayable File,” and
then skips to the next track when the following
tracks are played:
•Tracks in WMA or AAC format protected by
digital rights management (DRM)
•Tracks in unsupported format
If there is a problem, you may see an error
message on the display.
2 Error Messages P. 200
USB mode
Track list
Page 160 of 234
159
Audio
Audio Remote Controls
Steering Wheel Controls
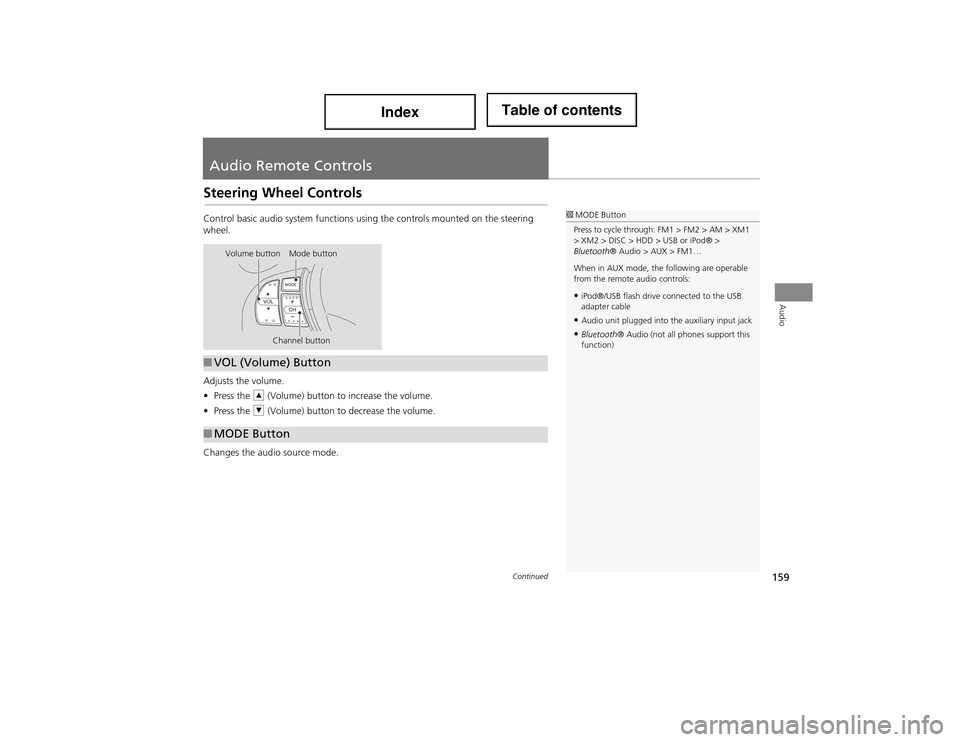
Control basic audio system functions using the controls mounted on the steering
wheel.
Adjusts the volume.
•Press the R (Volume) button to increase the volume.
• Press the U (Volume) button to decrease the volume.
Changes the audio source mode.1 MODE Button
Press to cycle through: FM1 > FM2 > AM > XM1
> XM2 > DISC > HDD > USB or iPod® >
Bluetooth ® Audio > AUX > FM1…
When in AUX mode, the following are operable
from the remote audio controls:
•iPod®/USB flash drive connected to the USB
adapter cable
•Audio unit plugged into the auxiliary input jack
•Bluetooth ® Audio (not all phones support this
function)
Volume button Mode button
Channel button
■VOL (Volume) Button
■MODE Button
Continued
Page 204 of 234
203
Error MessagesUSB Flash Drive
Troubleshooting
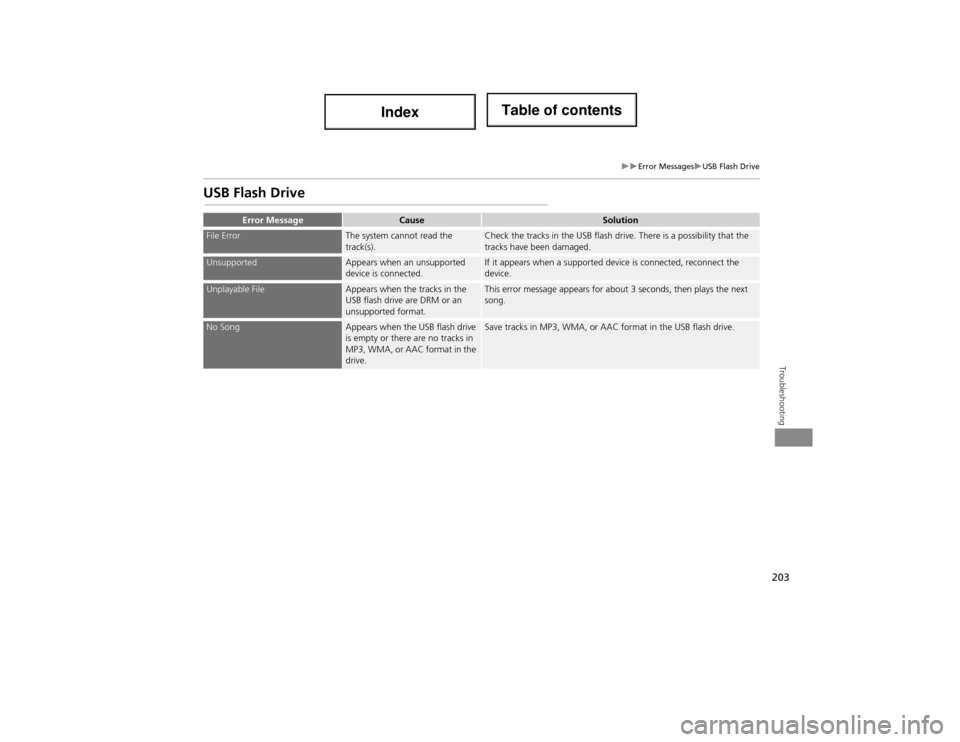
USB Flash Drive
Error MessageCauseSolution
File ErrorThe system cannot read the
track(s).Check the tracks in the USB flash drive. There is a possibility that the
tracks have been damaged.
UnsupportedAppears when an unsupported
device is connected.If it appears when a supported device is connected, reconnect the
device.
Unplayable FileAppears when the tracks in the
USB flash drive are DRM or an
unsupported format.This error message appears for about 3 seconds, then plays the next
song.
No SongAppears when the USB flash drive
is empty or there are no tracks in
MP3, WMA, or AAC format in the
drive.Save tracks in MP3, WMA, or AAC format in the USB flash drive.
Page 233 of 234
232
Index
Index
RepeatDisc ........................................................ 134
HDD ............. .................................. ........ 139
iPod® .................................................... 149
USB Flash Drive ...................................... 154
Rerouting ................................................... 49
Reset Clock Settings .................................. 56
Reset Factory Default ................................ 60
Restaurant (Place Category) ..................... 76
Roadside Assistance ................................ 189
Route (Menu) .......................................... 110
Route Pref. ................................................. 88
Routing & Guidance .................................. 48
S
Scan
Disc ........................................................ 135
FM/AM Radio ......................................... 127
HDD ............. .................................. ........ 139
USB Flash Drive ...................................... 154
SCAN/A.SEL Bar ............................................ 6
Scenic Road Information ......................... 188
Schedule
Calendar ................................................ 184
Search a Next Connected Phone ............ 168
Search Along ........................................... 113
Search Around ......................................... 113
Search by Keyword .................................... 77
Search Phonebook .................................. 175
Security PIN Code .................................... 206
Shopping (Place Category) ....................... 76
Show Icon on Map .................................. 103
Show Wallpaper ...................................... 191
Shuffle ...................................................... 149 Single Screen
........................................... 100
SKIP Bar ....................................................... 6
Song By Voice Searching Music ..................................... 151
Setting ..................................................... 45
Voice Commands List ............................. 223
Sort by Distance to Travel ........................ 77
Sound Setup ............................................ 158
Speed Dial
Making a Call ........................................ 176
Registering ............................................. 169
Split Screen .............................................. 101
Street ......................................................... 69
System/Device Information .................... 188T
Text Message
Receiving ............................................... 181
Replying ................................................. 182
Text Message Notice ............................... 173
TITLE Button ................................................ 6
Transfer ................................................... 177
Travel (Place Category) ............................. 76
Tune FM/AM Radio ......................................... 127
XM® Radio ............................................ 131
TUNE Bar ..................................................... 6
U
Unit Conversion ...................................... 186
Units (mile or km) ..................................... 26
Unverified Area Routing .......................... 50
Update Gracenote Info ........................... 146 Update System Software
Finding Update Informatio n ................... 211
Obtaining Update Data .......................... 211
USB Flash Drive Connecting, Disconnectin g ............ 147, 152
Playing .................................................. 152
Voice Commands List ..... ....................... 222
V
Vehicle ....................................................... 57
Correct Vehicle Position ........................... 59
Off-road Tracking .................... ................ 58
Verbal Reminder ....................................... 26
View Area Map ......................................... 52
View Routes .............................................. 88
Voice .......................................................... 94
Voice Commands
Basic Operation ......................................... 9
Help Info ................................................... 5
Voice Commands List ..... ....................... 218
Voice Control System ............................... 22
Voice Control Operation Basic Operation ......................................... 5
Voice Recognition Tutor .......................... 26
Voice Tag ................................................ 170
VOL (Volume) Button ............................. 159
VOL 9 (Volume/Power) Knob .................. 6
Volume ...................................................... 24
W
Wallpapers Setting
Deleting, Importing, Setting ..................... 32
Viewing ................................................. 191