automatic lock Acura MDX 2011 User Guide
[x] Cancel search | Manufacturer: ACURA, Model Year: 2011, Model line: MDX, Model: Acura MDX 2011Pages: 609, PDF Size: 12.7 MB
Page 133 of 609
When the light switch is in either of
these positions, the lights on
indicator comes on as a reminder.
This indicator stays on if you leave
the lights on and turn the ignition
switch to the ACCESSORY (I) or
LOCK (0) position.
High Beams-To switch from low
beams to high beams, push the left
lever forward until you hear a click.
The blue high beam indicator will
come on (see page 72). Pull it back to
return to low beams. To flash the
high beams, pull the lever back
lightly, then release it. The high
beams stay on as long as you hold
the lever back. AUTO
-The automatic lighting
feature turns on the headlights and
all other exterior lights, when it
senses low ambient light.
To turn on automatic lighting, turn
the light switch to AUTO at any time.
The lights will come on automatically
when the outside light level becomes
low (at dusk, for example). The
lights on indicator comes on as a
reminder. The lights and indicator
will turn off automatically when the
system senses high ambient light.
The lights will remain on when you
turn off the ignition switch. They will
turn off automatically when you
remove the key and open the driver's
door. To turn them on again, either
turn the ignition switch to the ON
(II) position or turn the light switch
to the
position. Even with the automatic lighting
feature turned on, we recommend
that you turn on the lights manually
when driving at night or in a dense
fog, or when you enter dark areas
such as long tunnels or parking
facilities.
To change the
‘‘AUTO LIGHT
SENSITIVITY ’’setting, see page 112.
Do not leave the light switch in
AUTO if you will not be driving the
vehicle for an extended period (a
week or more). You should also turn
off the lights if you plan to leave the
engine idling or off for a long time.
Turn Signal and Headlights12810/06/29 11:59:04 11 ACURA MDX MMC North America Owner's M 50 31STX640 enu
Page 135 of 609
If you see a‘‘CHECK DRL SYSTEM ’’
message on the multi-information
display, there is a problem with the
daytime running light system. Take
your vehicle to a dealer to have it
checked.
When the multi-information display
shows a ‘‘DRL OFF ’’message, the
daytime running lights are off.
Follow the procedure in the left
column to turn them on. Automatic Lighting Off Feature
This feature turns off the headlights,
all other exterior lights, and the
instrument panel lights within 15
seconds after you remove the key
and close the driver's door.
To change the
‘‘HEADLIGHT AUTO
OFF TIMER ’’setting, see page 111.
The automatic lighting off feature
activates if you leave the headlight
switch in the ‘‘
’’or ‘‘
’’
position or if the lights are turned on
by setting the switch in the ‘‘AUTO ’’
position, and you remove the key,
then open and close the driver's
door. If you turn the ignition switch to the
LOCK (0) position with the headlight
switch on, but do not open the door
and get out, the lights turn off after
10 minutes (3 minutes, if the switch
is in the
‘‘AUTO ’’position).
The lights turn on again when you
unlock or open the driver's door.
If you unlock the door, but do not
open it within 15 seconds, the lights
go off. With the driver's door open,
you will hear a lights-on reminder
chime.
Turn Signal and Headlights13010/06/29 11:59:04 11 ACURA MDX MMC North America Owner's M 50 31STX640 enu
Page 144 of 609

To lock all doors and the tailgate,
press the bottom of the master door
lock switch on either front door, pull
the lock tab above the driver's door
handle, or use the key on the outside
lock on the driver's door.
Pressing the top of either master
door lock switch will unlock all doors
and the tailgate.
The lock tab on any passenger's door
locks and unlocks that door.
All doors and the tailgate can be
locked from the outside by using the
key in the driver's door lock. To
unlock only the driver's door, insert
the key, turn the key, and release it.
The remaining doors and the tailgate
unlock when you turn the key a
second time within a few seconds.To change the
‘‘KEY AND REMOTE
UNLOCK MODE ’’setting, see page
118.
When the vehicle speed reaches
about 10 mph (about 16 km/h) or
more, all the doors lock
automatically.
To change the ‘‘AUTO DOOR
LOCK ’’setting, see page 115.
When you shift to P after driving, the
driver's door unlocks.
To change the ‘‘AUTO DOOR
UNLOCK ’’setting, see page 116.
UNLOCK
LOCK
LOCK
UNLOCK
CONTINUED
Door Locks
139
Instruments and Controls
10/06/29 11:59:04 11 ACURA MDX MMC North America Owner's M 50 31STX640 enu
Page 149 of 609
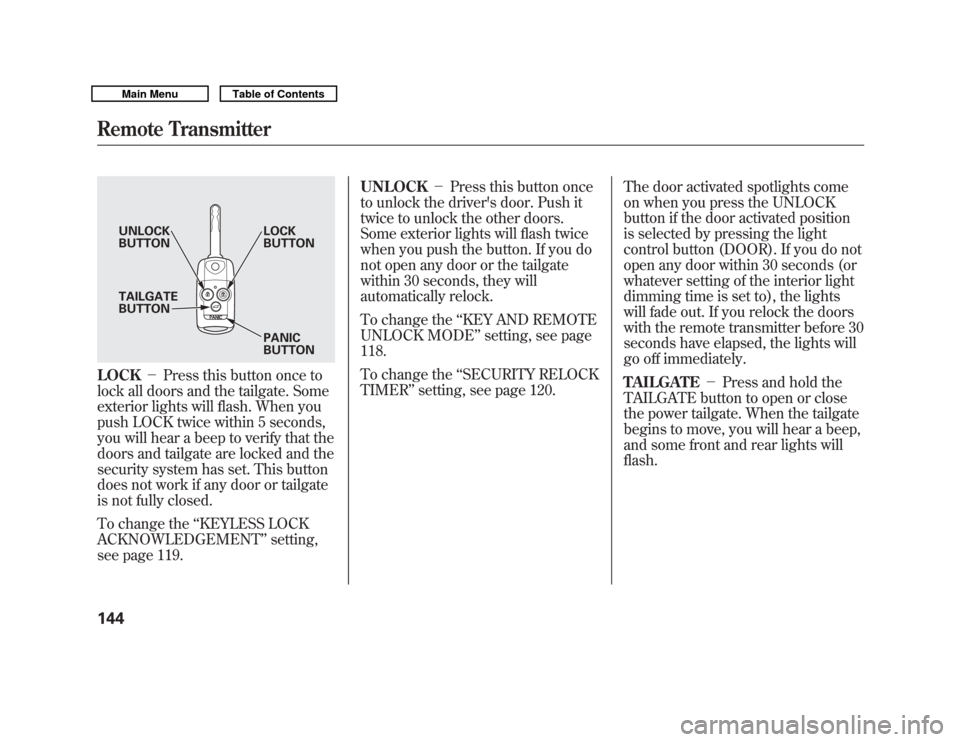
LOCK-Press this button once to
lock all doors and the tailgate. Some
exterior lights will flash. When you
push LOCK twice within 5 seconds,
you will hear a beep to verify that the
doors and tailgate are locked and the
security system has set. This button
does not work if any door or tailgate
is not fully closed.
To change the ‘‘KEYLESS LOCK
ACKNOWLEDGEMENT ’’setting,
see page 119. UNLOCK
-Press this button once
to unlock the driver's door. Push it
twice to unlock the other doors.
Some exterior lights will flash twice
when you push the button. If you do
not open any door or the tailgate
within 30 seconds, they will
automatically relock.
To change the ‘‘KEY AND REMOTE
UNLOCK MODE ’’setting, see page
118.
To change the ‘‘SECURITY RELOCK
TIMER ’’setting, see page 120. The door activated spotlights come
on when you press the UNLOCK
button if the door activated position
is selected by pressing the light
control button (DOOR). If you do not
open any door within 30 seconds (or
whatever setting of the interior light
dimming time is set to), the lights
will fade out. If you relock the doors
with the remote transmitter before 30
seconds have elapsed, the lights will
go off immediately.
TAILGATE
-Press and hold the
TAILGATE button to open or close
the power tailgate. When the tailgate
begins to move, you will hear a beep,
and some front and rear lights will
flash.
UNLOCK
BUTTON LOCK
BUTTON
PANIC
BUTTON
TAILGATE
BUTTON
Remote Transmitter14410/06/29 11:59:04 11 ACURA MDX MMC North America Owner's M 50 31STX640 enu
Page 169 of 609

The inside mirror can automatically
darken to reduce glare. To turn on
this feature, press the button on the
bottom of the mirror. The AUTO
indicator comes on as a reminder.
When it is on, the mirror darkens
when it senses the headlights of a
vehicle behind you, then returns to
normal visibility when the lights are
gone. Press the button again to turn
off this feature.
There is also a sensor on the back of
the mirror. Items hung on the mirror
may block this sensor and affect its
performance.Adjusting the Power Mirrors
1. Turn the ignition switch to the ON
(II) position.
2. Move the selector switch to L (driver's side) or R (passenger's
side).
INDICATOR AUTO BUTTON SENSOR
SELECTOR
SWITCH
Mirrors16410/06/29 11:59:04 11 ACURA MDX MMC North America Owner's M 50 31STX640 enu
Page 181 of 609
Each socket is intended to supply
power for 12 volt DC accessories that
are rated 120 watts or less (10 amps).
None of the sockets will power an
automotive type cigarette lighter
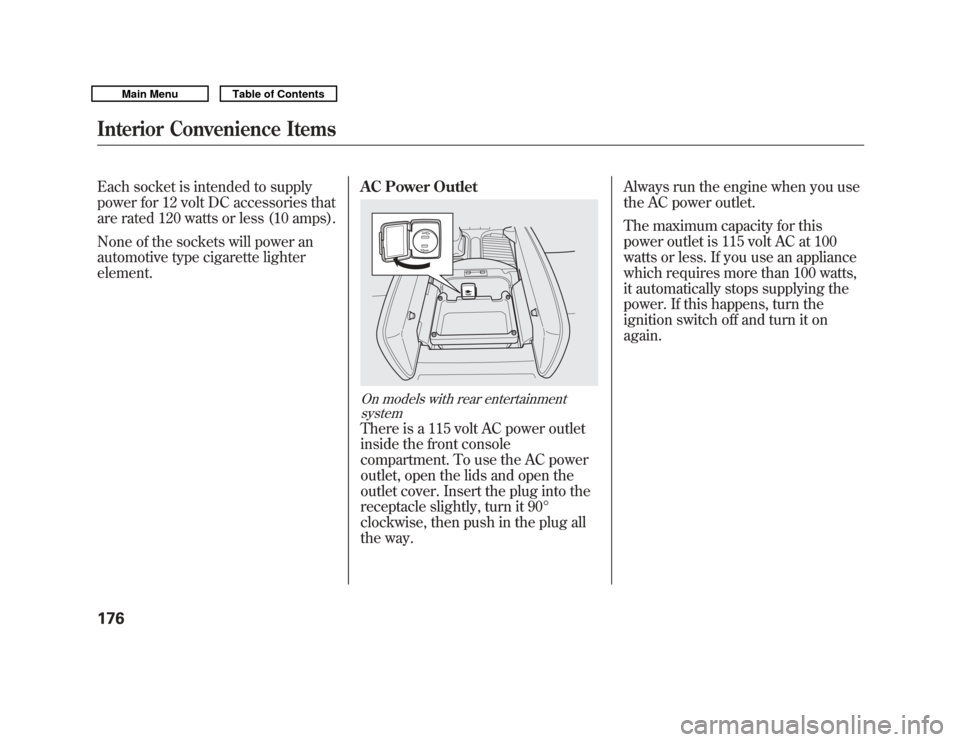
element.AC Power Outlet
On models with rear entertainment
systemThere is a 115 volt AC power outlet
inside the front console
compartment. To use the AC power
outlet, open the lids and open the
outlet cover. Insert the plug into the
receptacle slightly, turn it 90°
clockwise, then push in the plug all
the way. Always run the engine when you use
the AC power outlet.
The maximum capacity for this
power outlet is 115 volt AC at 100
watts or less. If you use an appliance
which requires more than 100 watts,
it automatically stops supplying the
power. If this happens, turn the
ignition switch off and turn it on
again.
Interior Convenience Items17610/06/29 11:59:04 11 ACURA MDX MMC North America Owner's M 50 31STX640 enu
Page 186 of 609
Personalization Setting
When you unlock the doors with
your remote, the driver's ID (Driver
1 or Driver 2) is detected, and the
climate control settings are turned to
the respective mode automatically
when the ignition is turned to the ON
(II) position.
Voice Control SystemOn models with navigation systemThe climate control system can also
be operated by voice control. See the
navigation system manual for
complete details.Using Automatic Climate Control
The automatic climate control system
in your vehicle picks the proper
combination of air conditioning,
heating, and ventilation to maintain
the interior temperature you select,
and to remove moisture from the air
and make the interior dry. The
system also adjusts the fan speed and
airflow levels.
1. Press the Auto button on the front
control panel.
2. Set the desired temperature with the temperature control buttons.
You will see AUTO in the system's
display.
3. You can set the driver's side temperature, the passenger's side
temperature, and the temperature
of the rear passenger compartment
separately. The system automatically selects the
proper mix of conditioned and/or
heated air that will, as quickly as
possible, raise or lower the interior
temperature to your preference.
Temperature ControlThe driver's side temperature, the
passenger's side temperature and the
rear passenger compartment
temperature can be set separately.
Press the
▲button of the
appropriate temperature control to
increase the temperature of airflow.
Press the ▼button to decrease it.
Each set temperature is shown in the
display. The rear temperature is
shown in the display on the back of
the center console.
CONTINUED
Climate Control System
181
Features
10/06/29 11:59:04 11 ACURA MDX MMC North America Owner's M 50 31STX640 enu
Page 195 of 609
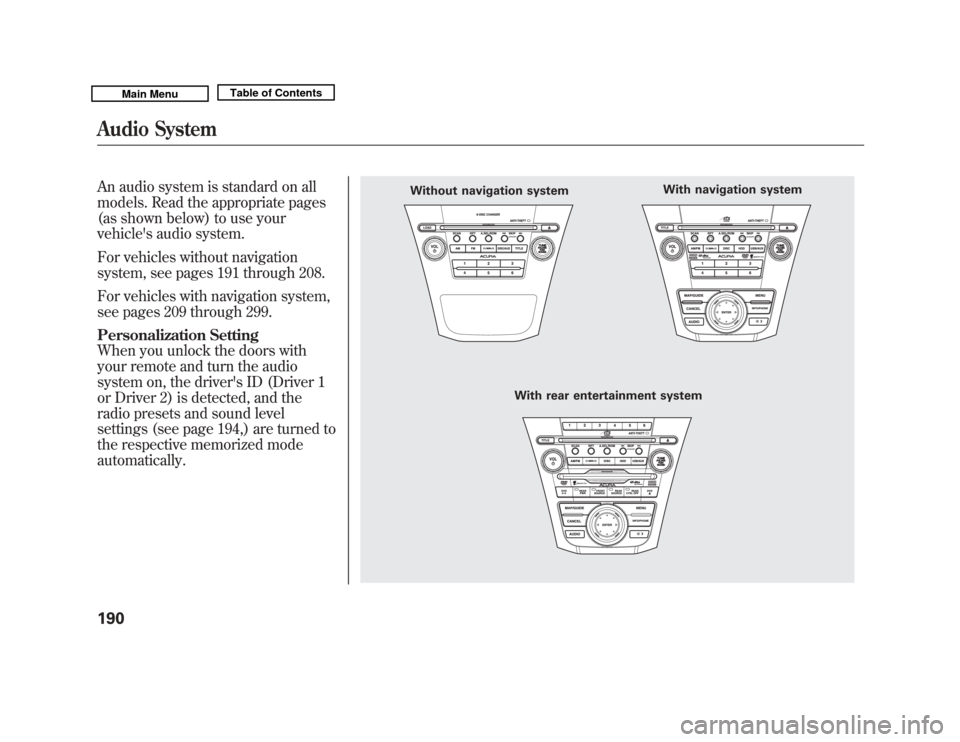
An audio system is standard on all
models. Read the appropriate pages
(as shown below) to use your
vehicle's audio system.
For vehicles without navigation
system, see pages 191 through 208.
For vehicles with navigation system,
see pages 209 through 299.
Personalization Setting
When you unlock the doors with
your remote and turn the audio
system on, the driver's ID (Driver 1
or Driver 2) is detected, and the
radio presets and sound level
settings (see page 194,) are turned to
the respective memorized mode
automatically.
Without navigation systemWith rear entertainment system With navigation system
Audio System19010/06/29 11:59:04 11 ACURA MDX MMC North America Owner's M 50 31STX640 enu
Page 214 of 609
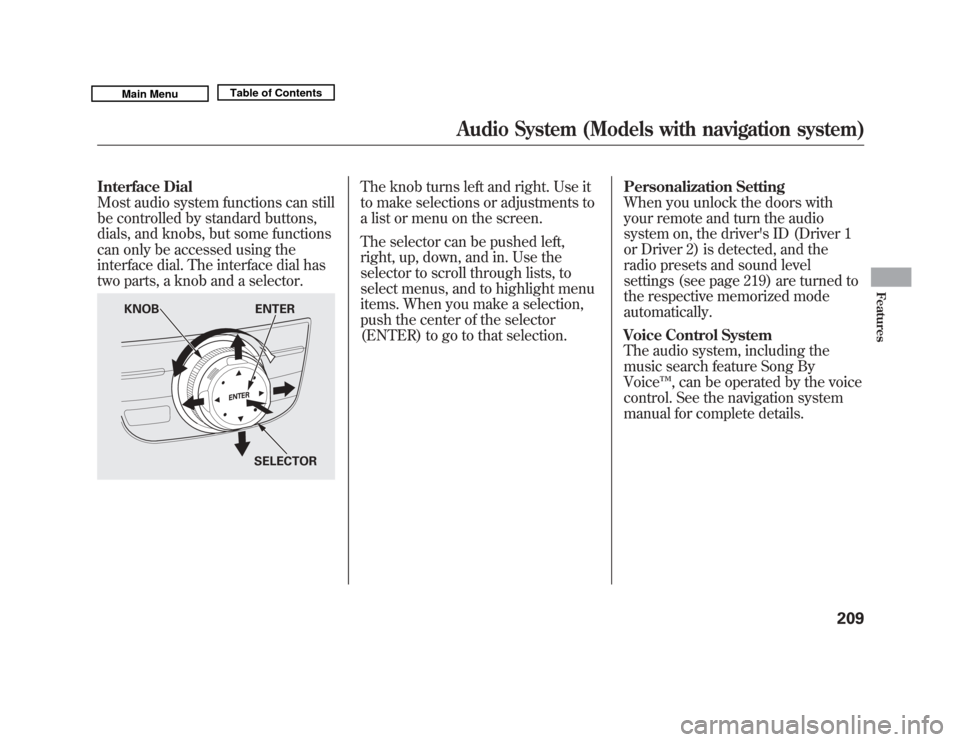
Interface Dial
Most audio system functions can still
be controlled by standard buttons,
dials, and knobs, but some functions
can only be accessed using the
interface dial. The interface dial has
two parts, a knob and a selector.
The knob turns left and right. Use it
to make selections or adjustments to
a list or menu on the screen.
The selector can be pushed left,
right, up, down, and in. Use the
selector to scroll through lists, to
select menus, and to highlight menu
items. When you make a selection,
push the center of the selector
(ENTER) to go to that selection.Personalization Setting
When you unlock the doors with
your remote and turn the audio
system on, the driver's ID (Driver 1
or Driver 2) is detected, and the
radio presets and sound level
settings (see page 219) are turned to
the respective memorized mode
automatically.
Voice Control System
The audio system, including the
music search feature Song By
Voice
™, can be operated by the voice
control. See the navigation system
manual for complete details.
KNOB ENTER
SELECTOR
Audio System (Models with navigation system)
209
Features
10/06/29 11:59:04 11 ACURA MDX MMC North America Owner's M 50 31STX640 enu
Page 311 of 609
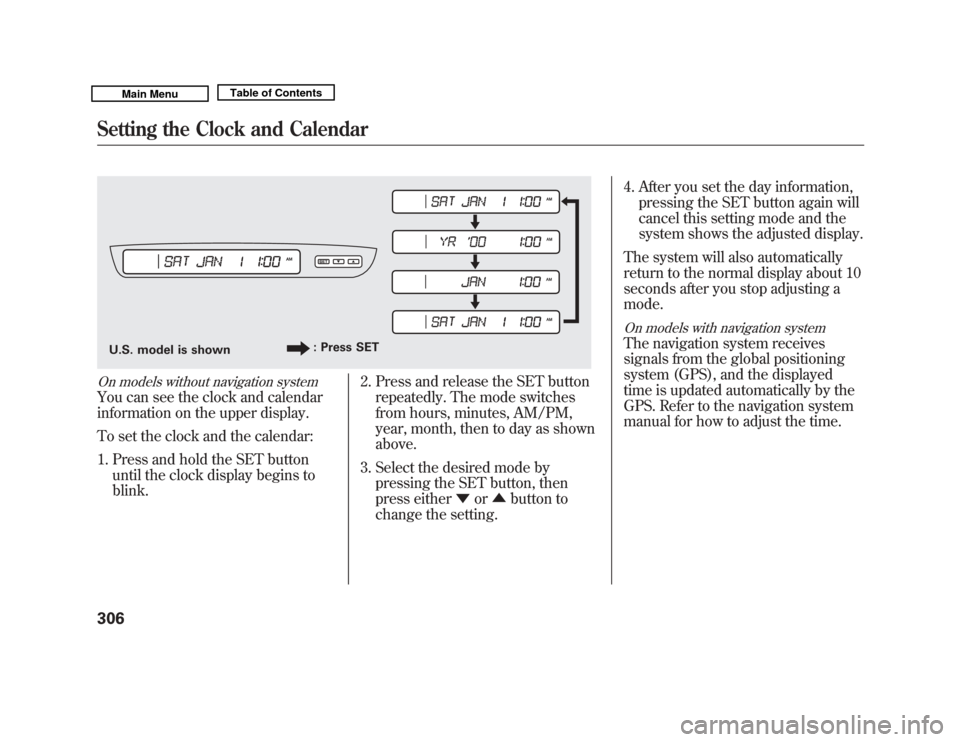
On models without navigation systemYou can see the clock and calendar
information on the upper display.
To set the clock and the calendar:1. Press and hold the SET button until the clock display begins to
blink. 2. Press and release the SET button
repeatedly. The mode switches
from hours, minutes, AM/PM,
year, month, then to day as shown
above.
3. Select the desired mode by pressing the SET button, then
press either ▼or▲ button to
change the setting. 4. After you set the day information,
pressing the SET button again will
cancel this setting mode and the
system shows the adjusted display.
The system will also automatically
return to the normal display about 10
seconds after you stop adjusting a
mode.
On models with navigation systemThe navigation system receives
signals from the global positioning
system (GPS), and the displayed
time is updated automatically by the
GPS. Refer to the navigation system
manual for how to adjust the time.
U.S. model is shown : Press SETSetting the Clock and Calendar30610/06/29 11:59:04 11 ACURA MDX MMC North America Owner's M 50 31STX640 enu