No start Acura MDX 2011 Repair Manual
[x] Cancel search | Manufacturer: ACURA, Model Year: 2011, Model line: MDX, Model: Acura MDX 2011Pages: 609, PDF Size: 12.7 MB
Page 529 of 609
Replacing Front Fog/Daytime
Running Light Bulbs
Your vehicle uses halogen light
bulbs. When replacing a bulb, handle
it by its plastic case, and protect the
glass from contact with your skin or
hard objects. If you touch the glass,
clean it with denatured alcohol and a
clean cloth.Halogen bulbs get very hot when lit.
Oil, perspiration, or a scratch on the
glass can cause the bulb to overheat
and shatter.1. To change the bulb on the driver's side, start the engine, turn the
steering wheel all the way to the
right, then turn off the engine. To
change the bulb on the
passenger's side, turn the steering
wheel to the left.
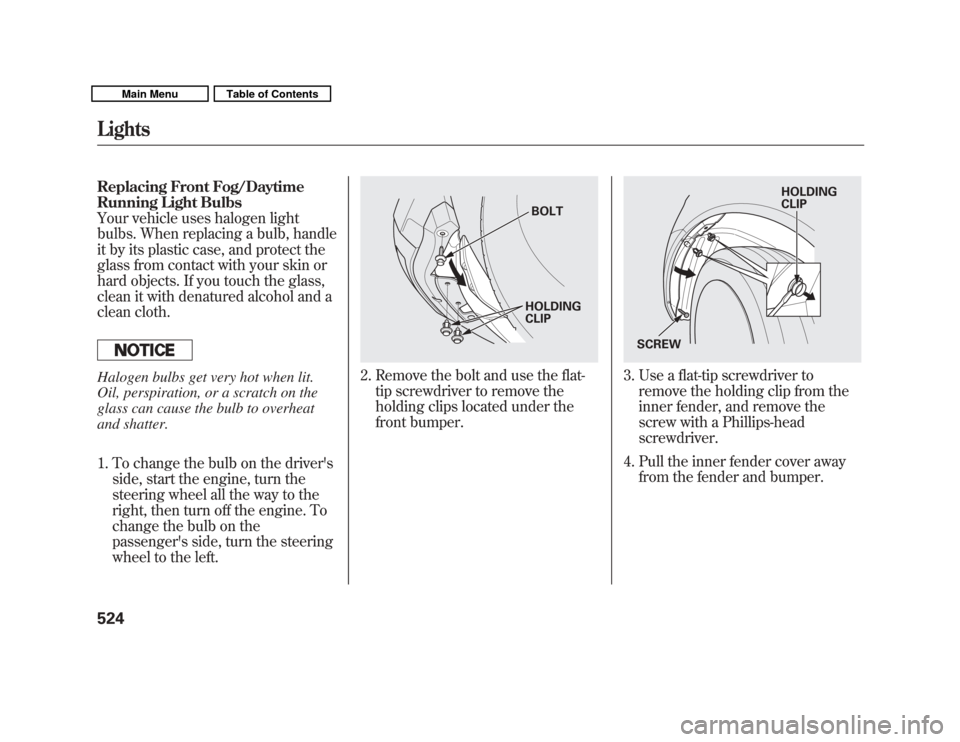
2. Remove the bolt and use the flat-tip screwdriver to remove the
holding clips located under the
front bumper.
3. Use a flat-tip screwdriver toremove the holding clip from the
inner fender, and remove the
screw with a Phillips-head
screwdriver.
4. Pull the inner fender cover away from the fender and bumper.
BOLT
HOLDING
CLIP
HOLDING
CLIP
SCREW
Lights52410/06/29 11:59:04 11 ACURA MDX MMC North America Owner's M 50 31STX640 enu
Page 540 of 609
Check the air pressures when the
tires are cold. This means the vehicle
has been parked for at least 3 hours,
or driven less than 1 mile (1.6 km).
Add or release air, if needed, to
match the recommended cold tire
pressures.
If you check air pressures when the
tires are hot [driven for several miles
(kilometers)], you will see readings 4
to 6 psi (30 to 40 kPa, 0.3 to 0.4
kgf/cm
2) higher than the cold
readings. This is normal. Do not let
air out to match the recommended
cold air pressure. The tire will be
underinflated.
While tubeless tires have some
ability to self-seal if they are
punctured, you should look closely
for punctures if a tire starts losing
pressure. You should get your own tire
pressure gauge and use it whenever
you check your tire pressures. This
will make it easier for you to tell if a
pressure loss is due to a tire problem
and not due to a variation between
gauges.
Recommended Tire Pressures
The following chart shows the
recommended cold tire pressures for
most normal driving conditions.
MDX, Technology Package, and U.S.
Technology Package with Entertainment
models
Tire Size Cold Tire Pressure for Normal Driving
P255/55R18 104H Front/Rear: 32 psi (220 kPa, 2.2
kgf/cm
2)
U.S. Advance Package, AdvancePackage with Entertainment, andCanadian Elite Package models
Tire Size Cold Tire Pressure
for Normal Driving
P255/50R19 103H Front/Rear: 32 psi (220 kPa, 2.2
kgf/cm
2)
The compact spare tire pressure is:
60 psi (420 kPa, 4.2 kgf/cm
2)
For convenience, the recommended
tire sizes and cold tire pressures are
on a label on the driver's doorjamb.
For additional information about your
tires, see page 574.
CONTINUED
Tires
535
Maintenance
10/06/29 11:59:04 11 ACURA MDX MMC North America Owner's M 50 31STX640 enu
Page 545 of 609
Snow Tires
If you mount snow tires on your
vehicle, make sure they are radial
tires of the same size and load range
as the original tires. Mount snow
tires on all four wheels. The traction
provided by snow tires on dry roads
may be lower than your original tires.
Check with the tire dealer for
maximum speed recommendations.
Tire Chains
Mount tire chains on your tires when
required by driving conditions or
local laws. Install them only on the
front tires.
Because your vehicle has limited tire
clearance, Acura strongly
recommends using the chains listed
below.
SCC Super Z-6#SC 435 When installing chains, follow the
manufacturer's instructions and
mount them as tightly as you can.
Drive slowly with chains installed. If
you hear them contacting the body
or chassis, stop and investigate.
Make sure the chains are installed
tightly, and that they are not
contacting the brake lines or
suspension. Remove the chains as
soon as you start driving on cleared
roads.
Using the wrong chains, or not
properly installing chains, can
damage the brake lines and
cause a crash in which you can
be seriously injured or killed.
Follow all instructions in this
owner's manual regarding the
selection and use of tire chains.
Traction devices that are the wrong size
or improperly installed can damage
your vehicle's brake lines, suspension,
body, and wheels. Stop driving if they
are hitting any part of the vehicle.
Wheels
Clean the wheels as you would the
rest of the exterior. Wash them with
the same solution, and rinse them
thoroughly.
Aluminum alloy wheels have a
protective clear-coat that keeps the
aluminum from corroding and
tarnishing. Cleaning the wheels with
harsh chemicals (including some
commercial wheel cleaners) or a stiff
brush can damage the clear-coat. To
clean the wheels, use a mild
detergent and a soft brush or sponge.
Tires54010/06/29 11:59:04 11 ACURA MDX MMC North America Owner's M 50 31STX640 enu
Page 548 of 609
This section covers the more
common problems that motorists
experience with their vehicles. It
gives you information about how to
safely evaluate the problem and what
to do to correct it. If the problem has
stranded you on the side of the road,
you may be able to get going again. If
not, you will also find instructions on
getting your vehicle towed.Compact Spare Tire
....................
544
Changing a Flat Tire
...................
545
If the Engine Won't Start
.............
551
Jump Starting
..............................
552
If the Engine Overheats
..............
554
Low Oil Pressure Indicator
.........
556
Charging System Indicator
.........
556
Malfunction Indicator Lamp
........
557
Brake System Indicator
...............
558
Fuses
..........................................
559
Fuse Locations
............................
563
Opening the Fuel Fill Door Manually
.................................
566
Emergency Towing
.....................
566
If Your Vehicle Gets Stuck
..........
567
Taking Care of the Unexpected
543
Taking Care of the Unexpected
10/06/29 11:59:04 11 ACURA MDX MMC North America Owner's M 50 31STX640 enu
Page 556 of 609
Diagnosing why the engine won't
start falls into two areas, depending
on what you hear when you turn the
ignition switch to the START (III)
position:●
You hear nothing, or almost
nothing. The engine's starter
motor does not operate at all, or
operates very slowly.
●
You can hear the starter motor
operating normally, or the starter
motor sounds like it is spinning
faster than normal, but the engine
does not start up and run.
Nothing Happens or the Starter
Motor Operates Very Slowly
When you turn the ignition switch to
the START (III) position, you do not
hear the normal noise of the engine
trying to start. You may hear a
clicking sound, a series of clicks, or
nothing at all. Check these things:
●
Check the transmission interlock.
The transmission must be in Park
or neutral or the starter will not
operate.
●
Turn the ignition switch to the ON
(II) position. Turn on the
headlights, and check their
brightness. If the headlights are
very dim or do not come on at all,
the battery is discharged. See
Jump Starting
on page 552.
●
Turn the ignition switch to the
START (III) position. If the
headlights do not dim, check the
condition of the fuses. If the fuses
are OK, there is probably
something wrong with the
electrical circuit for the ignition
switch or starter motor. You will
need a qualified technician to
determine the problem. See
Emergency Towing on page 566.If the headlights dim noticeably or
go out when you try to start the
engine, either the battery is
discharged or the connections are
corroded. Check the condition of
the battery and terminal
connections (see page 541). You
can then try jump starting the
vehicle from a booster battery (see
page 552).
The Starter Operates Normally
In this case, the starter motor's speed
sounds normal, or even faster than
normal, when you turn the ignition
switch to the START (III) position,
but the engine does not run.
●
Are you using a properly coded
key? An improperly coded key will
cause the immobilizer system
indicator in the instrument panel
to blink rapidly (see page 72).
CONTINUED
If the Engine Won't Start
551
Taking Care of the Unexpected
10/06/29 11:59:04 11 ACURA MDX MMC North America Owner's M 50 31STX640 enu
Page 557 of 609
●
Are you using the proper starting
procedure? Refer toStarting the
Engine on page 436.
●
Do you have fuel? Check the fuel
gauge; the warning indicator may
not be working.
●
There may be an electrical
problem, such as no power to the
fuel pump. Check all the fuses (see
page 560).
If you find nothing wrong, you will
need a qualified technician to find the
problem. See Emergency Towing on
page 566. Jump Starting
Although this seems like a simple
procedure, you should take several
precautions.
A battery can explode if you do
not follow the correct
procedure, seriously injuring
anyone nearby.
Keep all sparks, open flames,
and smoking materials away
from the battery.
You cannot start your vehicle by
pushing or pulling it.
To Jump Start Your Vehicle:1. Open the hood, and check the physical condition of the battery.
In very cold weather, check the
condition of the electrolyte. If it
seems slushy or frozen, do not try
jump starting until it thaws.If a battery sits in extreme cold, the
electrolyte inside can freeze. Attempting
to jump start with a frozen battery can
cause it to rupture.
2. Turn off all the electricalaccessories: heater, A/C, climate
control, audio system, lights, etc.
Put the transmission in neutral or
Park, and set the parking brake.
If the Engine Won't Start, Jump Starting55210/06/29 11:59:04 11 ACURA MDX MMC North America Owner's M 50 31STX640 enu
Page 558 of 609
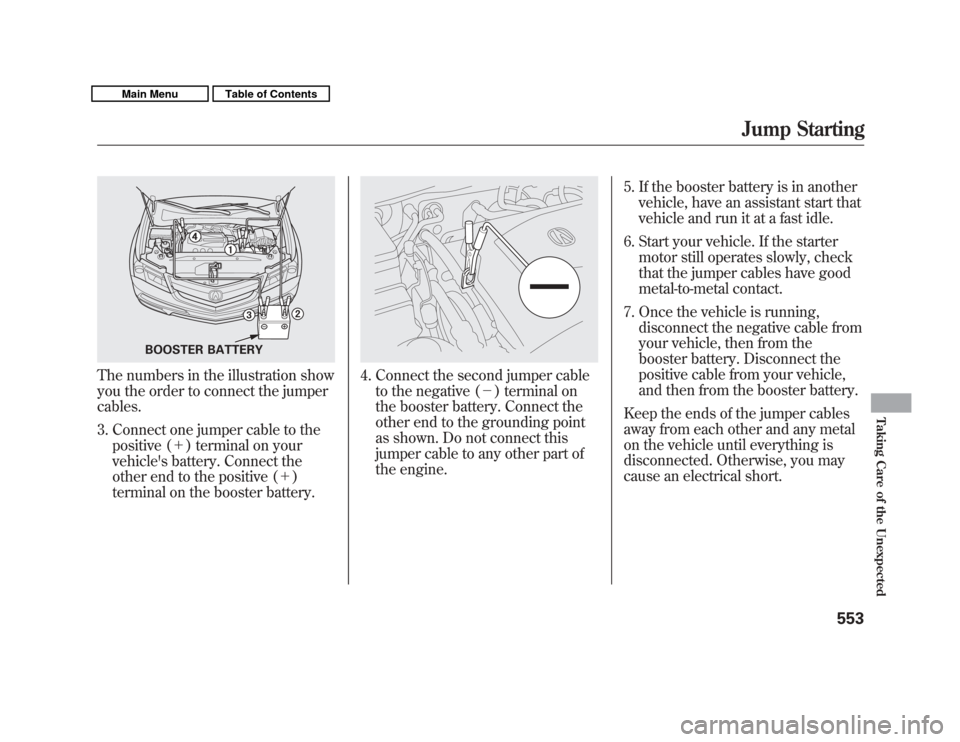
The numbers in the illustration show
you the order to connect the jumper
cables.3. Connect one jumper cable to the positive (+ ) terminal on your
vehicle's battery. Connect the
other end to the positive (+ )
terminal on the booster battery.
4. Connect the second jumper cable to the negative (- ) terminal on
the booster battery. Connect the
other end to the grounding point
as shown. Do not connect this
jumper cable to any other part of
the engine. 5. If the booster battery is in another
vehicle, have an assistant start that
vehicle and run it at a fast idle.
6. Start your vehicle. If the starter motor still operates slowly, check
that the jumper cables have good
metal-to-metal contact.
7. Once the vehicle is running, disconnect the negative cable from
your vehicle, then from the
booster battery. Disconnect the
positive cable from your vehicle,
and then from the booster battery.
Keep the ends of the jumper cables
away from each other and any metal
on the vehicle until everything is
disconnected. Otherwise, you may
cause an electrical short.
BOOSTER BATTERY
Jump Starting
553
Taking Care of the Unexpected
10/06/29 11:59:04 11 ACURA MDX MMC North America Owner's M 50 31STX640 enu
Page 559 of 609
The pointer of your vehicle's
temperature gauge should stay in the
midrange under most conditions. If it
climbs to the red mark, you should
determine the reason (hot day,
driving up a steep hill, etc.).
If the vehicle overheats, you should
take immediate action. The only
indication may be the temperature
gauge climbing to or above the red
mark. Or you may see steam or spray
coming from under the hood.Driving with the temperature gauge
pointer at the red mark can cause
serious damage to the engine.
Steam and spray from an
overheated engine can
seriously scald you.
Do not open the hood if steam
is coming out.1. Safely pull to the side of the road.
Put the transmission in Park, and
set the parking brake. Turn off all
accessories, and turn on the
hazard warning indicators.
2. If you see steam and/or spray coming from under the hood, turn
off the engine. Wait until you see
no more signs of steam or spray,
then open the hood.
3. If you do not see steam or spray, leave the engine running and
watch the temperature gauge. If
the high heat is due to
overloading, the engine should
start to cool down almost
immediately. If it does, wait until
the temperature gauge comes
down to the midpoint, then
continue driving.
If the Engine Overheats55410/06/29 11:59:04 11 ACURA MDX MMC North America Owner's M 50 31STX640 enu
Page 560 of 609
4. If the temperature gauge stays atthe red mark, turn off the engine.
5. Look for any obvious coolant leaks, such as a split radiator hose.
Everything is still extremely hot,
so use caution. If you find a leak, it
must be repaired before you
continue driving (see Emergency
Towing on page 566).
6. If you do not find an obvious leak, check the coolant level in the
radiator reserve tank. Add coolant
if the level is below the MIN mark.
7. If there was no coolant in the reserve tank, you may need to add
coolant to the radiator. Let the
engine cool down until the pointer
reaches the middle of the
temperature gauge, or lower,
before checking the radiator.
Removing the radiator cap
while the engine is hot can
cause the coolant to spray out,
seriously scalding you.
Always let the engine and
radiator cool down before
removing the radiator cap.
8. Using gloves or a large heavy cloth, turn the radiator cap
counterclockwise, without pushing
down, to the first stop. After the
pressure releases, push down on
the cap, and turn it until it comes
off. 9. Start the engine and set the
climate control to AUTO at ‘‘Hi. ’’
Add coolant to the radiator up to
the base of the filler neck. If you
do not have the proper coolant
mixture available, you can add
plain water. Remember to have the
cooling system drained and refilled
with the proper mixture as soon as
you can.
10. Put the radiator cap back on tightly. Run the engine, and check
the temperature gauge. If it goes
back to the red mark, the engine
needs repair (see Emergency
Towing on page 566).
11. If the temperature stays normal, check the coolant level in the
radiator reserve tank. If it has gone
down, add coolant to the MAX
mark. Put the cap back on tightly.
If the Engine Overheats
555
Taking Care of the Unexpected
10/06/29 11:59:04 11 ACURA MDX MMC North America Owner's M 50 31STX640 enu
Page 561 of 609
Low Oil Pressure Indicator
This indicator should never
come on when the engine is
running. If it starts flashing or stays
on, the oil pressure has dropped very
low or lost pressure. Serious engine
damage is possible, and you should
take immediate action.
You will also see a ‘‘CHECK
ENGINE OIL LEVEL’’ message on
the multi-information display when
this indicator comes on.
Running the engine with low oil
pressure can cause serious mechanical
damage almost immediately. Turn off
the engine as soon as you can safely get
the vehicle stopped. 1. Safely pull off the road, and shut
off the engine. Turn on the hazard
warning indicators.
2. Let the vehicle sit for a minute. Open the hood, and check the oil
level (see page 422). An engine
very low on oil can lose pressure
during cornering and other driving
maneuvers.
3. If necessary, add oil to bring the level back to the full mark on the
dipstick (see page 511).
4. Start the engine, and watch the oil pressure indicator. If it does not go
out within 10 seconds, turn off the
engine. There is a mechanical
problem that needs to be repaired
before you can continue driving
(see Emergency Towing on page
566). Charging System Indicator
If the charging system
indicator comes on brightly
when the engine is running, the
battery is not being charged.
You will also see a ‘‘CHECK
CHARGING SYSTEM’’ message on
the multi-information display (see
page 86).
Immediately turn off all electrical
accessories. Try not to use other
electrically operated controls such as
the power windows. Keep the engine
running; starting the engine will
discharge the battery rapidly.
Go to a service station or garage
where you can get technical
assistance.
If you see a ‘‘REPLACE BATTERY ’’
message on the multi-information
display, along with this indicator on,
you may need to replace the battery.
Have your vehicle's battery checked
and replaced by your dealer.
Low Oil Pressure Indicator, Charging System Indicator55610/06/29 11:59:04 11 ACURA MDX MMC North America Owner's M 50 31STX640 enu