lock Acura MDX 2012 Repair Manual
[x] Cancel search | Manufacturer: ACURA, Model Year: 2012, Model line: MDX, Model: Acura MDX 2012Pages: 621, PDF Size: 11.15 MB
Page 295 of 621
To Play a USB Flash Memory
Device
This audio system can select and
play the audio files on a USB flash
memory device with the same
controls used for the disc player. To
play a USB flash memory device,
connect it to the USB adapter cable
in the console compartment, then
press the USB/AUX button until you
see‘‘USB’’in the display. The
ignition switch must be in
ACCESSORY (I) or ON (II) position.The audio system reads and plays
the audio files on the USB flash
memory device in MP3, WMA or
ACC
ᤳ
formats.
ᤳ: Only AAC format files recorded
with iTunes are playable on this
audio unit.
The recommended USB flash
memory devices are 256 MB or
higher, and formatted with the FAT
file system. Some digital audio
players may be compatible as well.
Some USB flash memory devices
(such as devices with security
lockout features, etc.) will not work
in this audio unit.
NOTE:
●
Do not use a device such as a card
reader or hard drive as it or your
files may be damaged.
●
Do not connect your USB flash
memory device using a hub.
●
Do not use an extension cable to
the USB adapter cable equipped
with your vehicle.
●
Do not keep a USB flash memory
device in the vehicle. Direct
sunlight and high heat will damage
it.
●
We recommend backing up your
data before playing a USB flash
memory device.
●
Some devices cannot be powered
or charged via the USB adapter, if
this is the case use the accessory
adapter to supply power to your
device.
●
Depending on the type and
number of files, it may take some
time before they begin to play.
Playing a USB Flash Memory Device (Models with navigation system)288
Page 316 of 621
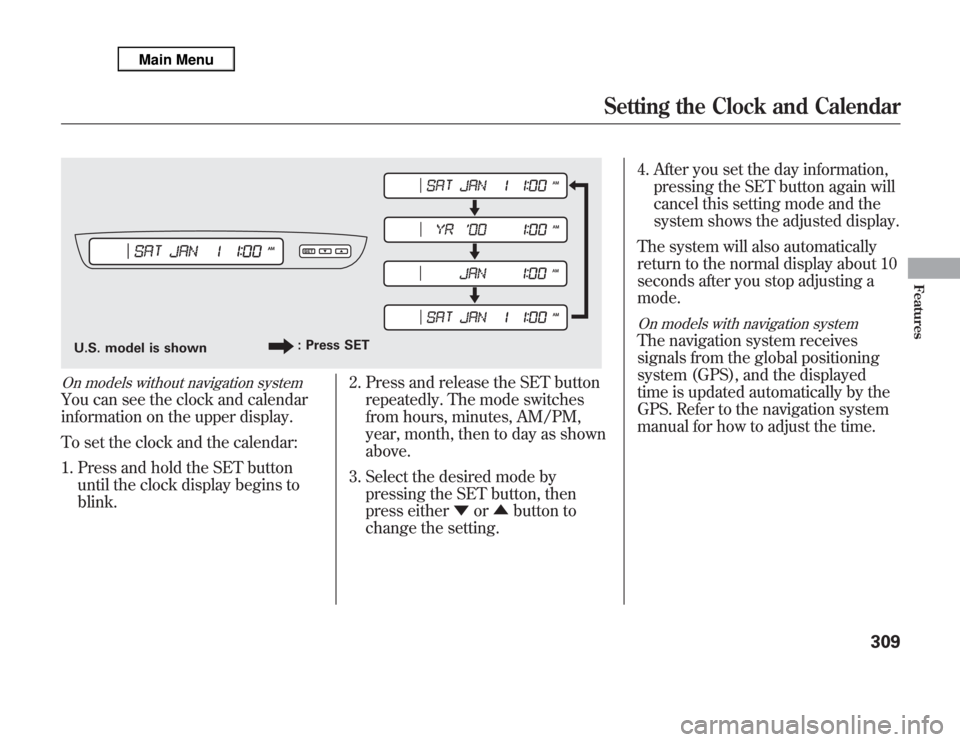
On models without navigation systemYou can see the clock and calendar
information on the upper display.
To set the clock and the calendar:
1. Press and hold the SET button
until the clock display begins to
blink.2. Press and release the SET button
repeatedly. The mode switches
from hours, minutes, AM/PM,
year, month, then to day as shown
above.
3. Select the desired mode by
pressing the SET button, then
press either▼or▲button to
change the setting.4. After you set the day information,
pressing the SET button again will
cancel this setting mode and the
system shows the adjusted display.
The system will also automatically
return to the normal display about 10
seconds after you stop adjusting a
mode.
On models with navigation systemThe navigation system receives
signals from the global positioning
system (GPS), and the displayed
time is updated automatically by the
GPS. Refer to the navigation system
manual for how to adjust the time.
U.S. model is shown: Press SET
Setting the Clock and Calendar
309
Features
Page 346 of 621
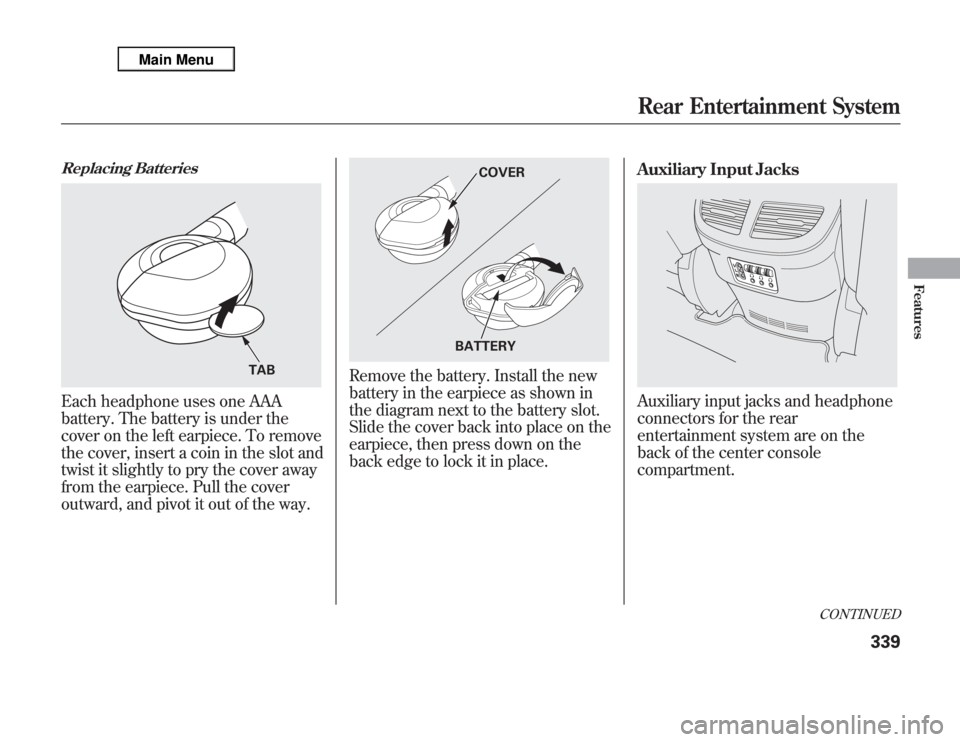
Replacing BatteriesEach headphone uses one AAA
battery. The battery is under the
cover on the left earpiece. To remove
the cover, insert a coin in the slot and
twist it slightly to pry the cover away
from the earpiece. Pull the cover
outward, and pivot it out of the way.
Remove the battery. Install the new
battery in the earpiece as shown in
the diagram next to the battery slot.
Slide the cover back into place on the
earpiece, then press down on the
back edge to lock it in place.Auxiliary Input Jacks
Auxiliary input jacks and headphone
connectors for the rear
entertainment system are on the
back of the center console
compartment.
TAB
COVER
BATTERY
CONTINUED
Rear Entertainment System
339
Features
Page 348 of 621
The security system helps to protect
your vehicle and valuables from
theft. The horn sounds and a
combination of headlights, position
lights, side marker lights and
taillights flashes if someone attempts
to break into your vehicle or remove
the audio unit. This alarm continues
for two minutes, then the system
resets. To deactivate the system
before the two minutes have elapsed,
unlock the driver's door with the key
or the remote transmitter.
The security system automatically
sets 15 seconds after you lock the
doors, hood, and tailgate. For the
system to activate, you must lock the
doors from the outside with the key,
or use driver's lock tab, door lock
master switch, or remote transmitter.
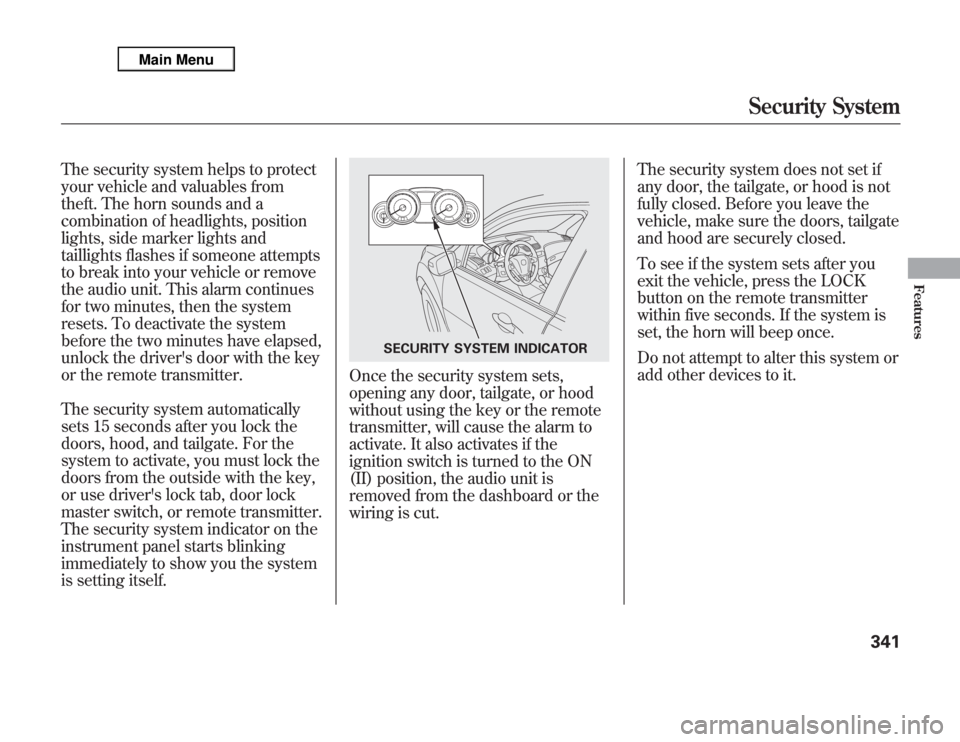
The security system indicator on the
instrument panel starts blinking
immediately to show you the system
is setting itself.
Once the security system sets,
opening any door, tailgate, or hood
without using the key or the remote
transmitter, will cause the alarm to
activate. It also activates if the
ignition switch is turned to the ON
(II) position, the audio unit is
removed from the dashboard or the
wiring is cut.The security system does not set if
any door, the tailgate, or hood is not
fully closed. Before you leave the
vehicle, make sure the doors, tailgate
and hood are securely closed.
To see if the system sets after you
exit the vehicle, press the LOCK
button on the remote transmitter
within five seconds. If the system is
set, the horn will beep once.
Do not attempt to alter this system or
add other devices to it.
SECURITY SYSTEM INDICATOR
Security System
341
Features
Page 349 of 621
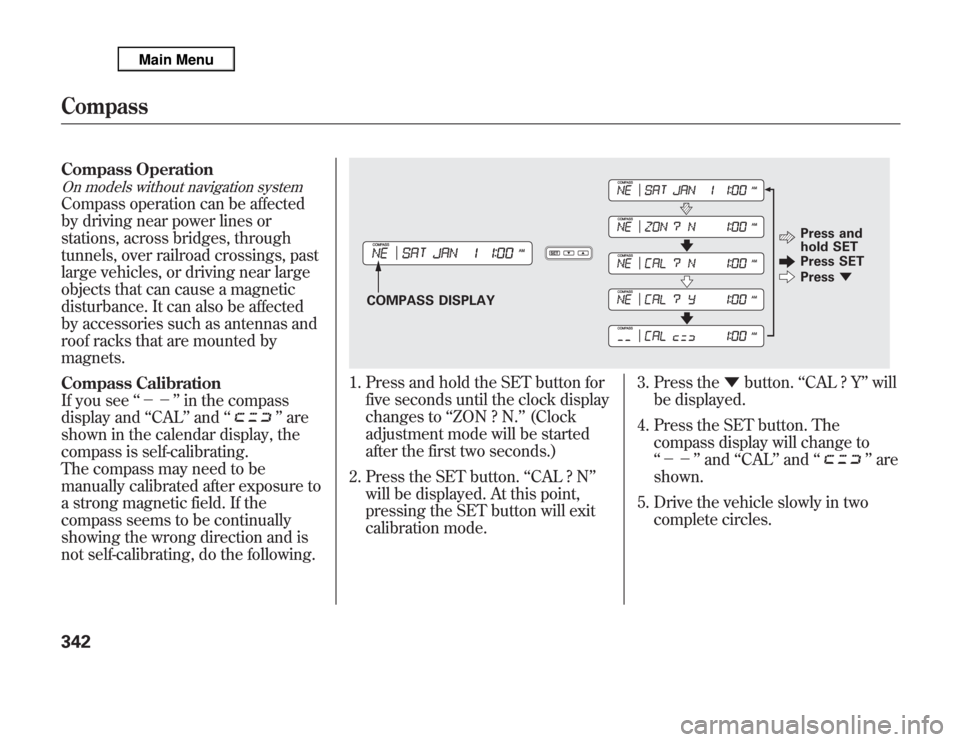
Compass OperationOn models without navigation systemCompass operation can be affected
by driving near power lines or
stations, across bridges, through
tunnels, over railroad crossings, past
large vehicles, or driving near large
objects that can cause a magnetic
disturbance. It can also be affected
by accessories such as antennas and
roof racks that are mounted by
magnets.
Compass Calibration
If you see‘‘--’’in the compass
display and‘‘CAL’’and‘‘
’’are
shown in the calendar display, the
compass is self-calibrating.
The compass may need to be
manually calibrated after exposure to
a strong magnetic field. If the
compass seems to be continually
showing the wrong direction and is
not self-calibrating, do the following.
1. Press and hold the SET button for
five seconds until the clock display
changes to‘‘ZON ? N.’’(Clock
adjustment mode will be started
after the first two seconds.)
2. Press the SET button.‘‘CAL ? N’’
will be displayed. At this point,
pressing the SET button will exit
calibration mode.3. Press the▼button.‘‘CAL ? Y’’will
be displayed.
4. Press the SET button. The
compass display will change to
‘‘--’’and‘‘CAL’’and‘‘
’’are
shown.
5. Drive the vehicle slowly in two
complete circles.
COMPASS DISPLAYPress and
hold SET
Press SET
Press▼
Compass342
Page 350 of 621
6. When the display goes from
‘‘--’’to an actual heading, the
unit is calibrated and the display
returns to normal.
NOTE:Do this procedure in an open
area, away from buildings, power
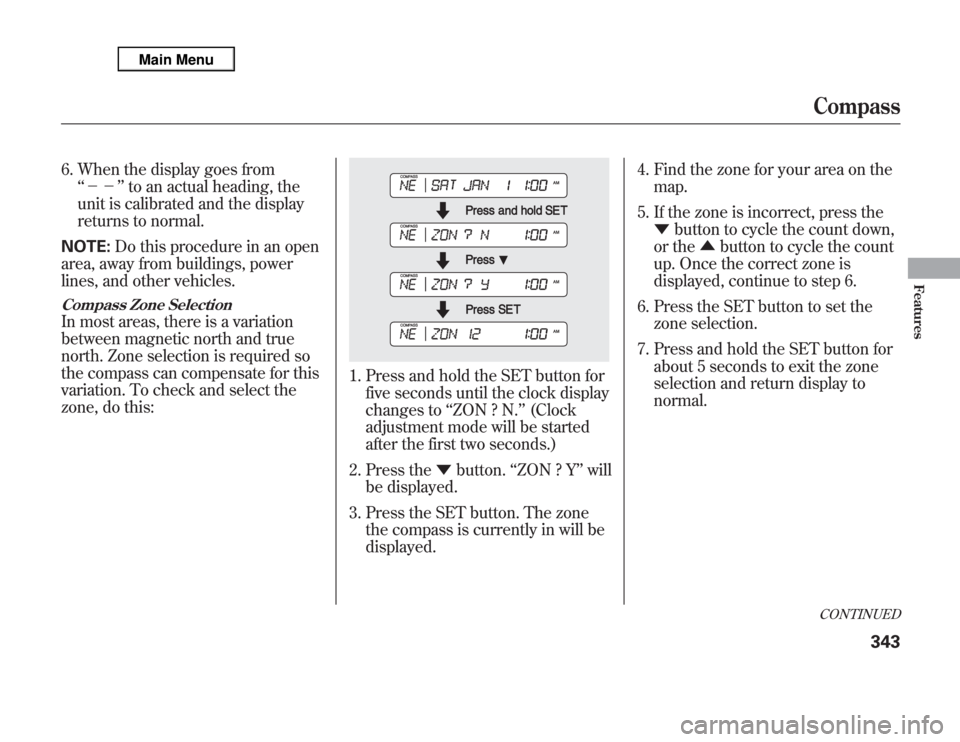
lines, and other vehicles.Compass Zone SelectionIn most areas, there is a variation
between magnetic north and true
north. Zone selection is required so
the compass can compensate for this
variation. To check and select the
zone, do this:
1. Press and hold the SET button for
five seconds until the clock display
changes to‘‘ZON ? N.’’(Clock
adjustment mode will be started
after the first two seconds.)
2. Press the▼button.‘‘ZON ? Y’’will
be displayed.
3. Press the SET button. The zone
the compass is currently in will be
displayed.4. Find the zone for your area on the
map.
5. If the zone is incorrect, press the
▼button to cycle the count down,
or the▲button to cycle the count
up. Once the correct zone is
displayed, continue to step 6.
6. Press the SET button to set the
zone selection.
7. Press and hold the SET button for
about 5 seconds to exit the zone
selection and return display to
normal.
CONTINUEDCompass
343
Features
Page 366 of 621

●
Driving on a mountainous road, or
driving off road for extended
periods.
●
Abrupt steering wheel movement.
●
When the ABS or VSA is activated.
●
When the VSA indicator comes on.
If ACC is canceled by any these
conditions, wait until the condition
improves, then press the RES/
ACCEL button to restore ACC. When
you do this, the vehicle will resume
its set cruising speed.
If you turn the ignition switch to the
ACCESSORY (I) or LOCK (0)
position after ACC was automatically
canceled, the set speed is erased,
and you must enter it again (see page
353).ACC Indicator
The ACC amber indicator normally
comes on for a few seconds when
you turn the ignition switch to the
ON (II) position. If it comes on at any
other time, there is a problem in the
ACC system. If this happens, take
the vehicle to your dealer to have it
checked.
The ACC system cannot be used
while this amber indicator is on.
ACC INDICATOR
CONTINUED
Adaptive Cruise Control (ACC)
359
Features
Page 386 of 621
To set a 4-digit passcode to lock the
HFL system for security purposes:Press and release the HFL Talk
button before a command.
1. Say‘‘System setup.’’
2. Say‘‘Security’’after the prompts.
3. Follow the HFL prompts and say
the 4-digit passcode you want to
set.
4. Follow the HFL prompts to
confirm the number.NOTE:Once a passcode is set, you
will need to enter it to use HFL each
time you start the vehicle. If you
forget the code, your dealer will have
to reset it for you, or you will have to
clear the entire system (see page
380).
To change your security pass code:Press and release the HFL Talk
button before a command.
1. Say‘‘System setup.’’
2. Say‘‘Change passcode’’after the
prompts.
3. Follow the HFL prompts and say
the new 4-digit passcode.
4. Follow the HFL prompts to
confirm the number.
CONTINUED
Bluetooth
®
HandsFreeLink
®
(Models without navigation system)
379
Features
Page 438 of 621

Modifying your vehicle, or installing
non-Acura accessories, may make
your vehicle unsafe. Before you
make any modifications or add any
accessories, be sure to read the
following information.
Accessories
Your dealer has Acura accessories
that allow you to personalize your
vehicle. These accessories have been
designed and approved for your
vehicle, and are covered by warranty.
Although non-Acura accessories may
fit on your vehicle, they may not
meet factory specifications, and could
adversely affect your vehicle's
handling, stability, and reliability.
Improper accessories or
modifications can affect your
vehicle's handling, stability, and
performance, and cause a
crash in which you can be hurt
or killed.
Follow all instructions in this
owner's manual regarding
accessories and modifications.
When properly installed, cellular
phones, alarms, two-way radios, and
low-powered audio systems should
not interfere with your vehicle's
computer controlled systems, such
as your airbags, anti-lock brakes, and
tire pressure monitoring system.Before installing any accessory:
●
Make sure the accessory does not
obscure any lights, or interfere
with proper vehicle operation or
performance.
●
Be sure electronic accessories do
not overload electrical circuits (see
page 566) or interfere with proper
operation of your vehicle.
●
Do not install accessories on the
side pillars or across the rear
windows. Accessories installed in
these areas may interfere with
proper operation of the side
curtain airbags.
●
Before installing any electronic
accessory, have the installer
contact your dealer for assistance.
If possible, have your dealer
inspect the final installation.
CONTINUED
Accessories and Modifications
431
Before Driving
Page 439 of 621

Modifying Your Vehicle
Removing parts from your vehicle, or
replacing components with non-
Acura components could seriously
affect your vehicle's handling,
stability, and reliability.
Some examples are:●
Lowering your vehicle with a non-
Acura suspension kit that
significantly reduces ground
clearance can allow the
undercarriage to hit speed bumps
or other raised objects, which
could cause the airbags to deploy.
●
Raising your vehicle with a non-
Acura suspension kit can affect the
handling and stability.
●
Non-Acura wheels, because they
are a universal design, can cause
excessive stress on suspension
components and will not be
compatible with the tire pressure
monitoring system (TPMS).
●
Larger or smaller wheels and tires
can interfere with the operation of
your vehicle's anti-lock brakes and
other systems.
Modifying your steering wheel or
any other part of your vehicle's safety
features can make the systems
ineffective.
If you plan to modify your vehicle,
consult your dealer.
Accessories and Modifications432