change wheel Acura MDX 2012 Owner's Manual
[x] Cancel search | Manufacturer: ACURA, Model Year: 2012, Model line: MDX, Model: Acura MDX 2012Pages: 621, PDF Size: 11.15 MB
Page 86 of 621

The multi-information display in the
instrument panel displays various
information and messages when the
ignition switch is in the ON (II)
position. Some of the messages help
you operate your vehicle more
comfortably. Others help to keep you
aware of the periodic maintenance
your vehicle needs for continued
trouble-free driving.
When you open the driver's door, a
‘‘Welcome’’message is shown on the
multi-information display.
To change the display, press the
INFO (
/
) button on the steering
wheel repeatedly until the main
menu appears (see page 80).With the ignition switch in the ON
(II) position, the multi-information
display changes as shown on the
next page each time you press the
INFO (
/
) button or SEL/RESET
button.
When you turn the ignition switch to
the ON (II) position, your last
selection is displayed.
In the multi-information display, the
system message is also displayed
(see page 86) and you can customize
your vehicle control settings (see
page 90).
SEL/
RESET
BUTTON INFO (▲/▼)
BUTTON
CONTINUED
Multi-Information Display
79
Instruments and Controls
Page 90 of 621

Engine Oil LifeThis shows the remaining life of the
engine oil. It shows 100% after the
engine oil is replaced and the display
is reset. The engine oil life is
calculated based on engine operating
conditions and accumulated engine
revolutions. For more information,
see page 507.SH-AWD Torque Distribution
Monitor
This monitor shows how much
torque is being delivered to each
wheel. For more information, see
page 452.Tire Pressure Monitor
When the tire pressure monitor is
shown on the multi-information
display, press the SEL/RESET
button. The display changes as
shown.
You can see the pressure of each tire
in this monitor. If one or more tires
are low, inflate them to the correct
pressure. For more information, see
page 455.
ENGINE OIL LIFE
U.S.
Canada
CONTINUED
Multi-Information Display
83
Instruments and Controls
Page 98 of 621

Group Setup Menu Item Description Setting Option Page
ACC SETUP
(P. 96)PRE-RUNNING CAR DETECT
BEEPCauses the system to beep when a vehicle ahead of
you gets too close.ON
ᤳ1
97
OFF
ACC DISPLAY SPEED UNIT Changes the ACC display speed unit. mph
ᤳ2
previous
setting98
km/h
ᤳ3
METER SETUP
(P. 99)LANGUAGE SELECTION Changes the language used in the display. ENGLISH
ᤳ1
100 FRENCH
SPANISH
ADJUST OUTSIDE
TEMP. DISPLAYChanges the outside temperature reading above or
below its current reading.-5°F~ᤣ0°F
ᤳ2~5°F
101
-3°C~ᤣ0°Cᤳ3~3°C
TRIP A & AVG. FUEL
RESET with REFUELCauses trip meter A and the average fuel economy to
reset when you refuel.ON 102
OFF
ᤳ1
ADJUST
ALARM VOLUMEChanges the indicator alarm volumes into three levels. HIGH
103 MID
ᤳ1
LOW
ELAPSED TIME RESET Resets the elapsed time of your current trip. MANUAL ONLY
104 IGN OFF
ᤳ1
TRIP B
TRIP A
AUTO INTERIOR
ILLUMINATIONChanges the interior light sensitivity to your liking. MAX LOW
105 HIGH MIN
MID
ᤳ1
OFF
POSITION SETUP
(P. 107)MEMORY POSITION LINK Changes the driver's seat, the steering wheel, and the
outside mirror positions to a stored setting.ON
ᤳ1
108
OFF
AUTO TILT & TELESCOPE
STEERING WHEELMoves the steering wheel fully in and up when the key
is removed.ON
ᤳ1
109
OFF
ᤳ1: Default setting
ᤳ2: Default setting for U.S. models
ᤳ3: Default setting for Canadian models
CONTINUED
Multi-Information Display
91
Instruments and Controls
Page 114 of 621

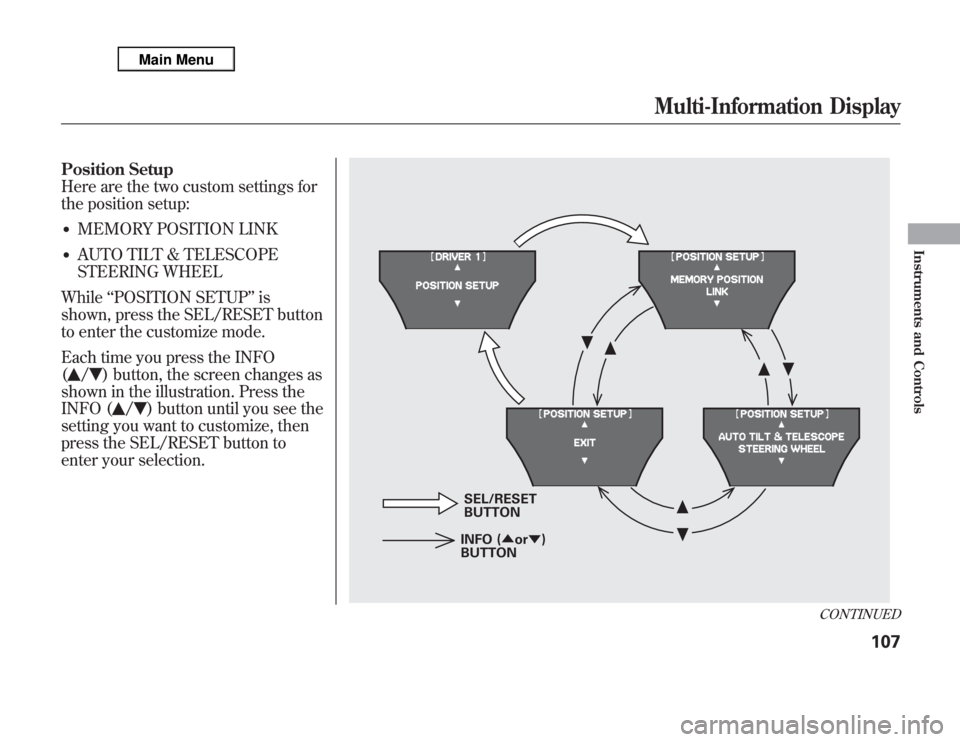
Position Setup
Here are the two custom settings for
the position setup:●
MEMORY POSITION LINK
●
AUTO TILT & TELESCOPE
STEERING WHEEL
While‘‘POSITION SETUP’’is
shown, press the SEL/RESET button
to enter the customize mode.
Each time you press the INFO
(/
) button, the screen changes as
shown in the illustration. Press the
INFO (
/
) button until you see the
setting you want to customize, then
press the SEL/RESET button to
enter your selection.
SEL/RESET
BUTTON
INFO (▲or▼)
BUTTON
CONTINUED
Multi-Information Display
107
Instruments and Controls
Page 115 of 621

Memory Position LinkIf‘‘MEMORY POSITION LINK’’is
set to‘‘ON,’’the driver's seat, the
steering wheel, and outside mirror
positions move to the position stored
in the memory when you open the
driver's door, using the remote
transmitter.
You can choose this customizable
item from‘‘POSITION SETUP’’by
pressing the INFO (
/
) button
repeatedly.
Press the SEL/RESET button to see
the selections.
Select ON or OFF by pressing the
INFO (
/
) button, then enter your
selection by pressing the SEL/
RESET button.
When your selection is successfully
completed, the display changes as
shown above, and then goes back to
the customize item screen.
If the‘‘SETTING INCOMPLETE’’
message appears, go back to
‘‘MEMORY POSITION LINK’’and
repeat the procedure again.
Multi-Information Display108
Page 116 of 621

Auto Tilt & Telescope Steering WheelWhen‘‘AUTO TILT & TELESCOPE
STEERING WHEEL’’is set to‘‘ON,’’
the steering wheel automatically
moves fully in and up when you turn
the ignition switch to the LOCK (0)
position and remove the key.
You can choose this customizable
item from‘‘POSITION SETUP’’by
pressing the INFO (
/
) button
repeatedly.
Press the SEL/RESET button to see
the selections.
Select ON or OFF by pressing the
INFO (
/
) button, then enter your
selection by pressing the SEL/
RESET button.
When your selection is successfully
completed, the display changes as
shown above, and then goes back to
the customize item screen.
If the‘‘SETTING INCOMPLETE’’
message appears, go back to‘‘AUTO
TILT & TELESCOPE STEERING
WHEEL’’and repeat the procedure
again.
CONTINUED
Multi-Information Display
109
Instruments and Controls
Page 142 of 621

When you remove the key from the
ignition switch, the steering wheel
automatically moves fully in and up.
To change the‘‘AUTO TILT &
TELESCOPE STEERING WHEEL’’
setting, see page 109.
The steering wheel then returns to
its original position when you insert
the key back in the ignition switch.
Steering wheel movement is also
controlled by the driving position
memory system (see page 168).If your vehicle's battery is
disconnected or goes dead, or the
fuse for the power tilt and telescopic
steering wheel is removed, the
power tilt and telescopic steering
wheel system needs to be reset when
you reconnect the battery or install
the fuse.
Insert the key into the ignition
switch, and remove it. The steering
wheel automatically moves fully in
and up to let you know the system is
reset.
Steering Wheel Adjustments
135
Instruments and Controls
Page 176 of 621

3. Press and release the MEMO
button on the control panel. You
will hear a beep. Immediately
press and hold one of the memory
buttons (1 or 2) until you hear two
beeps. The indicator in the
memory button will come on. The
current positions of the driver's
seat, steering wheel, and outside
mirrors are now stored.Doing any of the following after
pressing the MEMO button will
cancel the storing procedure.
●
Not pressing a memory button
within 5 seconds.
●
Readjusting the seat position.
●
Readjusting the outside mirror
position.
Each memory button stores only one
driving position. Storing a new
position erases the previous setting
stored in that button's memory. If
you want to add a new position while
retaining the current one, use the
other memory button.Selecting a Memorized Position
To select a memorized position, do
this:
1. Make sure the vehicle is parked.
2. Press the desired memory button
(1 or 2) until you hear a beep, then
release the button.
The system will move the seat,
steering wheel, and outside mirrors
to the memorized positions. The
indicator in the selected memory
button will flash during movement.
When the adjustments are complete,
you will hear two beeps, and the
indicator will remain on.
To change the‘‘MEMORY
POSITION LINK’’setting, see page
108.
MEMO BUTTON MEMORY BUTTONS
CONTINUED
Driving Position Memory System
169
Instruments and Controls
Page 177 of 621

To stop the system's automatic
adjustment, do any of these actions:●
Press any button on the control
panel: MEMO, 1, or 2.
●
Push any of the adjustment
switches for the seat.
●
Shift out of Park.
●
Adjust the outside mirrors.
If desired, you can use the
adjustment switches to change the
positions of the seat, steering wheel
or outside mirrors after they are in
their memorized position. If you
change the memorized position, the
indicator in the memory button will
go out. To keep this driving position
for later use, you must store it in the
driving position memory.Light Control Buttons
Your vehicle has the light control
buttons on the front ceiling. With
these buttons, you can select three
positions: OFF, Door (door activated
position), and ON. To select a
position, press the appropriate
button.
When you press the DOOR button,
the green indicator in the button
comes on as a reminder.To turn off the setting, press the OFF
button.
OFF position:●
The front individual map lights can
be turned on and off by pressing
each map light button (
).
●
The second and third row
individual map lights cannot be
turned on.
Front
ON
DOOR ACTIVATE
OFF
Second and Third row Front
MAP LIGHT BUTTONS
Driving Position Memory System, Interior Lights170
Page 309 of 621

Turn the dial to select a sound setup
mode, then press ENTER to set your
selection. See page 222 for more
sound setting information.To switch to HFL modeIf you receive a call when theBluetooth
®Audio is playing, press
the PICK-UP button on the steering
wheel. The screen and the center
display switch to the HFL mode (see
page 384).
After ending the call, press the
HANG-UP button to go back to the
Bluetooth
®Audio mode.
To turn off the Bluetooth
®Audio
mode
Select any other audio mode by
pressing a button; AM/FM,DISC, or HDD on the audio control
panel, or press the MODE button on
the steering wheel to select another
audio mode.
Switching to another mode pauses
the music playing from your phone.
As required by the FCC:
This device complies with Part 15 of the
FCC rules. Operation is subject to the
following two conditions: (1) This device
may not cause harmful interference, and
(2) this device must accept any
interference received, including
interference that may cause undesired
operation.
Changes or modifications not expressly
approved by the party responsible for
compliance could void the user's
authority to operate the equipment.
This device complies with Industry
Canada Standard RSS-210.
Operation is subject to the following two
conditions: (1) this device may not cause
interference, and (2) this device must
accept any interference that may cause
undesired operation of the device.
Bluetooth
®
Audio System (Models with navigation system)
302