ECO mode Acura MDX 2014 Repair Manual
[x] Cancel search | Manufacturer: ACURA, Model Year: 2014, Model line: MDX, Model: Acura MDX 2014Pages: 500, PDF Size: 11.72 MB
Page 258 of 500
257
uuCustomized Featuresu
Continued
Features
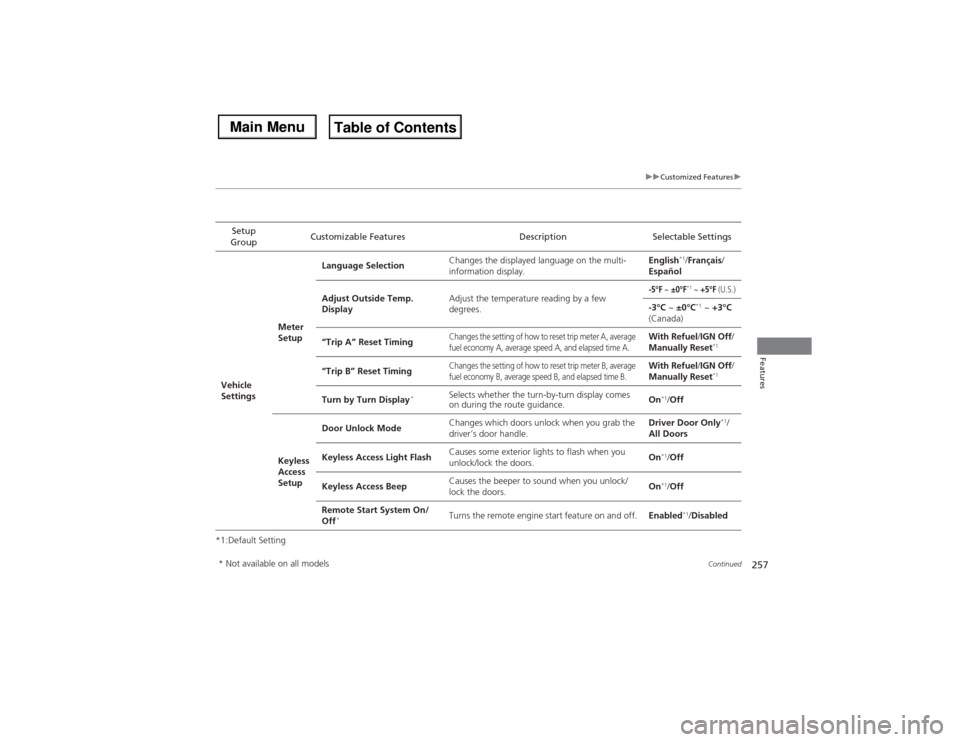
*1:Default SettingSetup
GroupCustomizable Features Description Selectable SettingsVehicle
SettingsMeter
SetupLanguage SelectionChanges the displayed language on the multi-
information display.English
*1/Français/
Español
Adjust Outside Temp.
DisplayAdjust the temperature reading by a few
degrees.
-5°F
~ ±0°F
*1 ~ +5°F
(U.S.)
-3°C ~ ±0°C
*1 ~ +3°C
(Canada)
“Trip A” Reset Timing
Changes the setting of how to reset trip meter A, average
fuel economy A, average speed A, and elapsed time A.
With Refuel/IGN Off/
Manually Reset
*1
“Trip B” Reset Timing
Changes the setting of how to reset trip meter B, average
fuel economy B, average speed B, and elapsed time B.
With Refuel/IGN Off/
Manually Reset
*1
Turn by Turn Display
*
Selects whether the turn-by-turn display comes
on during the route guidance.On
*1/Off
Keyless
Access
SetupDoor Unlock ModeChanges which doors unlock when you grab the
driver’s door handle.Driver Door Only
*1/
All Doors
Keyless Access Light FlashCauses some exterior lights to flash when you
unlock/lock the doors.On
*1/Off
Keyless Access BeepCauses the beeper to sound when you unlock/
lock the doors.On*1/Off
Remote Start System On/
Off
*
Turns the remote engine start feature on and off.Enabled
*1/Disabled
* Not available on all models
Page 259 of 500
258
uuCustomized Featuresu
Features
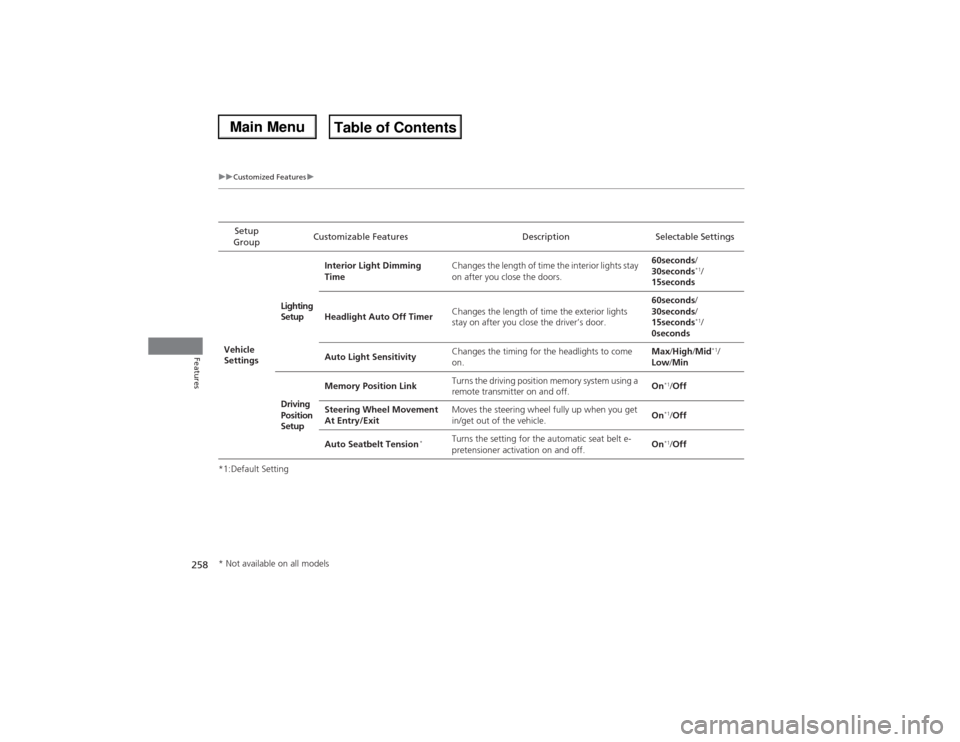
*1:Default SettingSetup
GroupCustomizable Features Description Selectable Settings
Vehicle
SettingsLighting
SetupInterior Light Dimming
TimeChanges the length of time the interior lights stay
on after you close the doors.60seconds/
30seconds
*1/
15seconds
Headlight Auto Off TimerChanges the length of time the exterior lights
stay on after you close the driver’s door.60seconds/
30seconds/
15seconds*1/
0seconds
Auto Light SensitivityChanges the timing for the headlights to come
on.Max/High/Mid*1/
Low/Min
Driving
Position
SetupMemory Position LinkTurns the driving position memory system using a
remote transmitter on and off.On
*1/Off
Steering Wheel Movement
At Entry/ExitMoves the steering wheel fully up when you get
in/get out of the vehicle.On*1/Off
Auto Seatbelt Tension
*
Turns the setting for the automatic seat belt e-
pretensioner activation on and off.On
*1/Off
* Not available on all models
Page 260 of 500

259
uuCustomized Featuresu
Continued
Features
*1:Default SettingSetup
GroupCustomizable Features Description Selectable Settings
Vehicle
SettingsDoor
SetupAuto Door LockChanges the setting for the automatic locking
feature.With Vehicle
Speed
*1/Shift from P/
Off
Auto Door UnlockChanges the setting for when the doors unlock
automatically.All Doors When
Driver’s Door
Opens*1/All Doors
When Shifted to
Park/All Doors When
Ignition Switched
Off/Off
Key And Remote Unlock
ModeSets up either the driver’s door or all doors to
unlock on the first push of the remote or built-in
key.Driver Door
*1/All
Doors
Keyless Lock Answer BackLOCK/UNLOCK- The exterior lights flash.
LOCK (2nd push)- The beeper sounds.On
*1/Off
Security Relock TimerChanges the time it takes for the doors to relock
and the security system to set after you unlock
the vehicle without opening any door.90seconds/
60seconds/
30seconds
*1
Page 262 of 500
261
uuCustomized Featuresu
Continued
Features
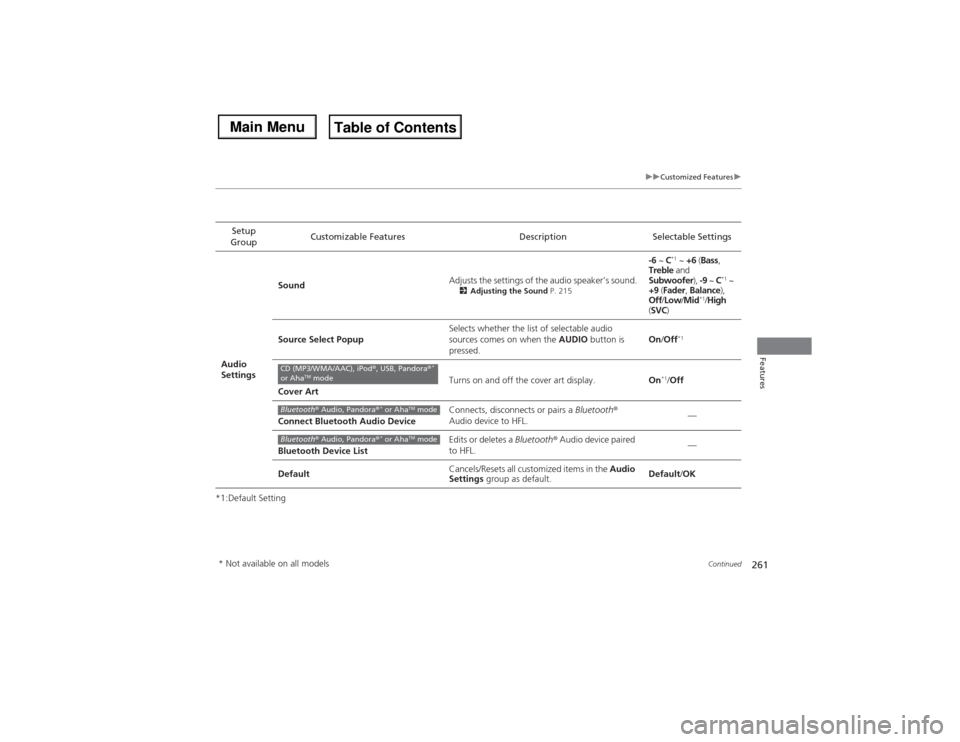
*1:Default SettingSetup
GroupCustomizable Features Description Selectable Settings
Audio
SettingsSoundAdjusts the settings of the audio speaker’s sound.
2Adjusting the Sound P. 215
-6 ~ C
*1 ~ +6 (Bass,
Treble and
Subwoofer), -9 ~ C
*1 ~
+9 (Fader, Balance),
Off/Low/Mid
*1/High
(SVC)
Source Select PopupSelects whether the list of selectable audio
sources comes on when the AUDIO button is
pressed.On/Off
*1
Cover ArtTurns on and off the cover art display.On
*1/Off
Connect Bluetooth Audio DeviceConnects, disconnects or pairs a Bluetooth®
Audio device to HFL.—
Bluetooth Device ListEdits or deletes a Bluetooth® Audio device paired
to HFL.—
DefaultCancels/Resets all customized items in the Audio
Settings group as default.Default/OK
CD (MP3/WMA/AAC), iPod®, USB, Pandora®
*
or Aha
TM mode
Bluetooth® Audio, Pandora®
* or Aha
TM mode
Bluetooth® Audio, Pandora®
* or Aha
TM mode
* Not available on all models
Page 269 of 500
268Features
Bluetooth® HandsFreeLink®See Navigation System Manual for how to operate Bluetooth® HandsFreeLink®.
Bluetooth® HandsFreeLink® (HFL) allows you to place and receive phone calls using
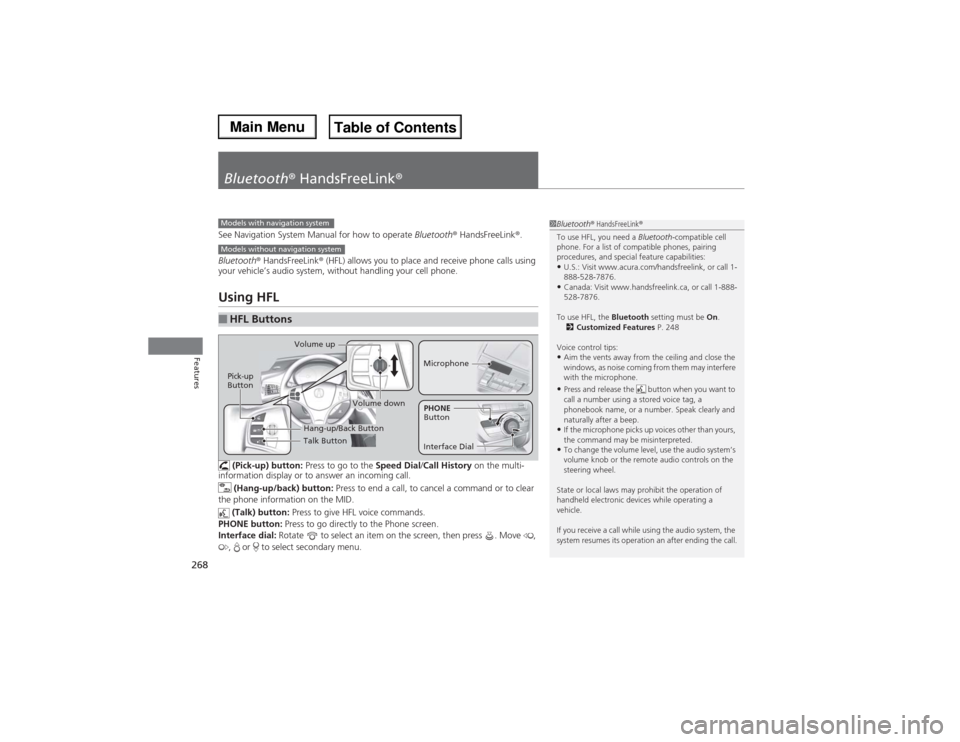
your vehicle’s audio system, without handling your cell phone.Using HFL (Pick-up) button: Press to go to the Speed Dial/Call History on the multi-
information display or to answer an incoming call.
(Hang-up/back) button: Press to end a call, to cancel a command or to clear
the phone information on the MID.
(Talk) button: Press to give HFL voice commands.
PHONE button: Press to go directly to the Phone screen.
Interface dial: Rotate to select an item on the screen, then press . Move ,
, or to select secondary menu.■HFL Buttons
1Bluetooth® HandsFreeLink®
To use HFL, you need a Bluetooth-compatible cell
phone. For a list of compatible phones, pairing
procedures, and special feature capabilities:•U.S.: Visit www.acura.com/handsfreelink, or call 1-
888-528-7876.•Canada: Visit www.handsfreelink.ca, or call 1-888-
528-7876.
To use HFL, the Bluetooth setting must be On.
2Customized Features P. 248
Voice control tips:•Aim the vents away from the ceiling and close the
windows, as noise coming from them may interfere
with the microphone.•Press and release the button when you want to
call a number using a stored voice tag, a
phonebook name, or a number. Speak clearly and
naturally after a beep.•If the microphone picks up voices other than yours,
the command may be misinterpreted.•To change the volume level, use the audio system’s
volume knob or the remote audio controls on the
steering wheel.
State or local laws may prohibit the operation of
handheld electronic devices while operating a
vehicle.
If you receive a call while using the audio system, the
system resumes its operation an after ending the call.
Models with navigation systemModels without navigation system
Talk Button Volume up
MicrophoneHang-up/Back Button
Pick-up
Button
Volume down
Interface DialPHONE
Button
Page 302 of 500
301Features
Compass
*
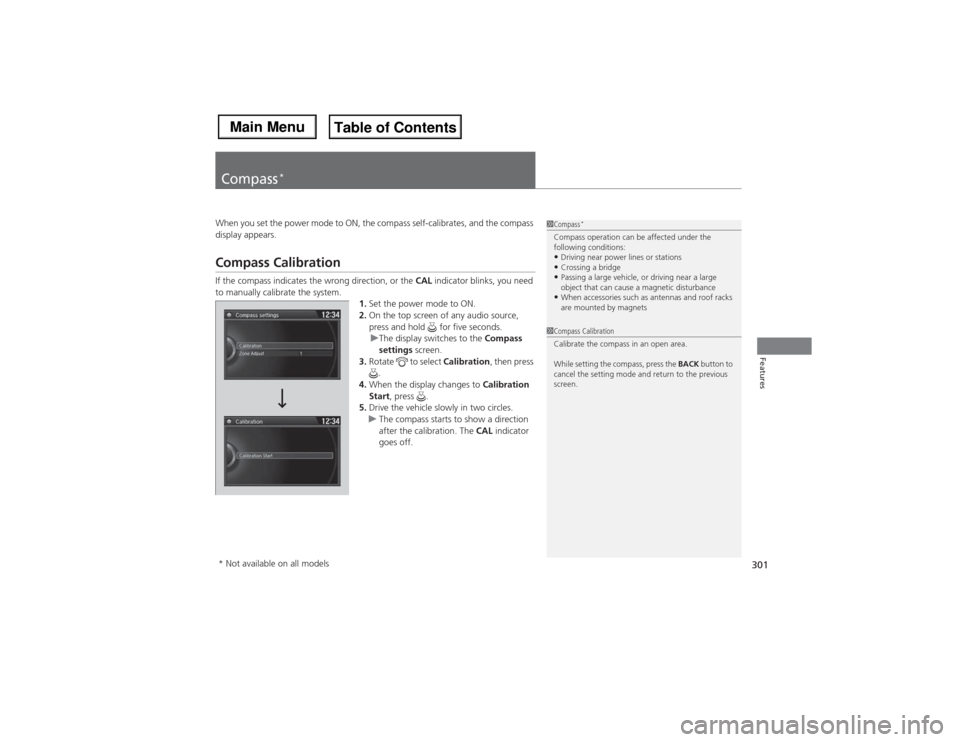
When you set the power mode to ON, the compass self-calibrates, and the compass
display appears.Compass CalibrationIf the compass indicates the wrong direction, or the CAL indicator blinks, you need
to manually calibrate the system.
1.Set the power mode to ON.
2.On the top screen of any audio source,
press and hold for five seconds.
uThe display switches to the Compass
settings screen.
3.Rotate to select Calibration, then press
.
4.When the display changes to Calibration
Start, press .
5.Drive the vehicle slowly in two circles.
uThe compass starts to show a direction
after the calibration. The CAL indicator
goes off.
1Compass
*
Compass operation can be affected under the
following conditions:•Driving near power lines or stations•Crossing a bridge•Passing a large vehicle, or driving near a large
object that can cause a magnetic disturbance•When accessories such as antennas and roof racks
are mounted by magnets
1Compass Calibration
Calibrate the compass in an open area.
While setting the compass, press the BACK button to
cancel the setting mode and return to the previous
screen.
* Not available on all models
Page 303 of 500
302
uuCompass
*uCompass Zone Selection
Features
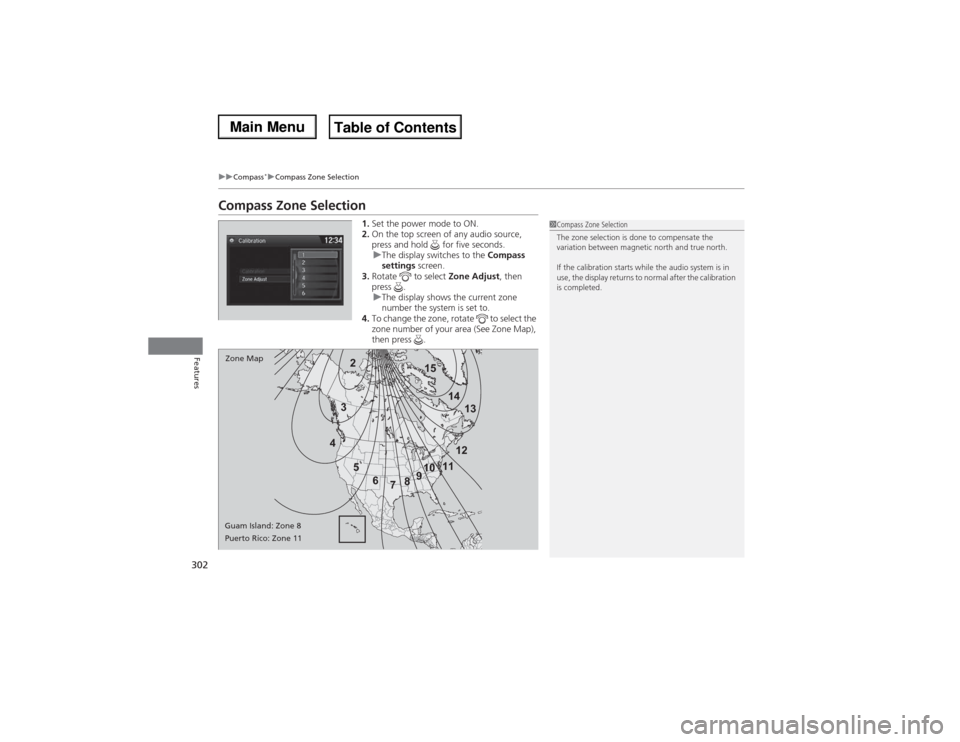
Compass Zone Selection
1.Set the power mode to ON.
2.On the top screen of any audio source,
press and hold for five seconds.
uThe display switches to the Compass
settings screen.
3.Rotate to select Zone Adjust, then
press .
uThe display shows the current zone
number the system is set to.
4.To change the zone, rotate to select the
zone number of your area (See Zone Map),
then press .2
3
4
5
6
78910111213 14 15
Zone Map
Guam Island: Zone 8
Puerto Rico: Zone 11
1Compass Zone Selection
The zone selection is done to compensate the
variation between magnetic north and true north.
If the calibration starts while the audio system is in
use, the display returns to normal after the calibration
is completed.
Page 304 of 500

303
Driving
This chapter discusses driving, refueling, and information on items such as accessories.
Before Driving
Driving Preparation .......................... 304
Maximum Load Limit........................ 307
Towing a Trailer................................ 309
Off-Highway Driving Guidelines..... 320
When Driving
Starting the Engine .......................... 322
Precautions While Driving................. 327
Automatic Transmission ................... 328
Shifting ............................................ 329
Integrated Dynamics System (IDS)..... 333
Cruise Control ................................. 334
Adaptive Cruise Control (ACC) with Low
Speed Follow (LSF)
*......................... 337Forward Collision Warning (FCW)
*.. 346
Lane Departure Warning (LDW)
*..... 350
Lane Keeping Assist System (LKAS)*.. 353
VSA® (Vehicle Stability Assist), aka ESC
(Electronic Stability Control), System .. 358Agile Handling Assist System............ 360
Blind Spot Information (BSI) System
*... 361
Super Handling-All Wheel DriveTM (SH-
AWD®)
*......................................... 363
Tire Pressure Monitoring System (TPMS) ... 363Tire Pressure Monitoring System (TPMS) -
Required Federal Explanation ......... 365
Braking
Brake System ................................... 367Anti-lock Brake System (ABS) ........... 369
Brake Assist System ......................... 370
Collision Mitigation Braking System
TM
(CMBS
TM)*..................................... 371
Parking Your Vehicle
When Stopped ................................ 377
Parking Sensor System
*................... 378
Multi-View Rear Camera*................ 382
Refueling
Fuel Information .............................. 383
How to Refuel ................................. 384
Fuel Economy.................................... 385
Accessories and Modifications........ 386
* Not available on all models
Page 310 of 500

309
Continued
Driving
Towing a TrailerTowing PreparationYour vehicle can tow a trailer if you carefully observe the load limits, use the proper
equipment, and follow the towing guidelines. Check the load limits before driving.
■Total trailer weight
Do not exceed the maximum allowable
weight of the trailer, cargo, and everything in
or on it shown in the table.
Towing loads in excess of this can seriously
affect vehicle handling and performance and
can damage the engine and drivetrain.
Each weight limit is calculated based on the following conditions:
•Occupants fill seats from the front of the vehicle to the back
•Each occupant weights 150 lbs (68 kg)
•Each occupant has 15 lbs (7 kg) of cargo in the cargo area
Any additional weight, cargo or accessories reduce the maximum trailer weight and
maximum tongue load.
■Towing Load Limits
1Towing Load Limits
Check if all loads are within limits at a public scale.
If a public scale is not available, add the estimated
weight of your cargo load to the weight of your
trailer (as quoted by the manufacturer), and then
measure the tongue load with an appropriate scale or
tongue gauge or estimate it based on cargo
distribution.
Refer to the trailer owner’s manual for additional
information.
Break-in Period
Avoid towing a trailer during your vehicle’s first 600
miles (1,000 km).
Never exceed the gross weight ratings.
Gross weight information
2Vehicle Specifications P. 480
3
WARNING
Exceeding any load limit or improperly
loading your vehicle and trailer can cause a
crash in which you can be seriously hurt or
killed.
Check the loading of your vehicle and
trailer carefully before starting to drive.
Total Load
Number of
occupants
4WD models with
ATF cooler
4WD models
without ATF cooler
2WD models
2
5,000 lbs (2,268 kg)
3,500 lbs (1,588 kg)
3,500 lbs (1,588 kg)
3
4,750 lbs (2,155 kg)
3,250 lbs (1,474 kg)
3,250 lbs (1,474 kg)
4
4,500 lbs (2,041 kg)
3,000 lbs (1,361 kg)
3,000 lbs (1,361 kg)
5
4,250 lbs (1,928 kg)
2,750 lbs (1,247 kg)
2,750 lbs (1,247 kg)
6
4,000 lbs (1,814 kg)
2,500 lbs (1,134 kg)
2,500 lbs (1,134 kg)
7
Towing not recommended
Page 311 of 500

310
uuTowing a TraileruTowing Preparation
Driving
■Tongue load
The weight of the tongue with a fully loaded
trailer on the hitch should be approximately:
Boat trailers: 5 – 15% of the total trailer
weight
Other trailers: 10 – 15% of total trailer weight
Tongue LoadTongue Load
Number of
occupants
4WD models
2WD models
2
500 lbs (227 kg)
350 lbs (159 kg)
3
475 lbs (215 kg)
325 lbs (147 kg)
4
380 lbs (172 kg)
300 lbs (136 kg)
5
290 lbs (132 kg)
275 lbs (125 kg)
6
165 lbs (75 kg)
150 lbs (68 kg)
7
Towing not recommended