lock Acura MDX 2015 Owner's Manual
[x] Cancel search | Manufacturer: ACURA, Model Year: 2015, Model line: MDX, Model: Acura MDX 2015Pages: 79, PDF Size: 16.44 MB
Page 50 of 79
92 || 93
DrIvING
DrIvING
Starting to Drive
The keyless access system allows simple push-button start.
Before Starting the engine
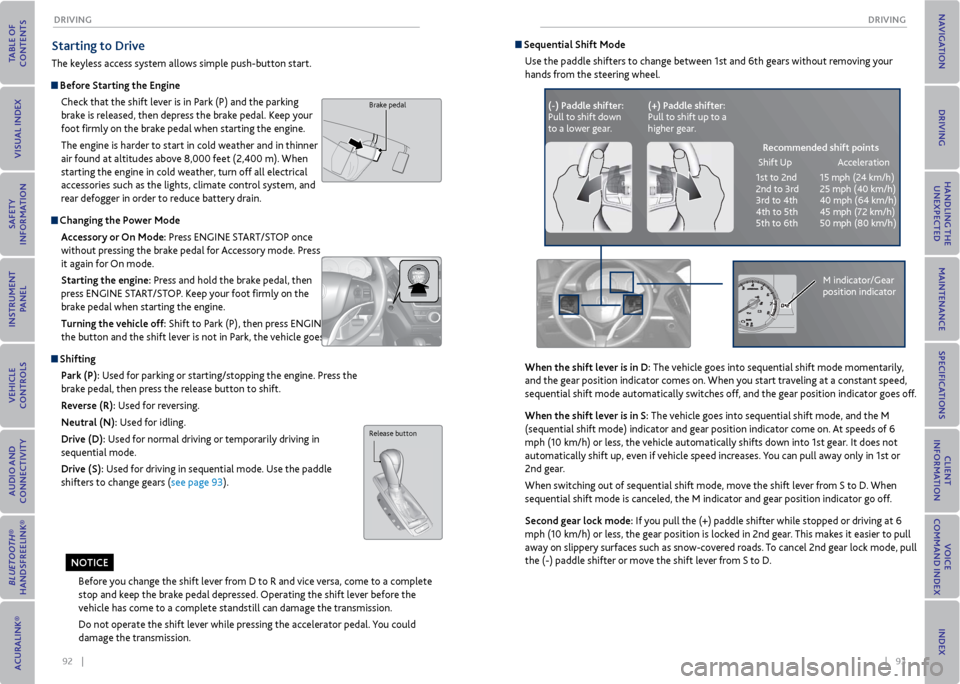
Check that the shift lever is in Park (P) and the parking
brake is released, then depress the brake pedal. Keep your
foot firmly on the brake pedal when starting the engine.
The engine is harder to start in cold weather and in thinner
air found at altitudes above 8,000 feet (2,400 m). When
starting the engine in cold weather, turn off all electrical
accessories such as the lights, climate control system, and
rear defogger in order to reduce battery drain.
Changing the Power mode Accessory or on mode: Press ENGINE START/STOP once
without pressing the brake pedal for Accessory mode. Press
it again for On mode.
Starting the engine: Press and hold the brake pedal, then
press ENGINE START/STOP. Keep your foot firmly on the
brake pedal when starting the engine.
Turning the vehicle off: Shift to Park (P), then press ENGINE START/STOP. If you press
the button and the shift lever is not in Park, the vehicle goes into Accessory mode.
Shifting
Park (P): Used for parking or starting/stopping the engine. Press the
brake pedal, then press the release button to shift.
r everse (r): Used for reversing.
Neutral (N): Used for idling.
Drive (D): Used for normal driving or temporarily driving in
sequential mode.
Drive (S): Used for driving in sequential mode. Use the paddle
shifters to change gears (see page 93).
Brake pedal
Before you change the shift lever from D to R and vice versa, come to a complete
stop and keep the brake pedal depressed. Operating the shift lever before the
vehicle has come to a complete standstill can damage the transmission.
Do not operate the shift lever while pressing the accelerator pedal. You could
damage the transmission.
Release button
No TICe
Sequential Shift mode
Use the paddle shifters to change between 1st and 6th gears without removing your
hands from the steering wheel.
When the shift lever is in D: The vehicle goes into sequential shift mode momentarily,
and the gear position indicator comes on. When you start traveling at a constant speed,
sequential shift mode automatically switches off, and the gear position indicator goes off.
When the shift lever is in S: The vehicle goes into sequential shift mode, and the M
(sequential shift mode) indicator and gear position indicator come on. At speeds of 6
mph (10 km/h) or less, the vehicle automatically shifts down into 1st gear. It does not
automatically shift up, even if vehicle speed increases. You can pull away only in 1st or
2nd gear.
When switching out of sequential shift mode, move the shift lever from S to D. When
sequential shift mode is canceled, the M indicator and gear position indicator go off.
Second gear lock mode: If you pull the (+) paddle shifter while stopped or driving at 6
mph (10 km/h) or less, the gear position is locked in 2nd gear. This makes it easier to pull
away on slippery surfaces such as snow-covered roads. To cancel 2nd gear lock mode, pull
the (-) paddle shifter or move the shift lever from S to D.
(-) Paddle shifter:
Pull to shift down
to a lower gear. (+) Paddle shifter:
Pull to shift up to a
higher gear.
recommended shift points
Shift Up Acceleration
1st to 2nd 15 mph (24 km/h)
2nd to 3rd 25 mph (40 km/h)
3rd to 4th 40 mph (64 km/h)
4th to 5th 45 mph (72 km/h)
5th to 6th 50 mph (80 km/h)
M indicator/Gear
position indicator
Page 51 of 79
94 || 95
DrIvING
DrIvING
Integrated Dynamics System (IDS)
Choose a driving mode for your preference based on road conditions, vehicle speed, and
handling.
Comfort: Maximizes driver comfort through increased steering assist.
Normal: Balances performance for everyday driving.
Sport: Enhances vehicle response and feel through decreased steering assist and increased
throttle and torque.
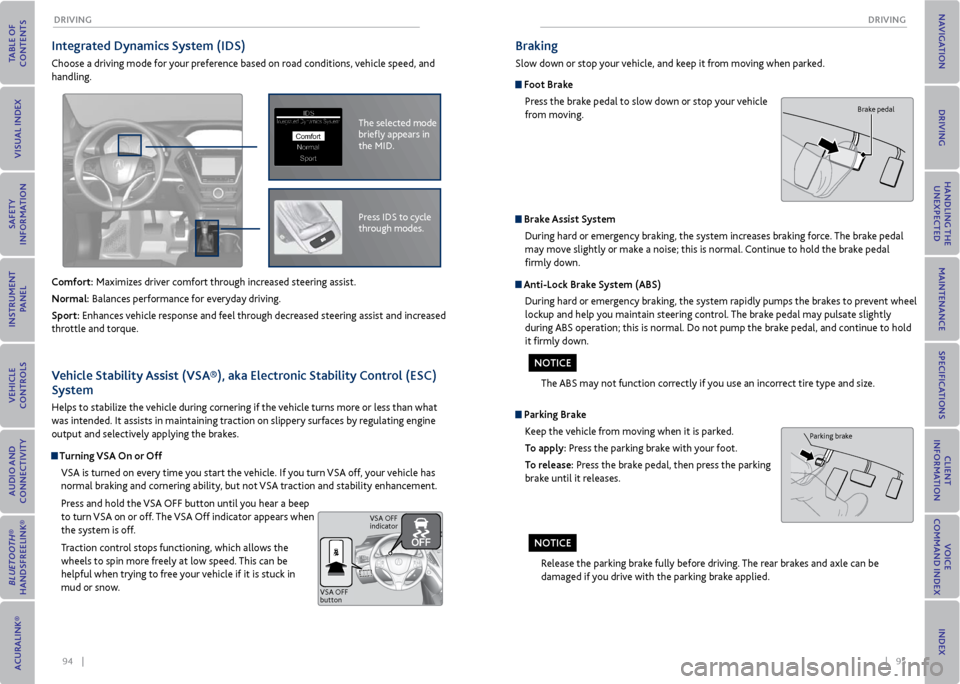
The selected mode
briefly appears in
the MID.IDSIntegrated Dynamics System
NormalSport
Comfort
Press IDS to cycle
through modes.
v ehicle Stability Assist (vSA®), aka electronic Stability Control (eSC)
System
Helps to stabilize the vehicle during cornering if the vehicle turns more or less than what
was intended. It assists in maintaining traction on slippery surfaces by regulating engine
output and selectively applying the brakes.
Turning vSA on or off
VSA is turned on every time you start the vehicle. If you turn VSA off, your vehicle has
normal braking and cornering ability, but not VSA traction and stability enhancement.
Press and hold the VSA OFF button until you hear a beep
to turn VSA on or off. The VSA Off indicator appears when
the system is off.
Traction control stops functioning, which allows the
wheels to spin more freely at low speed. This can be
helpful when trying to free your vehicle if it is stuck in
mud or snow.
VSA OFF
button VSA OFF
indicator
Braking
Slow down or stop your vehicle, and keep it from moving when parked.
Foot Brake
Press the brake pedal to slow down or stop your vehicle
from moving.
Parking BrakeKeep the vehicle from moving when it is parked.
To apply: Press the parking brake with your foot.
To release: Press the brake pedal, then press the parking
brake until it releases.
Brake Assist SystemDuring hard or emergency braking, the system increases braking force. The brake pedal
may move slightly or make a noise; this is normal. Continue to hold the brake pedal
firmly down.
Anti-Lock Brake System (ABS)
During hard or emergency braking, the system rapidly pumps the brakes to prevent wheel
lockup and help you maintain steering control. The brake pedal may pulsate slightly
during ABS operation; this is normal. Do not pump the brake pedal, and continue to hold
it firmly down.
The ABS may not function correctly if you use an incorrect tire type and size.
Release the parking brake fully before driving. The rear brakes and axle can be
damaged if you drive with the parking brake applied.
Brake pedal
Parking brake
No TICe
NoTICe
Page 58 of 79
108 || 109
HANDLING THe UNexPeCTeD
HANDLING THe UNexPeCTeD
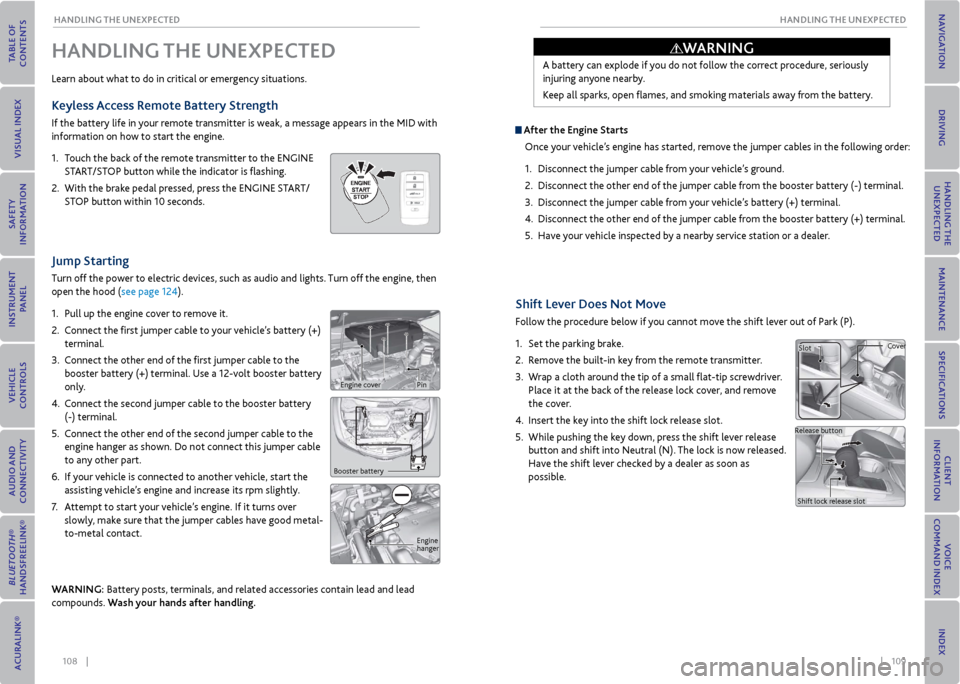
Shift Lever Does Not move
Follow the procedure below if you cannot move the shift lever out of Park (P).
1. Set the parking brake.
2. Remove the built-in key from the remote transmitter.
3. Wrap a cloth around the tip of a small flat-tip screwdriver.
Place it at the back of the release lock cover, and remove
the cover.
4. Insert the key into the shift lock release slot.
5. While pushing the key down, press the shift lever release
button and shift into Neutral (N). The lock is now released.
Have the shift lever checked by a dealer as soon as
possible.
Jump Starting
Turn off the power to electric devices, such as audio and lights. Turn off the engine, then
open the hood (see page 124).
1. Pull up the engine cover to remove it.
2. Connect the first jumper cable to your vehicle’s battery (+)
terminal.
3. Connect the other end of the first jumper cable to the
booster battery (+) terminal. Use a 12-volt booster battery
only.
4. Connect the second jumper cable to the booster battery
(-) terminal.
5. Connect the other end of the second jumper cable to the
engine hanger as shown. Do not connect this jumper cable
to any other part.
6. If your vehicle is connected to another vehicle, start the
assisting vehicle’s engine and increase its rpm slightly.
7. Attempt to start your vehicle’s engine. If it turns over
slowly, make sure that the jumper cables have good metal-
to-metal contact.
WArNING: Battery posts, terminals, and related accessories contain lead and lead
compounds. Wash your hands after handling.
HANDLING THe UNexPeCTeD
Learn about what to do in critical or emergency situations.
Keyless Access remote Battery Strength
If the battery life in your remote transmitter is weak, a message appears in the MID with
information on how to start the engine.
1. Touch the back of the remote transmitter to the ENGINE
START/STOP button while the indicator is flashing.
2. With the brake pedal pressed, press the ENGINE START/
STOP button within 10 seconds.
Booster battery
Engine
hanger
A battery can explode if you do not follow the correct procedure, seriously
injuring anyone nearby.
Keep all sparks, open flames, and smoking materials away from the battery.
After the engine Starts
Once your vehicle’s engine has started, remove the jumper cables in the following order:
1. Disconnect the jumper cable from your vehicle’s ground.
2. Disconnect the other end of the jumper cable from the booster battery (-) terminal.
3. Disconnect the jumper cable from your vehicle’s battery (+) terminal.
4. Disconnect the other end of the jumper cable from the booster battery (+) terminal.
5. Have your vehicle inspected by a nearby service station or a dealer.
Slot Cover
Release button Shift lock release slot
WArNING
Engine coverPin
Page 59 of 79
110 || 111
HANDLING THe UNexPeCTeD
HANDLING THe UNexPeCTeD
overheating
If the temperature gauge needle is at the H mark, the engine suddenly loses power, or
steam or spray comes out from under the hood, your engine is overheating.
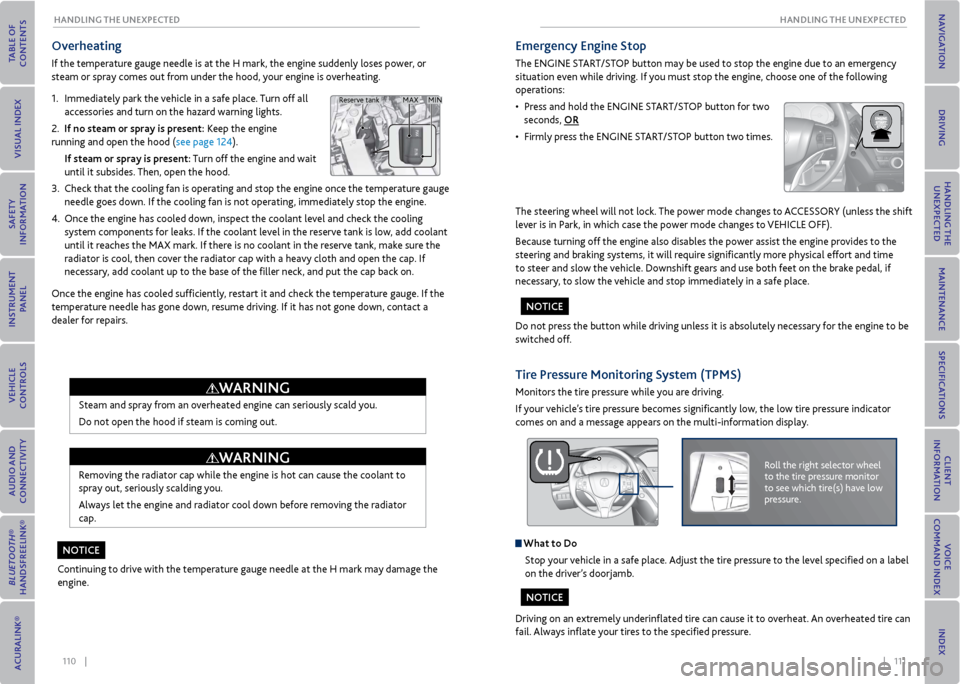
1. Immediately park the vehicle in a safe place. Turn off all
accessories and turn on the hazard warning lights.
2. If no steam or spray is present: Keep the engine
running and open the hood (see page 124).
If steam or spray is present: Turn off the engine and wait
until it subsides. Then, open the hood.
3. Check that the cooling fan is operating and stop the engine once the temperature gauge
needle goes down. If the cooling fan is not operating, immediately stop the engine.
4. Once the engine has cooled down, inspect the coolant level and check the cooling
system components for leaks. If the coolant level in the reserve tank is low, add coolant
until it reaches the MAX mark. If there is no coolant in the reserve tank, make sure the
radiator is cool, then cover the radiator cap with a heavy cloth and open the cap. If
necessary, add coolant up to the base of the filler neck, and put the cap back on.
Once the engine has cooled sufficiently, restart it and check the temperature gauge. If the
temperature needle has gone down, resume driving. If it has not gone down, contact a
dealer for repairs.
Steam and spray from an overheated engine can seriously scald you.
Do not open the hood if steam is coming out.
Removing the radiator cap while the engine is hot can cause the coolant to
spray out, seriously scalding you.
Always let the engine and radiator cool down before removing the radiator
cap.
Continuing to drive with the temperature gauge needle at the H mark may damage the
engine.
MAX MIN
Reserve tank
WArNING
WArNING
No TICe
emergency engine Stop
The ENGINE START/STOP button may be used to stop the engine due to an emergency
situation even while driving. If you must stop the engine, choose one of the following
operations:
• Press and hold the ENGINE START/STOP button for two
seconds, or
• Firmly press the ENGINE START/STOP button two times.
The steering wheel will not lock. The power mode changes to ACCESSORY (unless the shift
lever is in Park, in which case the power mode changes to VEHICLE OFF).
Because turning off the engine also disables the power assist the engine provides to the
steering and braking systems, it will require significantly more physical effort and time
to steer and slow the vehicle. Downshift gears and use both feet on the brake pedal, if
necessary, to slow the vehicle and stop immediately in a safe place.
Do not press the button while driving unless it is absolutely necessary for the engine to be
switched off.
Tire Pressure monitoring System (TPmS)
Monitors the tire pressure while you are driving.
If your vehicle’s tire pressure becomes significantly low, the low tire pressure indicator
comes on and a message appears on the multi-information display.
Roll the right selector wheel
to the tire pressure monitor
to see which tire(s) have low
pressure.
What to Do Stop your vehicle in a safe place. Adjust the tire pressure to the level specified on a label
on the driver’s doorjamb.
Driving on an extremely underinflated tire can cause it to overheat. An overheated tire can
fail. Always inflate your tires to the specified pressure.
No TICe
NoTICe
Page 61 of 79
114 || 115
HANDLING THe UNexPeCTeD
HANDLING THe UNexPeCTeD
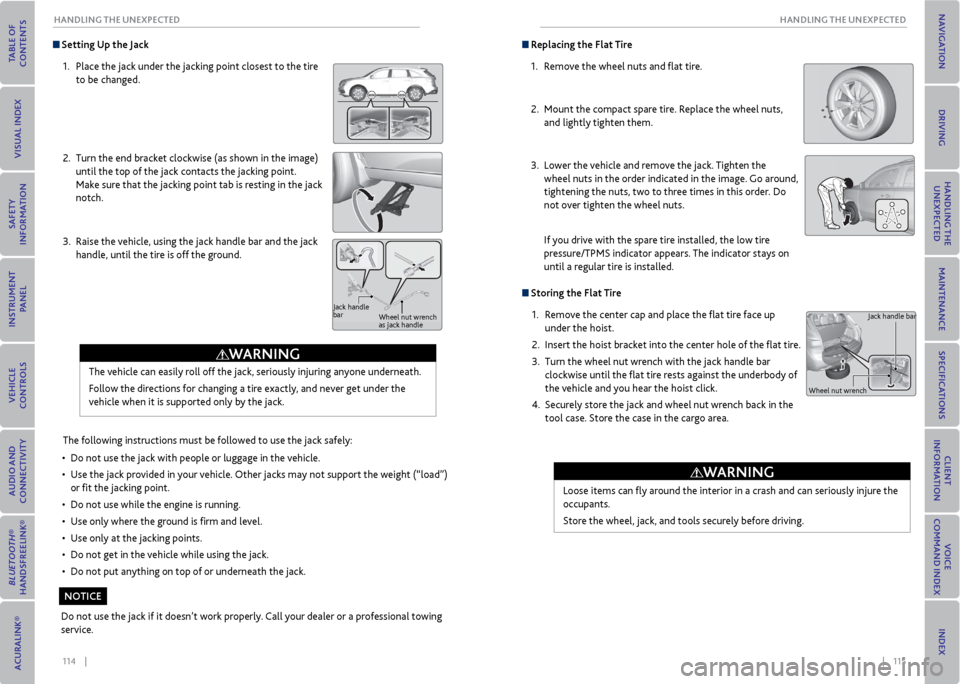
Setting Up the Jack
1. Place the jack under the jacking point closest to the tire
to be changed.
2. Turn the end bracket clockwise (as shown in the image)
until the top of the jack contacts the jacking point.
Make sure that the jacking point tab is resting in the jack
notch.
3. Raise the vehicle, using the jack handle bar and the jack
handle, until the tire is off the ground.
The following instructions must be followed to use the jack safely:
• Do not use the jack with people or luggage in the vehicle.
• Use the jack provided in your vehicle. Other jacks may not support the weight (“load”)
or fit the jacking point.
• Do not use while the engine is running.
• Use only where the ground is firm and level.
• Use only at the jacking points.
• Do not get in the vehicle while using the jack.
• Do not put anything on top of or underneath the jack.
The vehicle can easily roll off the jack, seriously injuring anyone underneath.
Follow the directions for changing a tire exactly, and never get under the
vehicle when it is supported only by the jack.
Jack handle
bar
Wheel nut wrench
as jack handle
Do not use the jack if it doesn’t work properly. Call your dealer or a professional towing
service.
WArNING
NoTICe
replacing the Flat Tire
1. Remove the wheel nuts and flat tire.
2. Mount the compact spare tire. Replace the wheel nuts,
and lightly tighten them.
3. Lower the vehicle and remove the jack. Tighten the
wheel nuts in the order indicated in the image. Go around,
tightening the nuts, two to three times in this order. Do
not over tighten the wheel nuts.
If you drive with the spare tire installed, the low tire
pressure/TPMS indicator appears. The indicator stays on
until a regular tire is installed.
Storing the Flat Tire
1. Remove the center cap and place the flat tire face up
under the hoist.
2. Insert the hoist bracket into the center hole of the flat tire.
3. Turn the wheel nut wrench with the jack handle bar
clockwise until the flat tire rests against the underbody of
the vehicle and you hear the hoist click.
4. Securely store the jack and wheel nut wrench back in the
tool case. Store the case in the cargo area.
Loose items can fly around the interior in a crash and can seriously injure the
occupants.
Store the wheel, jack, and tools securely before driving.
Jack handle bar
Wheel nut wrench
WArNING
Page 62 of 79
116 || 117
HANDLING THe UNexPeCTeD
HANDLING THe UNexPeCTeD
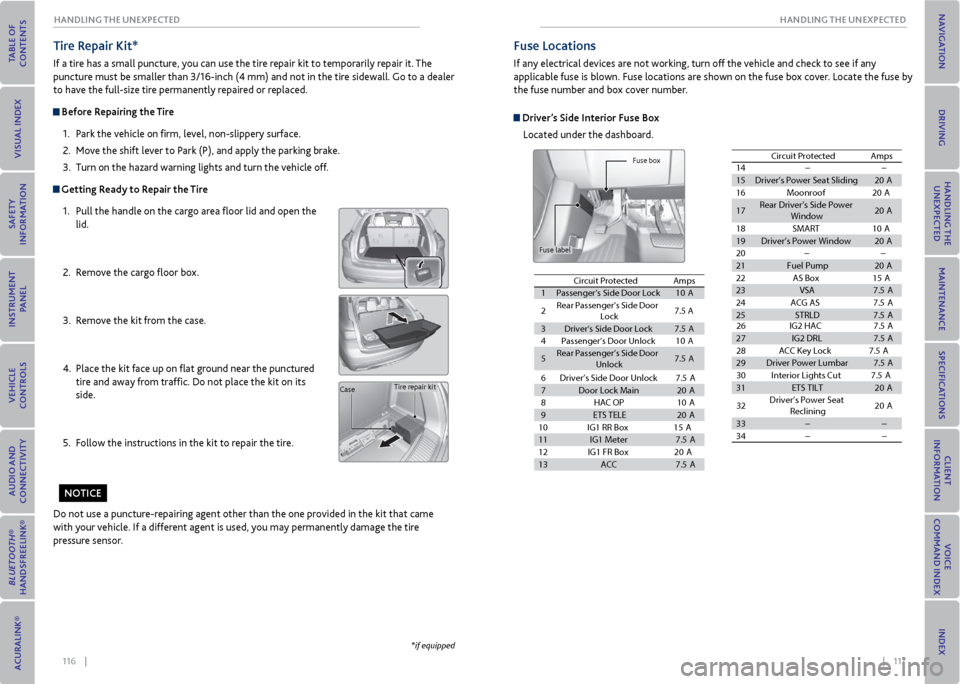
Tire r epair Kit*
If a tire has a small puncture, you can use the tire repair kit to temporarily repair it. The
puncture must be smaller than 3/16-inch (4 mm) and not in the tire sidewall. Go to a dealer
to have the full-size tire permanently repaired or replaced.
Before r epairing the Tire
1. Park the vehicle on firm, level, non-slippery surface.
2. Move the shift lever to Park (P), and apply the parking brake.
3. Turn on the hazard warning lights and turn the vehicle off.
Getting ready to repair the Tire
1. Pull the handle on the cargo area floor lid and open the
lid.
2. Remove the cargo floor box.
3. Remove the kit from the case.
4. Place the kit face up on flat ground near the punctured
tire and away from traffic. Do not place the kit on its
side.
5. Follow the instructions in the kit to repair the tire.
Do not use a puncture-repairing agent other than the one provided in the kit that came
with your vehicle. If a different agent is used, you may permanently damage the tire
pressure sensor.
Tire repair kit
Case
*if equipped
No TICe
Fuse Locations
If any electrical devices are not working, turn off the vehicle and check to see if any
applicable fuse is blown. Fuse locations are shown on the fuse box cover. Locate the fuse by
the fuse number and box cover number.
Driver’s Side Interior Fuse Box
Located under the dashboard.
Fuse box
Fuse label
Circuit ProtectedAmps
1Passenger’s Side Door Lock10 A
2Rear Passenger’s Side Door
Lock7.5 A
3Driver’s Side Door Lock7.5A
4Passenger’s Door Unloc k10A
5Rear Passenger’s Side Door Unlock7.5A
6 Driver’s Side Door Unlock 7.5A
7 Door Lock Main 20A
8 HAC OP 10A
9 ETS TELE 20A
10 IG1 RR Box1 5A
11 IG1 Meter 7.5A
12 IG1 FR Box2 0A
13 ACC 7.5A
14 ��
15 Driver’s Power Seat Sliding 20A
16 Moonroof 20A
17 Rear Driver’s Side Power
Window 20
A
18 SMART 10A
19 Driver’s Power Windo w20A
20 ��
21 Fuel Pump 20A
22 AS Box 15A
23 VSA 7.5A
24 ACG AS 7.5A
25 STRLD 7.5A
Circuit Protecte
dAmps
26 IG2 HAC 7.5A
27 IG2 DRL 7.5A
28 ACC Key Lock 7.5A
29 Driver Power Lumbar 7.5A
30 Interior Lights Cut 7.5A
31 ETS TILT 20A
32 Driver’s Power Seat
Reclining 20
A
33 � �
34 � �
Circuit Protected
Amps
Circuit Protected Amps
1 Passenger’s Side Door Lock 10A
2 Rear
Passenger’s Side Door
Lock 7.5
A
3 Driver’s Side Door Lock 7.5A
4 Passenger’s Door Unloc k10A
5 Rear
Passenger’s Side Door
Unlock 7.
5A
6Driver’s Side Door Unlock7.5A
7Door Lock Main20 A
8HAC OP10A
9ETS TELE20A
10 IG1 RR Bo
x15A
11IG1 Meter7.5A
12 IG1 FR Bo
x20A
13ACC7.5A
14 ��
15 Driver’s Power Seat Sliding 20A
16 Moonroof 20A
17 Rear Driver’s Side Power
Window 20
A
18 SMART 10A
19 Driver’s Power Windo w20A
20 ��
21 Fuel Pump 20A
22 AS Box 15A
23 VSA 7.5A
24 ACG AS 7.5A
25 STRLD 7.5A
Circuit Protecte dAmps
26IG2 HAC 7.5A
27 IG2 DRL 7.5A
28 ACC Key Lock 7.5A
29 Driver Power Lumbar 7.5A
30 Interior Lights Cut 7.5A
31 ETS TILT 20A
32 Driver’s Power Seat
Reclining 20
A
33 � �
34 � �
Circuit Protected
Amps
Circuit Protected Amps
1 Passenger’s Side Door Lock 10A
2 Rear
Passenger’s Side Door
Lock 7.5
A
3 Driver’s Side Door Lock 7.5A
4 Passenger’s Door Unloc k10A
5 Rear
Passenger’s Side Door
Unlock 7.
5A 6
Driver’s Side Door Unlock 7.5A
7 Door Lock Main 20A
8 HAC OP 10A
9 ETS TELE 20A
10 IG1 RR Box1 5A
11 IG1 Meter 7.5A
12 IG1 FR Box2 0A
13 ACC 7.5A
14 ��
15 Driver’s Power Seat Sliding 20A
16 Moonroof 20A
17 Rear Driver’s Side Power
Window 20
A
18 SMART 10A
19 Driver’s Power Windo w20A
20 ��
21 Fuel Pump 20A
22 AS Box 15A
23 VSA 7.5A
24 ACG AS 7.5A
25 STRLD 7.5A
Circuit Protecte
dAmps
26 IG2 HAC 7.5A
27IG2 DR L7.5A
28 ACC Key Lock 7.5A
29Driver Power Lumbar7.5A
30 Interior Lights Cut 7.5A
31ETS TILT20 A
32 Driver’s Power Seat
Reclining 20
A
33��
34��
Circuit ProtectedAmps
Circuit Protected Amps
1 Passenger’s Side Door Lock 10A
2 Rear
Passenger’s Side Door
Lock 7.5
A
3 Driver’s Side Door Lock 7.5A
4 Passenger’s Door Unloc k10A
5 Rear
Passenger’s Side Door
Unlock 7.
5A 6
Driver’s Side Door Unlock 7.5A
7 Door Lock Main 20A
8 HAC OP 10A
9 ETS TELE 20A
10 IG1 RR Box1 5A
11 IG1 Meter 7.5A
12 IG1 FR Box2 0A
13ACC7.5A
14 ��
15Driver’s Power Seat Sliding20A
16 Moonroof 20A
17Rear Driver’s Side Power
Window20A
18 SMART 10A
19Driver’s Power Windo w20A
20
��
21Fuel Pump20 A
22 AS Box 15A
23VSA7.5A
24 ACG AS 7.5A
25STRLD7.5A
Circuit Protecte
dAmps
26 IG2 HAC 7.5A
27 IG2 DRL 7.5A
28 ACC Key Lock 7.5A
29 Driver Power Lumbar 7.5A
30 Interior Lights Cut 7.5A
31 ETS TILT 20A
32 Driver’s Power Seat
Reclining 20
A
33 � �
34 � �
Circuit Protected
Amps
Circuit ProtectedAmps
1Passenger’s Side Door Lock10A
2 Rear
Passenger’s Side Door
Lock 7.5
A
3 Driver’s Side Door Lock 7.5A
4 Passenger’s Door Unloc k10A
5 Rear
Passenger’s Side Door
Unlock 7.
5A6 Driver’s Side Door Unlock 7.5A
7 Door Lock Main 20A
8 HAC OP 10A
9 ETS TELE 20A
10 IG1 RR Box1 5A
11 IG1 Meter 7.5A
12 IG1 FR Box2 0A
13 ACC 7.5A
14 ��
15 Driver’s Power Seat Sliding 20A
16 Moonroof 20A
17 Rear Driver’s Side Power
Window 20
A
18 SMART 10A
19 Driver’s Power Windo w20A
20 ��
21 Fuel Pump 20A
22 AS Box 15A
23 VSA 7.5A
24 ACG AS 7.5A
25 STRLD 7.5A
Circuit Protecte
dAmps
26 IG2 HAC 7.5A
27 IG2 DRL 7.5A
28 ACC Key Lock 7.5A
29 Driver Power Lumbar 7.5A
30 Interior Lights Cut 7.5A
31 ETS TILT 20A
32 Driver’s Power Seat
Reclining 20
A
33 � �
34 � �
Circuit Protected
Amps
Page 66 of 79
124 || 125
mAINTeNANCe
mAINTeNANCe
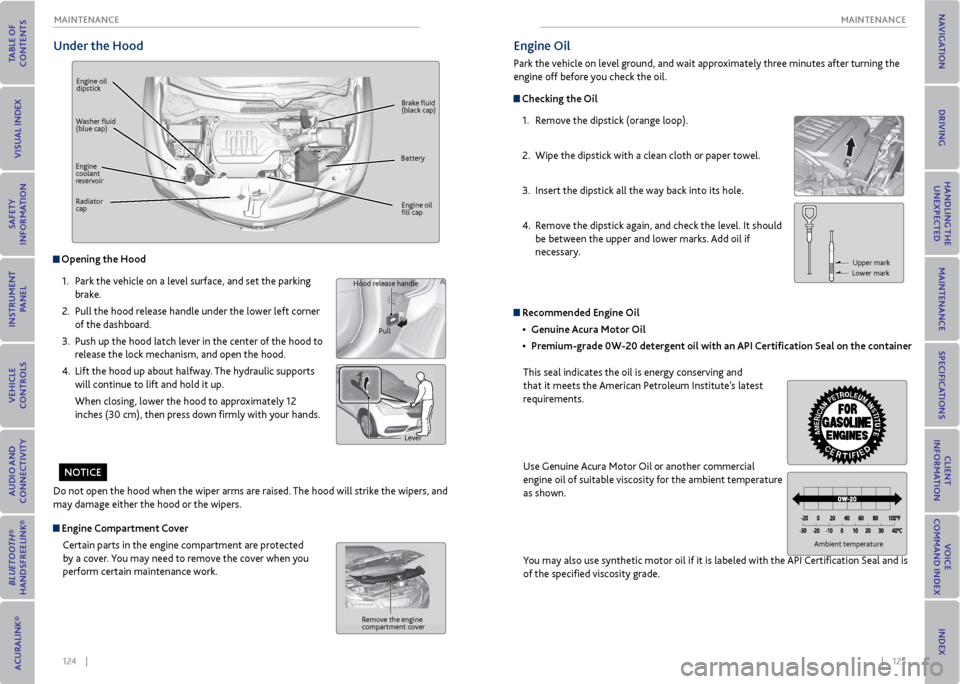
Under the Hood
Engine oil
dipstick
Brake fluid
(black cap)
Engine oil
fill cap
Washer fluid
(blue cap)
Battery
Engine
coolant
reservoir
Radiator
cap
opening the Hood
1. Park the vehicle on a level surface, and set the parking
brake.
2. Pull the hood release handle under the lower left corner
of the dashboard.
3. Push up the hood latch lever in the center of the hood to
release the lock mechanism, and open the hood.
4. Lift the hood up about halfway. The hydraulic supports
will continue to lift and hold it up.
When closing, lower the hood to approximately 12
inches (30 cm), then press down firmly with your hands.
Do not open the hood when the wiper arms are raised. The hood will strike the wipers, and
may damage either the hood or the wipers.
Hood release handle
Pull
Lever
engine Compartment CoverCertain parts in the engine compartment are protected
by a cover. You may need to remove the cover when you
perform certain maintenance work.
Remove the engine
compartment cover
No TICe
engine oil
Park the vehicle on level ground, and wait approximately three minutes after turning the
engine off before you check the oil.
Checking the oil
1. Remove the dipstick (orange loop).
2. Wipe the dipstick with a clean cloth or paper towel.
3. Insert the dipstick all the way back into its hole.
4. Remove the dipstick again, and check the level. It should
be between the upper and lower marks. Add oil if
necessary.
Upper mark
Lower mark
Ambient temperature
r ecommended engine oil
• Genuine Acura motor oil
• Premium-grade 0W-20 detergent oil with an API Certification Seal on the container
This seal indicates the oil is energy conserving and
that it meets the American Petroleum Institute’s latest
requirements.
Use Genuine Acura Motor Oil or another commercial
engine oil of suitable viscosity for the ambient temperature
as shown.
You may also use synthetic motor oil if it is labeled with the API Certification Seal and is
of the specified viscosity grade.
Page 67 of 79
126 || 127
mAINTeNANCe
mAINTeNANCe
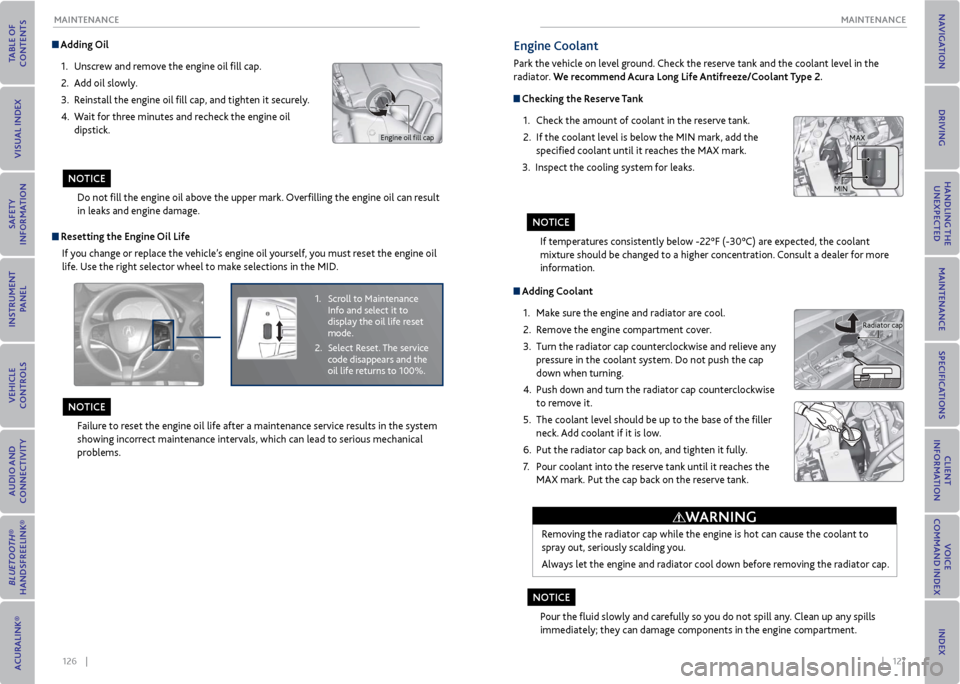
Adding oil
1. Unscrew and remove the engine oil fill cap.
2. Add oil slowly.
3. Reinstall the engine oil fill cap, and tighten it securely.
4. Wait for three minutes and recheck the engine oil
dipstick.
Do not fill the engine oil above the upper mark. Overfilling the engine oil can result
in leaks and engine damage.
Engine oil fill cap
r esetting the engine oil Life
If you change or replace the vehicle’s engine oil yourself, you must reset the engine oil
life. Use the right selector wheel to make selections in the MID.
Failure to reset the engine oil life after a maintenance service results in the system
showing incorrect maintenance intervals, which can lead to serious mechanical
problems.
1. Scroll to Maintenance
Info and select it to
display the oil life reset
mode.
2. Select Reset. The service
code disappears and the
oil life returns to 100%.
No TICe
NoTICe
Adding Coolant
1. Make sure the engine and radiator are cool.
2. Remove the engine compartment cover.
3. Turn the radiator cap counterclockwise and relieve any
pressure in the coolant system. Do not push the cap
down when turning.
4. Push down and turn the radiator cap counterclockwise
to remove it.
5. The coolant level should be up to the base of the filler
neck. Add coolant if it is low.
6. Put the radiator cap back on, and tighten it fully.
7. Pour coolant into the reserve tank until it reaches the
MAX mark. Put the cap back on the reserve tank.
Removing the radiator cap while the engine is hot can cause the coolant to
spray out, seriously scalding you.
Always let the engine and radiator cool down before removing the radiator cap.
Pour the fluid slowly and carefully so you do not spill any. Clean up any spills
immediately; they can damage components in the engine compartment.
Radiator cap
WArNING
engine Coolant
Park the vehicle on level ground. Check the reserve tank and the coolant level in the
radiator. We recommend Acura Long Life Antifreeze/Coolant Type 2.
Checking the reserve Tank
1. Check the amount of coolant in the reserve tank.
2. If the coolant level is below the MIN mark, add the
specified coolant until it reaches the MAX mark.
3. Inspect the cooling system for leaks.
If temperatures consistently below -22°F (-30°C) are expected, the coolant
mixture should be changed to a higher concentration. Consult a dealer for more
information.
MAX
MIN
No TICe
NoTICe
Page 68 of 79
128 || 129
mAINTeNANCe
mAINTeNANCe
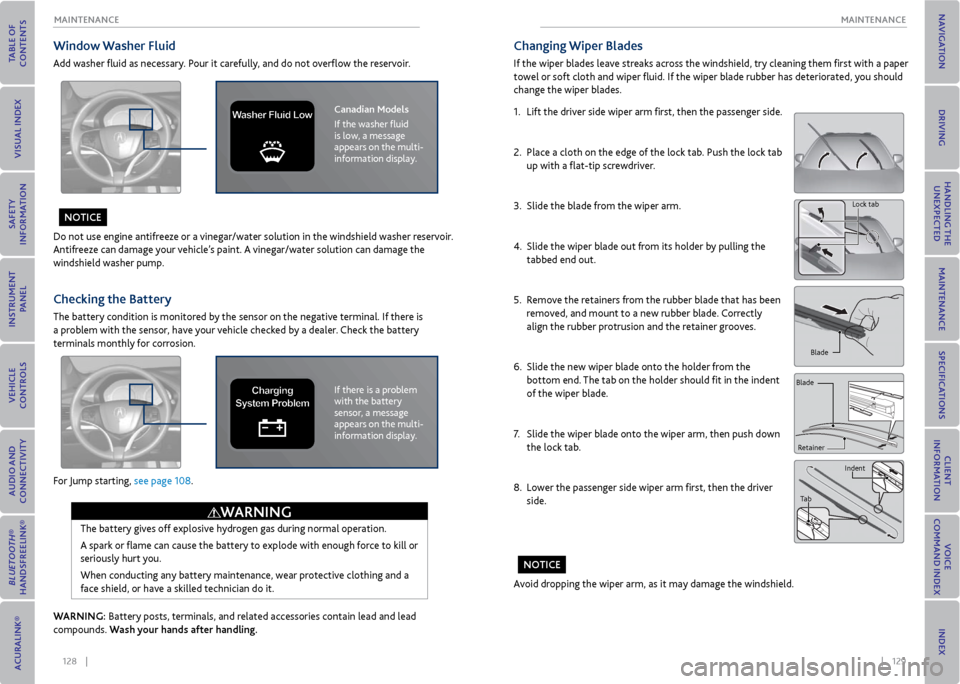
Window Washer Fluid
Add washer fluid as necessary. Pour it carefully, and do not overflow the reservoir.
Do not use engine antifreeze or a vinegar/water solution in the windshield washer reservoir.
Antifreeze can damage your vehicle’s paint. A vinegar/water solution can damage the
windshield washer pump.
For Jump starting, see page 108.
Checking the Battery
The battery condition is monitored by the sensor on the negative terminal. If there is
a problem with the sensor, have your vehicle checked by a dealer. Check the battery
terminals monthly for corrosion.
The battery gives off explosive hydrogen gas during normal operation.
A spark or flame can cause the battery to explode with enough force to kill or
seriously hurt you.
When conducting any battery maintenance, wear protective clothing and a
face shield, or have a skilled technician do it.
WArNING
Canadian models
If the washer fluid
is low, a message
appears on the multi-
information display.Washer Fluid Lo w
WArNING: Battery posts, terminals, and related accessories contain lead and lead
compounds. Wash your hands after handling.
If there is a problem
with the battery
sensor, a message
appears on the multi-
information display.Charging
System Problem
No TICe
Changing Wiper Blades
If the wiper blades leave streaks across the windshield, try cleaning them first with a paper
towel or soft cloth and wiper fluid. If the wiper blade rubber has deteriorated, you should
change the wiper blades.
1. Lift the driver side wiper arm first, then the passenger side.
2. Place a cloth on the edge of the lock tab. Push the lock tab
up with a flat-tip screwdriver.
3. Slide the blade from the wiper arm.
4. Slide the wiper blade out from its holder by pulling the
tabbed end out.
5. Remove the retainers from the rubber blade that has been
removed, and mount to a new rubber blade. Correctly
align the rubber protrusion and the retainer grooves.
6. Slide the new wiper blade onto the holder from the
bottom end. The tab on the holder should fit in the indent
of the wiper blade.
7. Slide the wiper blade onto the wiper arm, then push down
the lock tab.
8. Lower the passenger side wiper arm first, then the driver
side.
Lock tab
Blade
Retainer
Blade
Indent
Tab
Avoid dropping the wiper arm, as it may damage the windshield.
No TICe
Page 73 of 79
138 || 139
CLIeNT INFormATIoN
SPeCIFICATIoNS
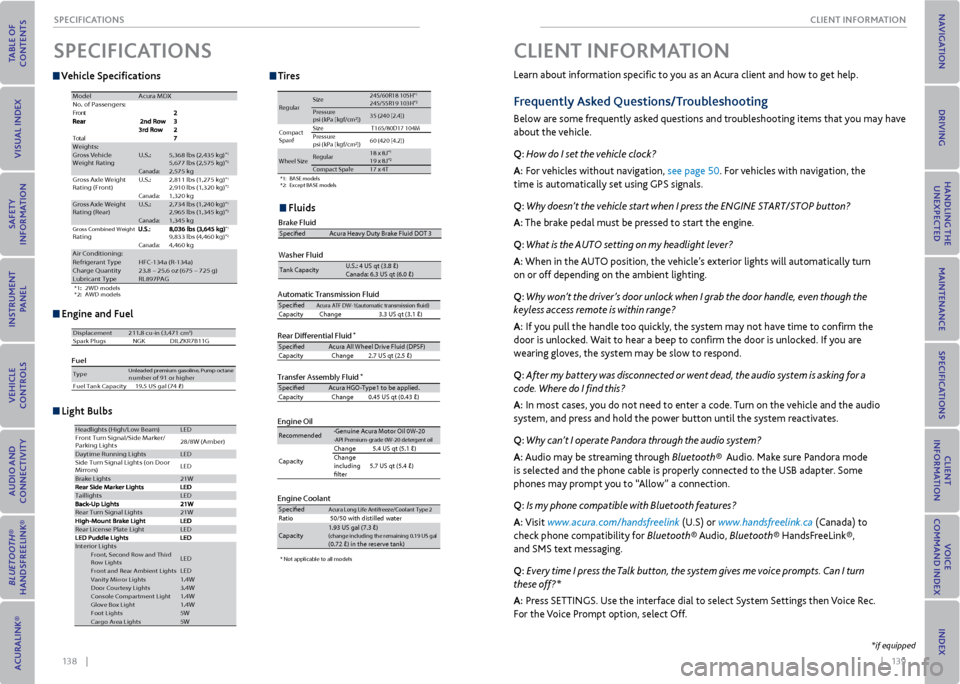
v ehicle Specifications
engine and Fuel
Fluids
*1 :2 WD model s
*2 :A WD model s
ModelAcura MDX
No. of Passengers:
t
n
o
r
F
l
a
t
o
TWeights:Gross Vehicle
Weight Ratin gU.S.:5,368 lbs (2,435 kg)*15,677 lbs (2,575 kg)*2Canada:2,575 kgGross Axle Weight
Rating (Front )U.S.:2,811 lbs (1,275 kg )*12,910 lbs (1,320 kg)*2Canada:1,320 kgGross Axle Weight
Rating (R ear)U.S.:2,734 lbs (1,240 kg )*12,965 lbs (1,345 kg)*2Canada:1,345 kgGross Combined Weight Rating*19,833 lbs (4,460 kg )*2Canada:4,460 kgAir Conditioning :Refrigerant TypeHFC-134a (R-134a )Charge Quantity23.8 – 25.6 oz (675 – 725 g)Lubricant TypeRL897PAG
Engine Specifcatio\hn s
FuelDisplacement211.8 cu-in (3,471 cm3)
Spark Plug sN GKDILZKR7B11 G
TypeUnleaded premium gasoline, Pump octane number of 91 or higher
Fuel Tank Capacity 19.5 US gal (74 �)
Light \fulbsHeadl ights (High/Low Beam )LED
Front Turn Signal/Side Marker /
Parking Lights 28
/8W (A mber)
Daytime Running Light sLED
Si de Turn Si gnal Lights (on Door
Mirrors ) LED
Brake Lights21
W
Taillight sLED
Rear Turn Signal Li ghts21W
Rear License Plate Ligh tLED
Interior LightsFront, Second Row and Third
Ro w LightsLED
Front and Rear Ambient LightsLEDVa nity Mirror Lights 1.4WDoor Courtesy Lights3.4WConsole Compartment Ligh t1.4WGlove Box Ligh t1.4WFoot Lights5WCargo Area Lights5WAutomatic Transmis\Dsion Fluid
Rear Di\ferential Fl\Duid*
Transfer Assembl\b Fl\Duid*
Specife dAcura ATF DW-1(au\fo\(ma\fic \fran\bmi\b\bion fuid\( )Capaci\fy Change 3.3 US q \f (3.1 �)
Specife dAcura All Wheel Dr\(ive Fluid (DPSF )
Ca paci\fy Change2.7 US q\f (2.5 �)
Specife dAcura HGO-Type1 \fo \(be appli ed.
Ca paci\fy Change0.45 US q\f (0.43 �)
Engine Oil
Engine Coolant
Recommended·Genuine Acura Mo\for\( Oil 0W-20·API Premium-grade \(0W-20 de\fe rgen\f oil
Capaci\fy Change
5.4 US q\f (5.1 �)
Change
including
fl\fer 5.7 US q\f (5.4 �)
SpecifedAcura Long L
ife An\fifreeze/Cool\(an\f Type 2Ra\fio50/50 wi\fh di\b\filled\( wa\fer
Capaci\fy1.93 US g al (7.3 �)(change including \fhe\( remaining 0.19 US ga\(l (0.72 �) in \fhe re\ber\(ve \fank)
Tire
*1:B ASE model\b
*2 :E xcep\f BASE model \b
Regula r Size
245/60R18 105H
*1245/55R19 103H*2Pre\b\bure
p\b i (kPa [kgf/c m2])35 (24
0 [2.4])
Compac\f
Spar e
*Size T165/80D17 104M
Pre\b\bure
p\b i (kPa [kgf/cm
2]) 60 (42
0 [4.2])
Wheel Size Regular
18 x 8J*119 x 8J*2Compac\f Spare*17 x 4T
* Not applicable to all models
Washer Fluid
Tank Capaci\fyU.S.: 4 US q\f (3.8 �)
Ca nada: 6.3 US q\f (6.0 \(�)
Brake FluidSpecifedAcura Heavy Du\fy Br\(ake Fluid DOT 3
SPeCIFICATIoNS
*1:2 WD model s
*2 :A WD model s
ModelAcura MDX
No. of Passengers:
t
n
o
r
F
l
a
t
o
TWeights:Gross Vehicle
Weight Ratin gU.S.:5,368 lbs (2,435 kg)*15,677 lbs (2,575 kg)*2Canada:2,575 kgGross Axle Weight
Rating (Front )U.S.:2,811 lbs (1,275 kg )*12,910 lbs (1,320 kg)*2Canada:1,320 kgGross Axle Weight
Rating (R ear)U.S.:2,734 lbs (1,240 kg )*12,965 lbs (1,345 kg)*2Canada:1,345 kgGross Combined Weight Rating*19,833 lbs (4,460 kg )*2Canada:4,460 kgAir Conditioning :Refrigerant TypeHFC-134a (R-134a )Charge Quantity23.8 – 25.6 oz (675 – 725 g)Lubricant TypeRL897PAG
Engine Specifcatio\hn s
FuelDisplacement211.8 cu-in (3,471 cm3)
Spark Plug sN GKDILZKR7B11 G
TypeUnleaded premium gasoline, Pump octane number of 91 or higher
Fuel Tank Capacity 19.5 US gal (74 �)
Light \fulbsHeadl ights (High/Low Beam )LED
Front Turn Signal/Side Marker /
Parking Lights 28
/8W (A mber)
Daytime Running Light sLED
Si de Turn Si gnal Lights (on Door
Mirrors ) LED
Brake Lights21
W
Taillight sLED
Rear Turn Signal Li ghts21W
Rear License Plate Ligh tLED
Interior LightsFront, Second Row and Third
Ro w LightsLEDFront and Rear Ambient LightsLEDVa nity Mirror Lights 1.4WDoor Courtesy Lights3.4WConsole Compartment Ligh t1.4WGlove Box Ligh t1.4WFoot Lights5WCargo Area Lights5W
TiresAutomatic Transmis\Dsion Flui d
Rear Di\ferential Fl\Dui d
*
Transfer Assembl\b Fl\Duid*
SpecifedAcura ATF DW-1(au\fo\(ma\fic \fran\bmi\b\bion fuid\( )Capaci\fy Change 3.3 US q \f (3.1 �)
Specife d Acura All Wheel Dr\(ive Fluid (DPSF )
Ca paci\fy Change2.7 US q\f (2.5 �)
Specife d Acura HGO-Type1 \fo \(be appli ed.
Ca paci\fy Change0.45 US q\f (0.43 �)
Engine Oi l
Engine Coolan t
Recommended ·Genuine Acura Mo\for\( Oil 0W-20·API Premium-grade \(0W-20 de\fe
rgen\f oil
Capaci\fy Change
5.4 US q\f (5.1 �)
Change
including
fl\fer 5.7 US q\f (5.4 �)
Specifed
Acura Long L ife An\fifreeze/Cool\(an\f Type 2Ra\fio50/50 wi\fh di\b\filled\( wa\fer
Capaci\fy 1.93
US g al (7.3 �)
(change including \fhe\( remaining 0.19 US ga\(l (0.72 �) in \fhe re\ber\(ve \fank)
Tire
*1:B ASE model\b
*2 :E xcep\f BASE model \b
Regula rSize245/60R18 105H*1245/55R19 103H*2Pre\b\bure
p\b i (kPa [kgf/c m2])35 (240 [2.4])
Compac\f
Spar e
*Size T165/80D17 104M
Pre\b\bure
p\b i (kPa [kgf/cm
2]) 60 (42
0 [4.2])
Wheel SizeRegular18 x 8J*119 x 8J*2Compac\f Spare*17 x 4T
* Not applicable to all models
Washer Fluid
Tank Capaci\fy U.S.: 4 US q\f (3.8 �)
Ca nada: 6.3 US q\f (6.0 \(�)
Brake FluidSpecifed Acura Heavy Du\fy Br\(ake Fluid DOT 3
Light Bulbs
*1:2 WD model s
*2 :A WD model s
ModelAcura MDX
No. of Passengers:
t
n
o
r
F
l
a
t
o
TWeights:Gross Vehicle
Weight Ratin gU.S.:5,368 lbs (2,435 kg)*15,677 lbs (2,575 kg)*2Canada:2,575 kgGross Axle Weight
Rating (Front )U.S.:2,811 lbs (1,275 kg )*12,910 lbs (1,320 kg)*2Canada:1,320 kgGross Axle Weight
Rating (R ear)U.S.:2,734 lbs (1,240 kg )*12,965 lbs (1,345 kg)*2Canada:1,345 kgGross Combined Weight Rating*19,833 lbs (4,460 kg )*2Canada:4,460 kgAir Conditioning :Refrigerant TypeHFC-134a (R-134a )Charge Quantity23.8 – 25.6 oz (675 – 725 g)Lubricant TypeRL897PAG
Engine Specifcatio\hn s
FuelDisplacement211.8 cu-in (3,471 cm3)
Spark Plug sN GKDILZKR7B11 G
TypeUnleaded premium gasoline, Pump octane number of 91 or higher
Fuel Tank Capacity 19.5 US gal (74 �)
Light \fulbsHeadl ights (High/Low Beam )LED
Front Turn Signal/Side Marker /
Parking Lights 28
/8W (A mber)
Daytime Running Light sLED
Si de Turn Si gnal Lights (on Door
Mirrors ) LED
Brake Lights21
W
Taillight sLED
Rear Turn Signal Li ghts21W
Rear License Plate Ligh tLED
Interior LightsFront, Second Row and Third
Ro w LightsLED
Front and Rear Ambient LightsLEDVa nity Mirror Lights 1.4WDoor Courtesy Lights3.4WConsole Compartment Ligh t1.4WGlove Box Ligh t1.4WFoot Lights5WCargo Area Lights5W
Learn about information specific to you as an Acura client and how to get help.
Frequently Asked Questions/Troubleshooting
Below are some frequently asked questions and troubleshooting items that you may have
about the vehicle.
Q: How do I set the vehicle clock?
A: For vehicles without navigation, see page 50. For vehicles with navigation, the
time is automatically set using GPS signals.
Q: Why doesn’t the vehicle start when I press the ENGINE START/STOP button?
A: The brake pedal must be pressed to start the engine.
Q: What is the AUTO setting on my headlight lever?
A: When in the AUTO position, the vehicle’s exterior lights will automatically turn
on or off depending on the ambient lighting.
Q: Why won’t the driver’s door unlock when I grab the door handle, even though the
keyless access remote is within range?
A: If you pull the handle too quickly, the system may not have time to confirm the
door is unlocked. Wait to hear a beep to confirm the door is unlocked. If you are
wearing gloves, the system may be slow to respond.
Q: After my battery was disconnected or went dead, the audio system is asking for a
code. Where do I find this?
A: In most cases, you do not need to enter a code. Turn on the vehicle and the audio
system, and press and hold the power button until the system reactivates.
Q: Why can’t I operate Pandora through the audio system?
A: Audio may be streaming through Bluetooth® Audio. Make sure Pandora mode
is selected and the phone cable is properly connected to the USB adapter. Some
phones may prompt you to “Allow” a connection.
Q: Is my phone compatible with Bluetooth features?
A: Visit www.acura.com/handsfreelink (U.S) or www.handsfreelink.ca (Canada) to
check phone compatibility for Bluetooth® Audio, Bluetooth® HandsFreeLink®,
and SMS text messaging.
Q: Every time I press the Talk button, the system gives me voice prompts. Can I turn
these off?*
A: Press SETTINGS. Use the interface dial to select System Settings then Voice Rec.
For the Voice Prompt option, select Off.
CLIeNT INFormATIoN
*if equipped