warning light Acura MDX 2015 Owner's Guide
[x] Cancel search | Manufacturer: ACURA, Model Year: 2015, Model line: MDX, Model: Acura MDX 2015Pages: 79, PDF Size: 16.44 MB
Page 4 of 79
| 1
vISUAL INDex
Quickly locate items in the vehicle’s interior.
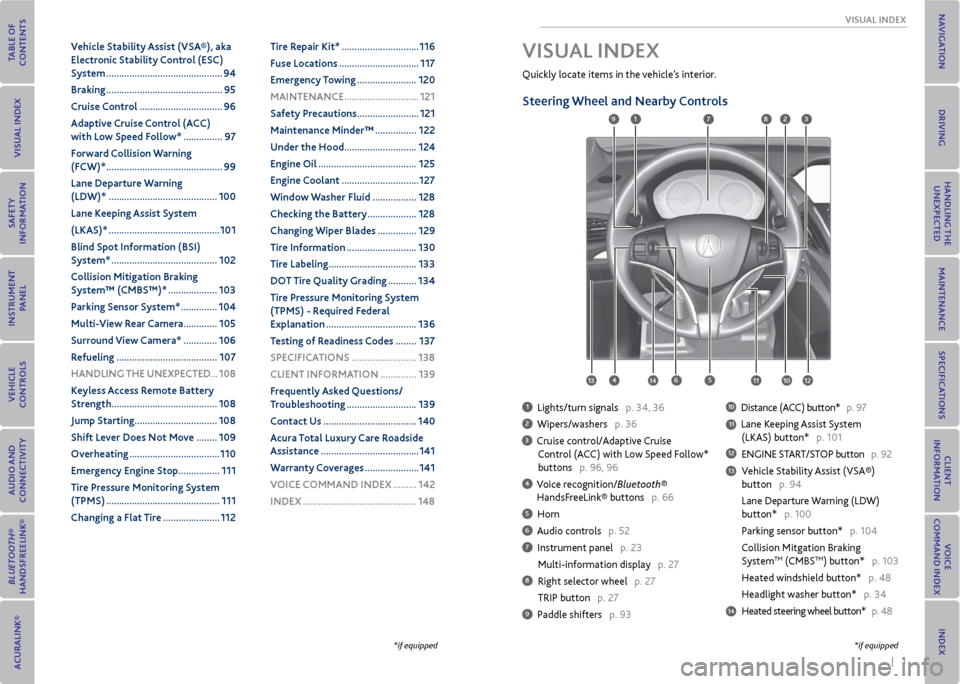
Steering Wheel and Nearby Controls
1 Lights/turn signals p. 34, 36
2 Wipers/washers p. 36
3 Cruise control/Adaptive Cruise
Control (ACC) with Low Speed Follow*
buttons p. 96, 96
4 Voice recognition/Bluetooth®
HandsFreeLink® buttons p. 66
5 Horn
6 Audio controls p. 52
7 Instrument panel p. 23
Multi-information display p. 27
8 Right selector wheel p. 27
TRIP button p. 27
9 Paddle shifters p. 93
10 Distance (ACC) button* p. 97
11 Lane Keeping Assist System
(LKAS) button* p. 101
12 ENGINE START/STOP button p. 92
13 Vehicle Stability Assist (VSA®)
button p. 94
Lane Departure Warning (LDW)
button* p. 100
Parking sensor button* p. 104
Collision Mitgation Braking
System
TM (CMBSTM) button* p. 103
Heated windshield button* p. 48
Headlight washer button* p. 34
14 Heated steering wheel button* p. 48
vISUAL INDex
1
45
9
61011
7283
131412
*if equipped*if equipped
v ehicle Stability Assist (vSA®), aka
electronic Stability Control (eSC)
System ............................................. 94
Braking ............................................. 95
Cruise Control ................................ 96
Adaptive Cruise Control (ACC)
with Low Speed Follow* ............... 97
Forward Collision Warning
(FCW)* ............................................. 99
Lane Departure Warning
(LDW)* .......................................... 100
Lane Keeping Assist System
(LKAS)* ........................................... 101
Blind Spot Information (BSI)
System* ......................................... 102
Collision mitigation Braking
System™ (CmBS™)* ................... 103
Parking Sensor System* .............. 104
multi- view rear Camera ............. 105
Surround view Camera* ............. 106
r efueling ....................................... 107
HANDLING THe UNexPeCTeD ...108
Keyless Access r emote Battery
Strength ......................................... 108
Jump Starting ................................ 108
Shift Lever Does Not move ........ 109
overheating ................................... 110
emergency engine Stop ................ 111
Tire Pressure monitoring System
(TPmS) ............................................ 111
Changing a Flat Tire ...................... 112Tire r
epair Kit* .............................. 116
Fuse Locations ............................... 117
emergency Towing ....................... 120
mAINTeNANCe ............................. 121
Safety Precautions ........................ 121
maintenance minder™ ................ 122
Under the Hood ............................ 124
engine oil ...................................... 125
engine Coolant .............................. 127
Window Washer Fluid ................. 128
Checking the Battery ................... 128
Changing Wiper Blades ............... 129
Tire Information ........................... 130
Tire Labeling .................................. 133
Do T Tire Quality Grading ........... 134
Tire Pressure monitoring System
(TPmS) - r equired Federal
explanation ................................... 136
Testing of readiness Codes ........ 137
SPeCIFICATIoNS ......................... 138
CLIeNT INFormATIoN .............. 139
Frequently Asked Questions/
Troubleshooting ........................... 139
Contact Us .................................... 140
Acura Total Luxury Care r oadside
Assistance ...................................... 141
Warranty Coverages ..................... 141
v oICe CommAND INDex ......... 142
INDex ............................................ 148
Page 5 of 79
2 || 3
SAFeTy
vISUAL INDex
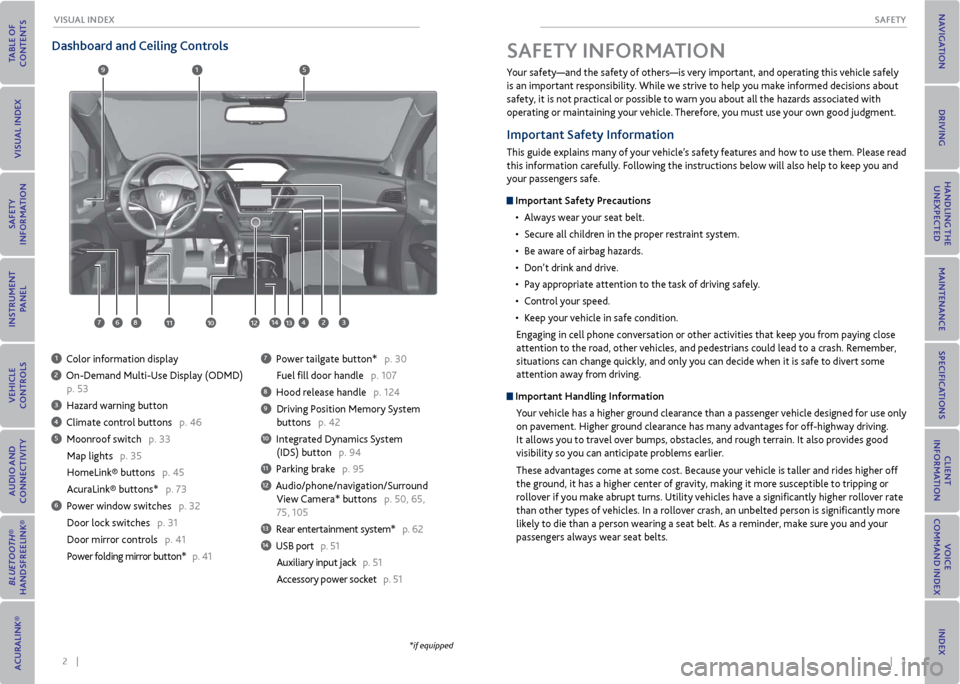
Dashboard and Ceiling Controls
1 Color information display
2 On-Demand Multi-Use Display (ODMD)
p. 53
3 Hazard warning button
4 Climate control buttons p. 46
5 Moonroof switch p. 33
Map lights p. 35
HomeLink® buttons p. 45
AcuraLink® buttons* p. 73
6 Power window switches p. 32
Door lock switches p. 31
Door mirror controls p. 41
Power folding mirror button* p. 41
7 Power tailgate button* p. 30
Fuel fill door handle p. 107
8 Hood release handle p. 124
9 Driving Position Memory System
buttons p. 42
10 Integrated Dynamics System
(IDS) button p. 94
11 Parking brake p. 95
12 Audio/phone/navigation/Surround
View Camera* buttons p. 50, 65,
75, 105
13 Rear entertainment system* p. 62
14 USB port p. 51
Auxiliary input jack p. 51
Accessory power socket p. 51
1
281134
5
67
9
1012
Your safety—and the safety of others—is very important, and operating this vehicle safely
is an important responsibility. While we strive to help you make informed decisions about
safety, it is not practical or possible to warn you about all the hazards associated with
operating or maintaining your vehicle. Therefore, you must use your own good judgment.
Important Safety Information
This guide explains many of your vehicle’s safety features and how to use them. Please read
this information carefully. Following the instructions below will also help to keep you and
your passengers safe.
Important Safety Precautions
• Always wear your seat belt.
• Secure all children in the proper restraint system.
• Be aware of airbag hazards.
• Don’t drink and drive.
• Pay appropriate attention to the task of driving safely.
• Control your speed.
• Keep your vehicle in safe condition.
Engaging in cell phone conversation or other activities that keep you from paying close
attention to the road, other vehicles, and pedestrians could lead to a crash. Remember,
situations can change quickly, and only you can decide when it is safe to divert some
attention away from driving.
Important Handling Information Your vehicle has a higher ground clearance than a passenger vehicle designed for use only
on pavement. Higher ground clearance has many advantages for off-highway driving.
It allows you to travel over bumps, obstacles, and rough terrain. It also provides good
visibility so you can anticipate problems earlier.
These advantages come at some cost. Because your vehicle is taller and rides higher off
the ground, it has a higher center of gravity, making it more susceptible to tripping or
rollover if you make abrupt turns. Utility vehicles have a significantly higher rollover rate
than other types of vehicles. In a rollover crash, an unbelted person is significantly more
likely to die than a person wearing a seat belt. As a reminder, make sure you and your
passengers always wear seat belts.
SAFeTy INFormATIoN
13
*if equipped
14
Page 9 of 79
10 || 11
SAFeTy
SAFeTy
Side Airbags
The side airbags help protect the upper torso and pelvis of the driver or a front passenger
during a moderate-to-severe side impact. They are housed in the outside edge of the
driver’s and front passenger’s seat-backs. Both are marked SIDe AIrBAG.
Side Curtain Airbags
Side curtain airbags help protect the head and torso of the driver and passengers in outer
seating positions during a moderate-to-severe side impact. The side curtain airbags
equipped in this vehicle are also designed to help reduce the likelihood of partial and
complete ejection of vehicle occupants through side windows in crashes, particularly
rollover crashes.
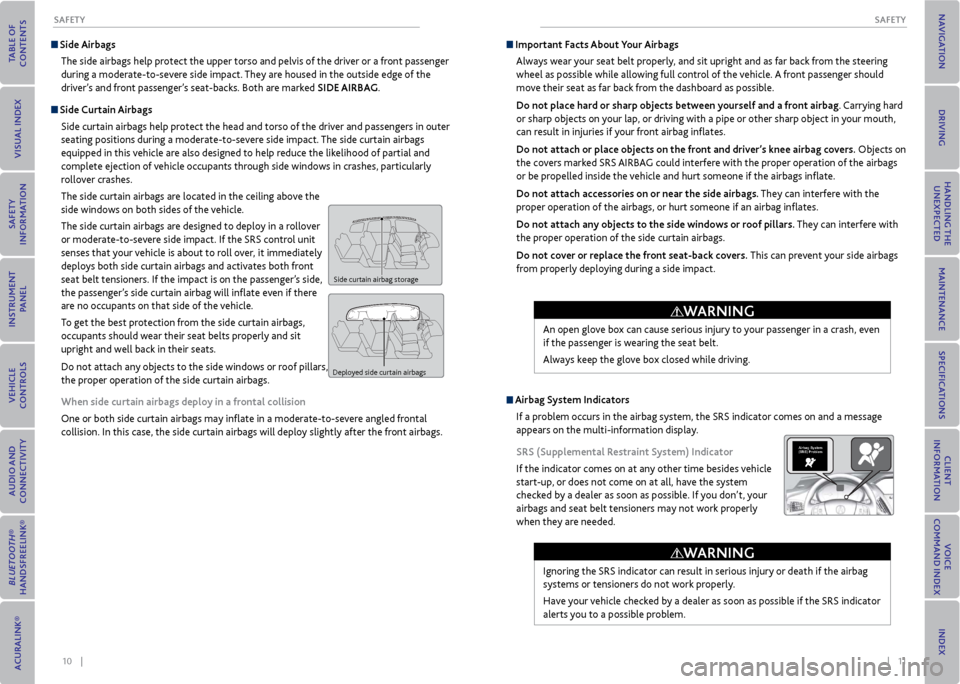
The side curtain airbags are located in the ceiling above the
side windows on both sides of the vehicle.
The side curtain airbags are designed to deploy in a rollover
or moderate-to-severe side impact. If the SRS control unit
senses that your vehicle is about to roll over, it immediately
deploys both side curtain airbags and activates both front
seat belt tensioners. If the impact is on the passenger’s side,
the passenger’s side curtain airbag will inflate even if there
are no occupants on that side of the vehicle.
To get the best protection from the side curtain airbags,
occupants should wear their seat belts properly and sit
upright and well back in their seats.
Do not attach any objects to the side windows or roof pillars, as they can interfere with
the proper operation of the side curtain airbags.
When side curtain airbags deploy in a frontal collision
One or both side curtain airbags may inflate in a moderate-to-severe angled frontal
collision. In this case, the side curtain airbags will deploy slightly after the front airbags.
Side curtain airbag storage
Deployed side curtain airbags
Important Facts About your Airbags
Always wear your seat belt properly, and sit upright and as far back from the steering
wheel as possible while allowing full control of the vehicle. A front passenger should
move their seat as far back from the dashboard as possible.
Do not place hard or sharp objects between yourself and a front airbag. Carrying hard
or sharp objects on your lap, or driving with a pipe or other sharp object in your mouth,
can result in injuries if your front airbag inflates.
Do not attach or place objects on the front and driver’s knee airbag covers. Objects on
the covers marked SRS AIRBAG could interfere with the proper operation of the airbags
or be propelled inside the vehicle and hurt someone if the airbags inflate.
Do not attach accessories on or near the side airbags. They can interfere with the
proper operation of the airbags, or hurt someone if an airbag inflates.
Do not attach any objects to the side windows or roof pillars. They can interfere with
the proper operation of the side curtain airbags.
Do not cover or replace the front seat-back covers. This can prevent your side airbags
from properly deploying during a side impact.
Ignoring the SRS indicator can result in serious injury or death if the airbag
systems or tensioners do not work properly.
Have your vehicle checked by a dealer as soon as possible if the SRS indicator
alerts you to a possible problem.
Airbag System
(SRS) Problem
WArNING
Airbag System Indicators
If a problem occurs in the airbag system, the SRS indicator comes on and a message
appears on the multi-information display.
SrS (Supplemental r estraint System) Indicator
If the indicator comes on at any other time besides vehicle
start-up, or does not come on at all, have the system
checked by a dealer as soon as possible. If you don’t, your
airbags and seat belt tensioners may not work properly
when they are needed. An open glove box can cause serious injury to your passenger in a crash, even
if the passenger is wearing the seat belt.
Always keep the glove box closed while driving.
WArNING
Page 20 of 79
32 || 33
veHICLe CoNTroLS
veHICLe CoNTroLS
Power Window operation
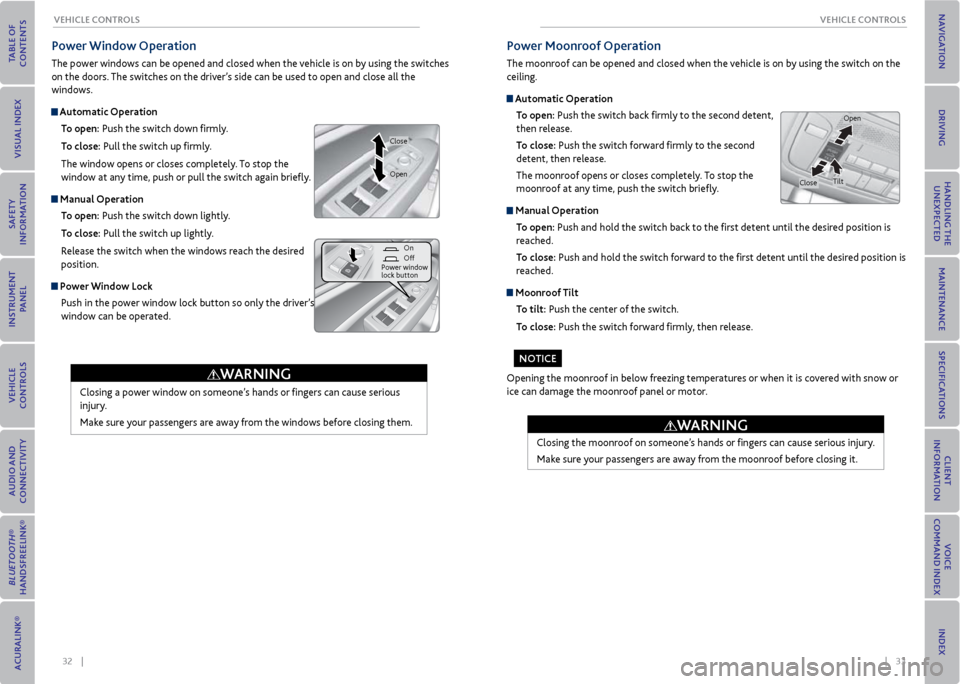
The power windows can be opened and closed when the vehicle is on by using the switches
on the doors. The switches on the driver’s side can be used to open and close all the
windows.
Automatic operation
To open: Push the switch down firmly.
To close: Pull the switch up firmly.
The window opens or closes completely. To stop the
window at any time, push or pull the switch again briefly.
manual operation
To open: Push the switch down lightly.
To close: Pull the switch up lightly.
Release the switch when the windows reach the desired
position.
Power Window Lock Push in the power window lock button so only the driver’s
window can be operated.
Closing a power window on someone’s hands or fingers can cause serious
injury.
Make sure your passengers are away from the windows before closing them.
WArNING
Close
Power moonroof operation
The moonroof can be opened and closed when the vehicle is on by using the switch on the
ceiling.
Automatic operation
To open: Push the switch back firmly to the second detent,
then release.
To close: Push the switch forward firmly to the second
detent, then release.
The moonroof opens or closes completely. To stop the
moonroof at any time, push the switch briefly.
manual operation
To open: Push and hold the switch back to the first detent until the desired position is
reached.
To close: Push and hold the switch forward to the first detent until the desired position is
reached.
moonroof Tilt
To tilt: Push the center of the switch.
To close: Push the switch forward firmly, then release.
Closing the moonroof on someone’s hands or fingers can cause serious injury.
Make sure your passengers are away from the moonroof before closing it.
Opening the moonroof in below freezing temperatures or when it is covered with snow or
ice can damage the moonroof panel or motor.
Open
CloseTilt
WArNING
On
Off
Power window
lock button
Open
No TICe
Page 24 of 79
40 || 41
veHICLe CoNTroLS
veHICLe CoNTroLS
For a head restraint system to work properly:
• Do not hang any items on the head restraints or from the restraint legs.
• Do not place any object between an occupant and the seat-back.
• Install each restraint in its proper location.
Improperly positioning head restraints reduces their effectiveness and
increases the likelihood of serious injury in a crash.
Make sure head restraints are in place and positioned properly before driving.
Failure to reinstall, or correctly reinstall, the head restraints can result in
severe injury during a crash.
Always replace the head restraints before driving.
WArNING
WArNING
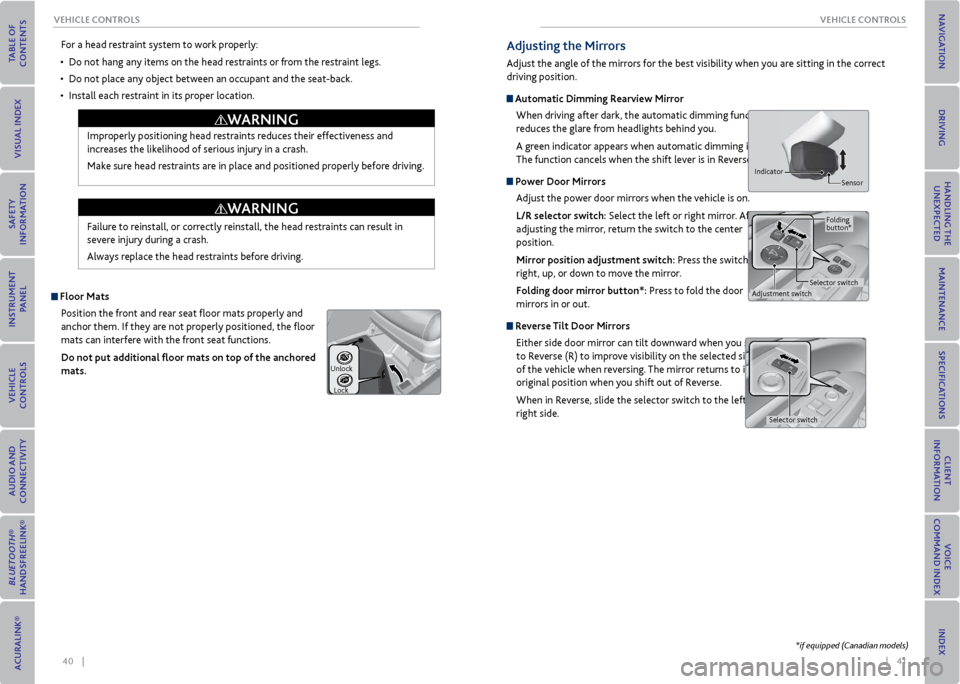
Floor matsPosition the front and rear seat floor mats properly and
anchor them. If they are not properly positioned, the floor
mats can interfere with the front seat functions.
Do not put additional floor mats on top of the anchored
mats.
Unlock
Lock
Adjusting the mirrors
Adjust the angle of the mirrors for the best visibility when you are sitting in the correct
driving position.
Automatic Dimming r earview mirror
When driving after dark, the automatic dimming function
reduces the glare from headlights behind you.
A green indicator appears when automatic dimming is on.
The function cancels when the shift lever is in Reverse (R).
Power Door mirrors Adjust the power door mirrors when the vehicle is on.
L/r selector switch: Select the left or right mirror. After
adjusting the mirror, return the switch to the center
position.
mirror position adjustment switch: Press the switch left,
right, up, or down to move the mirror.
Folding door mirror button*: Press to fold the door
mirrors in or out.
r everse Tilt Door mirrors
Either side door mirror can tilt downward when you shift
to Reverse (R) to improve visibility on the selected side
of the vehicle when reversing. The mirror returns to its
original position when you shift out of Reverse.
When in Reverse, slide the selector switch to the left or
right side.
Indicator Sensor
Adjustment switchSelector switchFolding
button*
Selector switch
*if equipped (Canadian models)
Page 42 of 79
76 || 77
NA
vIGATIoN
NA vIGATIoN
Learn how to enter a destination and operate the navigation system.
Basic Navigation operation
A real-time navigation system uses GPS and a map database to show your current location
and help guide you to a desired destination. You can operate the system using voice
commands or the system controls.
To reduce the potential for driver distraction, certain manual functions may be
inoperable or grayed out while the vehicle is moving. voice commands are always
available.
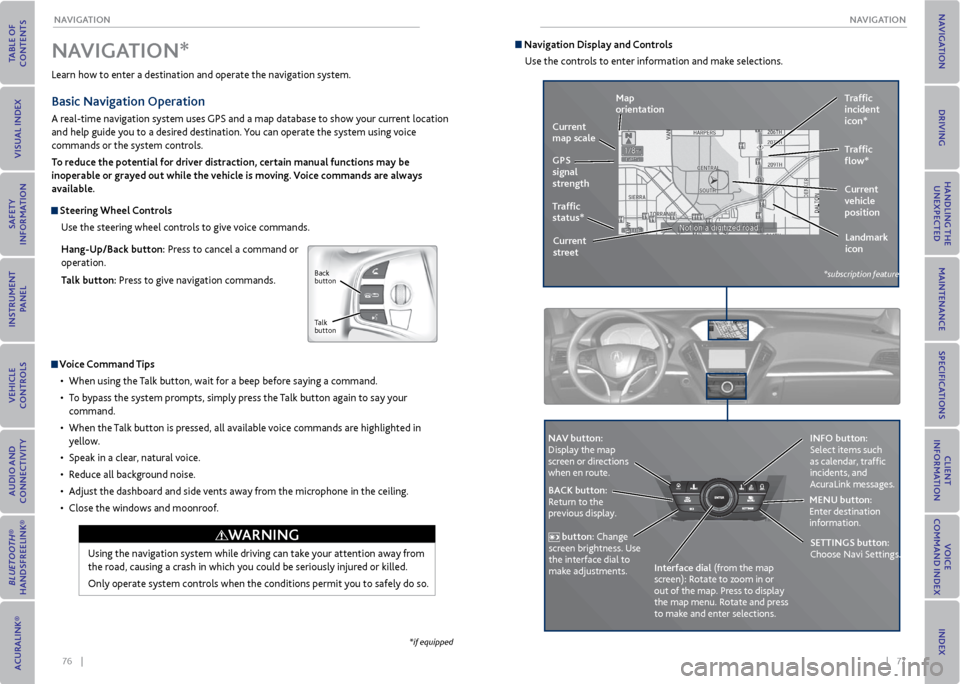
Steering Wheel Controls
Use the steering wheel controls to give voice commands.
Hang-Up/Back button: Press to cancel a command or
operation.
Talk button: Press to give navigation commands.
v oice Command Tips
• When using the Talk button, wait for a beep before saying a command.
• To bypass the system prompts, simply press the Talk button again to say your
command.
• When the Talk button is pressed, all available voice commands are highlighted in
yellow.
• Speak in a clear, natural voice.
• Reduce all background noise.
• Adjust the dashboard and side vents away from the microphone in the ceiling.
• Close the windows and moonroof.
Using the navigation system while driving can take your attention away from
the road, causing a crash in which you could be seriously injured or killed.
Only operate system controls when the conditions permit you to safely do so.
NA vIGATIoN*
WArNING
*if equipped
Back
button
Talk
button
Navigation Display and Controls Use the controls to enter information and make selections.
REAR
REAR
AUDIO
FRON
T
AUDIO
NAVFFFFAAAAAAAAAREARAUDIOFAAFRON
TAUDIOAA
REAR
NAVNAVFRONT
AUDIOREAR
AU DIO
NA v button:
Display the map
screen or directions
when en route. INFo button:
Select items such
as calendar, traffic
incidents, and
AcuraLink messages.
BACK button:
Return to the
previous display. meNU button:
Enter destination
information.
button: Change
screen brightness. Use
the interface dial to
make adjustments. Interface dial (from the map
screen): Rotate to zoom in or
out of the map. Press to display
the map menu. Rotate and press
to make and enter selections.
GPS
signal
strength Traffic
incident
icon*
Traffic
status* Traffic
flow*
Current
map scale
Current
vehicle
position
map
orientation
Current
street Landmark
icon
*subscription feature
SeTTINGS button:
Choose Navi Settings.
Page 47 of 79
86 || 87
DrIvING
DrIvING
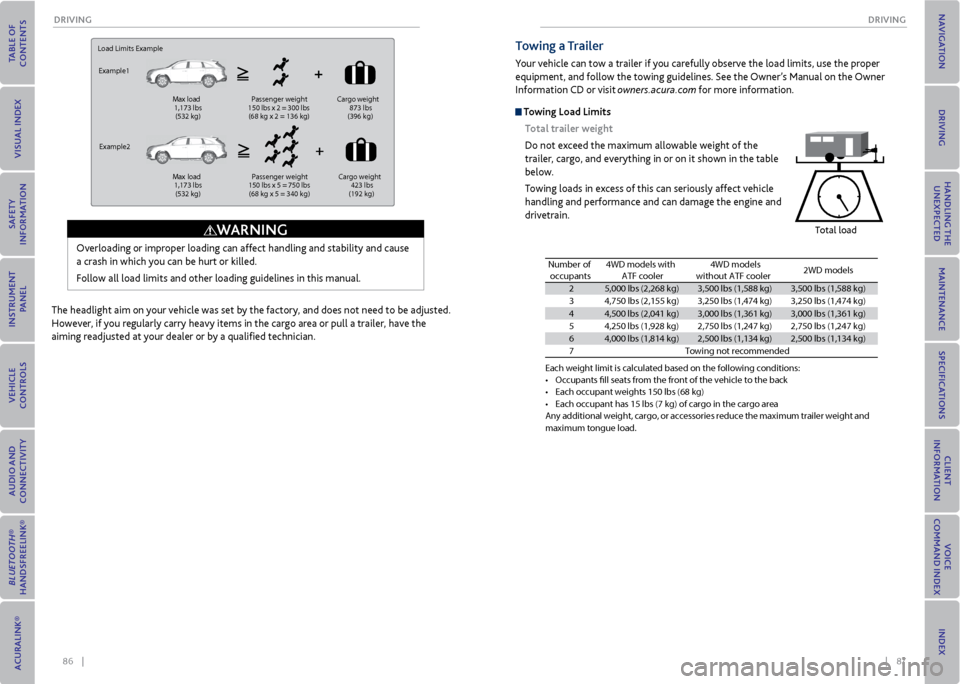
Load Limits Example
Example1
Max load
1,173 lbs
(532 kg ) Passenger weight
150 lbs x 2 = 300 lbs
(68 kg x 2 = 136 kg )Cargo
weight
873 lbs
(396 kg )
Example2 Max load
1,173 lbs
(532 kg ) Passenger weight
150 lbs x 5 = 750 lbs
(68 kg x 5 = 340 kg )Cargo
weight
423 lbs
(192 kg )
Overloading or improper loading can affect handling and stability and cause
a crash in which you can be hurt or killed.
Follow all load limits and other loading guidelines in this manual.
WArNING
The headlight aim on your vehicle was set by the factory, and does not need to be adjusted.
However, if you regularly carry heavy items in the cargo area or pull a trailer, have the
aiming readjusted at your dealer or by a qualified technician.
Towing a Trailer
Your vehicle can tow a trailer if you carefully observe the load limits, use the proper
equipment, and follow the towing guidelines. See the Owner’s Manual on the Owner
Information CD or visit owners.acura.com for more information.
Towing Load Limits
Total trailer weight
Do not exceed the maximum allowable weight of the
trailer, cargo, and everything in or on it shown in the table
below.
Towing loads in excess of this can seriously affect vehicle
handling and performance and can damage the engine and
drivetrain.
Total load
Each weight limit \fis calculated base\fd on the following \fconditions\f•Occupants fll seats\f f\bom the f\bont of th\fe vehicle to the b\fac k•Each occupant weigh\fts 150 lbs (68 kg)•Each occupant has 1\f5 lbs (7 kg) of ca\b\fgo in the ca\bgo a\be\faAny additional weight, ca\bgo, o\b accesso\bies \beduce the maximum t\baile\b weight and maximum tongue loa\fd.
Number of
occupant s4WD models with
ATF cooler4WD models
without ATF cooler2WD models
25,000 lbs (2,268 kg\f)3,500 lbs (1,588 kg)\f3,500 lbs (1,588 kg)\f
34,750 lbs (2,155 k\fg )3,250 lbs (1,474 k\fg)3,250 lbs (1,474 k\fg)
44,500 lbs (2,041 k\fg)3,000 lbs (1,361 k\fg)3,000 lbs (1,361 k\fg)
54,250 lbs (1,928 kg\f)2,750 lbs (1,247 k\fg)2,750 lbs (1,247 k\fg)
64,000 lbs (1,814 kg\f)2,500 lbs (1,134 k\fg)2,500 lbs (1,134 k\fg)
7Towing not \becommen\fded
Page 49 of 79
90 || 91
DrIvING
DrIvING
Pre-Tow Checklist
When preparing to tow, and before driving away, be sure to check the following:
• Avoid towing a trailer during your vehicle’s first 600 miles (1,000 km).
• The vehicle and trailer have been properly serviced and are in good condition. Lights
and brakes work properly, and the tires are properly inflated.
• All weights and loads are within limits. Never exceed the gross weight ratings.
• When towing more than 3,500 lbs (1,590 kg), use of gasoline with an octane rating of
91 or higher is recommended.
• Check if all loads are within limits at a public scale (see page 89). If a public scale is
not available, add the estimated weight of your cargo load to the weight of the trailer
(as quoted by the manufacturer) and the tongue load.
• The hitch, safety chains, and any other attachments are secure.
• All items in or on the trailer are properly secured and cannot shift while you drive.
Exceeding any load limit or improperly loading your vehicle and trailer can
cause a crash in which you can be seriously hurt or killed.
Check the loading of your vehicle and trailer carefully before starting to
drive.
WArNING
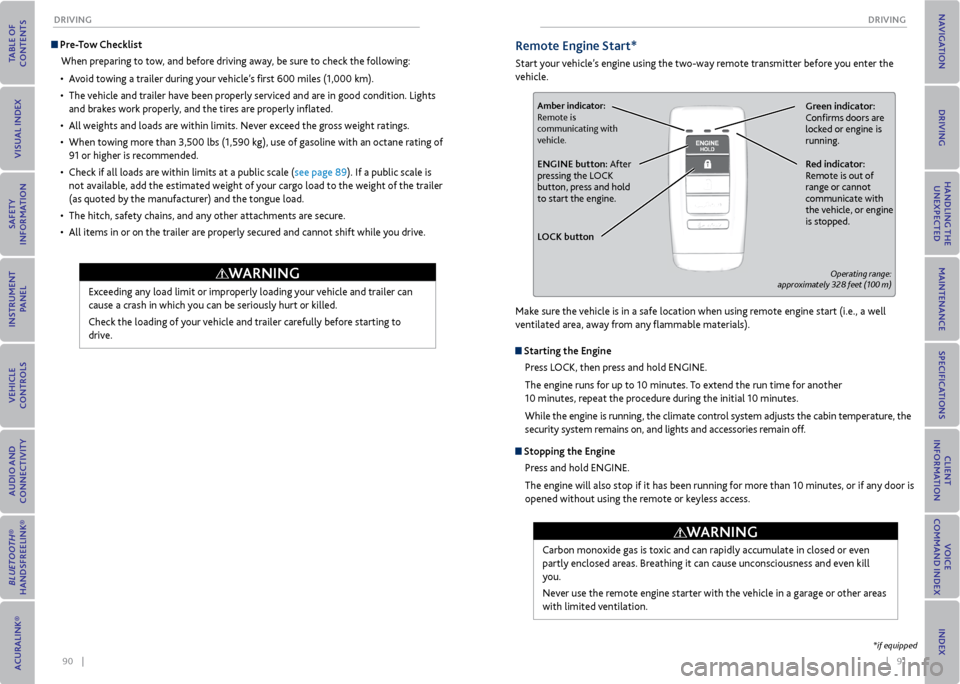
remote engine Start*
Start your vehicle’s engine using the two-way remote transmitter before you enter the
vehicle.
Green indicator:
Confirms doors are
locked or engine is
running.Amber indicator:
Remote is
communicating with
vehicle.
red indicator:
Remote is out of
range or cannot
communicate with
the vehicle, or engine
is stopped.eNGINe button: After
pressing the LOCK
button, press and hold
to start the engine.
L oCK button
Operating range:
approximately 328 feet (100 m)
Make sure the vehicle is in a safe location when using remote engine start (i.e., a well
ventilated area, away from any flammable materials).
Starting the engine
Press LOCK, then press and hold ENGINE.
The engine runs for up to 10 minutes. To extend the run time for another
10 minutes, repeat the procedure during the initial 10 minutes.
While the engine is running, the climate control system adjusts the cabin temperature, the
security system remains on, and lights and accessories remain off.
Stopping the engine
Press and hold ENGINE.
The engine will also stop if it has been running for more than 10 minutes, or if any door is
opened without using the remote or keyless access.
Carbon monoxide gas is toxic and can rapidly accumulate in closed or even
partly enclosed areas. Breathing it can cause unconsciousness and even kill
you.
Never use the remote engine starter with the vehicle in a garage or other areas
with limited ventilation.
WArNING
*if equipped
Page 54 of 79
100 || 101
DrIvING
DrIvING
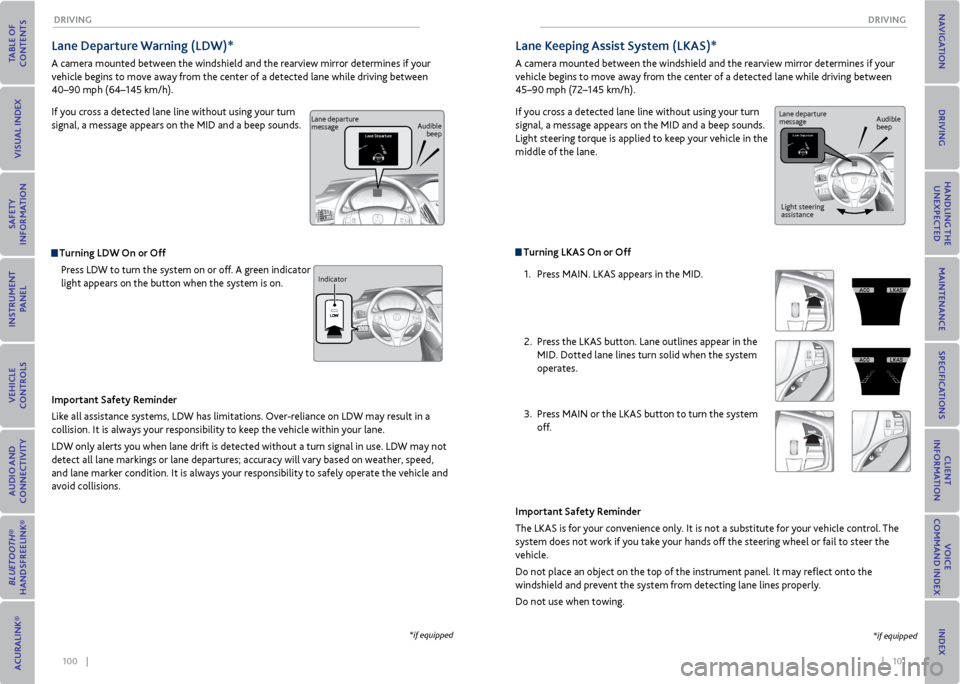
Lane Departure Warning (LDW)*
A camera mounted between the windshield and the rearview mirror determines if your
vehicle begins to move away from the center of a detected lane while driving between
40–90 mph (64–145 km/h).
If you cross a detected lane line without using your turn
signal, a message appears on the MID and a beep sounds.
Turning LDW on or off
Press LDW to turn the system on or off. A green indicator
light appears on the button when the system is on.
Important Safety reminder
Like all assistance systems, LDW has limitations. Over-reliance on LDW may result in a
collision. It is always your responsibility to keep the vehicle within your lane.
LDW only alerts you when lane drift is detected without a turn signal in use. LDW may not
detect all lane markings or lane departures; accuracy will vary based on weather, speed,
and lane marker condition. It is always your responsibility to safely operate the vehicle and
avoid collisions.
*if equipped
Lane departure
message Audible
beep
Indicator
Turning LKAS on or off 1. Press MAIN. LKAS appears in the MID.
2. Press the LKAS button. Lane outlines appear in the
MID. Dotted lane lines turn solid when the system
operates.
3. Press MAIN or the LKAS button to turn the system
off.
Lane Keeping Assist System (LKAS)*
A camera mounted between the windshield and the rearview mirror determines if your
vehicle begins to move away from the center of a detected lane while driving between
45–90 mph (72–145 km/h).
If you cross a detected lane line without using your turn
signal, a message appears on the MID and a beep sounds.
Light steering torque is applied to keep your vehicle in the
middle of the lane.
Important Safety reminder
The LKAS is for your convenience only. It is not a substitute for your vehicle control. The
system does not work if you take your hands off the steering wheel or fail to steer the
vehicle.
Do not place an object on the top of the instrument panel. It may reflect onto the
windshield and prevent the system from detecting lane lines properly.
Do not use when towing.
*if equipped
Lane departure
message Audible
beep
Light steering
assistance
Page 55 of 79
102 || 103
DrIvING
DrIvING
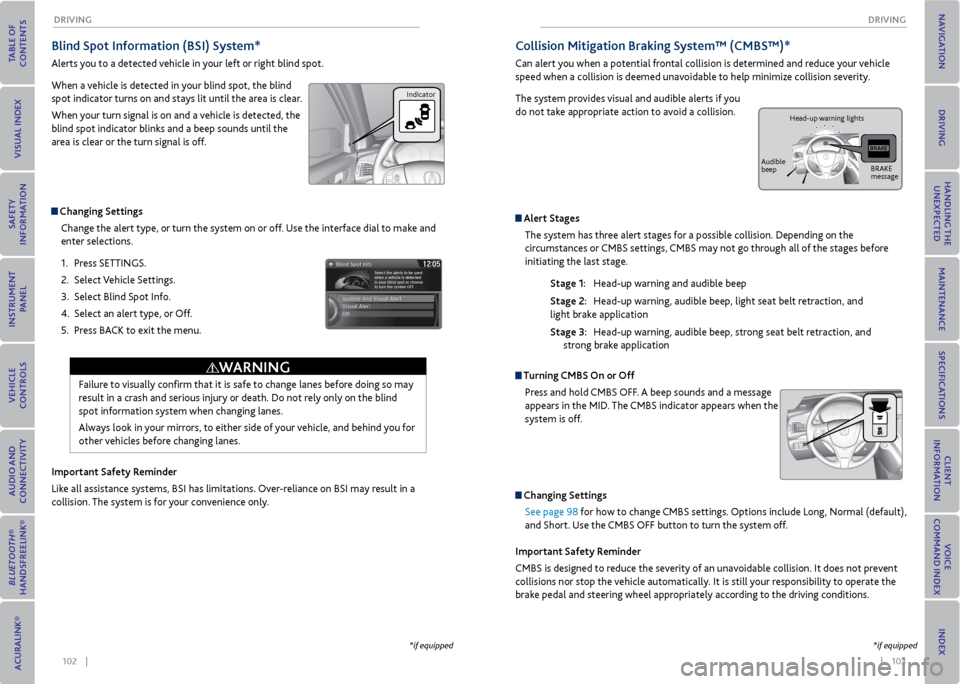
Blind Spot Information (BSI) System*
Alerts you to a detected vehicle in your left or right blind spot.
When a vehicle is detected in your blind spot, the blind
spot indicator turns on and stays lit until the area is clear.
When your turn signal is on and a vehicle is detected, the
blind spot indicator blinks and a beep sounds until the
area is clear or the turn signal is off.
Changing Settings
Change the alert type, or turn the system on or off. Use the interface dial to make and
enter selections.
1. Press SETTINGS.
2. Select Vehicle Settings.
3. Select Blind Spot Info.
4. Select an alert type, or Off.
5. Press BACK to exit the menu.
Important Safety reminder
Like all assistance systems, BSI has limitations. Over-reliance on BSI may result in a
collision. The system is for your convenience only.
Failure to visually confirm that it is safe to change lanes before doing so may
result in a crash and serious injury or death. Do not rely only on the blind
spot information system when changing lanes.
Always look in your mirrors, to either side of your vehicle, and behind you for
other vehicles before changing lanes.
WArNING
*if equipped
Indicator
Collision mitigation Braking System™ (CmBS™)*
Can alert you when a potential frontal collision is determined and reduce your vehicle
speed when a collision is deemed unavoidable to help minimize collision severity.
The system provides visual and audible alerts if you
do not take appropriate action to avoid a collision.
Alert Stages The system has three alert stages for a possible collision. Depending on the
circumstances or CMBS settings, CMBS may not go through all of the stages before
initiating the last stage.
Stage 1: Head-up warning and audible beep
Stage 2: Head-up warning, audible beep, light seat belt retraction, and
light brake application
Stage 3: Head-up warning, audible beep, strong seat belt retraction, and
strong brake application
Turning CmBS on or off
Press and hold CMBS OFF. A beep sounds and a message
appears in the MID. The CMBS indicator appears when the
system is off.
Changing SettingsSee page 98 for how to change CMBS settings. Options include Long, Normal (default),
and Short. Use the CMBS OFF button to turn the system off.
Important Safety reminder
CMBS is designed to reduce the severity of an unavoidable collision. It does not prevent
collisions nor stop the vehicle automatically. It is still your responsibility to operate the
brake pedal and steering wheel appropriately according to the driving conditions.
*if equipped
BRAKE
message
Audible
beep Head-up warning lights