USB Acura MDX 2017 Owner's Guide
[x] Cancel search | Manufacturer: ACURA, Model Year: 2017, Model line: MDX, Model: Acura MDX 2017Pages: 170, PDF Size: 12.43 MB
Page 6 of 170
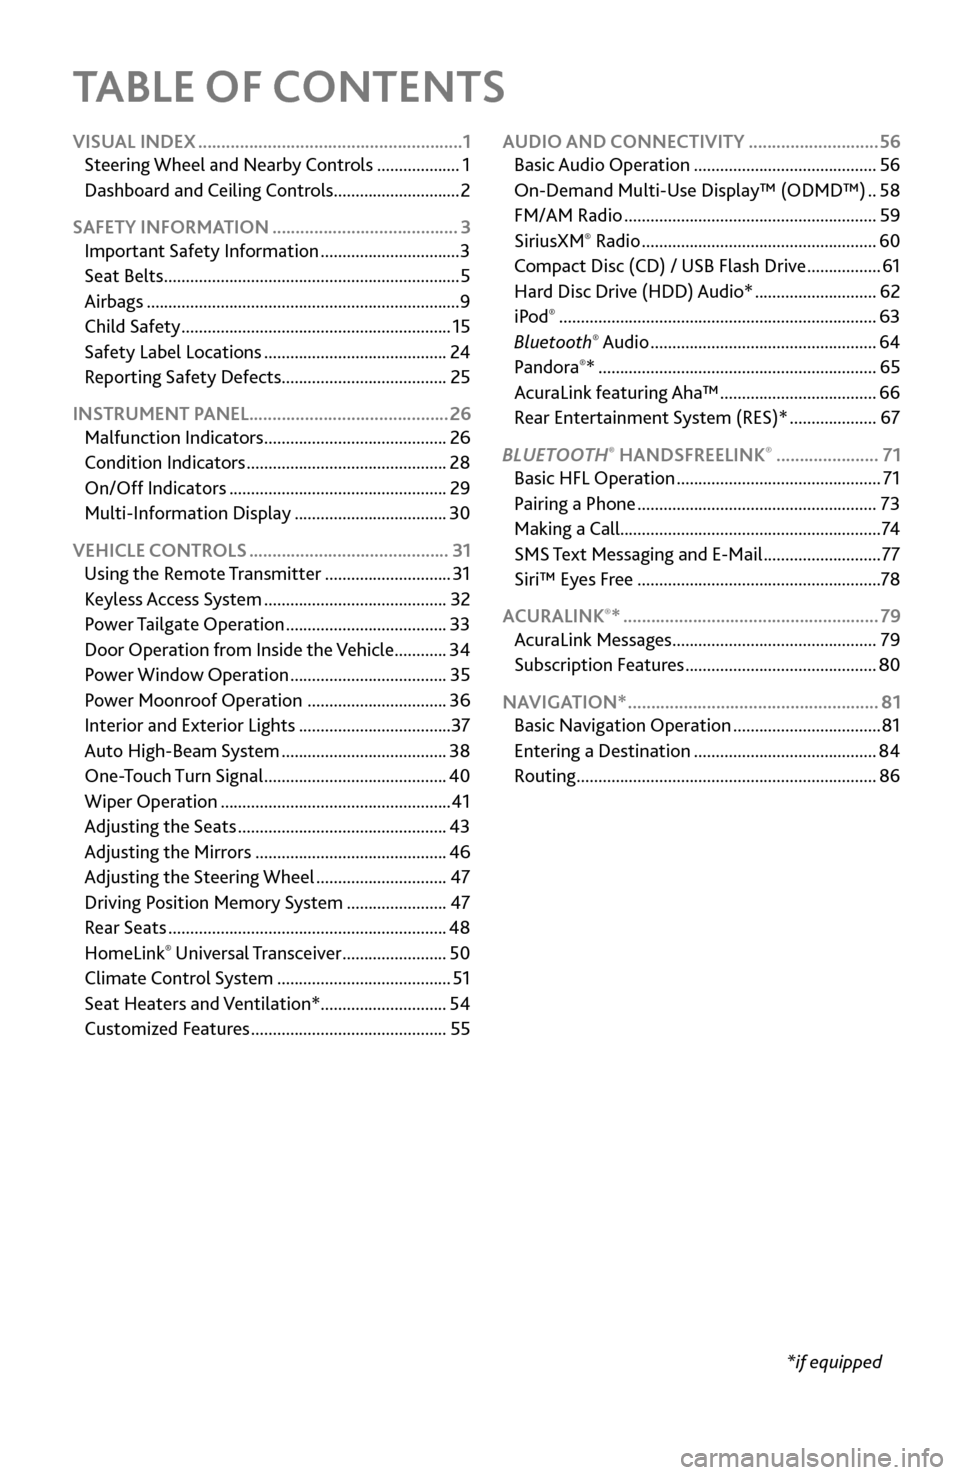
TABLE OF CONTENTS
*if equipped
VISUAL INDEX
.........................................................
1
Steering Wheel and Nearb
y Controls
...................
1
Dashboard
and Ceiling Controls
.............................
2
SAFETY INFORMATION
........................................ 3
Important Safety Information ................................ 3
Seat Belts .................................................................... 5
Airbags ........................................................................\
9
Child Safety .............................................................. 15
Safety Label Locations .......................................... 24
Reporting Safety
Defects...................................... 25
INSTRUMENT PANEL........................................... 26 Malfunction Indicators
.......................................... 26
Condition Indicators .............................................. 28
On/Off Indicators .................................................. 29
Multi-Information Display ................................... 30
VEHICLE CONTROLS
........................................... 31
Using the
Remote Transmitter
.............................
31
Keyless A
ccess System
..........................................
32
Power T
ailgate Operation
.....................................
33
Door Operation
from Inside the Vehicle
............
34
Power Window
Operation
....................................
35
Power
Moonroof Operation
................................
36
Interior and Exterior Lights ................................... 37
Auto High-Beam S
ystem
......................................
38
One-T
ouch Turn Signal
..........................................
40
Wiper Operation ..................................................... 41
Adjusting
the Seats
................................................
43
Adjusting the
Mirrors
............................................
46
Adjusting
the Steering Wheel
..............................
47
Driving Position Memory
System
.......................
47
Rear Seats ................................................................ 48
HomeLink® Universal Transceiver ........................ 50
Climate Control System ........................................ 51
Seat Heaters and V
entilation*............................. 54
Customized Features
............................................. 55AUDIO AND CONNECTIVITY
............................
56
Basic Audio Operation .......................................... 56
On-Demand Multi-Use Display™ (ODMD™) .. 58
FM/AM Radio .......................................................... 59
SiriusXM® Radio ...................................................... 60
Compact Disc (CD) / USB Flash Driv e .................61
Hard Disc Driv
e (HDD) Audio*
............................ 62
iPod® ........................................................................\
. 63
Bluetooth® Audio .................................................... 64
Pandora®* ................................................................ 65
AcuraLink featuring Aha™ .................................... 66
Rear Entertainment
System (RES)*
.................... 67
BLUET
OOTH
® HANDSFREELINK® ...................... 71
Basic HFL Operation ............................................... 71
Pairing a Phone ....................................................... 73
Making a Call ............................................................ 74
SMS
Text Messaging and E-Mail
........................... 77
Siri™ Eyes F
ree
........................................................ 78
ACURALINK
®* ....................................................... 79
AcuraLink Messages ............................................... 79
Subscription Featur
es
............................................ 80
NAVIGA
TION*
...................................................... 81
Basic Navigation Operation .................................. 81
Entering a Destination .......................................... 84
Routing ..................................................................... 86
Page 9 of 170
2 |
V
ISUAL INDEX
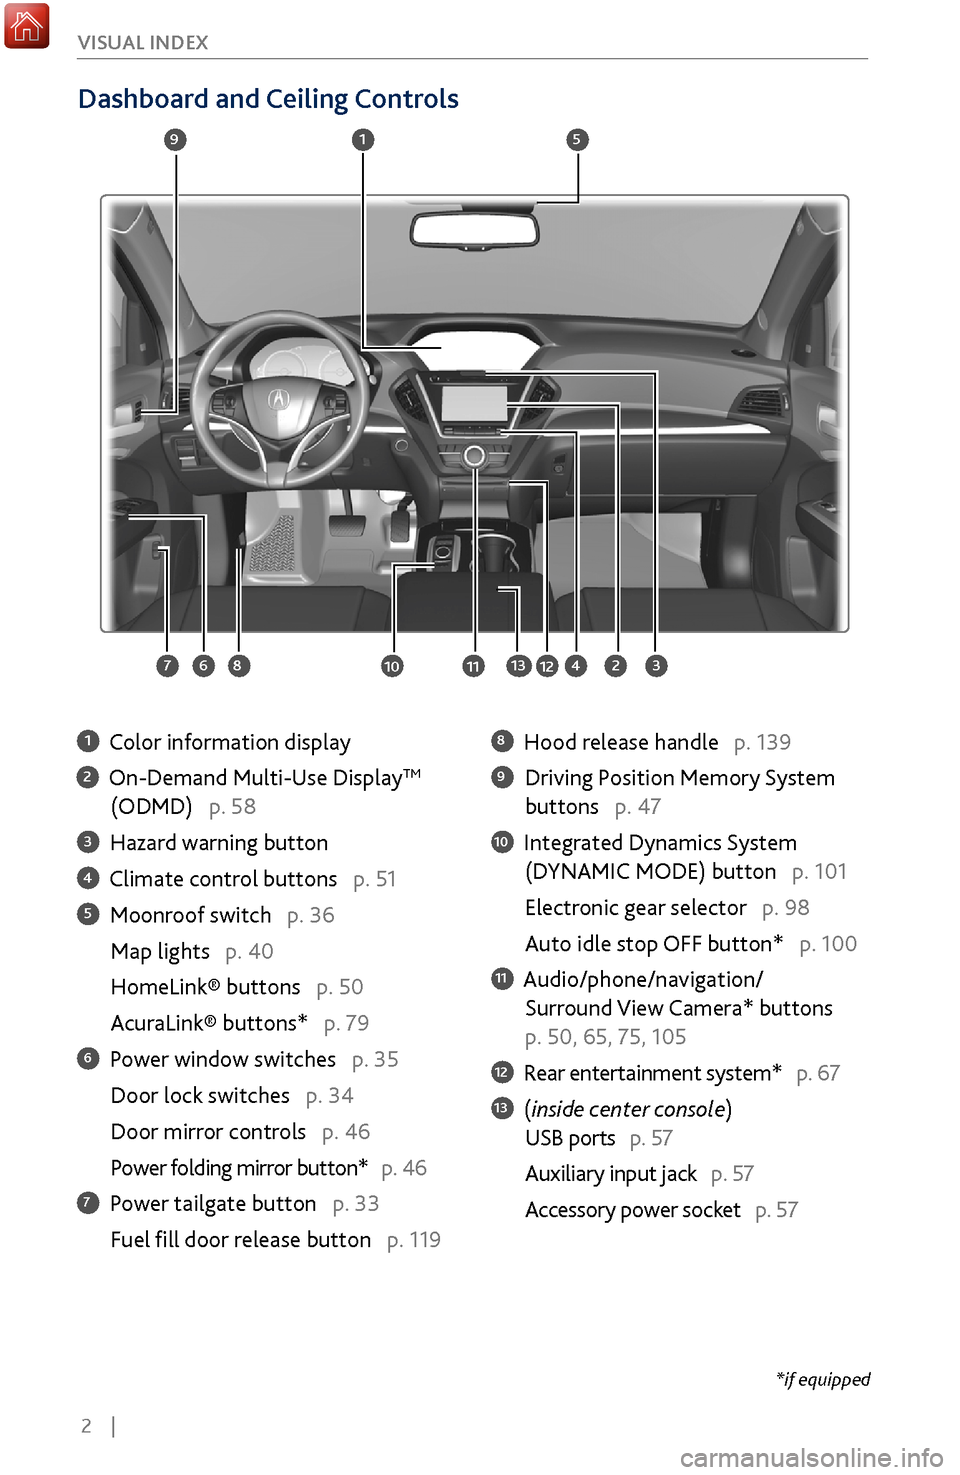
Dashboard and Ceiling Controls
1 Color information display
2 On-Demand Multi-Use DisplayTM
(ODMD) p. 58
3 Hazard warning button
4 Climate control buttons p. 51
5 Moonroof switch p. 36
Map lights p. 40
HomeLink® buttons p. 50
AcuraLink® buttons* p. 79
6 Power window switches p. 35
Door lock switches p. 34
Door mirror controls
p. 46
Power folding mirr
or button* p. 46
7 Power tailgate button p. 33
Fuel fill door r
elease button p. 119
8 Hood release handle p. 139
9 Driving Position Memory System
buttons p. 47
10 Integrated Dynamics System
(D
YNAMIC MODE) button p. 101
Electronic gear selector p. 98
Auto idle stop OFF button* p. 100
11 Audio/phone/navigation/
Surround View Camera*
buttons
p. 50, 65, 75, 105
12 Rear entertainment system* p. 67
13 (inside center console)
USB ports p. 57
Auxiliary input jack p. 57
Accessory power socket
p. 57
1
2834
5
67
9
101112
*if equipped
13
Page 63 of 170
56 |
AUDIO AND CONNECTIVITY
Learn how to operate the vehicle’s audio system.
Basic
Audio Operation
Connect audio devices and operate buttons and displays for the audio system.
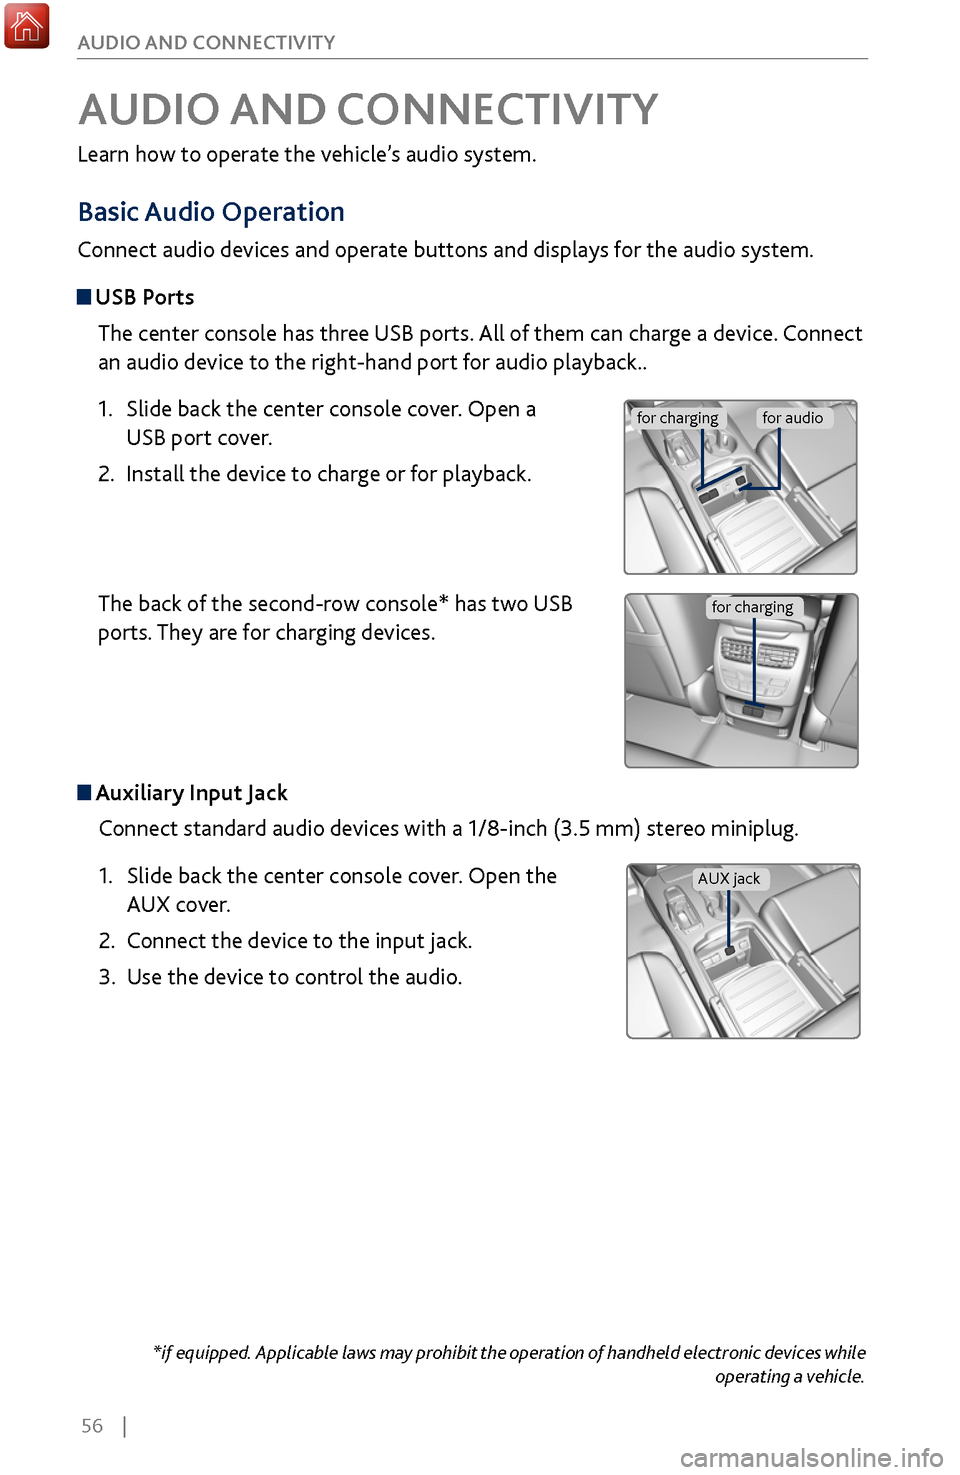
USB Ports
The center console has three USB ports. All of them can charge a device. Connect
an audio device to the right-hand port for audio playback..
1.
Slide back the center console cov
er. Open a
USB port cover.
2.
Install the device to charge or
for playback.
The back of the second-row console* has two USB
ports. They are for charging devices.
Auxiliary Input Jack
Connect standard audio devices with a 1/8-inch (3.5 mm) stereo miniplug.
1.
Slide back the center console cov
er. Open the
AUX cover.
2.
Connect the device to the input
jack.
3.
Use the device to control the
audio.
*if equipped. Applicable laws may prohibit the operation of handheld electronic devices while operating a vehicle.
AUDIO AND CONNECTIVITY
for chargingfor audio
AUX jack
for charging
Page 64 of 170
| 57
AUDIO AND CONNECTIVITY
Do not insert an automotive type cigarette lighter element. This can overheat the
power socket.
NOTICE
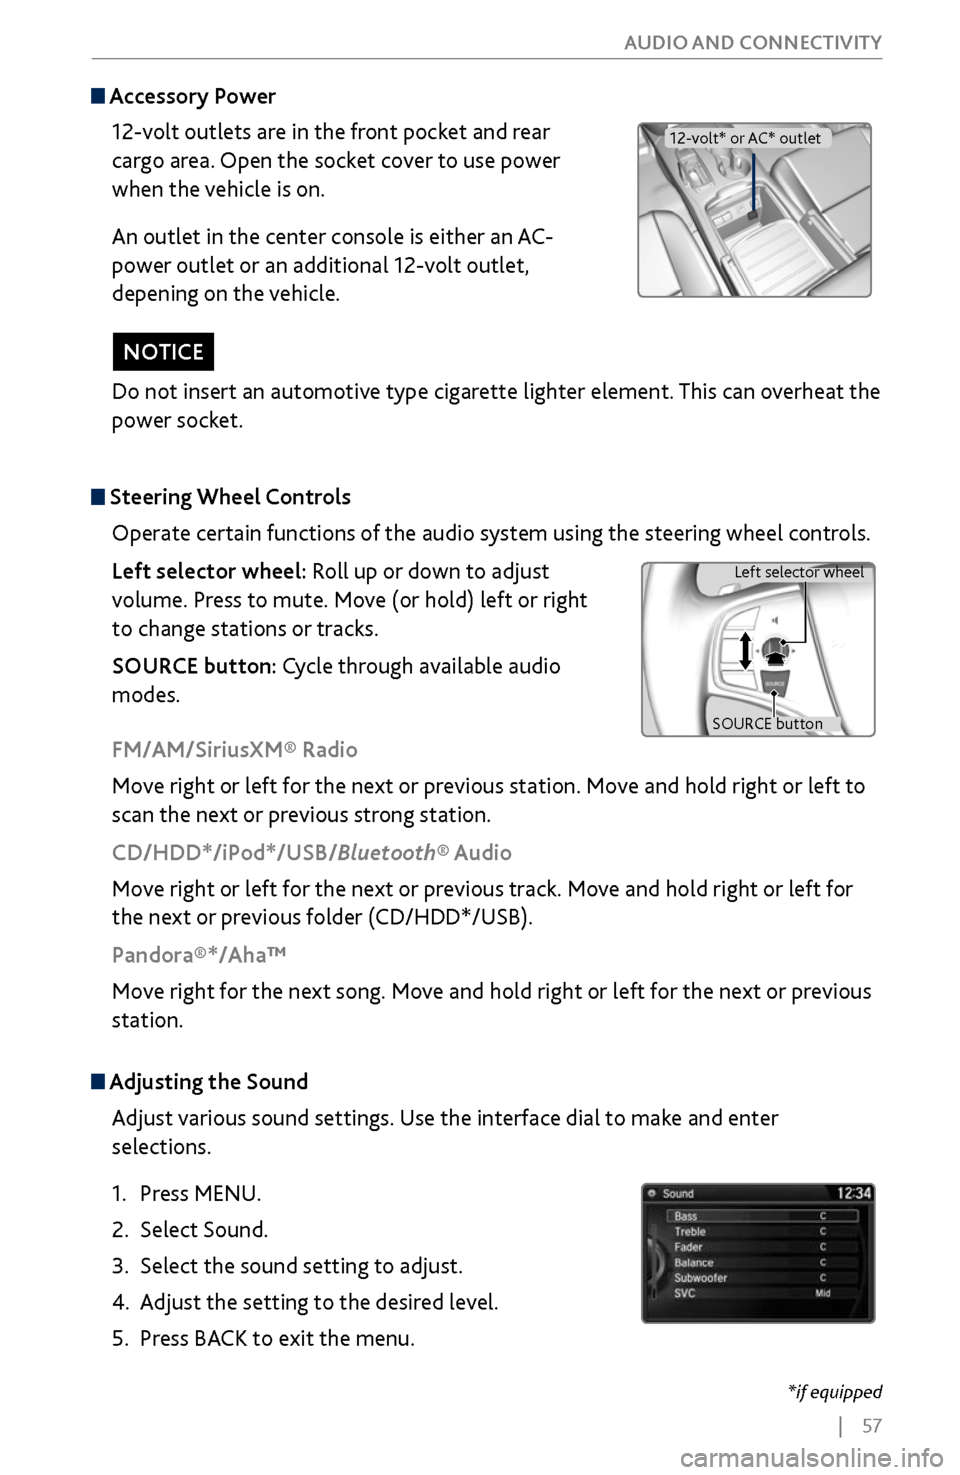
Adjusting the
Sound
Adjust various sound settings. Use the interface dial to make and enter
selections.
1.
Press MENU.
2.
Select Sound.
3.
Select the sound setting to adjust
.
4.
Adjust the setting to the desir
ed level.
5.
Press BACK
to exit the menu.
Steering Wheel Controls
Operate certain functions of the audio system using the steering wheel controls.
Left selector wheel: Roll up or down to adjust
volume. Press to mute. Move (or hold) left or right
to change stations or tracks.
SOURCE button: Cycle through available audio
modes.
SOURCE button Left selector wheel
FM/AM/SiriusXM® Radio
Move right or left for the next or previous station. Move and hold right or left to
scan the next or previous strong station.
CD/HDD*/iPod*/USB/Bluetooth® Audio
Move right or left for the next or previous track. Move and hold right or left for
the next or previous folder (CD/HDD*/USB).
Pandora®*/Aha™
Move right for the next song. Move and hold right or left for the next or previous
station.
Accessory Power
12-volt outlets are in the front pocket and rear
cargo area. Open the socket cover to use power
when the vehicle is on.
An outlet in the center console is either an AC-
power outlet or an additional 12-volt outlet,
depening on the vehicle.
12-volt* or AC* outlet
*if equipped
Page 68 of 170
| 61
AUDIO AND CONNECTIVITY
Compact Disc (CD) / USB Flash Drive
For CDs: The audio system supports audio CDs, CD-Rs, and CD-RWs in MP3, WMA,
or AAC formats.
For USB: Connect your device to the USB port (see page 56).
Do not use CDs with adhesive labels or insert a damaged CD. Inserting these types
of CDs may cause them to get stuck or damage the audio unit.
NOTICE
Searching for Music
Search for tracks stored on the CD or USB. Use the interface dial to make and
enter selections.
1.
From
the audio screen, press MENU.
2.
Select Music Search.
3.
Select a search type (artist
, album, track, etc.) or
folder.
4.
Select the song you
want to play.
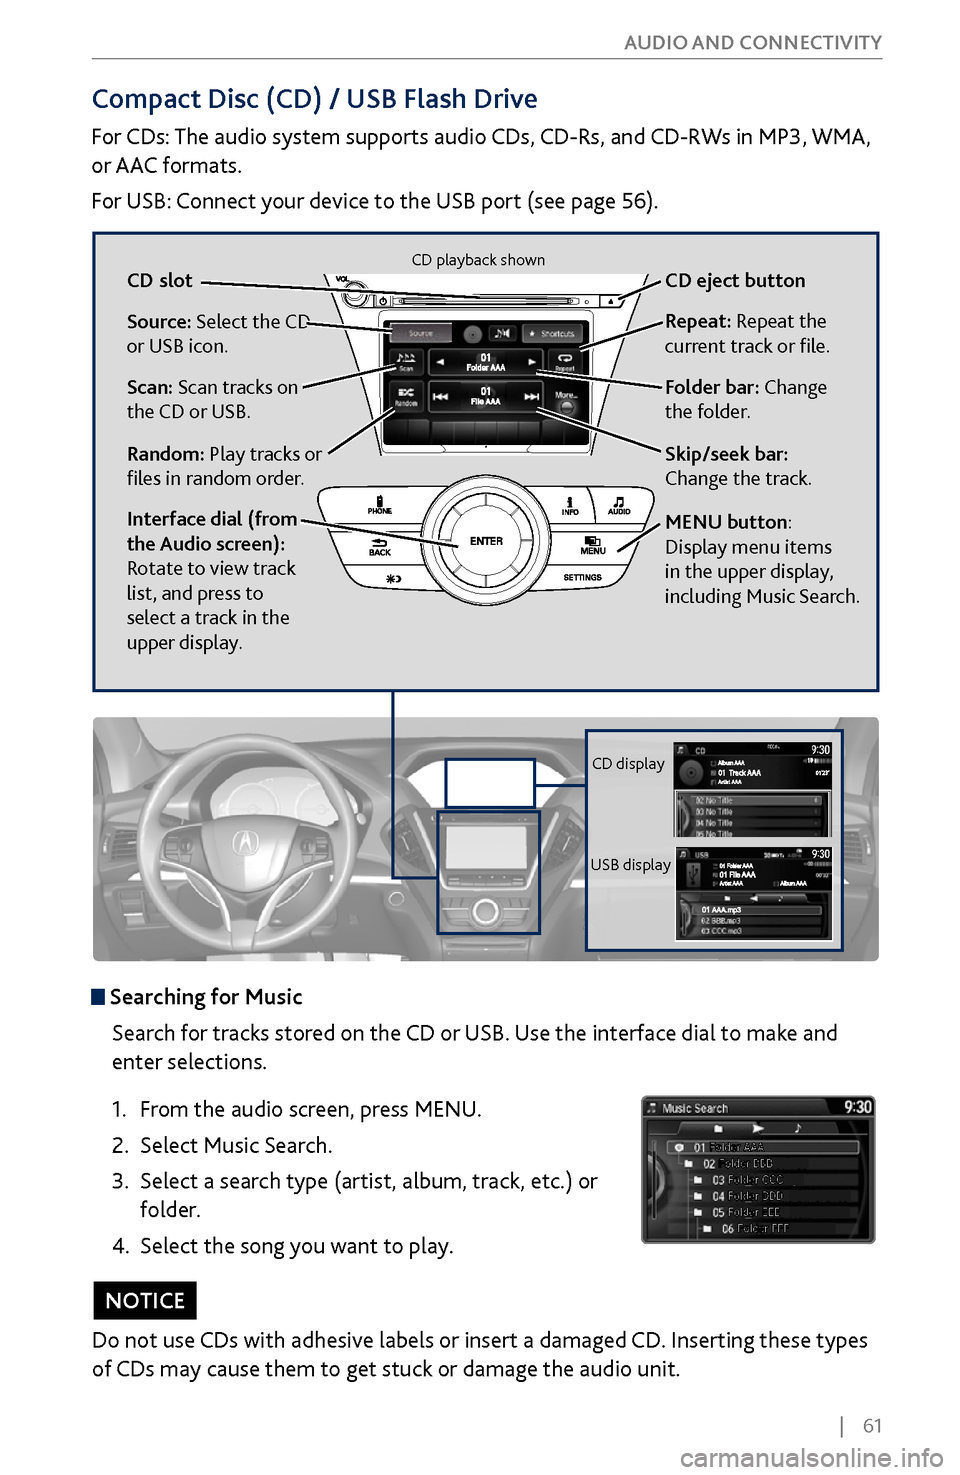
Source: Select the CD
or USB icon.
Scan: Scan tracks on
the CD or USB.
Random: Play tracks or
files in random order. CD
slot CD eject button
Folder
bar: Change
the folder. R
epeat: Repeat the
current track or file.
Interface dial (from
the Audio screen):
Rotate to view track
list, and press to
select a track in the
upper display.
Skip/seek bar:
Change the track.
MENU button:
Display menu items
in the upper display,
including Music Search.
CD display
USB display
CD playback shown
Page 70 of 170
| 63
AUDIO AND CONNECTIVITY
iPod®
Connect your device to the USB port (see page 56).
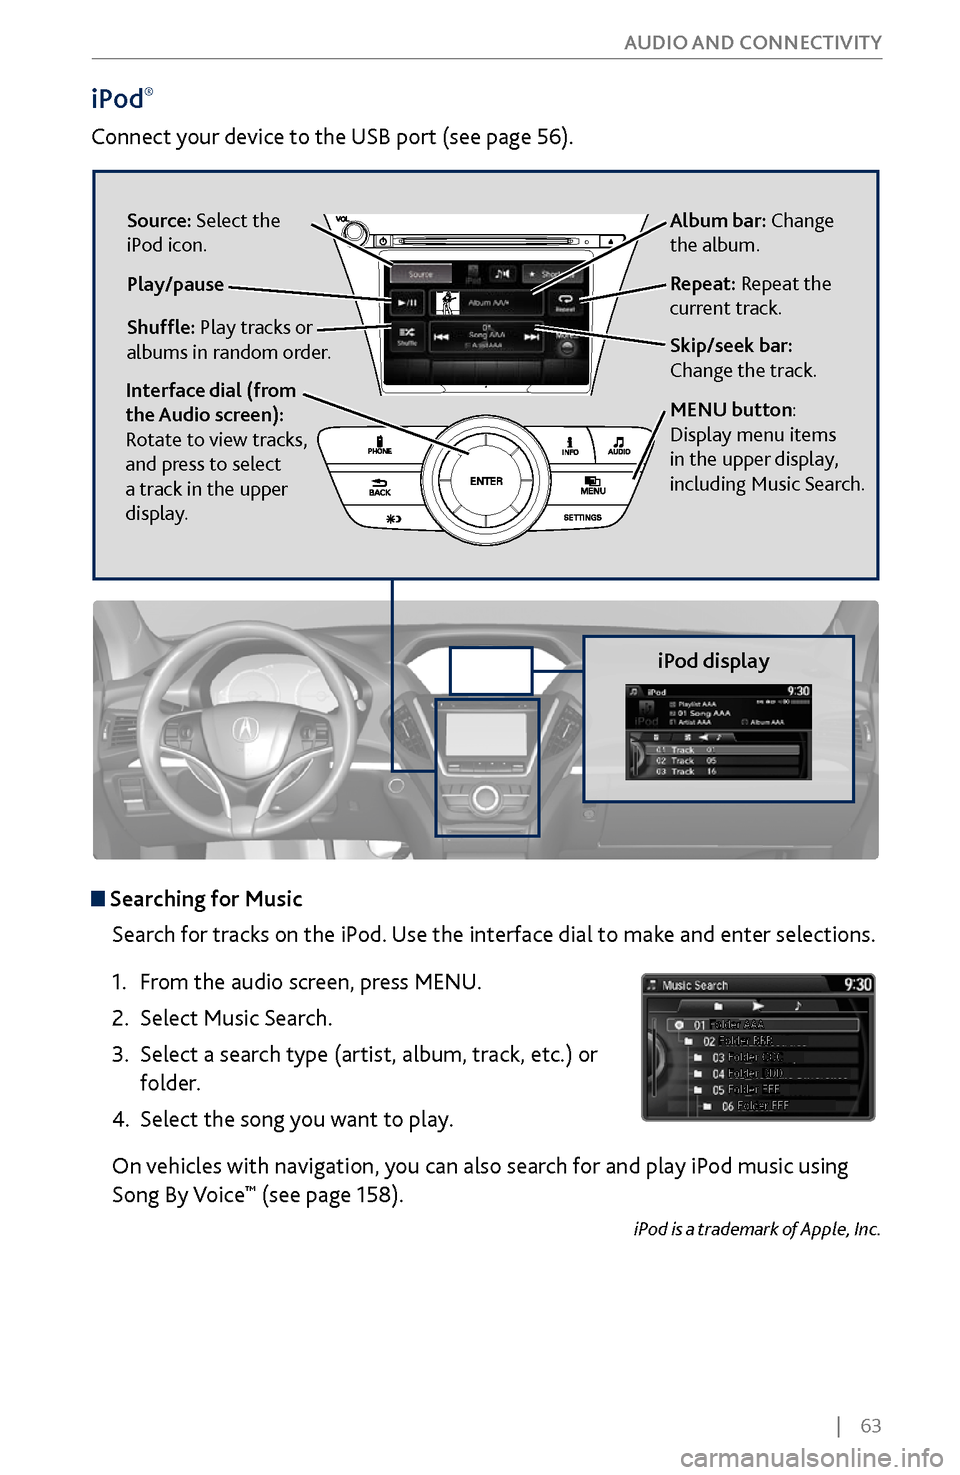
iPod display
Searching for Music
Search for tracks on the iPod. Use the interface dial to make and enter selections.
1.
From
the audio screen, press MENU.
2.
Select Music Search.
3.
Select a search type (artist
, album, track, etc.) or
folder.
4.
Select the song you
want to play.
On vehicles with navigation, you can also search for and play iPod music using
Song By Voice
™ (see page 158).
iPod is a trademark of Apple, Inc.
Album bar: Change
the album.
Skip/seek bar:
Change the track. Repeat: Repeat the
current track.
Shuffle: Play tracks or
albums in random order. Source: Select the
iPod icon.
Play/pause
Interface dial (from
the Audio screen):
Rotate to view tracks,
and press to select
a track in the upper
display.
MENU button:
Display menu items
in the upper display,
including Music Search.
Page 72 of 170
| 65
AUDIO AND CONNECTIVITY
Pandora®*
Play and operate Pandora from your phone through the vehicle’s audio system. Visit
www.acura.com/handsfreelink to check phone compatibility. Standard data rates
apply with your phone provider.
Connect your phone when the vehicle is stopped.
For iPhone:
•
Connect via
Bluetooth®
HandsFreeLink® (see page 73) or USB (see page 56).
•
A pop-up may appear on y
our phone requesting you to allow access for Pandora
to be launched.
•
If you cannot
operate Pandora through the audio system, it may be streaming
through Bluetooth® Audio. Make sure Pandora mode on the audio system is
selected.
•
If Pandora still does not
operate, try rebooting the phone and reconnecting the
cable if necessary.
For Android and BlackBerry:
•
Connect via Bluetooth®
HandsFreeLink® (see page 73).
* if equipped. Applicable laws may prohibit the operation of handheld electronic devices while operating a vehicle. Launch streaming audio on your phone only when safe to do so.
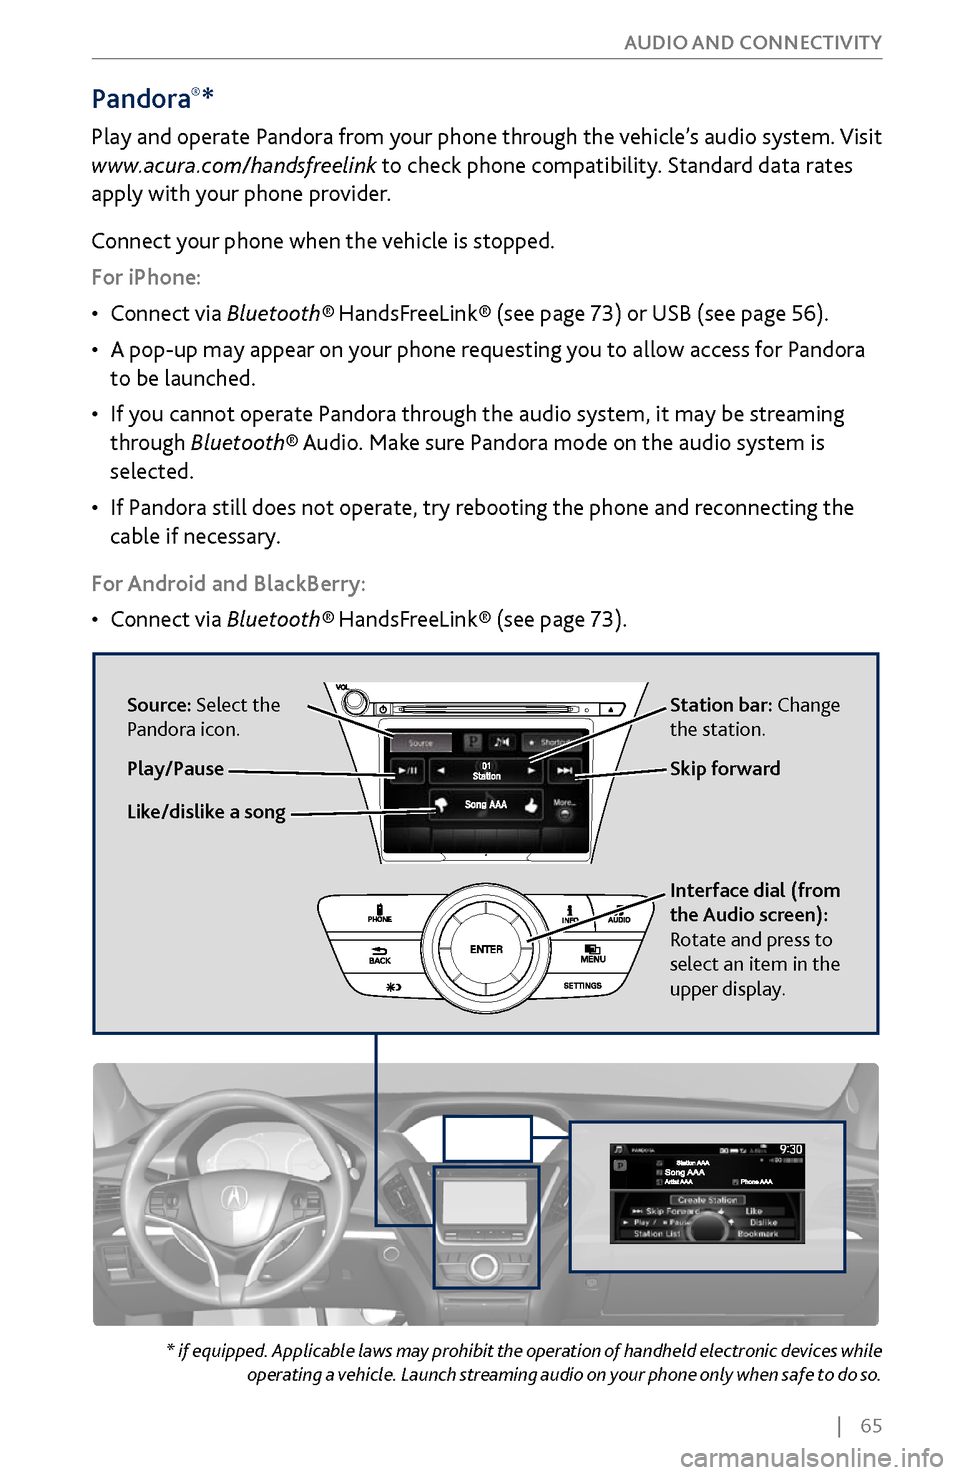
Source: Select the
Pandora icon. Station bar: Change
the station.
Like/dislike a song Skip forward
Interface dial (from
the Audio screen):
Rotate and press to
select an item in the
upper display.
Play/Pause
Page 73 of 170
66 |
AUDIO AND CONNECTIVITY
Applicable laws may prohibit the operation of handheld electronic devices while operating a vehicle.
Launch streaming audio on your phone only when safe to do so.
AcuraLink featuring Aha™
Access music and information programming, location-based services, and social
media through your vehicle’s audio system. Visit www.acura.com/handsfreelink
(U.S.) or www.handsfreelink.ca (Canada) to check phone compatibility. Standard
data rates apply with your phone provider.
Visit owners.acura.com (U.S.) or myacura.ca (Canada) and download the AcuraLink
app to your phone prior to using this feature. Make sure you have an active Aha
account. Connect your phone when the vehicle is stopped.
For iPhone:
•
Connect via Bluetooth®
HandsFreeLink® (see page 73) or USB (see page 56).
•
A pop-up may appear on y
our phone requesting you to allow access for Aha to be
launched.
•
If you cannot
operate Aha through the audio system, it may be streaming through
Bluetooth® Audio. Make sure Aha mode on your audio system is selected.
•
If Aha still does not
operate, try rebooting the phone and reconnecting the cable
if necessary.
For Android and BlackBerry:
•
Connect via Bluetooth®
HandsFreeLink® (see page 73).
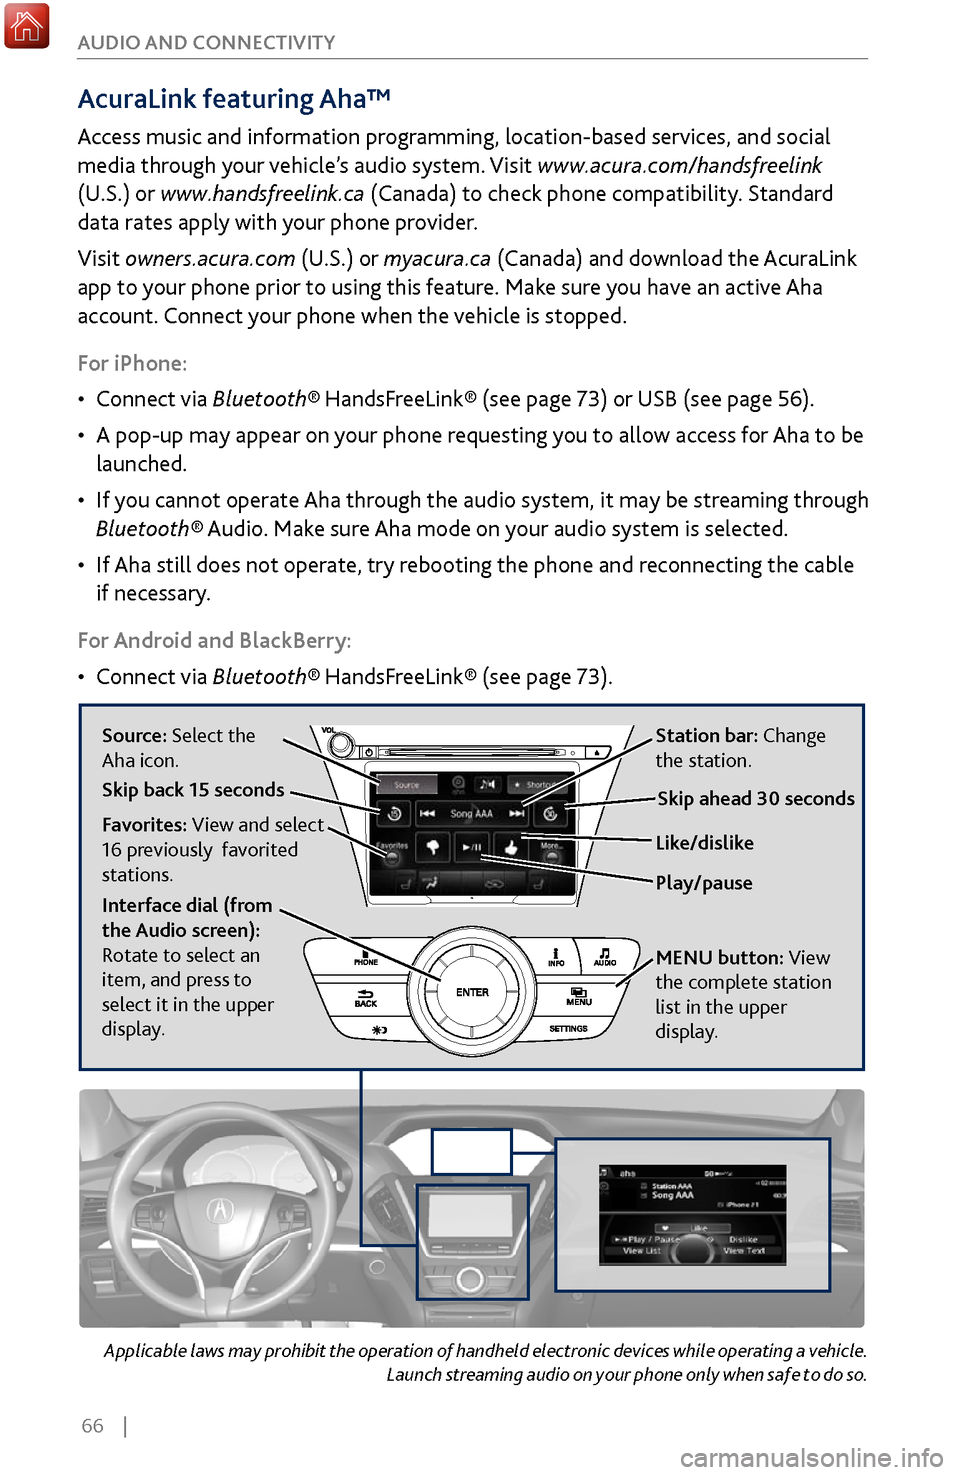
Source: Select the
Aha icon. Station bar: Change
the station.
Play/pause Like/dislike
Favorites: View and select
16 previously favorited
stations.
Interface dial (from
the Audio screen):
Rotate to select an
item, and press to
select it in the upper
display. MENU
button:
View
the complete station
list in the upper
display
.
Skip back 15 secondsSkip ahead 30 seconds
Page 76 of 170
| 69
AUDIO AND CONNECTIVITY
1. Make sure REAR POWER is turned on in the front audio controls.
2.
From
the rear control panel, press the desired audio source button (or the
SOURCE button for Ultrawide RES).
3.
Press the arr
ow/ENTER buttons to highlight options on the screen and select
them. Use the other rear control panel buttons to operate the system.
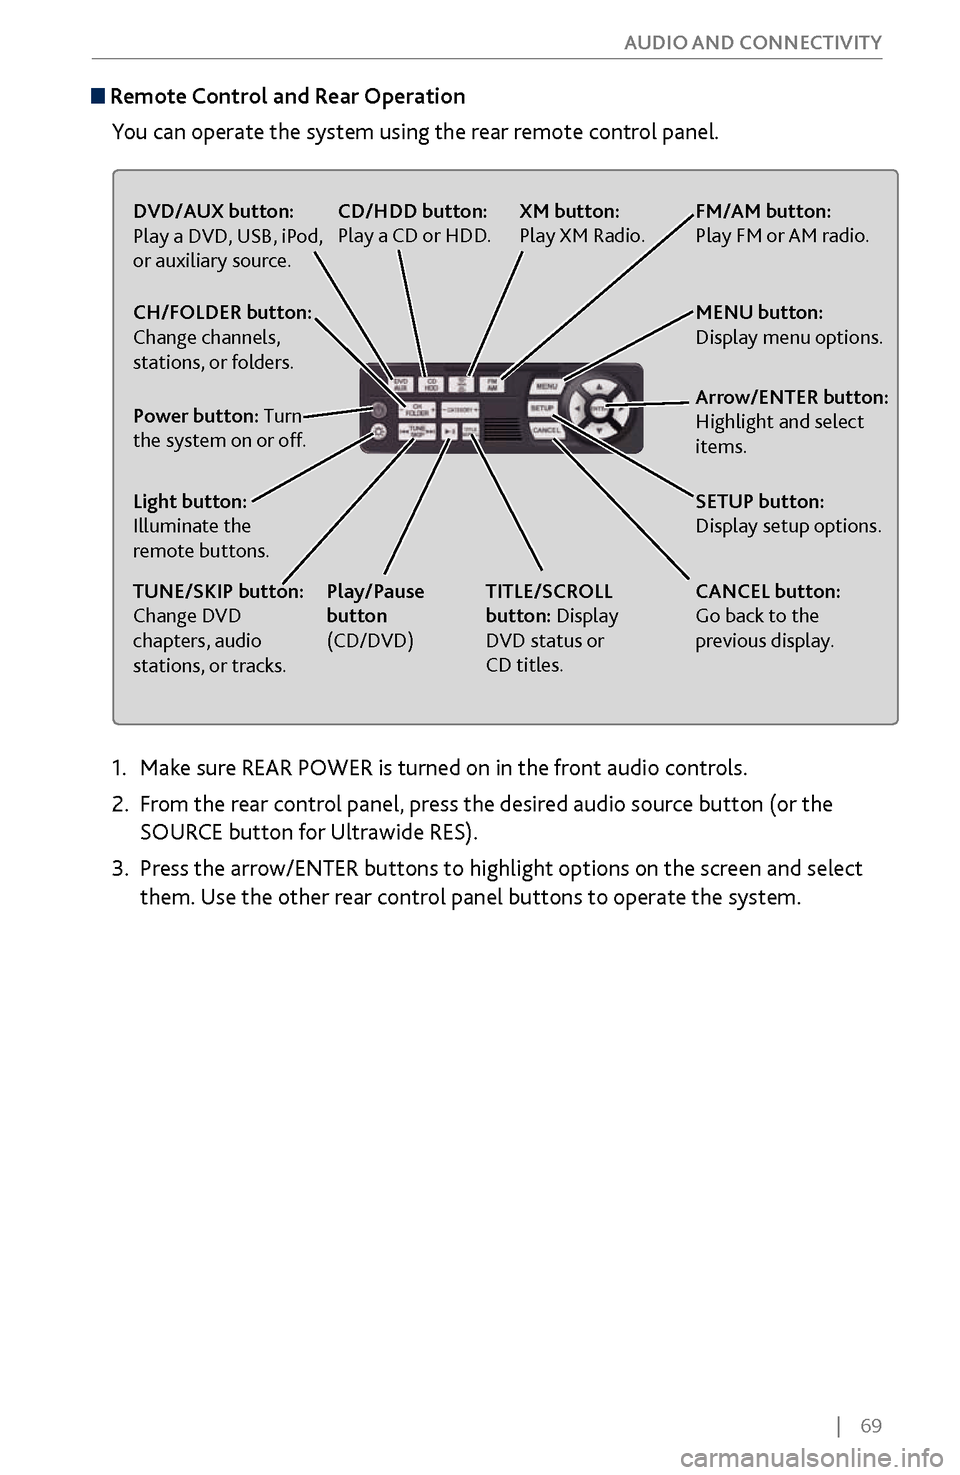
Remote Control and Rear Operation
You can operate the system using the rear remote control panel.
DVD/AUX button:
Play a DVD, USB, iPod,
or auxiliary source.
TUNE/SKIP button:
Change DVD
chapters, audio
stations, or tracks. TITLE/SCROLL
button: Display
DVD status or
CD titles.
Play/Pause
button
(CD/DVD)
Power button: Turn
the system on or off. CH/FOLDER button:
Change channels,
stations, or folders.
Light button:
Illuminate the
remote buttons.
CANCEL button:
Go back to the
previous display.
CD/HDD button:
Play a CD or HDD.
XM button:
Play XM Radio.FM/AM button:
Play FM or AM radio.
MENU button:
Display menu options.
SETUP button:
Display setup options. Arrow/ENTER button:
Highlight and select
items.
Page 141 of 170
134 |
HANDLING THE UNEXPECTED
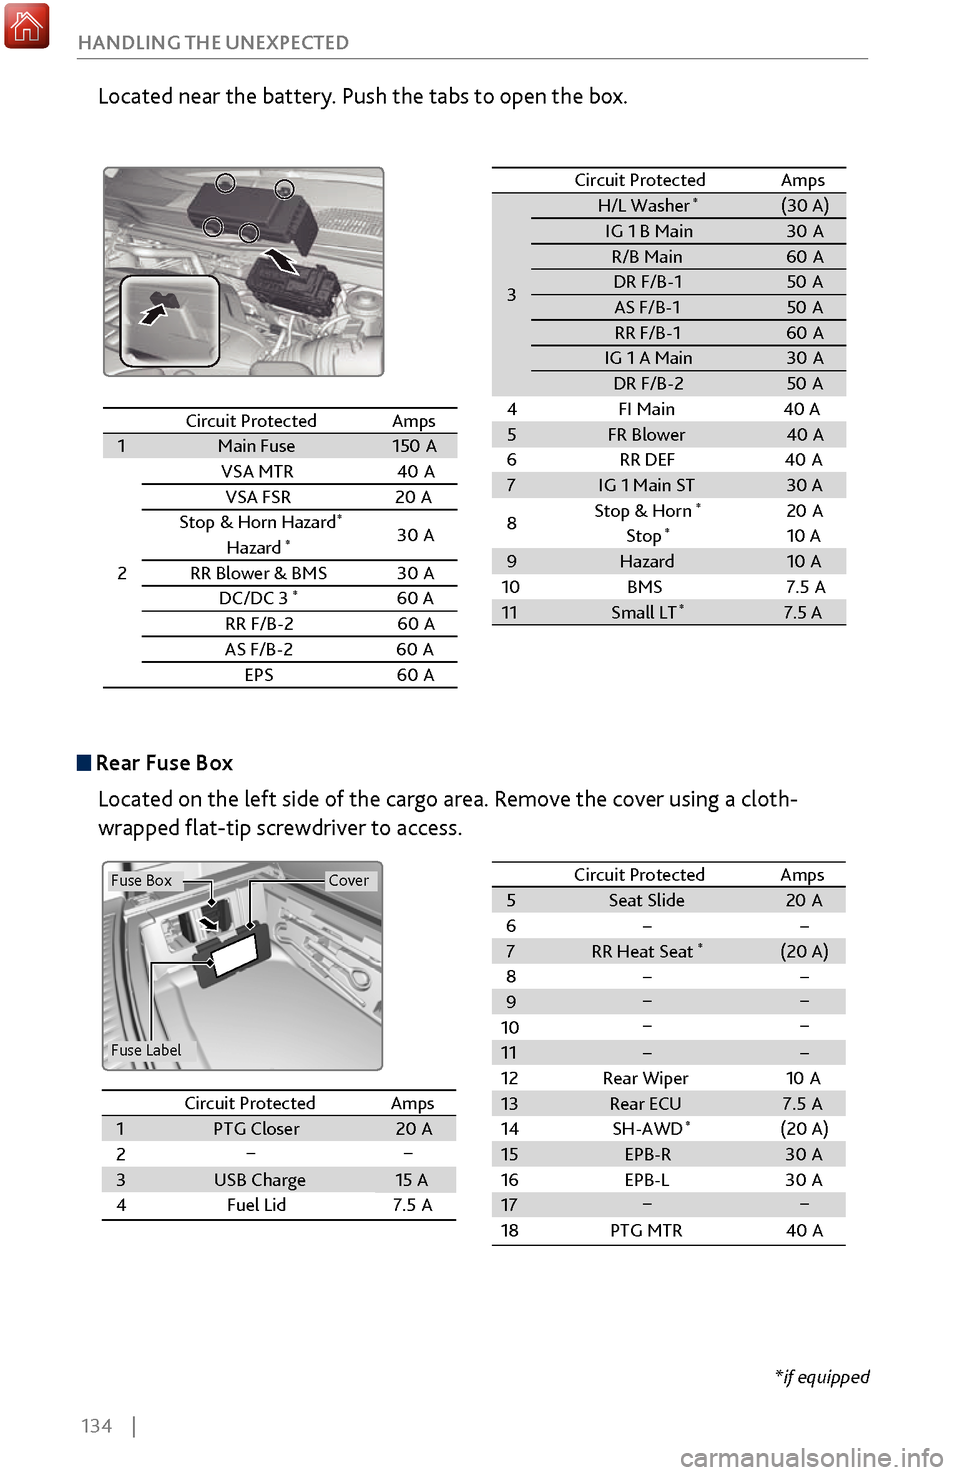
Located near the battery. Push the tabs to open the box.
Circuit ProtectedAmps1Main Fus
e150A
2
VSA MTR40A
VSA FSR20A
Stop & Horn Hazard*30 A
Hazard*
RR Blower & BM S
DC/DC 3*60 A
RR F/B-2 60A
AS F/B-
260A
EPS60A
3 H/L Washer
*(30 A)
IG 1 B Main 30A
R/B Main 60A
DR F/B-1 50A
AS F/B- 1 50A
RR F/B-1 60A
IG 1 A Mai n 30A
DR F/B-2 50A
4F I Main 40 A
5 FR Blower 40A
6R R DEF4 0A
7 IG 1 Main ST 30 A
8 Stop & Horn
*20
A
Stop*10 A
9 Hazard 10A
10 BMS
11 Small LT
*7.5 A
Circuit Protected
Amps
30A
7.5A
Circuit Protected Amps
1 Main Fuse 150A
2 VSA MTR
40A
VSA FS R2 0A
Stop & Horn Hazard
*30 A
Hazard*
RR Blower & BM S
DC/DC 3*60 A
RR F/B-2 60A
AS F/B- 26 0A
EPS6 0A
3
H/L Washer*(30 A)IG 1 B Main30AR/B Main60 ADR F/B-150AAS F/B- 150ARR F/B-160 AIG 1 A Mai n30ADR F/B-250A
4F I Main 40 A
5FR Blower40 A
6R R DEF40A7IG 1 Main ST30 A
8 Stop & Horn*20
A
Stop*10 A9Hazard10 A
10 BMS
11Small LT*7.5 A
Circuit ProtectedAmps
30A
7.5A
Rear Fuse Box
Located on the left side of the cargo area. Remove the cover using a cloth-
wrapped flat-tip screwdriver to access.
Fuse Label
Fuse BoxCover
Circuit ProtectedAmpsCircuit Protected Amps1PTG Closer20 A23USB Charge15 A4Fuel Lid 7.5A
5 Seat Slide 20A
6 � �
7 RR Heat Seat
*(20 A)
8 � �
9
10
11
12 Rear Wiper 10A
13 Rear ECU 7.5 A
14 (20 A)
15
16
17
18 PTG MTR 40A
��
��
��
��
SH-AWD
*
��
EPB-R
30A
EPB-L 30A
Circuit Protected AmpsCircuit ProtectedAmps1 PTG Closer 20A
2
3 USB Charge 15 A
4 Fuel Lid 7.5A5Seat Slide20A6��7RR Heat Seat*(20 A)8��9101112Rear Wiper10A13Rear ECU7.5 A14(20 A)15161718PTG MTR40 A
��
��
��
��
SH-AWD*
��
EPB-R30A
EPB-L 30A
*if equipped