remote control Acura MDX 2017 Owner's Guide
[x] Cancel search | Manufacturer: ACURA, Model Year: 2017, Model line: MDX, Model: Acura MDX 2017Pages: 170, PDF Size: 12.43 MB
Page 6 of 170
TABLE OF CONTENTS
*if equipped
VISUAL INDEX
.........................................................
1
Steering Wheel and Nearb
y Controls
...................
1
Dashboard
and Ceiling Controls
.............................
2
SAFETY INFORMATION
........................................ 3
Important Safety Information ................................ 3
Seat Belts .................................................................... 5
Airbags ........................................................................\
9
Child Safety .............................................................. 15
Safety Label Locations .......................................... 24
Reporting Safety
Defects...................................... 25
INSTRUMENT PANEL........................................... 26 Malfunction Indicators
.......................................... 26
Condition Indicators .............................................. 28
On/Off Indicators .................................................. 29
Multi-Information Display ................................... 30
VEHICLE CONTROLS
........................................... 31
Using the
Remote Transmitter
.............................
31
Keyless A
ccess System
..........................................
32
Power T
ailgate Operation
.....................................
33
Door Operation
from Inside the Vehicle
............
34
Power Window
Operation
....................................
35
Power
Moonroof Operation
................................
36
Interior and Exterior Lights ................................... 37
Auto High-Beam S
ystem
......................................
38
One-T
ouch Turn Signal
..........................................
40
Wiper Operation ..................................................... 41
Adjusting
the Seats
................................................
43
Adjusting the
Mirrors
............................................
46
Adjusting
the Steering Wheel
..............................
47
Driving Position Memory
System
.......................
47
Rear Seats ................................................................ 48
HomeLink® Universal Transceiver ........................ 50
Climate Control System ........................................ 51
Seat Heaters and V
entilation*............................. 54
Customized Features
............................................. 55AUDIO AND CONNECTIVITY
............................
56
Basic Audio Operation .......................................... 56
On-Demand Multi-Use Display™ (ODMD™) .. 58
FM/AM Radio .......................................................... 59
SiriusXM® Radio ...................................................... 60
Compact Disc (CD) / USB Flash Driv e .................61
Hard Disc Driv
e (HDD) Audio*
............................ 62
iPod® ........................................................................\
. 63
Bluetooth® Audio .................................................... 64
Pandora®* ................................................................ 65
AcuraLink featuring Aha™ .................................... 66
Rear Entertainment
System (RES)*
.................... 67
BLUET
OOTH
® HANDSFREELINK® ...................... 71
Basic HFL Operation ............................................... 71
Pairing a Phone ....................................................... 73
Making a Call ............................................................ 74
SMS
Text Messaging and E-Mail
........................... 77
Siri™ Eyes F
ree
........................................................ 78
ACURALINK
®* ....................................................... 79
AcuraLink Messages ............................................... 79
Subscription Featur
es
............................................ 80
NAVIGA
TION*
...................................................... 81
Basic Navigation Operation .................................. 81
Entering a Destination .......................................... 84
Routing ..................................................................... 86
Page 7 of 170
*if equipped
DRIVING
................................................................
88
Before Driving ......................................................... 88
Maximum Load Limit ............................................ 90
Towing
a Trailer
......................................................
92
Remote
Engine Start*
...........................................
96
Starting to Driv
e
......................................................
97
Shifting ..................................................................... 98
Auto Idle Stop* ..................................................... 100
Integrated Dynamics S
ystem
..............................101
Vehicle Stability Assist (VSA®)
........................... 101
Braking ................................................................... 102
Adaptiv
e Cruise Control (ACC)
with Low Speed
F
ollow
.............................................................
104
Forwar
d Collision Warning (FCW) with
Pedestrian Detection
.................................... 107
Collision Mitigation Braking
System™
(CMBS™)
....................................................... 108
Lane Departure
Warning (LDW)
.........................
110
Lane Keeping
Assist System (LKAS)
...................
111
Road Departur
e Mitigation (RDM)
....................
112
Blind Spot Information (BSI)*
............................. 113
Parking Sensor System*
....................................... 114
Multi-View
Rear Camera*
...................................
115
Cross T
raffic Monitor*
..........................................
116
Surround View
Camera*
......................................
117
Refueling ................................................................. 119
HANDLING THE UNEXPECTED ........................
120
Keyless Access Remote Battery Strength
........ 120
Jump Starting ........................................................ 120
Emergency
Engine Stop
.......................................
121
Overheating ........................................................... 122
Tire Pr
essure Monitoring System (TPMS)
........
123
Handling a Flat Tir
e
..............................................
126
Changing a Flat Tir
e*
...........................................
126
Tire R
epair Kit*
.....................................................
130
Fuse Locations ....................................................... 131
Emer
gency Towing
...............................................
135MAINTENANCE
..................................................
136
Safety Precautions ............................................... 136
Maintenance Minder™ ......................................... 137
Under the
Hood
.................................................... 139
Engine Oil
.............................................................. 140
Engine Coolant ..................................................... 142
Window Washer
Fluid
.........................................
143
Checking the Battery ........................................... 143
Changing Wiper Blades ....................................... 144
Tire Information ................................................... 146
Tire Labeling .......................................................... 149
DOT
Tire Quality Grading
...................................
150
Testing
of Readiness Codes
.................................
152
SPECIFICATIONS
................................................ 153
CLIENT INFORMATION
..................................... 154
Fr
equently Asked Questions/Troubleshooting
154
Contact Us .............................................................. 155
Acura
Total Luxury Care Roadside Assistance
156
Warranty Co
verages
............................................
156
EPA C
ontact Information
....................................
156
INDEX...................................................................
159
Page 38 of 170
| 31
V
EHICLE CONTROLS
Learn about the various controls necessary for operating and driving the vehicle.
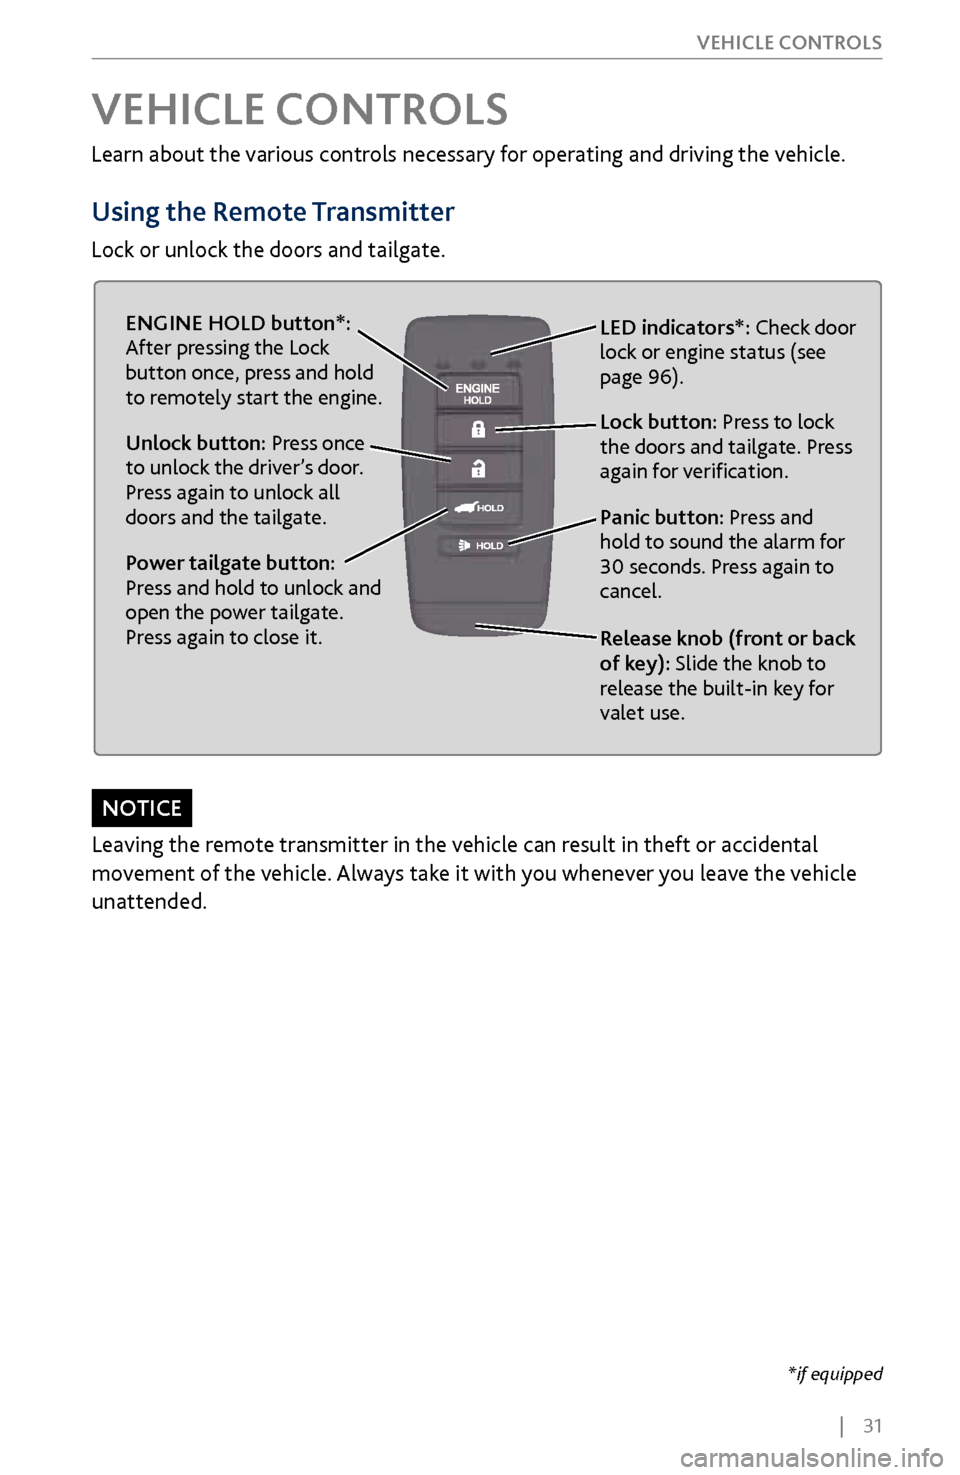
Using the
Remote Transmitter
Lock or unlock the doors and tailgate.
Unlock button: Press once
to unlock the driver’s door.
Press again to unlock all
doors and the tailgate.
Release knob (front or back
of key): Slide the knob to
release the built-in key for
valet use.
Power tailgate button:
Press and hold to unlock and
open the power tailgate.
Press again to close it. Lock button: Press to lock
the doors and tailgate. Press
again for verification. LED indicators*: Check door
lock or engine status (see
page 96).
Panic button: Press and
hold to sound the alarm for
30 seconds. Press again to
cancel.
VEHICLE CONTROLS
ENGINE HOLD button*:
After pressing the Lock
button once, press and hold
to remotely start the engine.
*if equipped
Leaving the remote transmitter in the vehicle can result in theft or accidental
movement of the vehicle. Always take it with you whenever you leave the vehicle
unattended.
NOTICE
Page 39 of 170
32 |
V
EHICLE CONTROLS
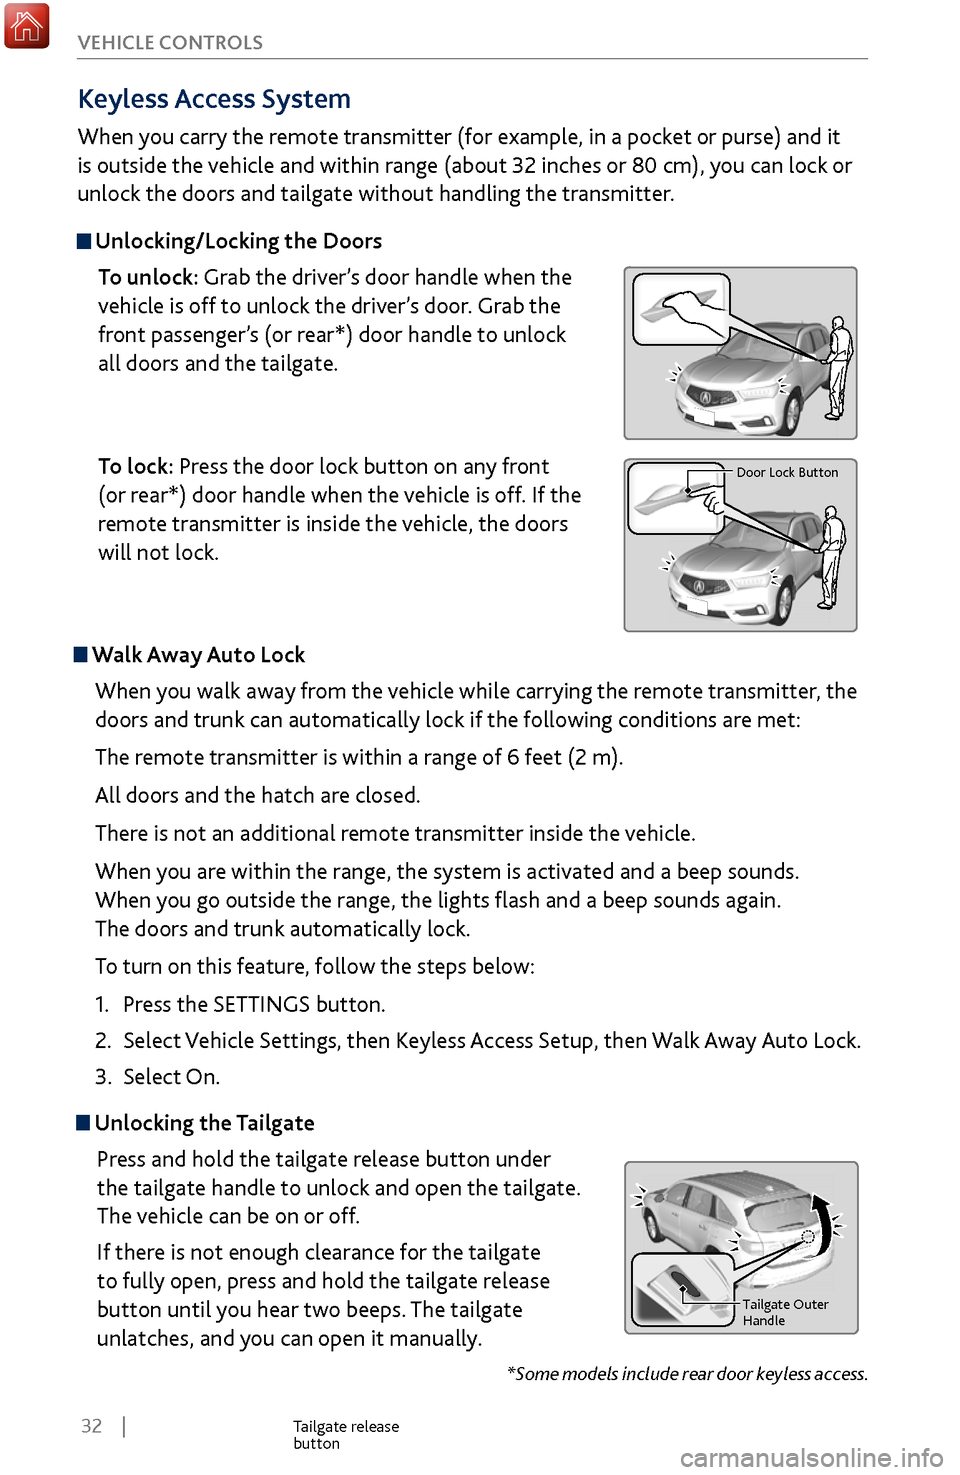
Unlocking the
Tailgate
Press and hold the tailgate release button under
the tailgate handle to unlock and open the tailgate.
The vehicle can be on or off.
If there is not enough clearance for the tailgate
to fully open, press and hold the tailgate release
button until you hear two beeps. The tailgate
unlatches, and you can open it manually.
Tailgate Outer Handl e
Tailgate release
button
Keyless Access System
When you carry the remote transmitter (for example, in a pocket or purse) and it
is outside the vehicle and within range (about 32 inches or 80 cm), you can lock or
unlock the doors and tailgate without handling the transmitter.
Unlocking/Locking the Doors
To unlock: Grab the driver’s door handle when the
vehicle is off to unlock the driver’s door. Grab the
front passenger’s (or rear*) door handle to unlock
all doors and the tailgate.
To lock: Press the door lock button on any front
(or rear*) door handle when the vehicle is off. If the
remote transmitter is inside the vehicle, the doors
will not lock.
Tailgate Outer Handl e
Door Lock Button
*Some models include rear door keyless access.
Walk Away Auto Lock
When you walk away from the vehicle while carrying the remote transmitter, the
doors and trunk can automatically lock if the following conditions are met:
The remote transmitter is within a range of 6 feet (2 m).
All doors and the hatch are closed.
There is not an additional remote transmitter inside the vehicle.
When you are within the range, the system is activated and a beep sounds.
When you go outside the range, the lights flash and a beep sounds again.
The doors and trunk automatically lock.
To turn on this feature, follow the steps below:
1.
Press the SETTINGS
button.
2.
Select Vehicle
Settings, then Keyless Access Setup, then Walk Away Auto Lock.
3.
Select On.
Page 42 of 170
| 35
V
EHICLE CONTROLS
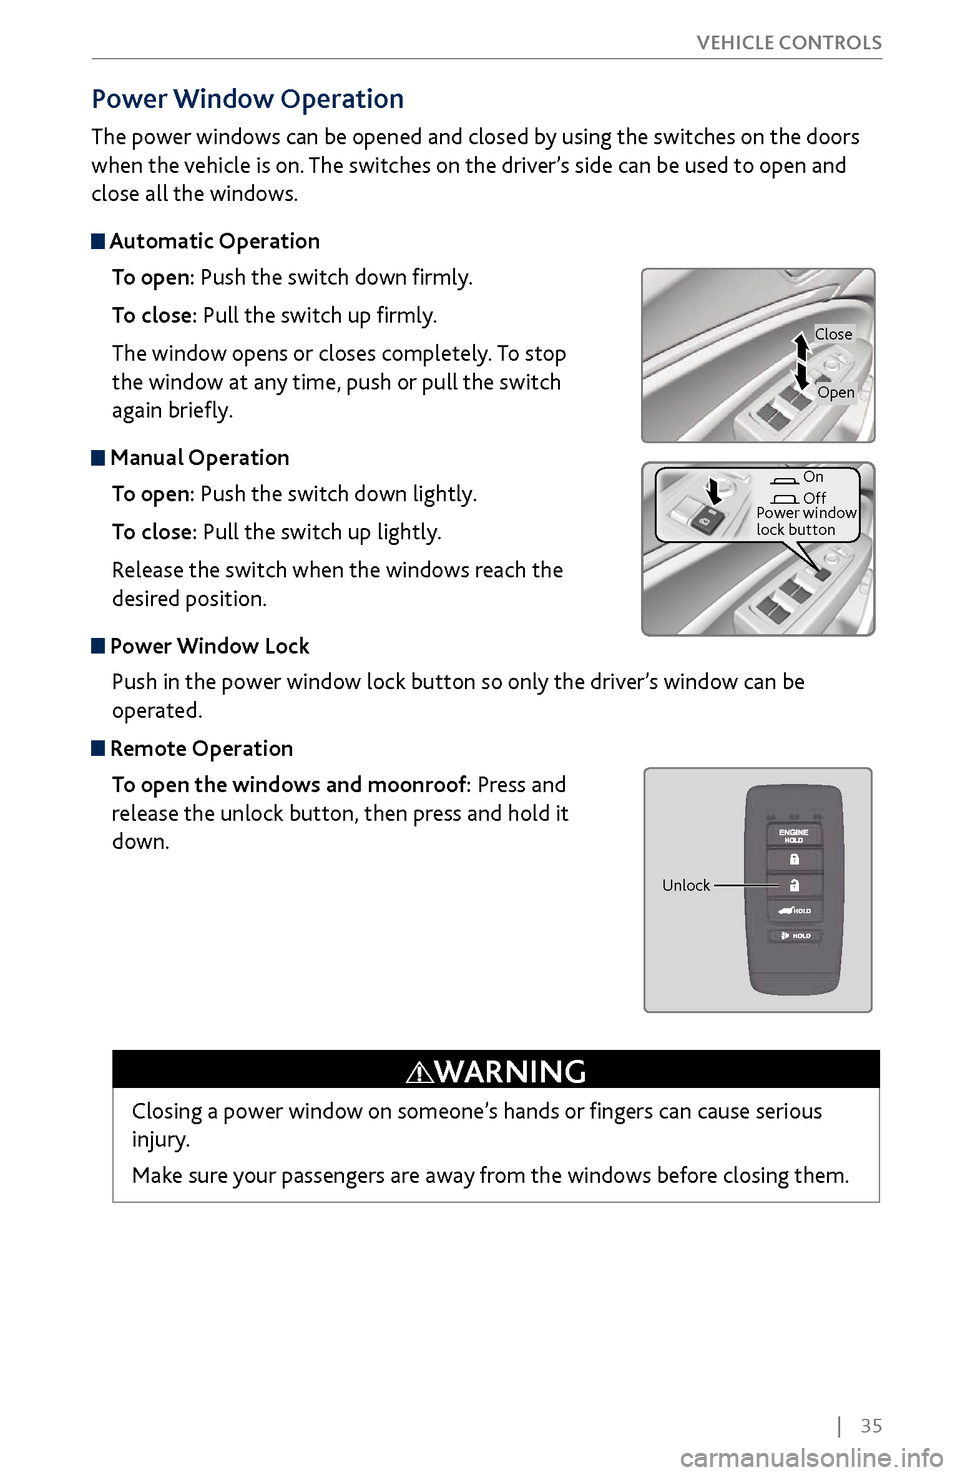
Power
Window Operation
The power windows can be opened and closed by using the switches on the doors
when the vehicle is on. The switches on the driver’s side can be used to open and
close all the windows.
Automatic Operation
To open: Push the switch down firmly.
To close: Pull the switch up firmly.
The window opens or closes completely. To stop
the window at any time, push or pull the switch
again briefly.
Manual OperationTo open: Push the switch down lightly.
To close: Pull the switch up lightly.
Release the switch when the windows reach the
desired position.
Power Window LockPush in the power window lock button so only the driver’s window can be
operated.
Remote OperationTo open the windows and moonroof: Press and
release the unlock button, then press and hold it
down.
Closing a power window on someone’s hands or fingers can cause serious
injury.
Make sure your passengers are away from the windows before closing them.
WARNING
Close
On
Off
Power window
lock button
Open
Unlock
Page 54 of 170
| 47
V
EHICLE CONTROLS
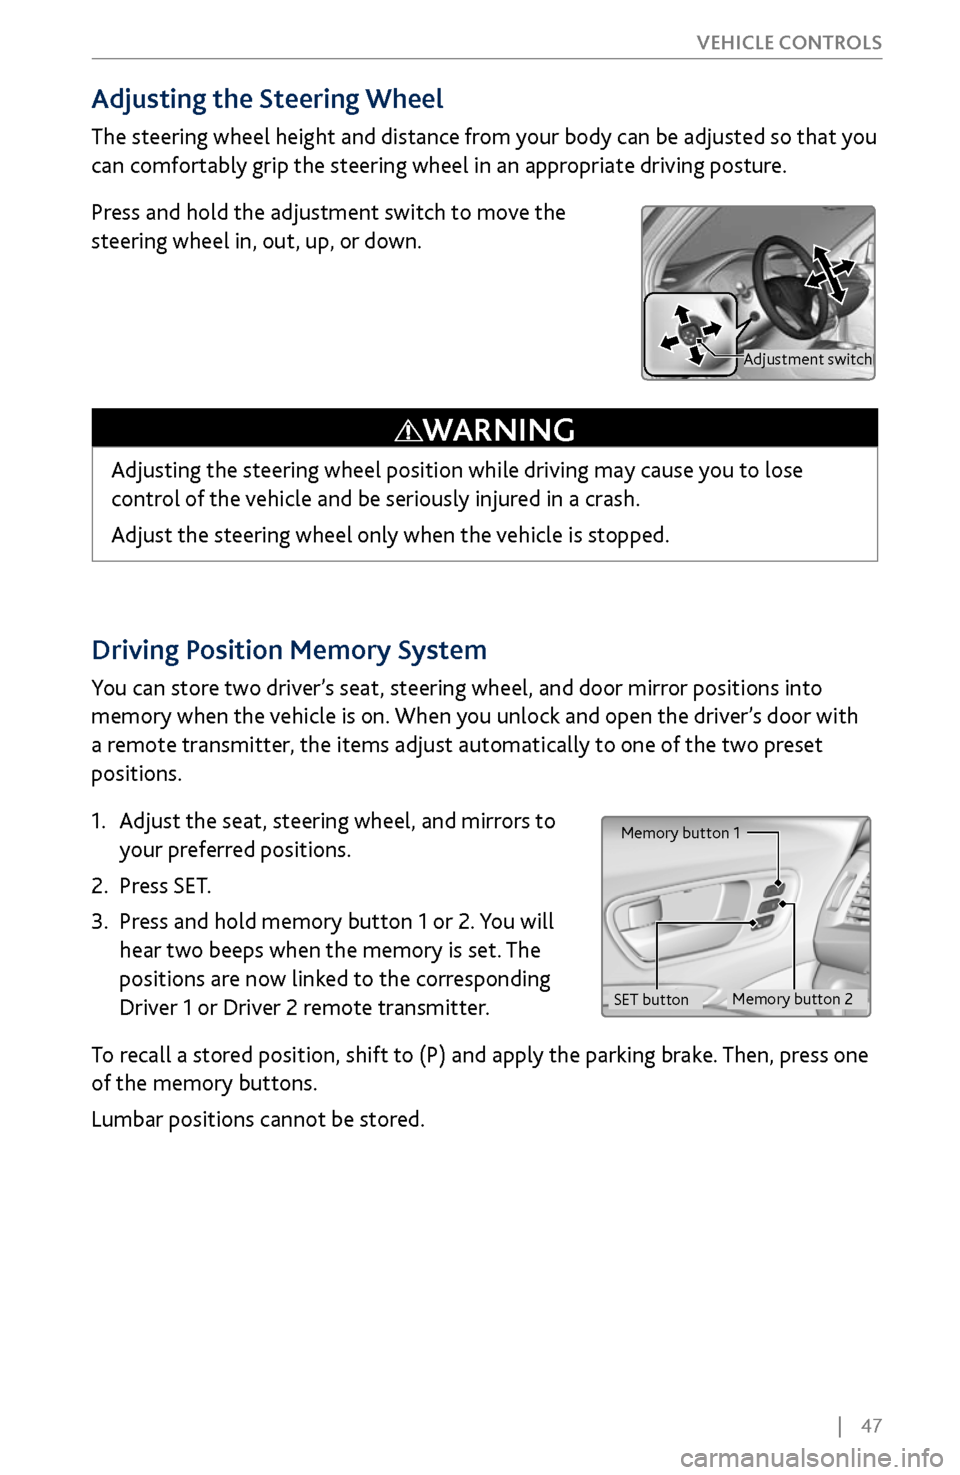
Driving Position Memory System
You can store two driver’s seat, steering wheel, and door mirror positions into
memory when the vehicle is on. When you unlock and open the driver’s door with
a remote transmitter, the items adjust automatically to one of the two preset
positions.
1.
Adjust the seat
, steering wheel, and mirrors to
your preferred positions.
2.
Press SET.
3.
Press and hold memory button 1 or 2.
You will
hear two beeps when the memory is set. The
positions are now linked to the corresponding
Driver 1 or Driver 2 remote transmitter.
To recall a stored position, shift to (P) and apply the parking brake. Then, press one
of the memory buttons.
Lumbar positions cannot be stored.
Memory button 1
Memory button 2
SET button
Adjusting the Steering Wheel
The steering wheel height and distance from your body can be adjusted so that you
can comfortably grip the steering wheel in an appropriate driving posture.
Press and hold the adjustment switch to move the
steering wheel in, out, up, or down.
Adjusting the steering wheel position while driving may cause you to lose
control of the vehicle and be seriously injured in a crash.
Adjust the steering wheel only when the vehicle is stopped.
WARNING
Adjustment switch
Page 57 of 170
50 |
V
EHICLE CONTROLS
HomeLink®
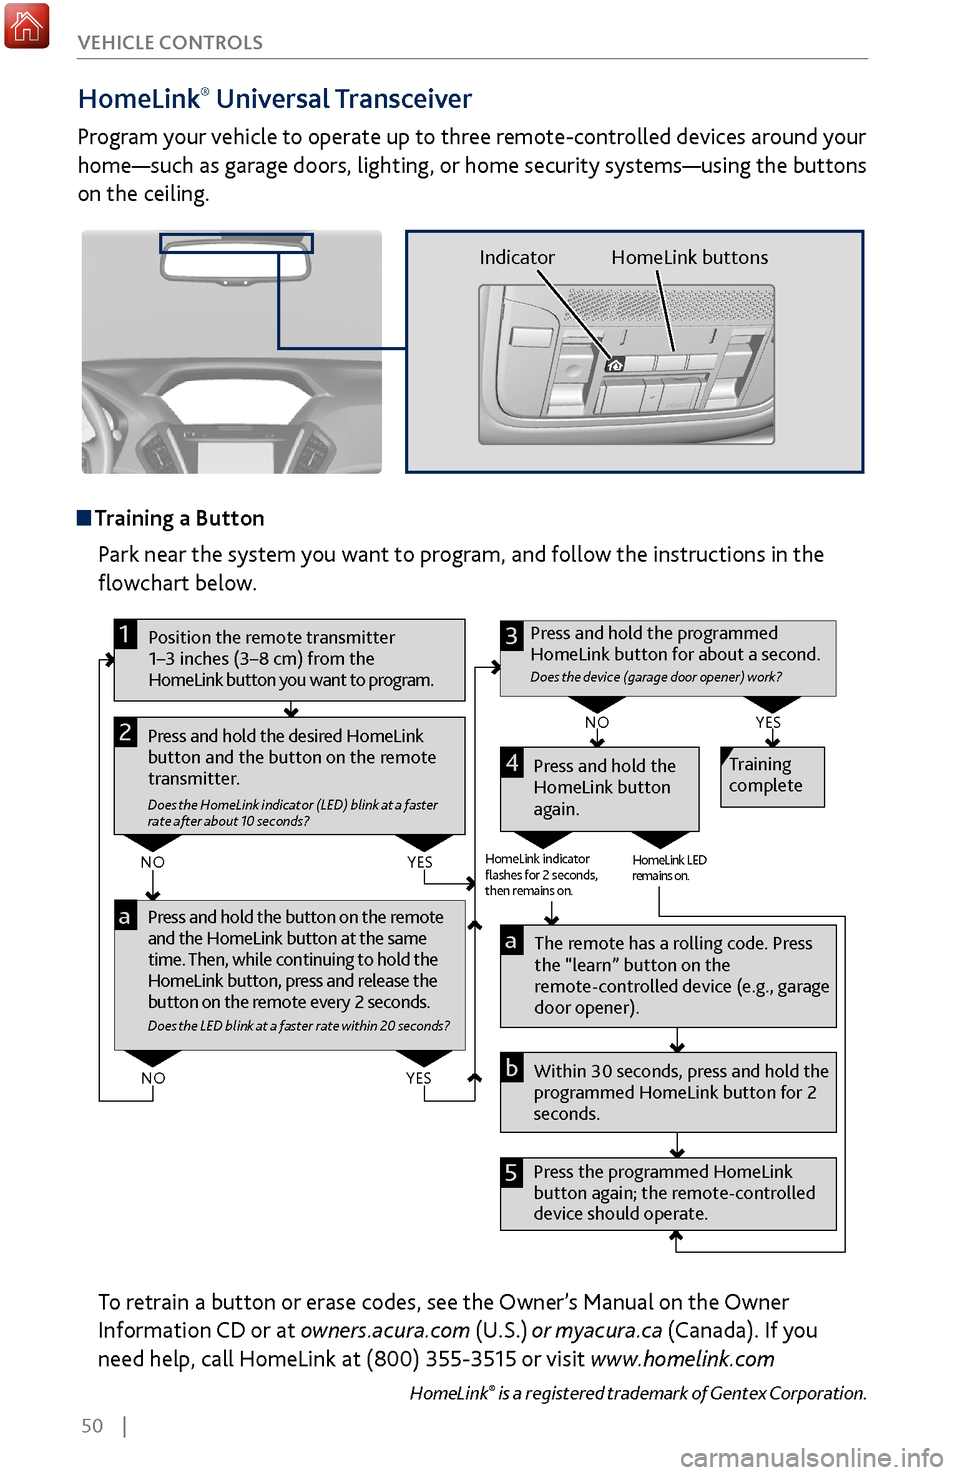
Universal Transceiver
Program your vehicle to operate up to three remote-controlled devices around your
home—such as garage doors, lighting, or home security systems—using the buttons
on the ceiling.
Training a Button
Park near the system you want to program, and follow the instructions in the
flowchart below.
Pr ess and hold the button on the r emote
and the HomeLink button at the same
time. Then, while continuing to hold the
HomeLink button, press and r elease the
button on the remote every 2 seconds.
Does the LED blink at a faster ra te within 20 seconds ?
Press and hold the
HomeLink button
again. Training
complete
YES
NO
HomeLink indicator
�ashes for 2 seconds,
then rem ains on. HomeLink LED
r
emains on.YES
NO
YES
NO
Position the remote transmitter
1–3 inches (3–8 cm) from the
HomeLink button you want to program.1
Press and hold the desired HomeLink
button and the button on the remote
transmitter.
Does the HomeLink indicator (LED) blink at a f aster
rate after about 10 seconds ?
2
a
The remote has a ro lling code. Press
the “learn” button on the
remote-controlled device (e.g., garage
door opener).
Press the programmed HomeLink
button again; the re mote-controlled
device should operate. Within 30 seconds, press and hold the
programmed HomeLink button for 2
seconds.a
Press and hold the programmed
HomeLink button for about a second.
Does the devic e (garage door opener) work ?
3
b
4
5
To retrain a button or erase codes, see the Owner’s Manual on the Owner
Information CD or at owners.acura.com (U.S.) or myacura.ca (Canada). If you
need help, call HomeLink at (800) 355-3515 or visit www.homelink.com
HomeLink® is a registered trademark of Gentex Corporation.
Indicator HomeLink buttons
Page 62 of 170
| 55
V
EHICLE CONTROLS
*if equipped
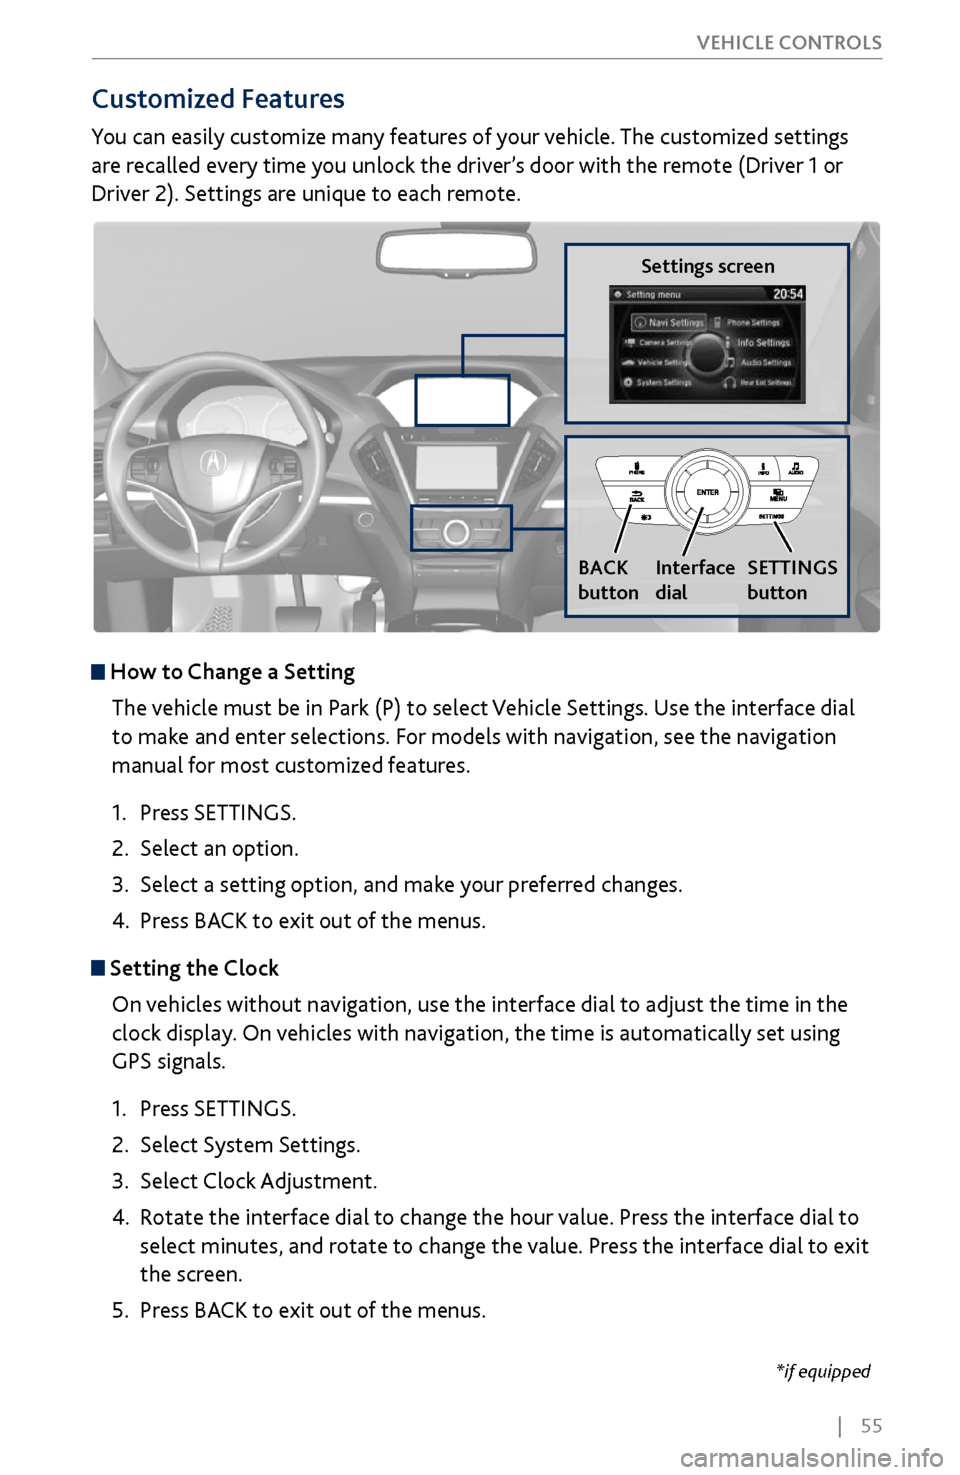
Customized Features
You can easily customize many features of your vehicle. The customized settings
are recalled every time you unlock the driver’s door with the remote (Driver 1 or
Driver 2). Settings are unique to each remote.
How to
Change a Setting
The vehicle must be in Park (P) to select Vehicle Settings. Use the interface dial
to make and enter selections. For models with navigation, see the navigation
manual for most customized features.
1.
Press SETTINGS.
2.
Select an option.
3.
Select a setting option, and make
your preferred changes.
4.
Press BA
CK to exit out of the menus.
Setting the Clock
On vehicles without navigation, use the interface dial to adjust the time in the
clock display. On vehicles with navigation, the time is automatically set using
GPS signals.
1.
Press SETTINGS.
2.
Select System Settings.
3.
Select Clock Adjustment
.
4.
Rotate the interface dial to
change the hour value. Press the interface dial to
select minutes, and rotate to change the value. Press the interface dial to exit
the screen.
5.
Press BA
CK to exit out of the menus.
Settings screen
BACK
button
Interface
dial SETTINGS
button
Page 75 of 170
68 |
AUDIO AND CONNECTIVITY
*if equipped
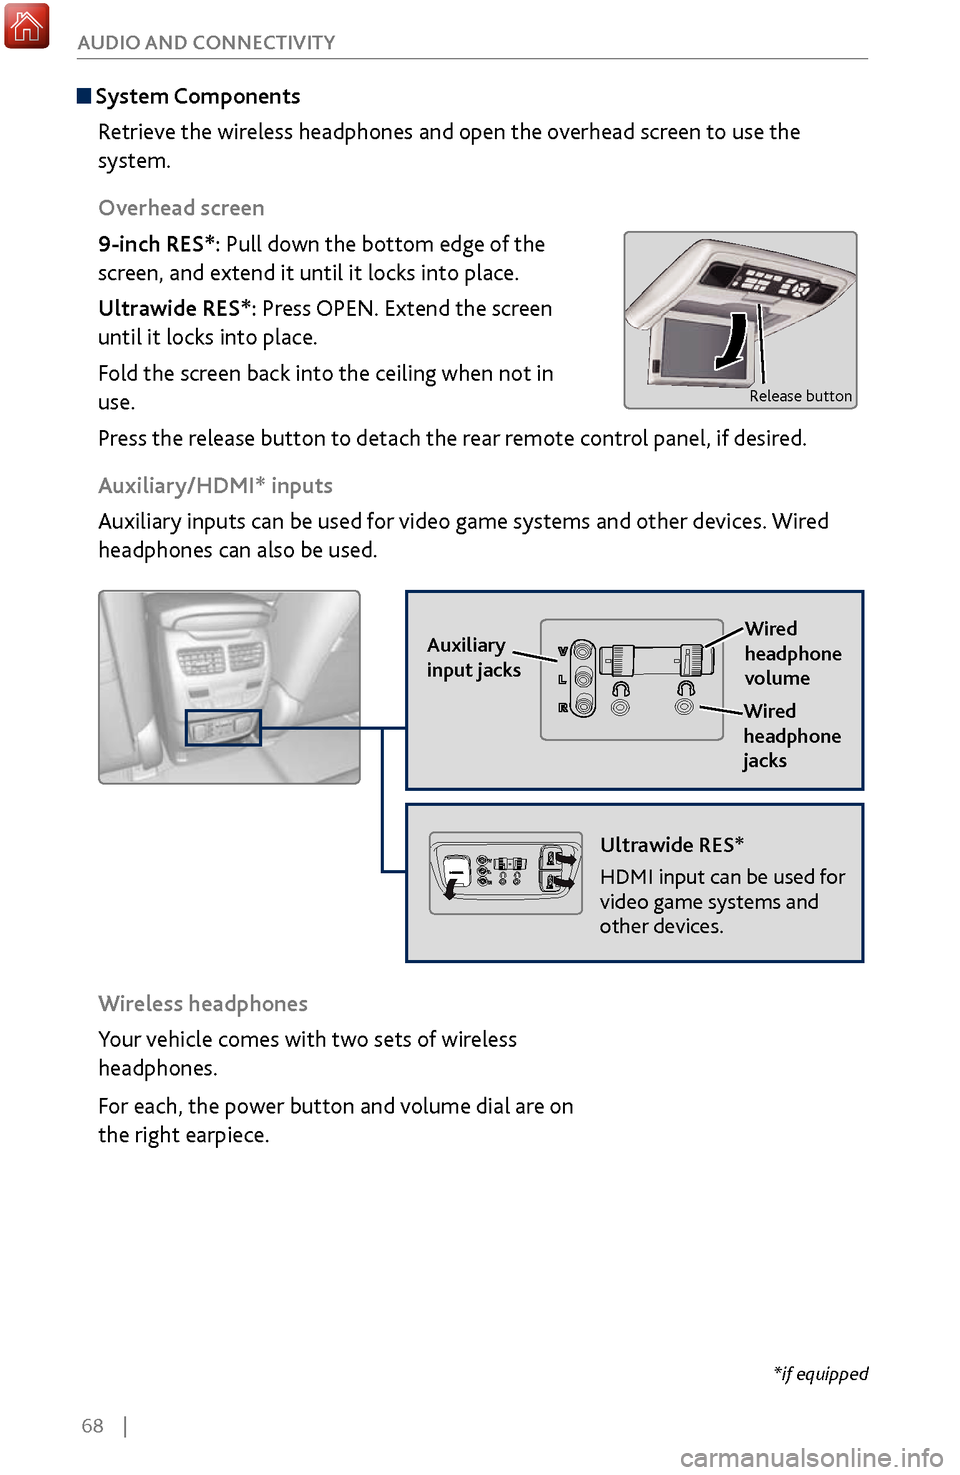
System Components
Retrieve the wireless headphones and open the overhead screen to use the
system.
Overhead screen
9-inch RES*: Pull down the bottom edge of the
screen, and extend it until it locks into place.
Ultrawide RES*: Press OPEN. Extend the screen
until it locks into place.
Fold the screen back into the ceiling when not in
use.
Press the release button to detach the rear remote control panel, if desired.
Auxiliary/HDMI* inputs
Auxiliary inputs can be used for video game systems and other devices. Wired
headphones can also be used.
Wireless headphones
Your vehicle comes with two sets of wireless
headphones.
For each, the power button and volume dial are on
the right earpiece.
Auxiliary
input jacks
Release button
Ultrawide RES*
HDMI input can be used for
video game systems and
other devices.
Wired
headphone
volume
Wired
headphone
jacks
Page 76 of 170
| 69
AUDIO AND CONNECTIVITY
1. Make sure REAR POWER is turned on in the front audio controls.
2.
From
the rear control panel, press the desired audio source button (or the
SOURCE button for Ultrawide RES).
3.
Press the arr
ow/ENTER buttons to highlight options on the screen and select
them. Use the other rear control panel buttons to operate the system.
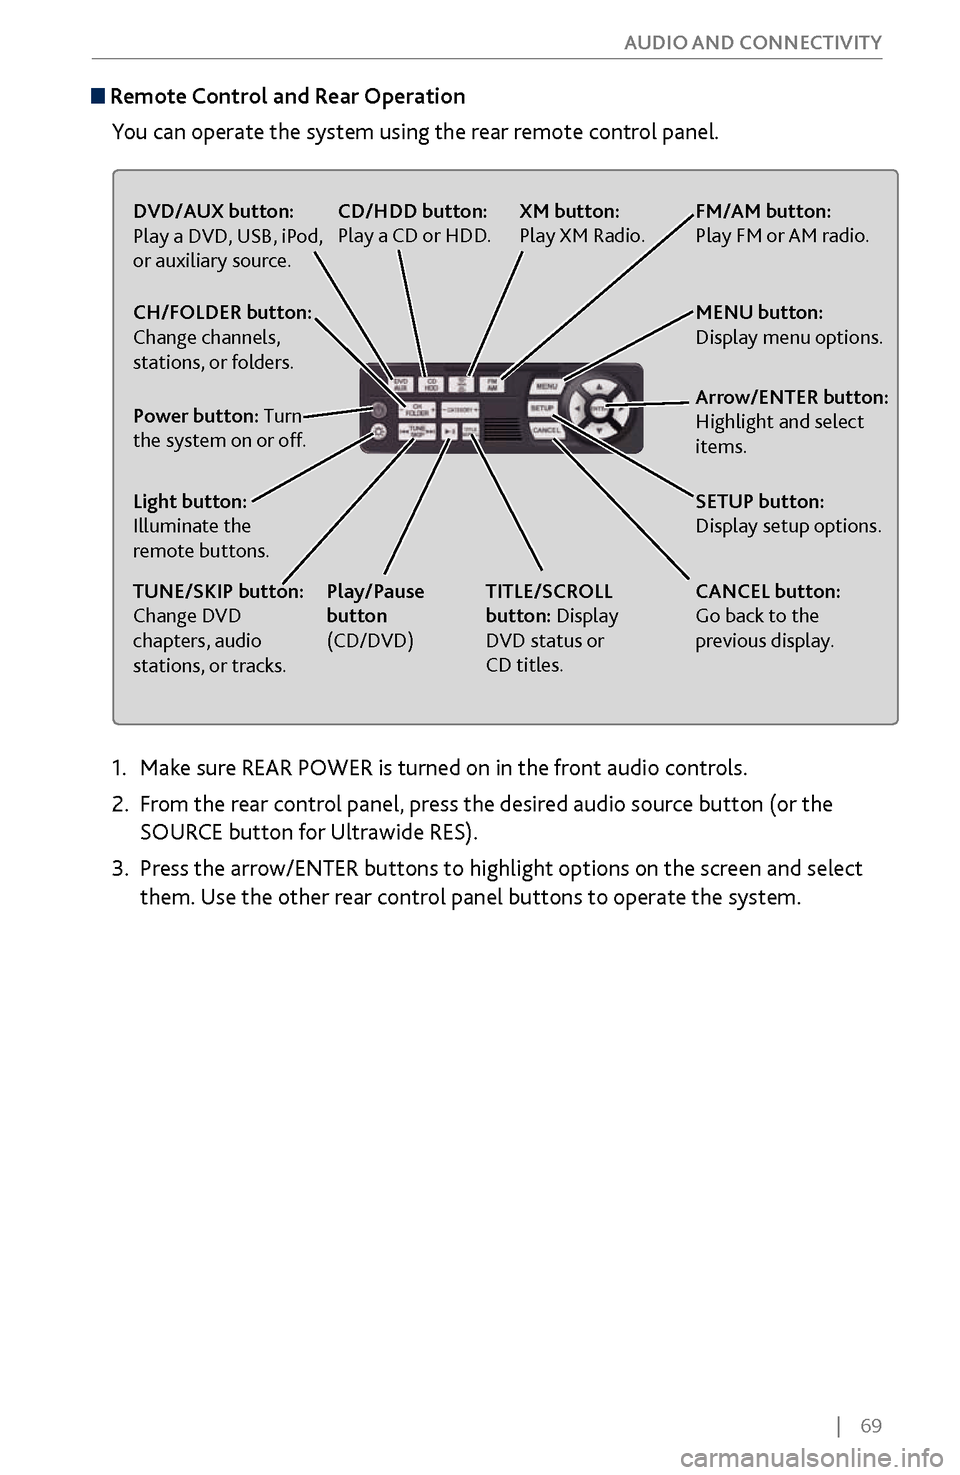
Remote Control and Rear Operation
You can operate the system using the rear remote control panel.
DVD/AUX button:
Play a DVD, USB, iPod,
or auxiliary source.
TUNE/SKIP button:
Change DVD
chapters, audio
stations, or tracks. TITLE/SCROLL
button: Display
DVD status or
CD titles.
Play/Pause
button
(CD/DVD)
Power button: Turn
the system on or off. CH/FOLDER button:
Change channels,
stations, or folders.
Light button:
Illuminate the
remote buttons.
CANCEL button:
Go back to the
previous display.
CD/HDD button:
Play a CD or HDD.
XM button:
Play XM Radio.FM/AM button:
Play FM or AM radio.
MENU button:
Display menu options.
SETUP button:
Display setup options. Arrow/ENTER button:
Highlight and select
items.