mirror Acura MDX 2017 Owner's Guide
[x] Cancel search | Manufacturer: ACURA, Model Year: 2017, Model line: MDX, Model: Acura MDX 2017Pages: 170, PDF Size: 12.43 MB
Page 6 of 170
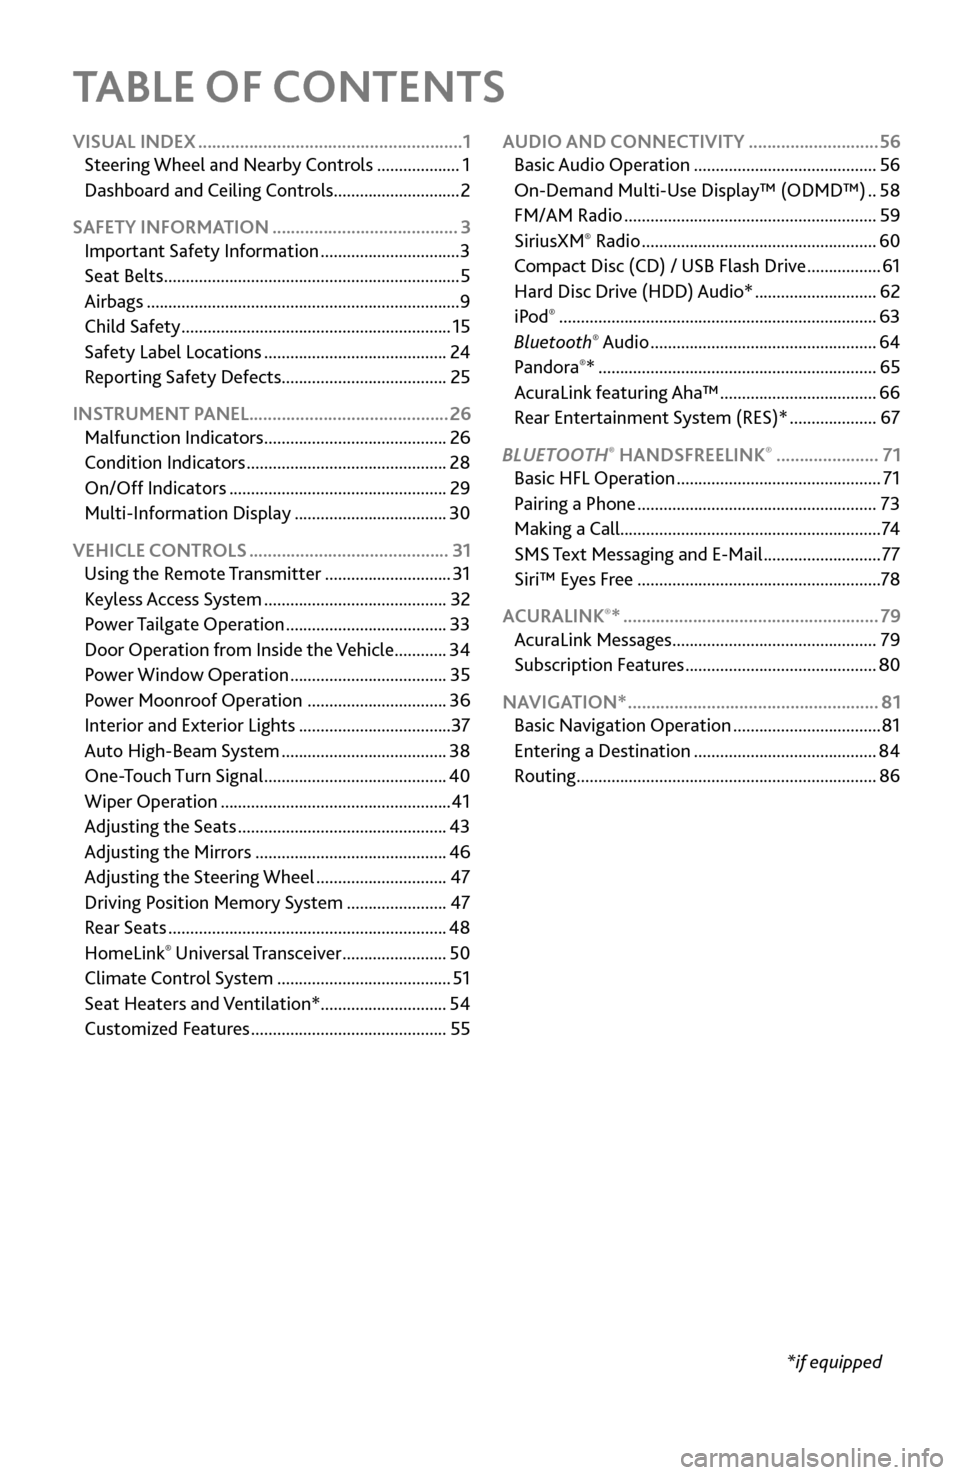
TABLE OF CONTENTS
*if equipped
VISUAL INDEX
.........................................................
1
Steering Wheel and Nearb
y Controls
...................
1
Dashboard
and Ceiling Controls
.............................
2
SAFETY INFORMATION
........................................ 3
Important Safety Information ................................ 3
Seat Belts .................................................................... 5
Airbags ........................................................................\
9
Child Safety .............................................................. 15
Safety Label Locations .......................................... 24
Reporting Safety
Defects...................................... 25
INSTRUMENT PANEL........................................... 26 Malfunction Indicators
.......................................... 26
Condition Indicators .............................................. 28
On/Off Indicators .................................................. 29
Multi-Information Display ................................... 30
VEHICLE CONTROLS
........................................... 31
Using the
Remote Transmitter
.............................
31
Keyless A
ccess System
..........................................
32
Power T
ailgate Operation
.....................................
33
Door Operation
from Inside the Vehicle
............
34
Power Window
Operation
....................................
35
Power
Moonroof Operation
................................
36
Interior and Exterior Lights ................................... 37
Auto High-Beam S
ystem
......................................
38
One-T
ouch Turn Signal
..........................................
40
Wiper Operation ..................................................... 41
Adjusting
the Seats
................................................
43
Adjusting the
Mirrors
............................................
46
Adjusting
the Steering Wheel
..............................
47
Driving Position Memory
System
.......................
47
Rear Seats ................................................................ 48
HomeLink® Universal Transceiver ........................ 50
Climate Control System ........................................ 51
Seat Heaters and V
entilation*............................. 54
Customized Features
............................................. 55AUDIO AND CONNECTIVITY
............................
56
Basic Audio Operation .......................................... 56
On-Demand Multi-Use Display™ (ODMD™) .. 58
FM/AM Radio .......................................................... 59
SiriusXM® Radio ...................................................... 60
Compact Disc (CD) / USB Flash Driv e .................61
Hard Disc Driv
e (HDD) Audio*
............................ 62
iPod® ........................................................................\
. 63
Bluetooth® Audio .................................................... 64
Pandora®* ................................................................ 65
AcuraLink featuring Aha™ .................................... 66
Rear Entertainment
System (RES)*
.................... 67
BLUET
OOTH
® HANDSFREELINK® ...................... 71
Basic HFL Operation ............................................... 71
Pairing a Phone ....................................................... 73
Making a Call ............................................................ 74
SMS
Text Messaging and E-Mail
........................... 77
Siri™ Eyes F
ree
........................................................ 78
ACURALINK
®* ....................................................... 79
AcuraLink Messages ............................................... 79
Subscription Featur
es
............................................ 80
NAVIGA
TION*
...................................................... 81
Basic Navigation Operation .................................. 81
Entering a Destination .......................................... 84
Routing ..................................................................... 86
Page 9 of 170
2 |
V
ISUAL INDEX
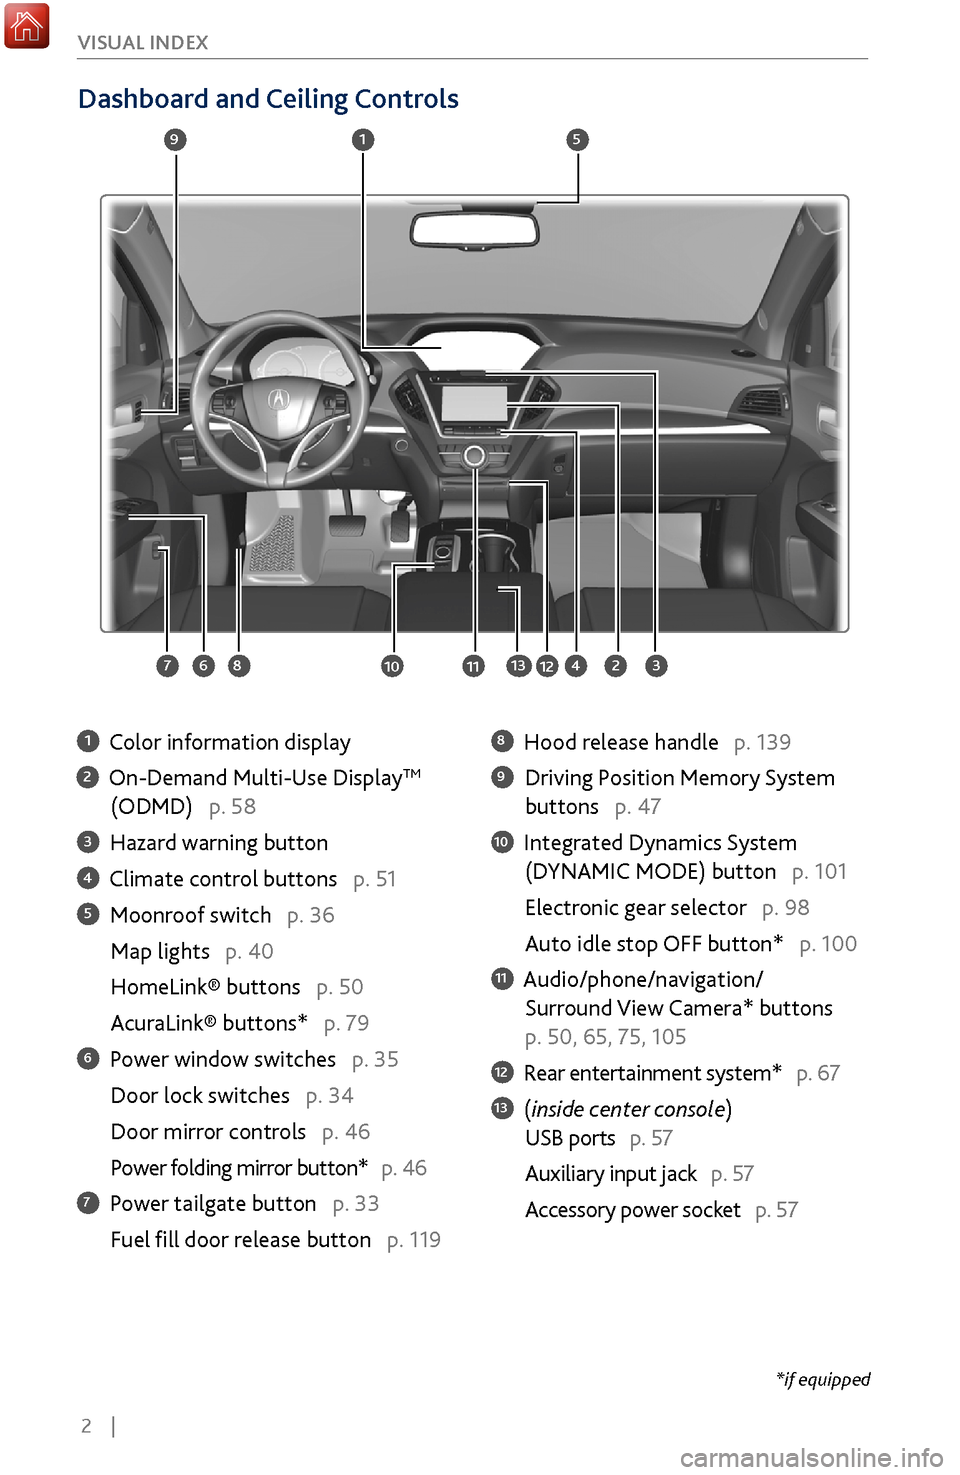
Dashboard and Ceiling Controls
1 Color information display
2 On-Demand Multi-Use DisplayTM
(ODMD) p. 58
3 Hazard warning button
4 Climate control buttons p. 51
5 Moonroof switch p. 36
Map lights p. 40
HomeLink® buttons p. 50
AcuraLink® buttons* p. 79
6 Power window switches p. 35
Door lock switches p. 34
Door mirror controls
p. 46
Power folding mirr
or button* p. 46
7 Power tailgate button p. 33
Fuel fill door r
elease button p. 119
8 Hood release handle p. 139
9 Driving Position Memory System
buttons p. 47
10 Integrated Dynamics System
(D
YNAMIC MODE) button p. 101
Electronic gear selector p. 98
Auto idle stop OFF button* p. 100
11 Audio/phone/navigation/
Surround View Camera*
buttons
p. 50, 65, 75, 105
12 Rear entertainment system* p. 67
13 (inside center console)
USB ports p. 57
Auxiliary input jack p. 57
Accessory power socket
p. 57
1
2834
5
67
9
101112
*if equipped
13
Page 53 of 170
46 |
V
EHICLE CONTROLS
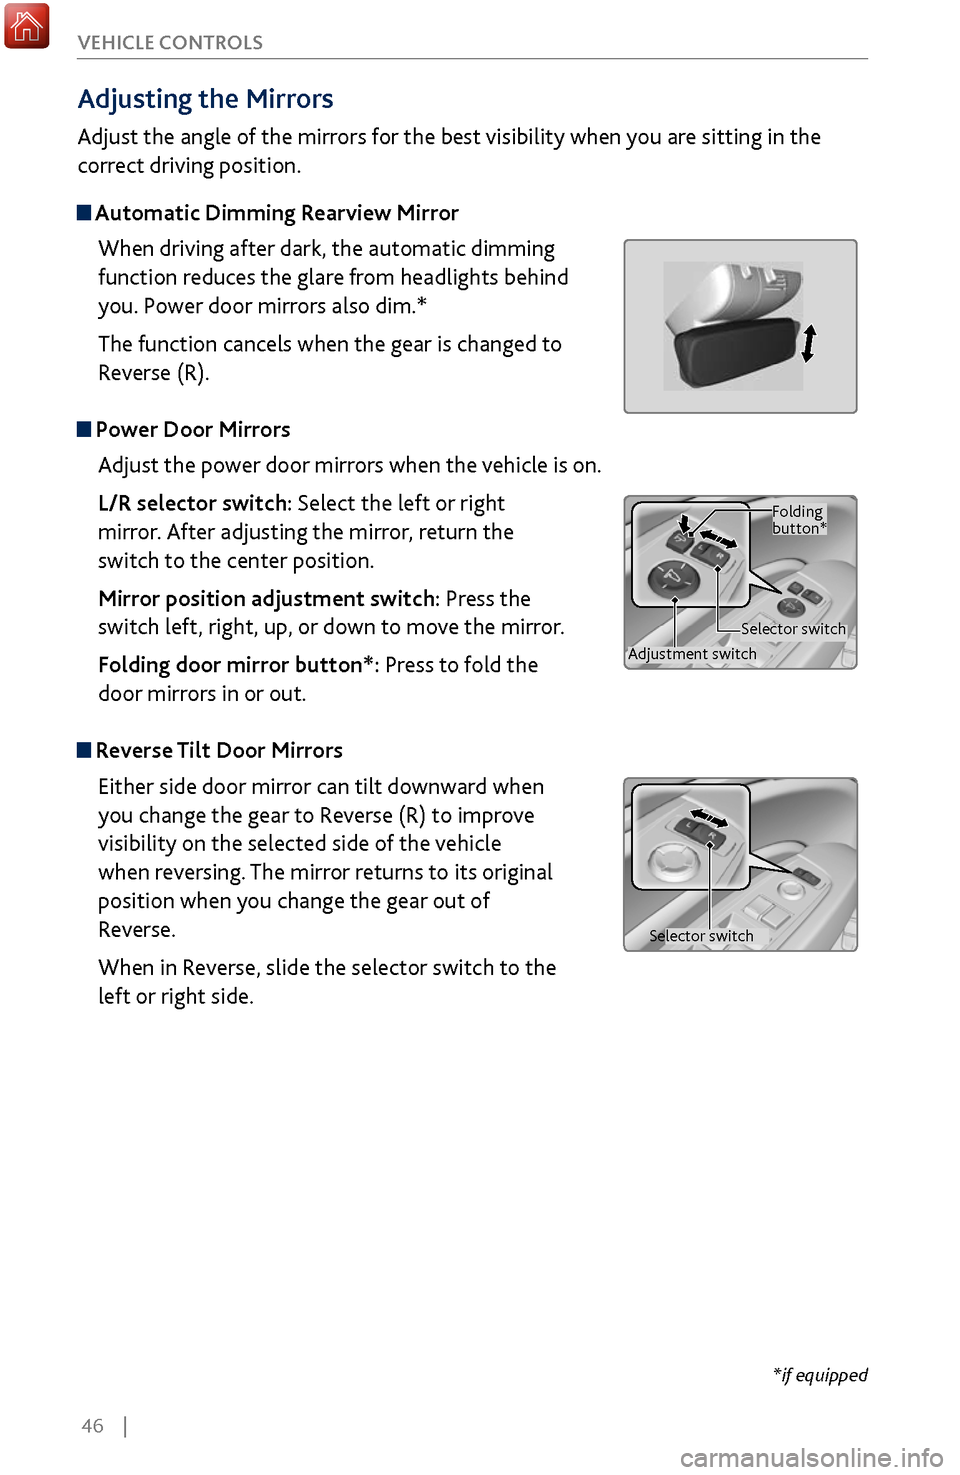
Adjusting the
Mirrors
Adjust the angle of the mirrors for the best visibility when you are sitting in the
correct driving position.
Automatic Dimming Rearview Mirror
When driving after dark, the automatic dimming
function reduces the glare from headlights behind
you. Power door mirrors also dim.*
The function cancels when the gear is changed to
Reverse (R).
Power Door MirrorsAdjust the power door mirrors when the vehicle is on.
L/R selector switch: Select the left or right
mirror. After adjusting the mirror, return the
switch to the center position.
Mirror position adjustment switch: Press the
switch left, right, up, or down to move the mirror.
Folding door mirror button*: Press to fold the
door mirrors in or out.
Reverse Tilt Door MirrorsEither side door mirror can tilt downward when
you change the gear to Reverse (R) to improve
visibility on the selected side of the vehicle
when reversing. The mirror returns to its original
position when you change the gear out of
Reverse.
When in Reverse, slide the selector switch to the
left or right side.
*if equipped
Adjustment switch Selector switchFolding
button*
Selector switch
Page 54 of 170
| 47
V
EHICLE CONTROLS
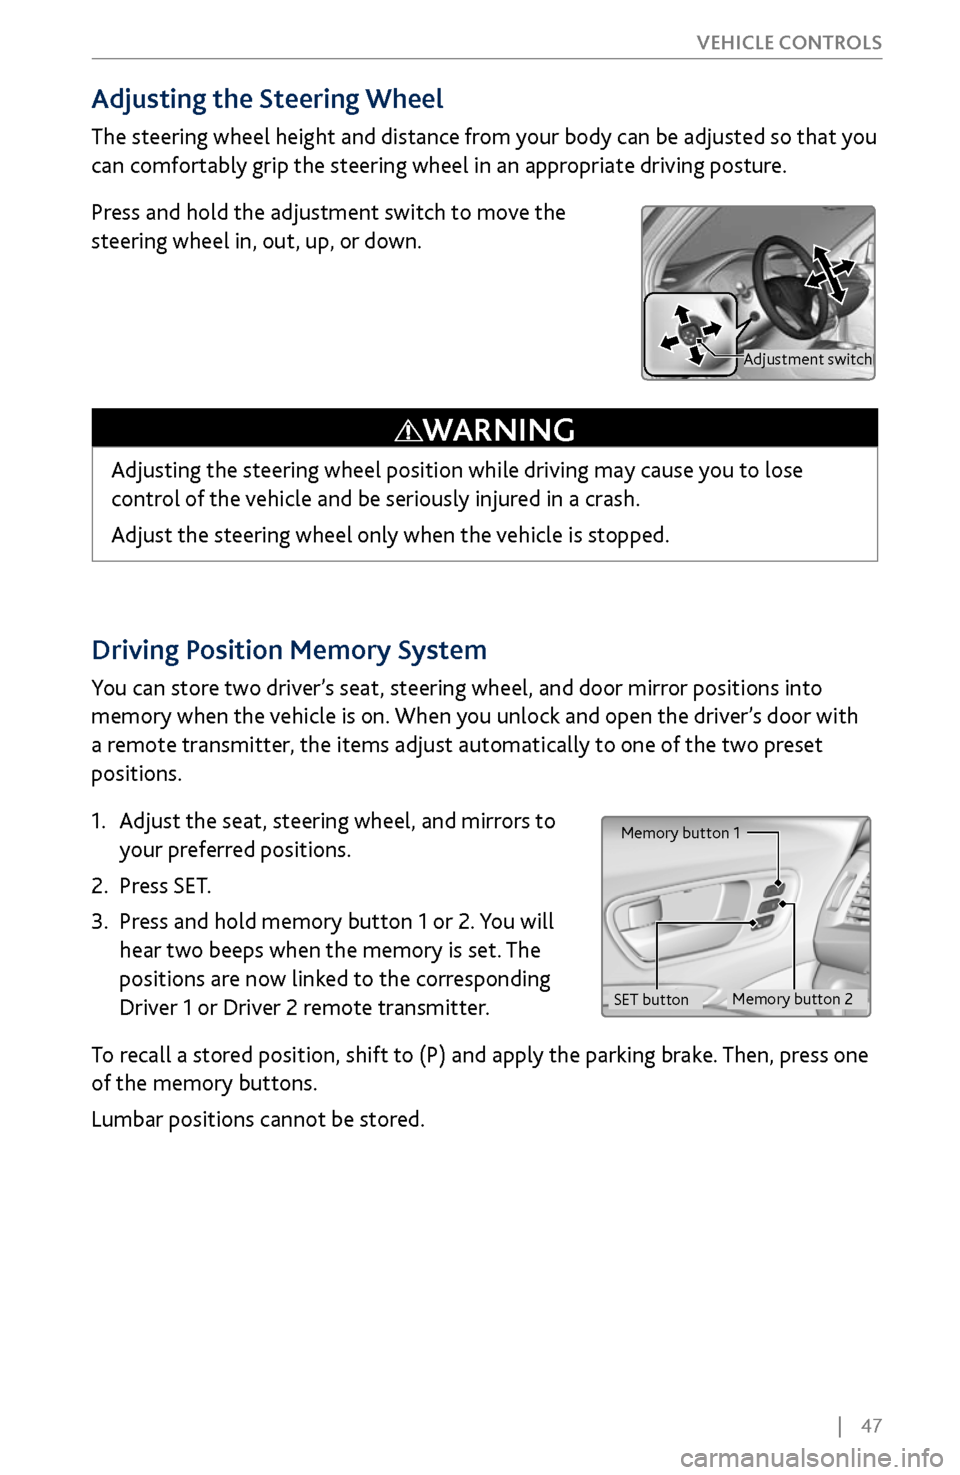
Driving Position Memory System
You can store two driver’s seat, steering wheel, and door mirror positions into
memory when the vehicle is on. When you unlock and open the driver’s door with
a remote transmitter, the items adjust automatically to one of the two preset
positions.
1.
Adjust the seat
, steering wheel, and mirrors to
your preferred positions.
2.
Press SET.
3.
Press and hold memory button 1 or 2.
You will
hear two beeps when the memory is set. The
positions are now linked to the corresponding
Driver 1 or Driver 2 remote transmitter.
To recall a stored position, shift to (P) and apply the parking brake. Then, press one
of the memory buttons.
Lumbar positions cannot be stored.
Memory button 1
Memory button 2
SET button
Adjusting the Steering Wheel
The steering wheel height and distance from your body can be adjusted so that you
can comfortably grip the steering wheel in an appropriate driving posture.
Press and hold the adjustment switch to move the
steering wheel in, out, up, or down.
Adjusting the steering wheel position while driving may cause you to lose
control of the vehicle and be seriously injured in a crash.
Adjust the steering wheel only when the vehicle is stopped.
WARNING
Adjustment switch
Page 58 of 170
| 51
V
EHICLE CONTROLS
Climate Control System
Set your preferred interior temperature by selecting the proper mix of heated or
cooled air and fan speed.
Front Operation
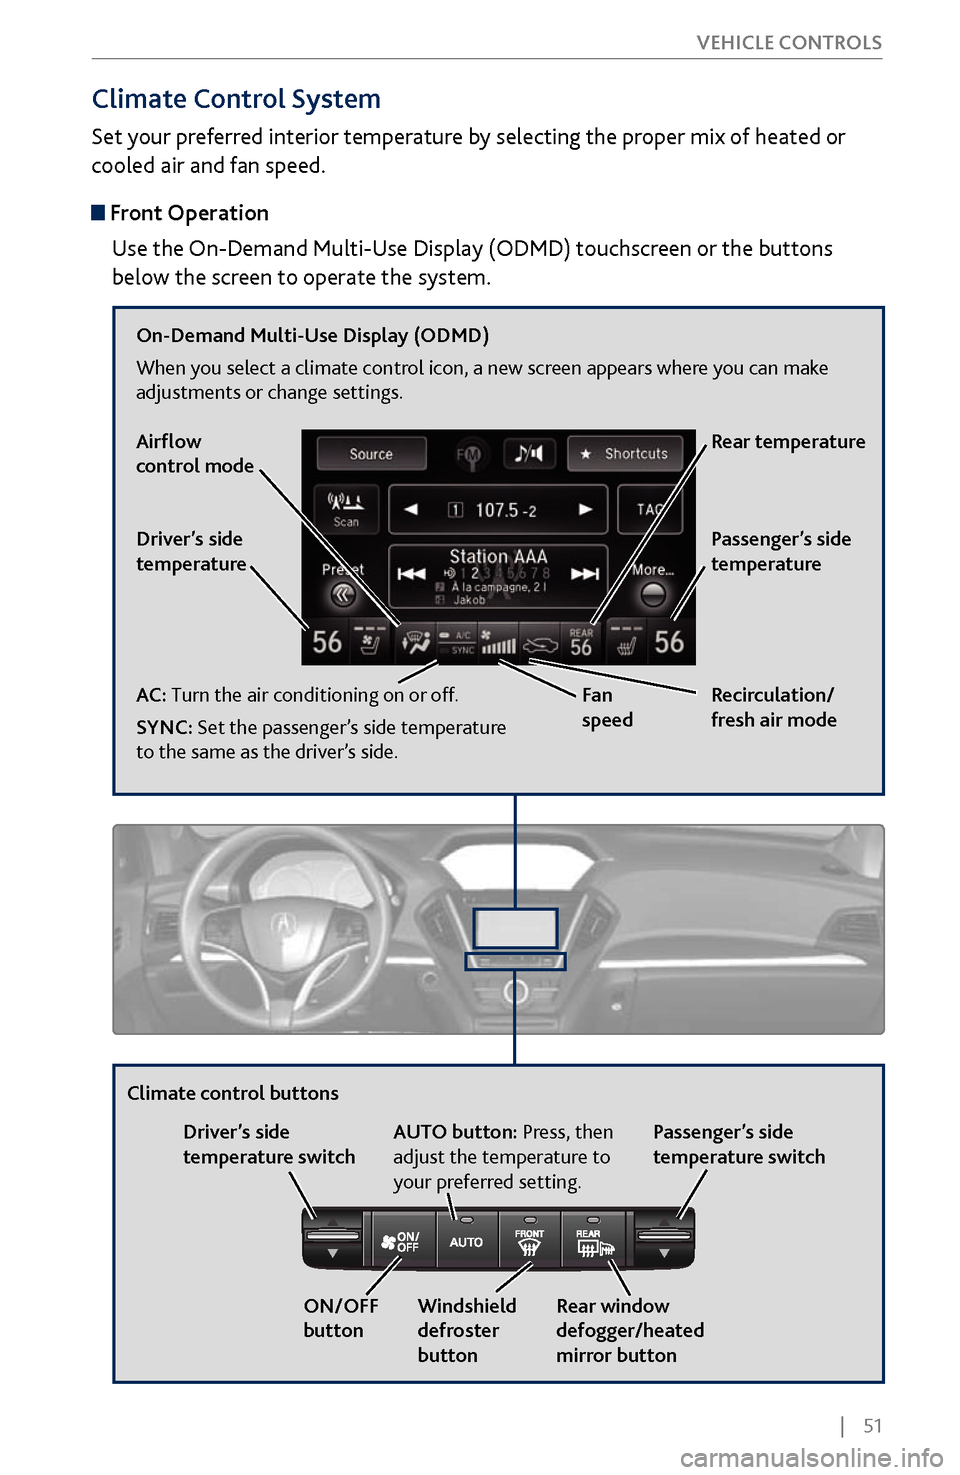
Use the On-Demand Multi-Use Display (ODMD) touchscreen or the buttons
below the screen to operate the system.
Recirculation/
fresh air mode
Driver’s side
temperature
On-Demand Multi-Use Display (ODMD)
When you select a climate control icon, a new screen appears where you can make
adjustments or change settings.
Airflow
control mode
AC: Turn the air conditioning on or off.
SYNC: Set the passenger’s side temperature
to the same as the driver’s side.
Fan
speedRear temperature
Passenger’s side
temperature
Windshield
defroster
button
Driver’s side
temperature switch
Climate control buttons
ON/OFF
buttonAUTO button: Press, then
adjust the temperature to
your preferred setting.
Rear window
defogger/heated
mirror buttonPassenger’s side
temperature switch
Page 95 of 170
88 |
DRIVING
Learn about preparation for driving, as well as other features.
Before Driving
Check the following items before you begin driving.
Exterior Checks
•
Make sur
e there are no obstructions on the windows, door mirrors, exterior
lights, or other parts of the vehicle.
•
Remov
e any frost, snow, or ice.
•
Make sure
the hood is securely closed.
•
Heat from
the engine and exhaust can ignite flammable materials left under
the hood, causing a fire. If you’ve parked your vehicle for an extended period,
inspect and remove any debris that may have collected, such as dried grass
and leaves that have fallen or have been carried in for use as a nest by a small
animal. Also check under the hood for leftover flammable materials after you
or someone else has performed maintenance on your vehicle.
•
Make sure
the tires are in good condition.
•
Make sure
there are no people or objects behind or around the vehicle.
DRIVING
Interior Checks•
Store or secur
e all items on board properly.
•
Do not pile items higher than the seat height
.
•
Do not place anything in the
front seat footwells. Make sure to secure the floor
mats.
•
If you hav
e any animals on board, do not let them move freely in the vehicle.
•
Securely close and lock all
doors and the tailgate.
•
Adjust y
our seating position, mirrors, and steering wheel properly.
•
Make sure items placed
on the floor behind the front seats cannot roll under
the seats.
•
Everyone in
the vehicle must fasten their seat belt.
•
Make sure
that the indicators in the instrument panel come on when you start
the vehicle, and go off soon after.
If the doors are frozen shut, use warm water around the door edges to melt any
ice. Do not try to force them open, as this can damage the rubber trim around the
doors. When done, wipe dry to avoid further freezing.
NOTICE
Page 120 of 170
| 113
DRIVING
Blind Spot Information (BSI)*
Alerts you to a detected vehicle in your left or right blind spot while driving 20 mph
(32 km/h) or higher.
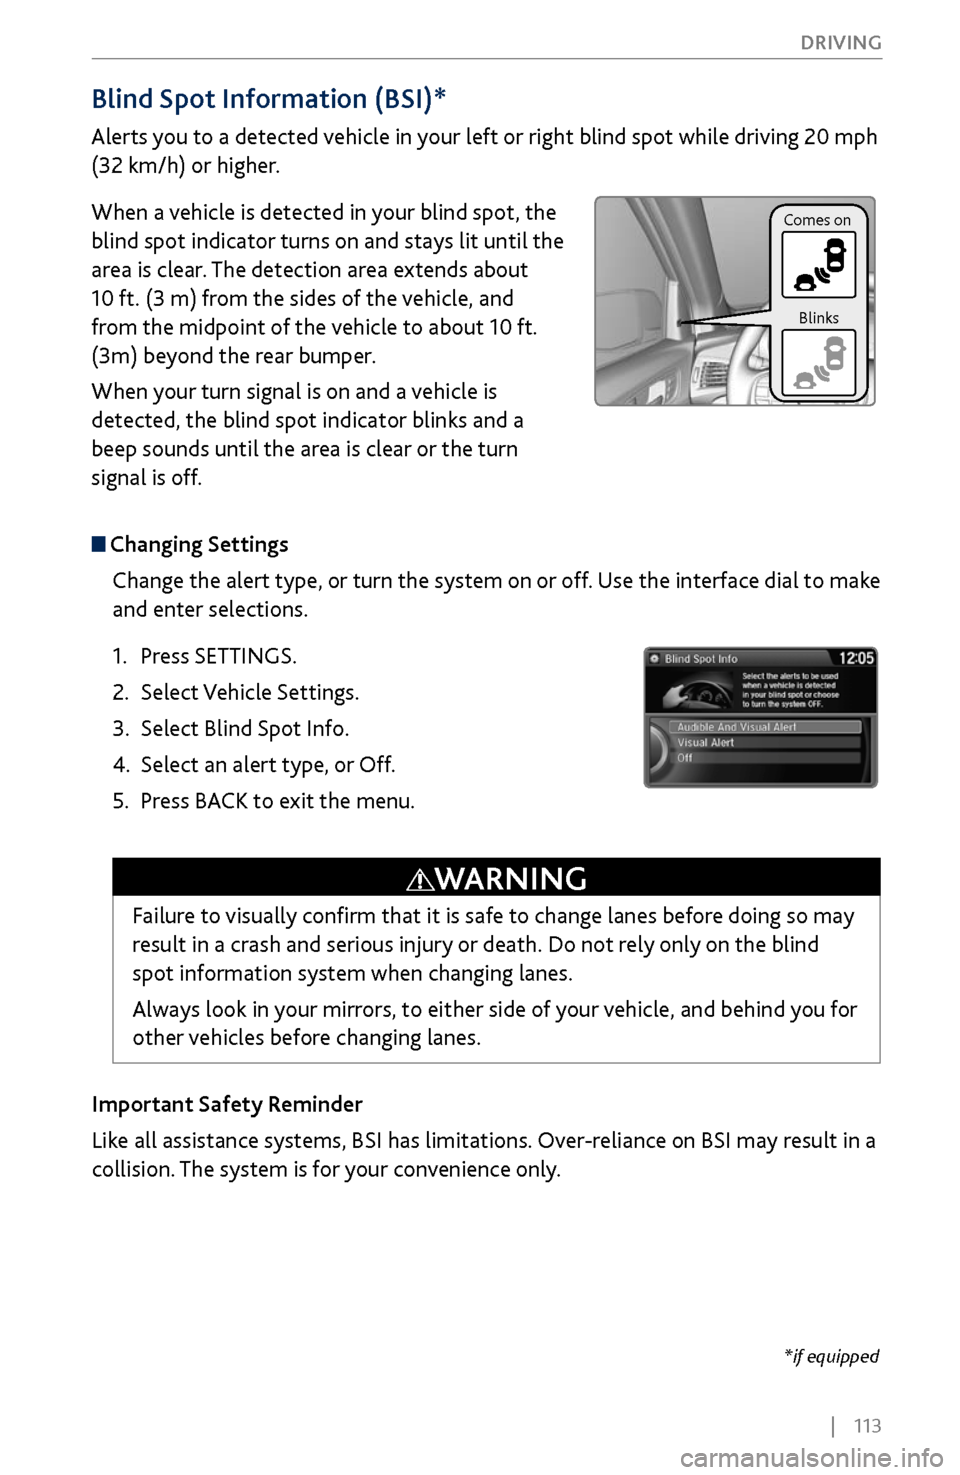
When a vehicle is detected in your blind spot, the
blind spot indicator turns on and stays lit until the
area is clear. The detection area extends about
10
ft. (3 m) fr
om the sides of the vehicle, and
from the midpoint of the vehicle to about 10 ft.
(3m) beyond the rear bumper.
When your turn signal is on and a vehicle is
detected, the blind spot indicator blinks and a
beep sounds until the area is clear or the turn
signal is off.
Changing Settings
Change the alert type, or turn the system on or off. Use the interface dial to make
and enter selections.
1.
Press SETTINGS.
2.
Select Vehicle Settings.
3.
Select Blind Spot Info.
4.
Select an alert type, or
Off.
5.
Press BACK
to exit the menu.
Important Safety Reminder
Like all assistance systems, BSI has limitations. Over-reliance on BSI may result in a
collision. The system is for your convenience only.
Failure to visually confirm that it is safe to change lanes before doing so may
result in a crash and serious injury or death. Do not rely only on the blind
spot information system when changing lanes.
Always look in your mirrors, to either side of your vehicle, and behind you for
other vehicles before changing lanes.
WARNING
Comes on Blinks
*if equipped
Page 123 of 170
116 |
DRIVING
Cross Traffic Monitor*
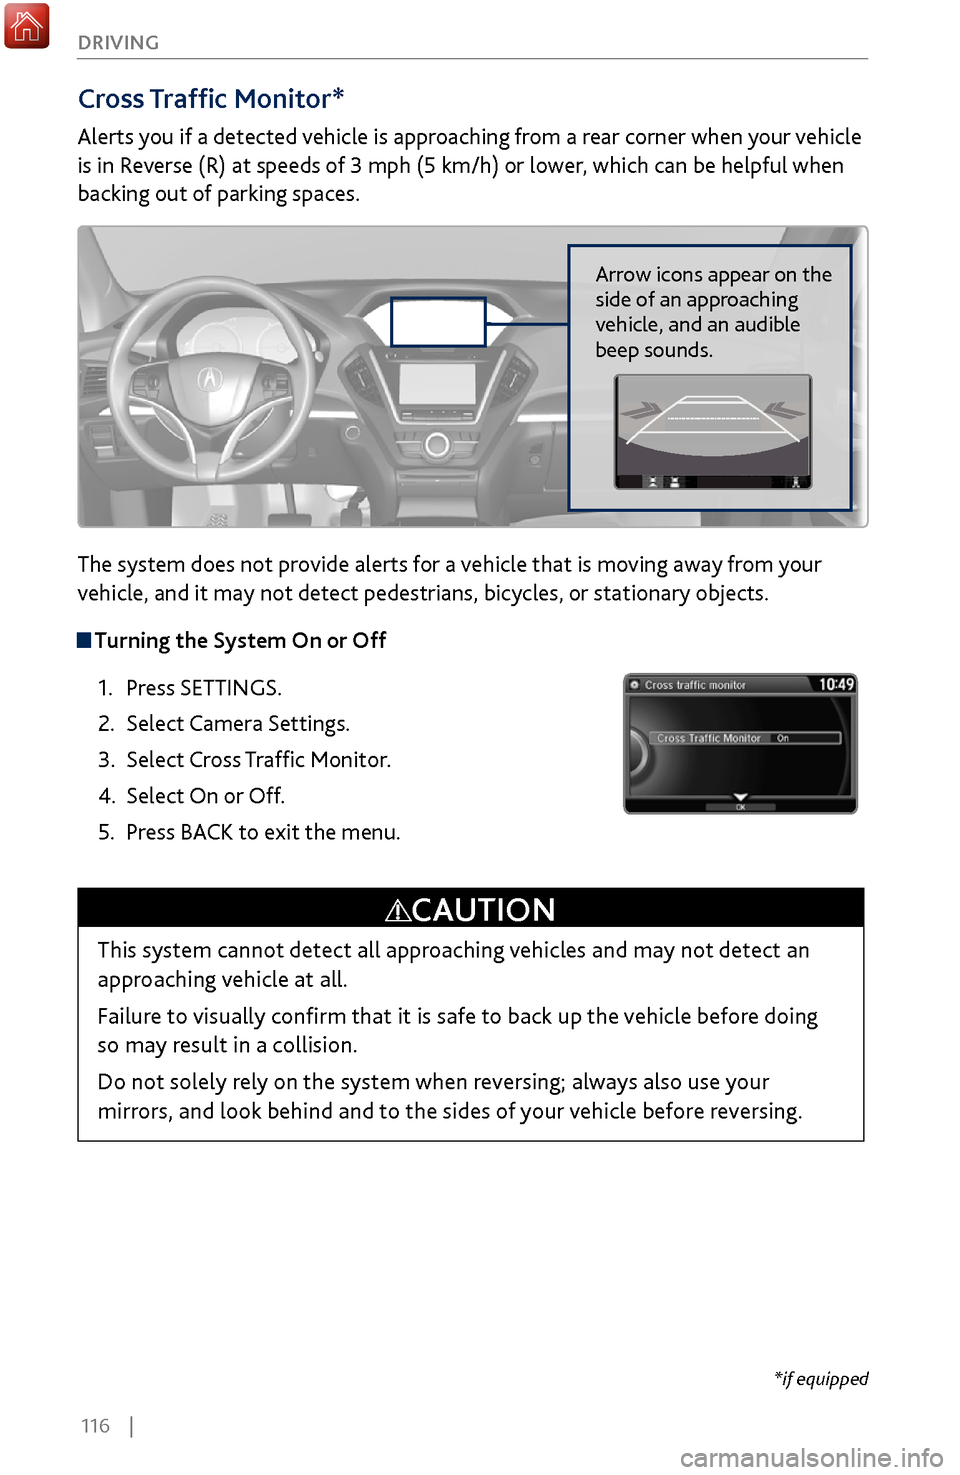
Alerts you if a detected vehicle is approaching from a rear corner when your vehicle
is in Reverse (R) at speeds of 3 mph (5 km/h) or lower, which can be helpful when
backing out of parking spaces.
The system does not provide alerts for a vehicle that is moving away from your
vehicle, and it may not detect pedestrians, bicycles, or stationary objects.
Turning the System On or Off
1.
Press SETTINGS.
2.
Select Camera Settings.
3.
Select Cross T
raffic Monitor.
4.
Select On or Off.
5.
Press BACK
to exit the menu.
This system cannot detect all approaching vehicles and may not detect an
approaching vehicle at all.
Failure to visually confirm that it is safe to back up the vehicle before doing
so may result in a collision.
Do not solely rely on the system when reversing; always also use your
mirrors, and look behind and to the sides of your vehicle before reversing.
CAUTION
Arrow icons appear on the
side of an approaching
vehicle, and an audible
beep sounds.
*if equipped
Page 124 of 170
| 117
DRIVING
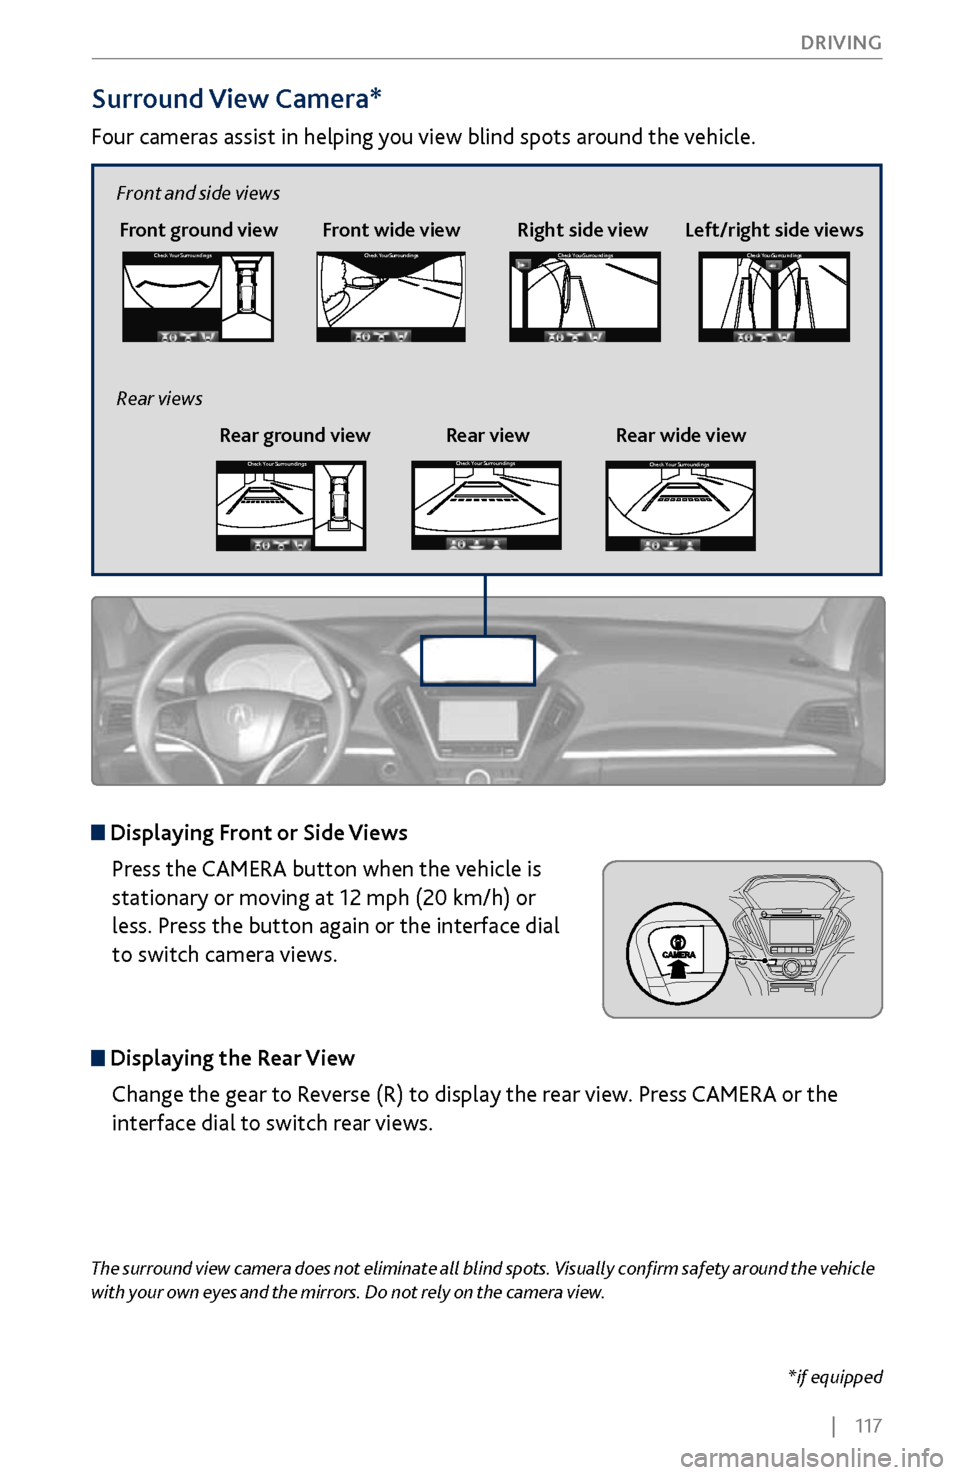
Surround View Camera*
Four cameras assist in helping you view blind spots around the vehicle.
*if equipped
The surround view camera does not eliminate all blind spots. Visually confirm safety around the vehicle
with your own eyes and the mirrors. Do not rely on the camera view.
Front ground view Front wide view Right side viewCheck
Your Surr oundingsCheck Your Surr oundings
Check Your Surr oundingsCh eck Yo ur Surroundi ngs
Displaying Front or Side Views
Press the CAMERA button when the vehicle is
stationary or moving at 12 mph (20 km/h) or
less. Press the button again or the interface dial
to switch camera views.
Displaying the Rear ViewChange the gear to Reverse (R) to display the rear view. Press CAMERA or the
interface dial to switch rear views.
Left/right side views
Front and side views
Rear ground view Rear view Rear wide view
Rear viewsCheck
Your Surr oundingsCheck Your Surr oundings
Check Your Surr oundingsCh eck Yo ur Surroundi ngs
Check Your Surr oundingsCheck Your Surr oundings
Check Your Surr oundingsCh eck Yo ur Surroundi ngs
Check Your Surr oundingsCheck Your Surr oundings
Check Your Surr oundingsCh eck Yo ur Surroundi ngs
Check Your Surroundings
Check Your Surroundings
Check Your Surroundings
Check Your Surroundings
Check Your Surroundings
Check Your Surroundings
Check Your Surroundings
Check Your Surroundings
Check Your Surroundings
Page 125 of 170
118 |
DRIVING
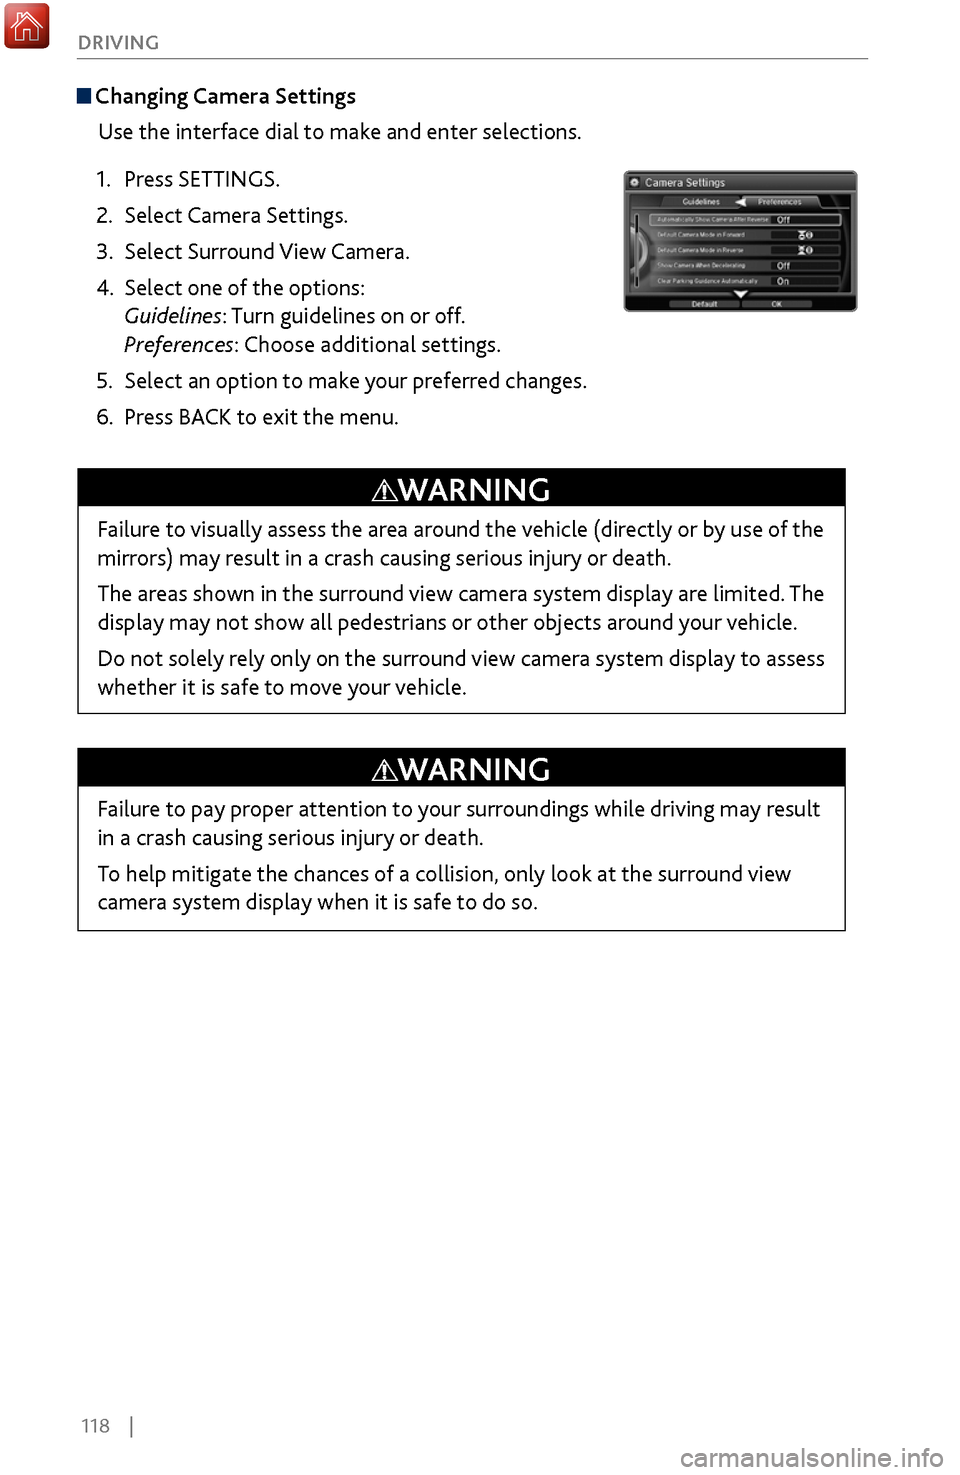
Changing Camera Settings
Use the interface dial to make and enter selections.
1.
Press SETTINGS.
2.
Select Camera Settings.
3.
Select Surround View
Camera.
4.
Select one of the options:
Guidelines:
Turn guidelines on or off.
Preferences: Choose additional settings.
5.
Select an option to mak
e your preferred changes.
6.
Press BACK
to exit the menu.
Failure to visually assess the area around the vehicle (directly or by use of the
mirrors) may result in a crash causing serious injury or death.
The areas shown in the surround view camera system display are limited. The
display may not show all pedestrians or other objects around your vehicle.
Do not solely rely only on the surround view camera system display to assess
whether it is safe to move your vehicle.
WARNING
Failure to pay proper attention to your surroundings while driving may result
in a crash causing serious injury or death.
To help mitigate the chances of a collision, only look at the surround view
camera system display when it is safe to do so.
WARNING