Power mode info Acura MDX 2020 User Guide
[x] Cancel search | Manufacturer: ACURA, Model Year: 2020, Model line: MDX, Model: Acura MDX 2020Pages: 701, PDF Size: 38.91 MB
Page 120 of 701
119
Instrument Panel
Gauges and Multi-Information Display (MID)
Gauges
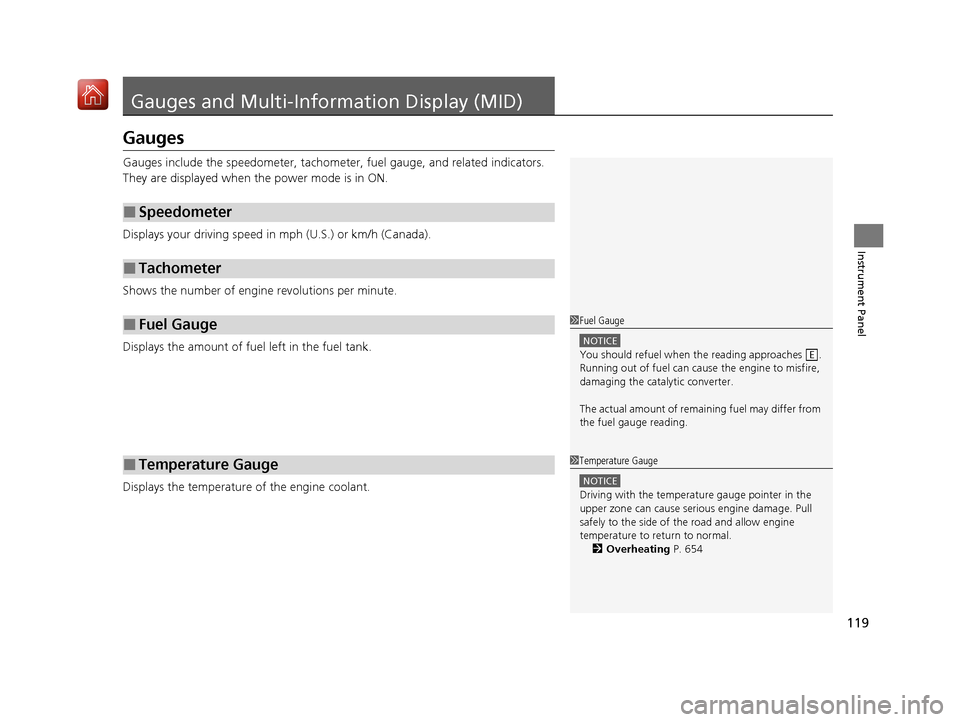
Gauges include the speedometer, tachometer, fuel gauge, and related indicators.
They are displayed when the power mode is in ON.
Displays your driving speed in mph (U.S.) or km/h (Canada).
Shows the number of engine revolutions per minute.
Displays the amount of fuel left in the fuel tank.
Displays the temperature of the engine coolant.
■Speedometer
■Tachometer
■Fuel Gauge
■Temperature Gauge
1Fuel Gauge
NOTICE
You should refuel when the reading approaches .
Running out of fuel can cause the engine to misfire,
damaging the cata lytic converter.
The actual amount of remain ing fuel may differ from
the fuel gauge reading.E
1 Temperature Gauge
NOTICE
Driving with the temperat ure gauge pointer in the
upper zone can cause serious engine damage. Pull
safely to the side of th e road and allow engine
temperature to return to normal. 2 Overheating P. 654
20 ACURA MDX-31TZ56600.book 119 ページ 2019年4月24日 水曜日 午後5時44分
Page 127 of 701
uuGauges and Multi-Information Display (MID) uMID
126
Instrument Panel
Use the MID to customize certain features.
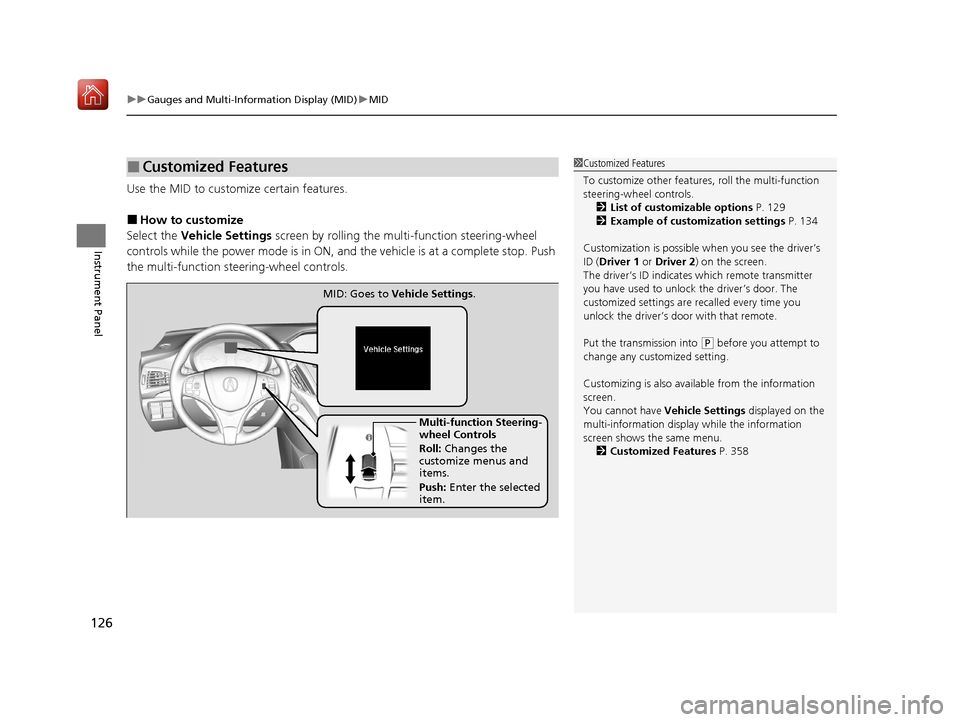
■How to customize
Select the Vehicle Settings screen by rolling the mult i-function steering-wheel
controls while the power mode is in ON, an d the vehicle is at a complete stop. Push
the multi-function steering-wheel controls.
■Customized Features1 Customized Features
To customize other features , roll the multi-function
steering-wheel controls.
2 List of customizable options P. 129
2 Example of customization settings P. 134
Customization is possible when you see the driver’s
ID ( Driver 1 or Driver 2) on the screen.
The driver’s ID indicates which remote transmitter
you have used to unlock the driver’s door. The
customized settings are recalled every time you
unlock the driver’s door with that remote.
Put the transmission into
( P before you attempt to
change any customized setting.
Customizing is also available from the information
screen.
You cannot have Vehicle Settings displayed on the
multi-information display while the information
screen shows the same menu. 2 Customized Features P. 358
Multi-function Steering-
wheel Controls
Roll: Changes the
customize menus and
items.
Push: Enter the selected
item.
MID: Goes to
Vehicle Settings .
20 ACURA MDX-31TZ56600.book 126 ページ 2019年4月24日 水曜日 午後5時44分
Page 129 of 701
128
uuGauges and Multi-Information Display (MID) uMID
Instrument Panel
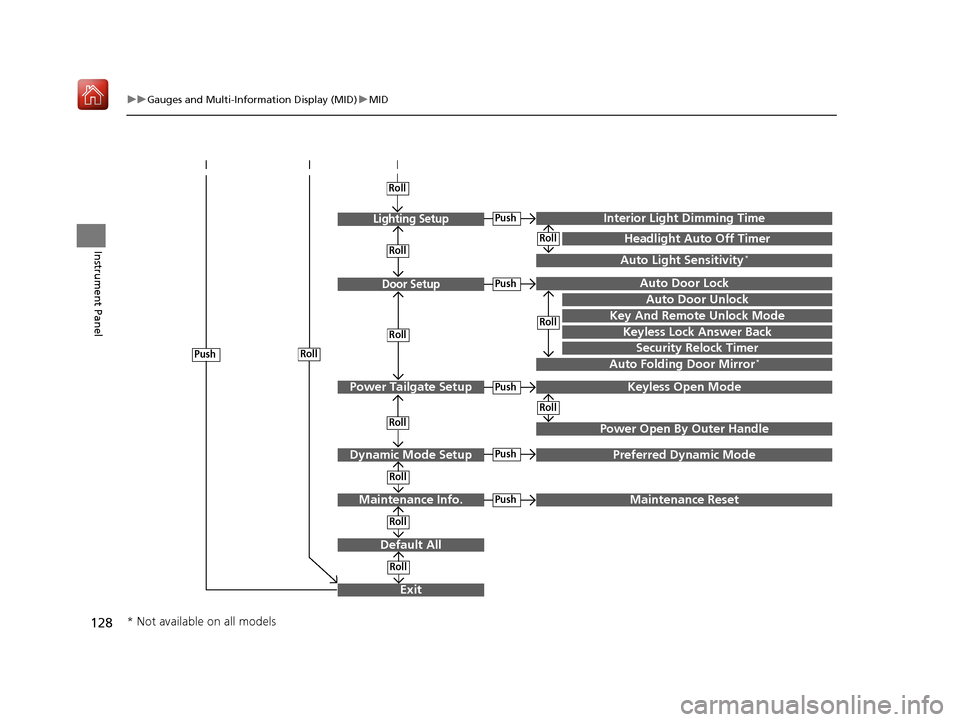
Exit
Door Setup
Dynamic Mode Setup
Default All
Lighting Setup
Key And Remote Unlock Mode
Auto Door Lock
Auto Door Unlock
Keyless Lock Answer Back
Auto Folding Door Mirror*
Interior Ligh t Dimming Time
Headlight Auto Off Timer
Auto Light Sensitivity*
Roll
Push
Push
Roll
Roll
Roll
Roll
Roll
Roll
Power Tailgate SetupPush
Power Open By Outer Handle
Keyless Open Mode
Push
Maintenance Info.
Roll
PushPreferred Dynamic Mode
Roll
Roll
Roll
PushMaintenance Reset
Security Relock Timer
* Not available on all models
20 ACURA MDX-31TZ56600.book 128 ページ 2019年4月24日 水曜日 午後5時44分
Page 134 of 701
133
uuGauges and Multi-Info rmation Display (MID)uMID
Continued
Instrument Panel
*1: Default SettingSetup Group Customizable Features
Description Selectable Settings
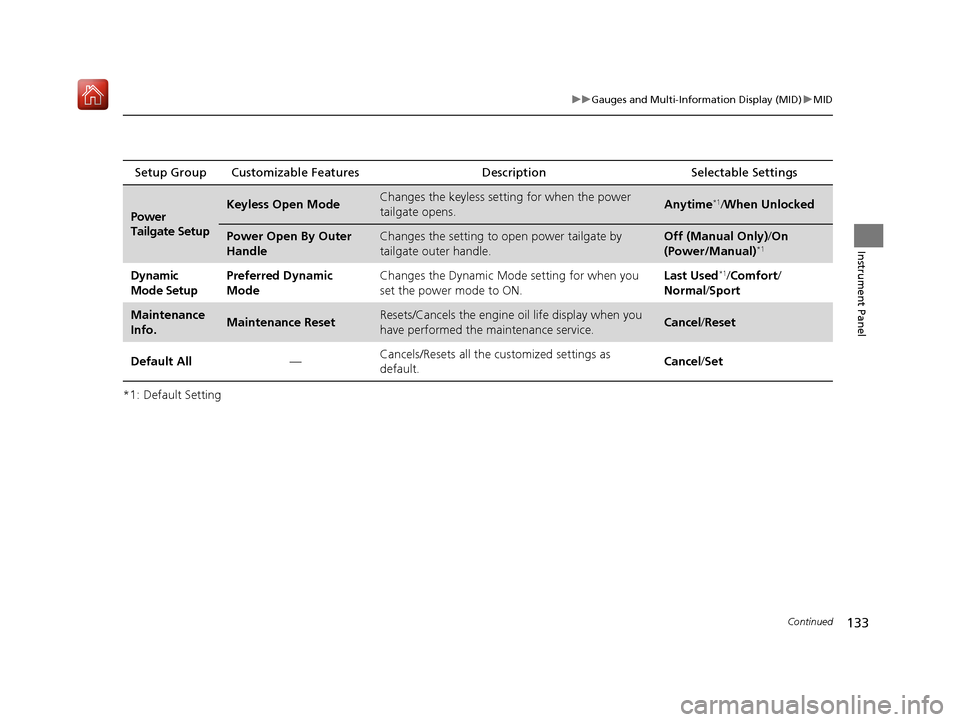
Power
Tailgate SetupKeyless Open ModeChanges the keyless setting for when the power
tailgate opens.Anytime*1/When Unlocked
Power Open By Outer
HandleChanges the setting to open power tailgate by
tailgate outer handle.Off (Manual Only) /On
(Power/Manual)*1
Dynamic
Mode SetupPreferred Dynamic
ModeChanges the Dynamic Mode setting for when you
set the power mode to ON.Last Used*1/ Comfort /
Normal /Sport
Maintenance
Info.Maintenance ResetResets/Cancels the engine oil life display when you
have performed the maintenance service. Cancel /Reset
Default All —Cancels/Resets all the
customized settings as
default. Cancel
/Set
20 ACURA MDX-31TZ56600.book 133 ページ 2019年4月24日 水曜日 午後5時44分
Page 139 of 701
138
Controls
Clock
Adjusting the Clock
You can adjust the time manually in the information screen with the power mode in
ON.
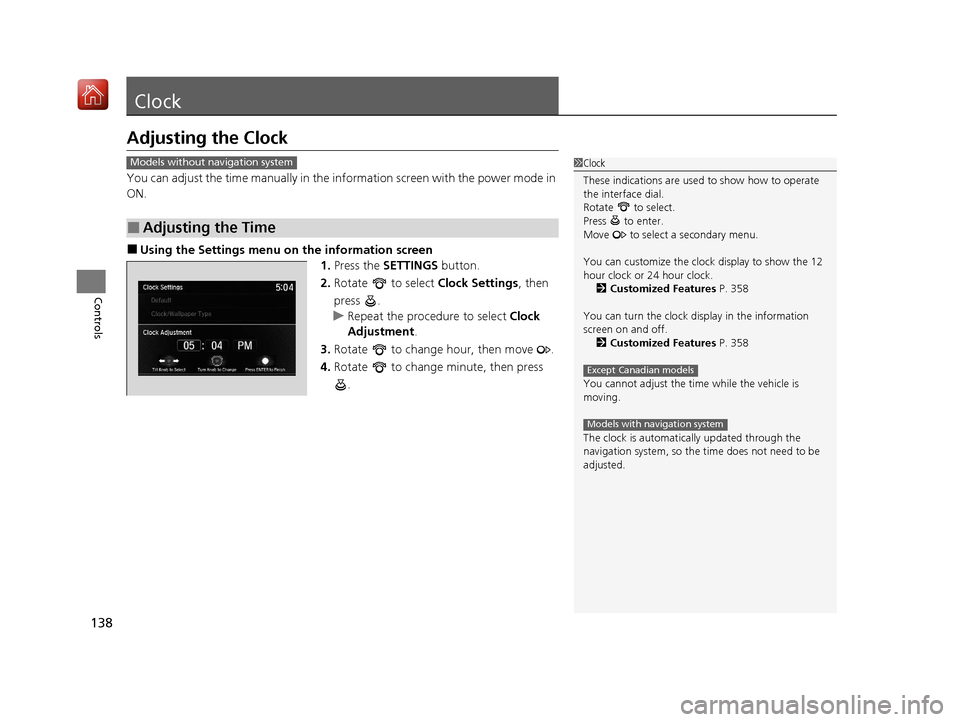
■Using the Settings menu on the information screen
1.Press the SETTINGS button.
2. Rotate to select Clock Settings, then
press .
u Repeat the procedure to select Clock
Adjustment .
3. Rotate to change hour, then move .
4. Rotate to change minute, then press
.
■Adjusting the Time
1Clock
These indications are used to show how to operate
the interface dial.
Rotate to select.
Press to enter.
Move to select a secondary menu.
You can customize the clock display to show the 12
hour clock or 24 hour clock. 2 Customized Features P. 358
You can turn the clock display in the information
screen on and off. 2 Customized Features P. 358
You cannot adjust the time while the vehicle is
moving.
The clock is automatica lly updated through the
navigation system, so the ti me does not need to be
adjusted.
Except Canadian models
Models with navigation system
Models without navigation system
20 ACURA MDX-31TZ56600.book 138 ページ 2019年4月24日 水曜日 午後5時44分
Page 186 of 701
185
uuOperating the Switches Around the Steering Wheel uDriving Position Memory System
Continued
Controls
Driving Position Memory System
You can store two driver’s seat (except for power lumbar), steering wheel and door
mirror positions with the driv ing position memory system.
When you unlock and open the driver’s door with a remote transmitter, or keyless
access system, door mirrors adjust to one of the two preset positions and the seat
adjusts to retracted positions of one of the two preset positions automatically.
The steering wheel and the seat will move to the stored position when you set the
power mode to ACCESSORY.
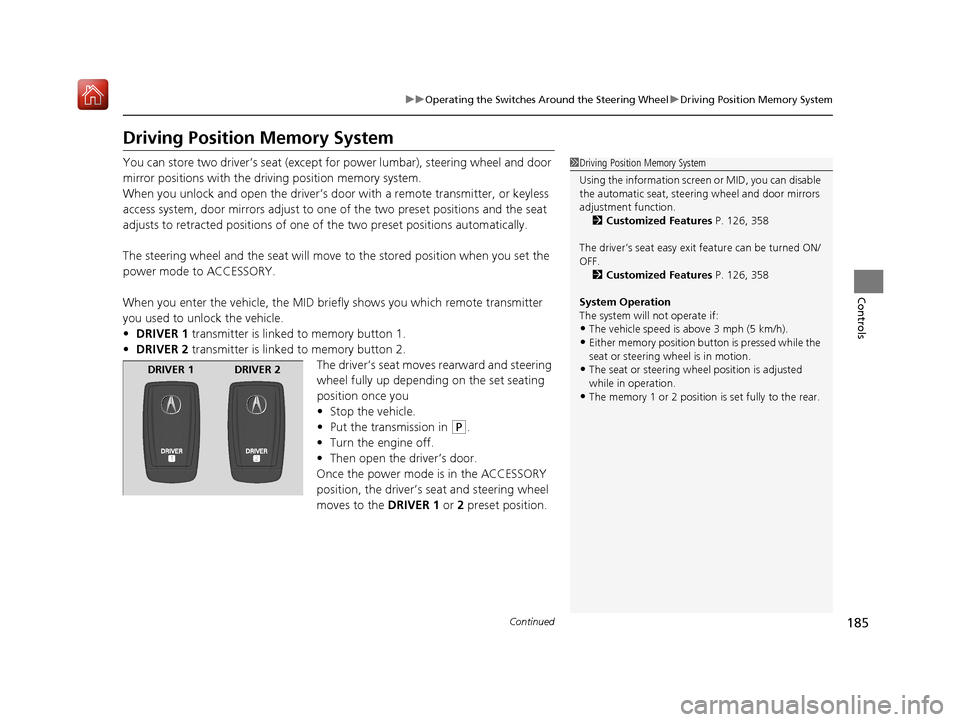
When you enter the vehicle, the MID br iefly shows you which remote transmitter
you used to unlock the vehicle.
• DRIVER 1 transmitter is linked to memory button 1.
• DRIVER 2 transmitter is linked to memory button 2.
The driver’s seat moves rearward and steering
wheel fully up depending on the set seating
position once you
•Stop the vehicle.
• Put the transmission in
(P.
• Turn the engine off.
• Then open the driver’s door.
Once the power mode is in the ACCESSORY
position, the driver’s s eat and steering wheel
moves to the DRIVER 1 or 2 preset position.
1 Driving Position Memory System
Using the information screen or MID, you can disable
the automatic seat, steeri ng wheel and door mirrors
adjustment function. 2 Customized Features P. 126, 358
The driver’s seat easy exit feature can be turned ON/
OFF. 2 Customized Features P. 126, 358
System Operation
The system will not operate if:
•The vehicle speed is above 3 mph (5 km/h).•Either memory position button is pressed while the
seat or steering wheel is in motion.
•The seat or steering wheel position is adjusted
while in operation.
•The memory 1 or 2 position is set fully to the rear.
DRIVER 1 DRIVER 2
20 ACURA MDX-31TZ56600.book 185 ページ 2019年4月24日 水曜日 午後5時44分
Page 240 of 701
239
Features
Audio System Basic Operation
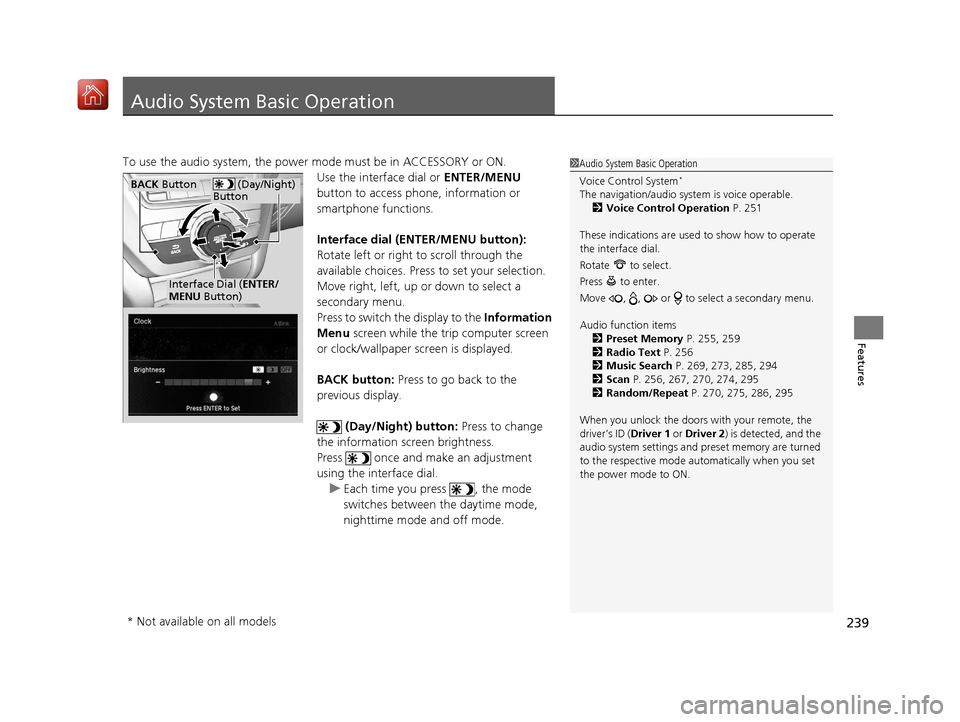
To use the audio system, the power mode must be in ACCESSORY or ON.Use the interface dial or ENTER/MENU
button to access phone, information or
smartphone functions.
Interface dial (E NTER/MENU button):
Rotate left or right to scroll through the
available choices. Press to set your selection.
Move right, left, up or down to select a
secondary menu.
Press to switch the display to the Information
Menu screen while the trip computer screen
or clock/wallpaper screen is displayed.
BACK button: Press to go back to the
previous display.
(Day/Night) button: Press to change
the information screen brightness.
Press once and make an adjustment
using the interface dial. u Each time you press , the mode
switches between the daytime mode,
nighttime mode and off mode.1Audio System Basic Operation
Voice Control System
*
The navigation/audio system is voice operable.
2 Voice Control Operation P. 251
These indications are used to show how to operate
the interface dial.
Rotate to select.
Press to enter.
Move , , or to se lect a secondary menu.
Audio function items 2 Preset Memory P. 255, 259
2 Radio Text P. 256
2 Music Search P. 269, 273, 285, 294
2 Scan P. 256, 267, 270, 274, 295
2 Random/Repeat P. 270, 275, 286, 295
When you unlock the doors with your remote, the
driver’s ID ( Driver 1 or Driver 2) is detected, and the
audio system settings and pr eset memory are turned
to the respective mode automatically when you set
the power mode to ON. (Day/Night)
ButtonBACK Button
Interface Dial ( ENTER/
MENU Button)
* Not available on all models
20 ACURA MDX-31TZ56600.book 239 ページ 2019年4月24日 水曜日 午後5時44分
Page 255 of 701
254
uuAudio System Basic Operation uPlaying AM/FM Radio
Features
Playing AM/FM Radio
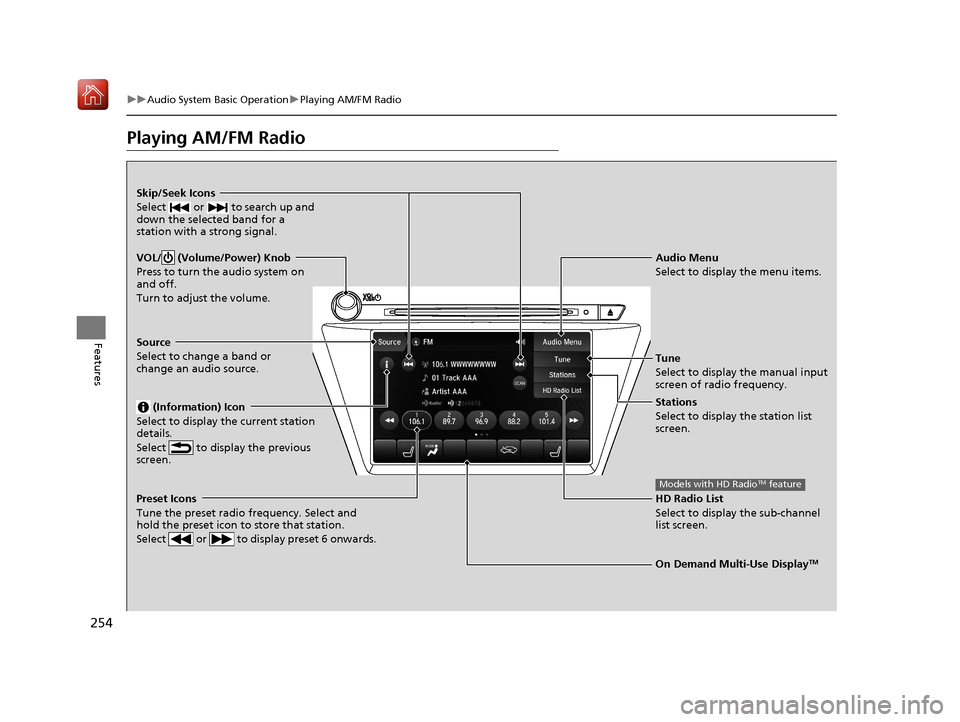
On Demand Multi-Use DisplayTM
VOL/ (Volume/Power) Knob
Press to turn the audio system on
and off.
Turn to adjust the volume.
Skip/Seek Icons
Select or to search up and
down the selected band for a
station with a strong signal.
Audio Menu
Select to display the menu items.
Source
Select to change a band or
change an audio source. (Information) Icon
Select to display the current station
details.
Select to display the previous
screen.
Preset Icons
Tune the preset radio frequency. Select and
hold the preset icon to store that station.
Select or to display preset 6 onwards.
Tune
Select to display the manual input
screen of radio frequency.
Stations
Select to display the station list
screen.
HD Radio List
Select to display the sub-channel
list screen.
Models with HD RadioTM feature
20 ACURA MDX-31TZ56600.book 254 ページ 2019年4月24日 水曜日 午後5時44分
Page 258 of 701
257
uuAudio System Basic Operation uPlaying SiriusXM ® Radio
Continued
Features
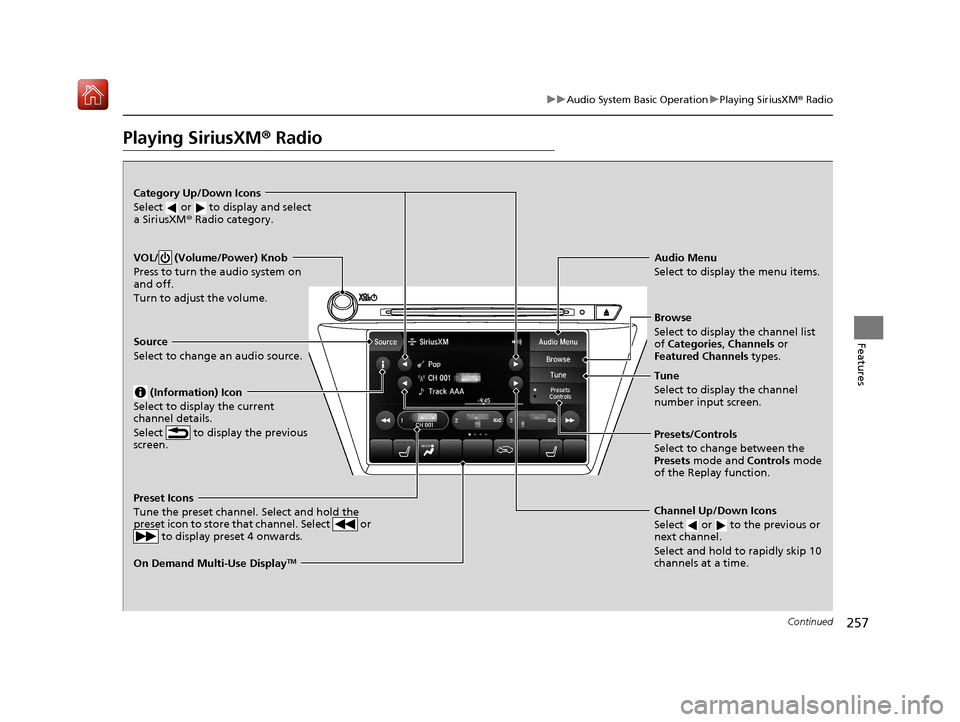
Playing SiriusXM® Radio
On Demand Multi-Use DisplayTM
VOL/ (Volume/Power) Knob
Press to turn the audio system on
and off.
Turn to adjust the volume.
Category Up/Down Icons
Select or to display and select
a SiriusXM® Radio category.
Audio Menu
Select to display the menu items.
Source
Select to change an audio source. (Information) Icon
Select to display the current
channel details.
Select to display the previous
screen.
Preset Icons
Tune the preset channel. Select and hold the
preset icon to store that channel. Select or to display preset 4 onwards.
Tune
Select to display the channel
number input screen.
Presets/Controls
Select to change between the
Presets mode and Controls mode
of the Replay function.
Browse
Select to display the channel list
of Categories , Channels or
Featured Channels types.
Channel Up/Down Icons
Select or to the previous or
next channel.
Select and hold to rapidly skip 10
channels at a time.
20 ACURA MDX-31TZ56600.book 257 ページ 2019年4月24日 水曜日 午後5時44分
Page 269 of 701
268
uuAudio System Basic Operation uPlaying a CD
Features
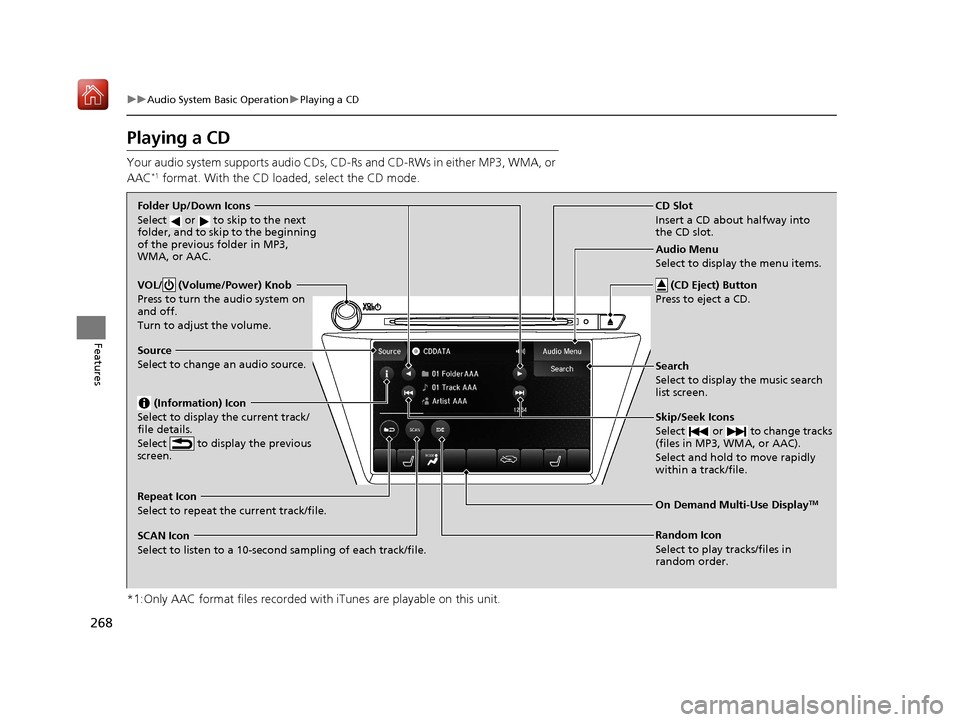
Playing a CD
Your audio system supports audio CDs, CD-Rs and CD-RWs in either MP3, WMA, or
AAC*1 format. With the CD load ed, select the CD mode.
*1:Only AAC format files recorded with iTunes are playable on this unit.
VOL/ (Volume/Power) Knob
Press to turn the audio system on
and off.
Turn to adjust the volume.
Skip/Seek Icons
Select or to change tracks
(files in MP3, WMA, or AAC).
Select and hold to move rapidly
within a track/file.
Audio Menu
Select to display the menu items.
Source
Select to change an audio source. (Information) Icon
Select to display the current track/
file details.
Select to display the previous
screen.
Search
Select to display the music search
list screen.
Folder Up/Down Icons
Select or to skip to the next
folder, and to skip to the beginning
of the previous folder in MP3,
WMA, or AAC.
On Demand Multi-Use DisplayTMRepeat Icon
Select to repeat the current track/file.
SCAN Icon
Select to listen to a 10-second sampling of each track/file. Random Icon
Select to play tracks/files in
random order.
(CD Eject) Button
Press to eject a CD.
CD Slot
Insert a CD about halfway into
the CD slot.
20 ACURA MDX-31TZ56600.book 268 ページ 2019年4月24日 水曜日 午後5時44分