Cargo Acura MDX 2020 Owner's Guide
[x] Cancel search | Manufacturer: ACURA, Model Year: 2020, Model line: MDX, Model: Acura MDX 2020Pages: 701, PDF Size: 38.91 MB
Page 573 of 701

572
Driving
Fuel Economy and CO2 Emissions
Improving Fuel Economy and Reducing CO2
Emissions
Achieving fuel economy and reducing CO2 emissions is dependent on several
factors, including driving conditions, load weight, idling time, driving habits, and
vehicle condition. Depending on these and other factors, you may not achieve the
rated fuel economy of this vehicle.
You can optimize your fuel economy with proper maintenance of your vehicle.
Always maintain your vehicle in accordance with the messages displayed on the
MID.
• Use the recommended viscosity engine oil.
2 Recommended Engine Oil P. 584
•Maintain the specified tire pressure.
• Do not load the vehicl e with excess cargo.
• Keep your vehicle clean. A buildup of snow or mud on your vehicle’s underside
adds weight and increases wind resistance.
■Maintenance and Fuel Economy
1Improving Fuel Economy and Reducing CO2 Emissions
Direct calculation is the recommended method to
determine actual fuel consumed while driving.
In Canada, posted fuel economy numbers are
established following a simulated test. For more
information on how this test is performed, please visit
http://oee.nrcan.gc.ca/
Miles driven Gallons of
fuel Miles per
Gallon
100 Liters of fuel Kilometers
driven L per 100 km
20 ACURA MDX-31TZ56600.book 572 ページ 2019年4月24日 水曜日 午後5時44分
Page 594 of 701
593
Maintenance
Replacing Light Bulbs
Headlights
Headlights are LED type. Have an authorized Acura dealer inspect and replace the
light assembly.
Front Turn Signal/Parking, Daytime Running and
Front Side Marker Lights
Front turn signal/parking, daytime running and front side marker lights are LED type.
Have an authorized Acura dealer in spect and replace the light assembly.
Fog Lights*
Fog lights are LED type. Have an authoriz ed Acura dealer inspect and replace the
light assembly.
Side Turn Signal/Emer gency Indicator Lights
Door mirror side turn lights are LED type. Have an authorized Acura dealer inspect
and replace the light assembly.
1 Headlights
The headlight aim is set by the factory, and does not
need to be adjusted. Howeve r, if you regularly carry
heavy items in the cargo area or tow a trailer, have
the aiming readjusted at a dealer or by a qualified
technician.
* Not available on all models
20 ACURA MDX-31TZ56600.book 593 ページ 2019年4月24日 水曜日 午後5時44分
Page 627 of 701
626
Handling the Unexpected
Tools
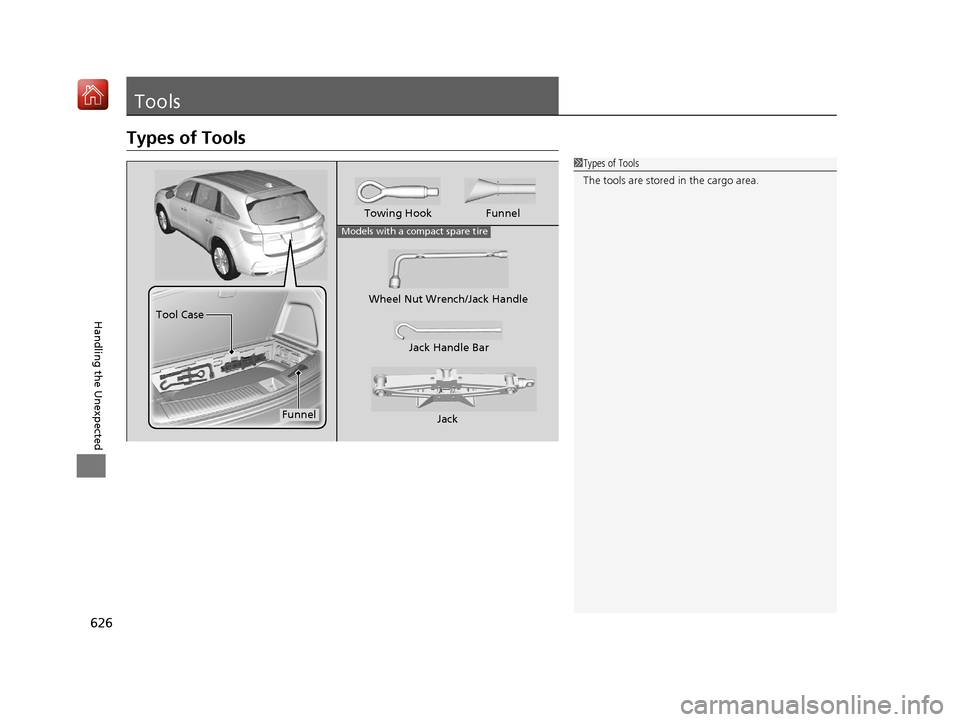
Types of Tools
1Types of Tools
The tools are stored in the cargo area.
Wheel Nut Wrench/Jack Handle
Jack
Jack Handle Bar
Models with a compact spare tire
Towing Hook Funnel
Funnel
Tool Case
20 ACURA MDX-31TZ56600.book 626 ページ 2019年4月24日 水曜日 午後5時44分
Page 629 of 701
uuIf a Tire Goes Flat uChanging a Flat Tire
628
Handling the Unexpected
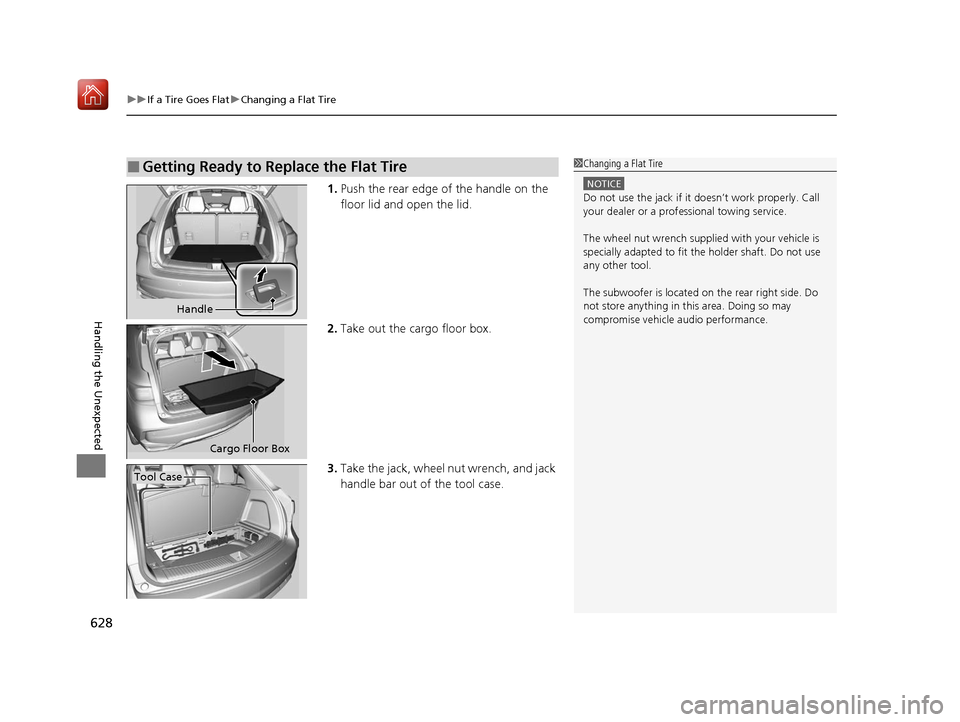
1. Push the rear edge of the handle on the
floor lid and open the lid.
2. Take out the cargo floor box.
3. Take the jack, wheel nut wrench, and jack
handle bar out of the tool case.
■Getting Ready to Replace the Flat Tire1Changing a Flat Tire
NOTICE
Do not use the jack if it doesn’t work properly. Call
your dealer or a prof essional towing service.
The wheel nut wrench supplied with your vehicle is
specially adapted to fit th e holder shaft. Do not use
any other tool.
The subwoofer is located on the rear right side. Do
not store anything in th is area. Doing so may
compromise vehicle audio performance.
Handle
Cargo Floor Box
Tool Case
20 ACURA MDX-31TZ56600.book 628 ページ 2019年4月24日 水曜日 午後5時44分
Page 630 of 701
629
uuIf a Tire Goes Flat uChanging a Flat Tire
Continued
Handling the Unexpected
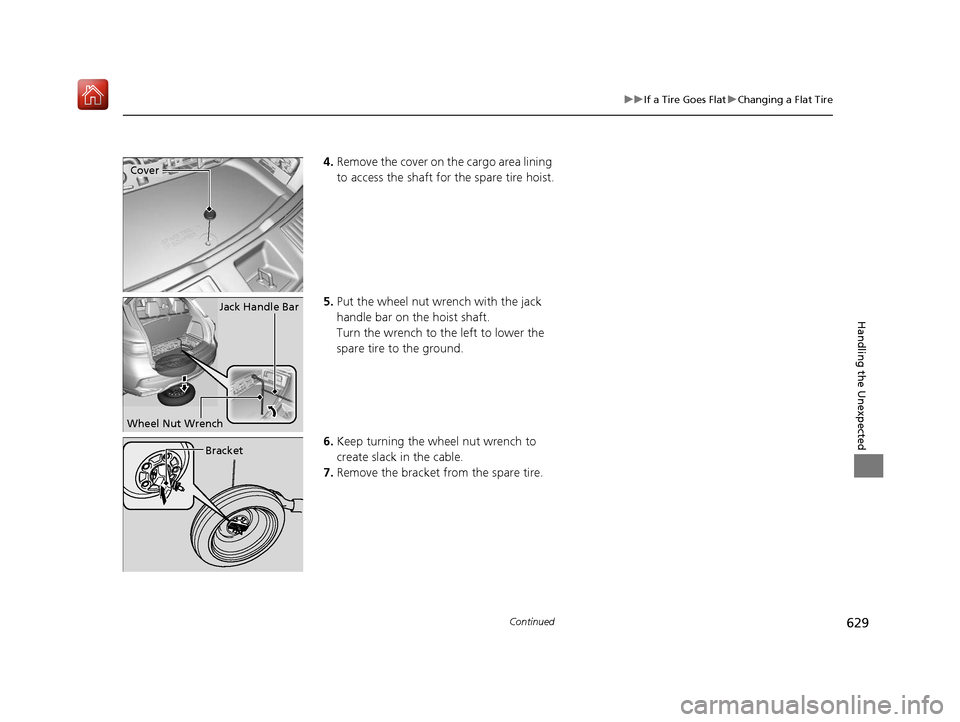
4. Remove the cover on the cargo area lining
to access the shaft for the spare tire hoist.
5. Put the wheel nut wrench with the jack
handle bar on the hoist shaft.
Turn the wrench to the left to lower the
spare tire to the ground.
6. Keep turning the wh eel nut wrench to
create slack in the cable.
7. Remove the bracket from the spare tire.Cover
Jack Handle Bar
Wheel Nut Wrench
Bracket
20 ACURA MDX-31TZ56600.book 629 ページ 2019年4月24日 水曜日 午後5時44分
Page 634 of 701
Continued633
uuIf a Tire Goes Flat uChanging a Flat Tire
Handling the Unexpected
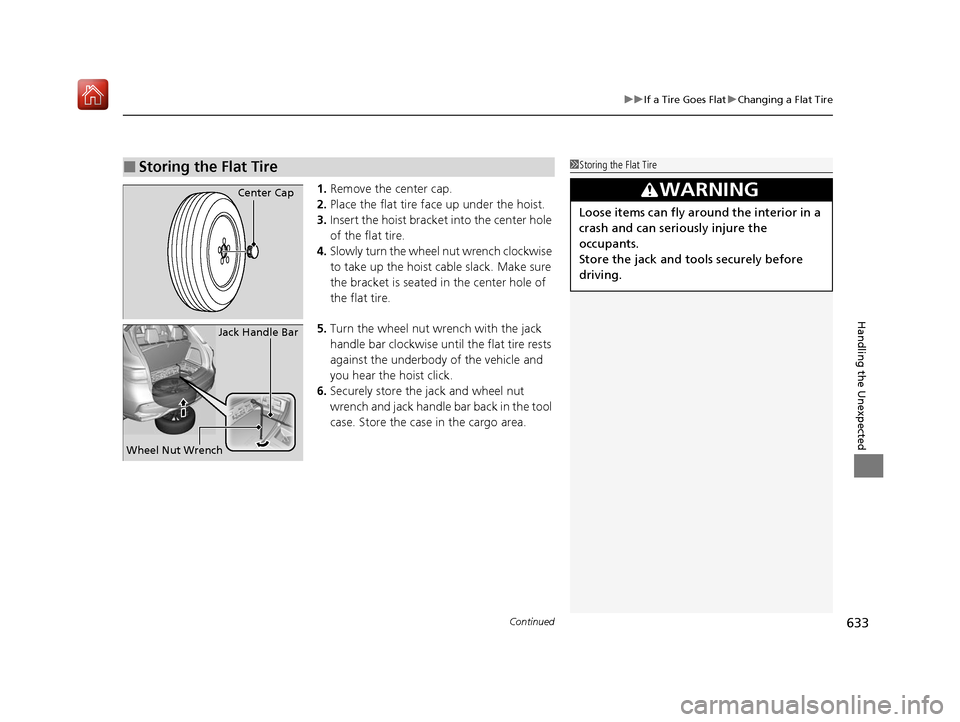
1. Remove the center cap.
2. Place the flat tire face up under the hoist.
3. Insert the hoist bracke t into the center hole
of the flat tire.
4. Slowly turn the wheel nut wrench clockwise
to take up the hoist cable slack. Make sure
the bracket is seated in the center hole of
the flat tire.
5. Turn the wheel nut wrench with the jack
handle bar clockwise until the flat tire rests
against the underbody of the vehicle and
you hear the hoist click.
6. Securely store the jack and wheel nut
wrench and jack handle bar back in the tool
case. Store the case in the cargo area.
■Storing the Flat Tire1Storing the Flat Tire
3WARNING
Loose items can fly around the interior in a
crash and can seriously injure the
occupants.
Store the jack and tools securely before
driving.
Center Cap
Wheel Nut Wrench Jack Handle Bar
20 ACURA MDX-31TZ56600.book 633 ページ 2019年4月24日 水曜日 午後5時44分
Page 638 of 701

637
uuIf a Tire Goes Flat uTemporarily Repairing a Flat Tire
Continued
Handling the Unexpected
1. Pull the handle on the cargo area floor lid
and open the lid.
2. Take out the cargo floor box.
3. Take the kit out of the case.
4. Place the kit face up, on flat ground near
the flat tire, and away from traffic. Do not
place the kit on its side.
Handle
Cargo Floor Box
CaseTire Repair Kit
20 ACURA MDX-31TZ56600.book 637 ページ 2019年4月24日 水曜日 午後5時44分
Page 640 of 701
Continued639
uuIf a Tire Goes Flat uTemporarily Repairing a Flat Tire
Handling the Unexpected
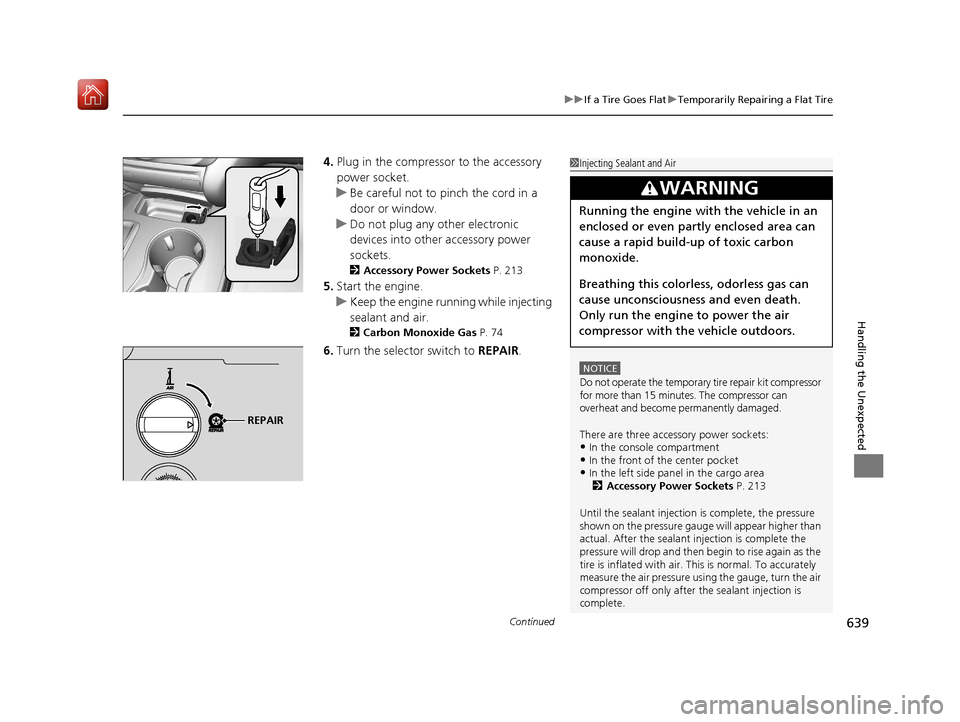
4. Plug in the compressor to the accessory
power socket.
u Be careful not to pinch the cord in a
door or window.
u Do not plug any other electronic
devices into other accessory power
sockets.
2 Accessory Power Sockets P. 213
5.Start the engine.
u Keep the engine running while injecting
sealant and air.
2 Carbon Monoxide Gas P. 74
6.Turn the selector switch to REPAIR.
1Injecting Sealant and Air
NOTICE
Do not operate the temporary tire repair kit compressor
for more than 15 minu tes. The compressor can
overheat and become permanently damaged.
There are three accessory power sockets:
•In the console compartment•In the front of the center pocket•In the left side panel in the cargo area 2 Accessory Power Sockets P. 213
Until the sealant injection is complete, the pressure
shown on the pressure gauge will appear higher than
actual. After the sealant injection is complete the
pressure will drop and then begin to rise again as the
tire is inflated with air. This is normal. To accurately
measure the air pressure usin g the gauge, turn the air
compressor off only after the sealant injection is
complete.
3WARNING
Running the engine with the vehicle in an
enclosed or even partly enclosed area can
cause a rapid build-up of toxic carbon
monoxide.
Breathing this colorless, odorless gas can
cause unconsciousness and even death.
Only run the engine to power the air
compressor with th e vehicle outdoors.
REPAIR
20 ACURA MDX-31TZ56600.book 639 ページ 2019年4月24日 水曜日 午後5時44分
Page 647 of 701

uuIf a Tire Goes Flat uTemporarily Repairing a Flat Tire
646
Handling the Unexpected
You can use the kit to inflate a non-punctured under-inflated tire.
1.Open the cargo area floor lid.
2 Getting Ready to Temporarily Repair
the Flat Tire P. 636
2.Remove the kit from the case.
3. Place the kit, face up, on flat ground near
the flat tire, away from traffic. Do not
place the kit on its side.
4. Remove the sealant/air hose from the kit.
5. Remove the valve cap.
6. Attach the sealant/air hose onto the tire
valve stem. Screw it until it is tight.
■Inflating an Under-inflated Tire1Inflating an Under-inflated Tire
NOTICE
Do not operate the temporary tire repair kit
compressor for more than 15 minutes. The
compressor can overheat and become permanently
damaged.
Sealant/Air Hose
Valve Cap
Valve Stem
Sealant/Air Hose
20 ACURA MDX-31TZ56600.book 646 ページ 2019年4月24日 水曜日 午後5時44分
Page 669 of 701
668
uuFuses uFuse Locations
Handling the Unexpected
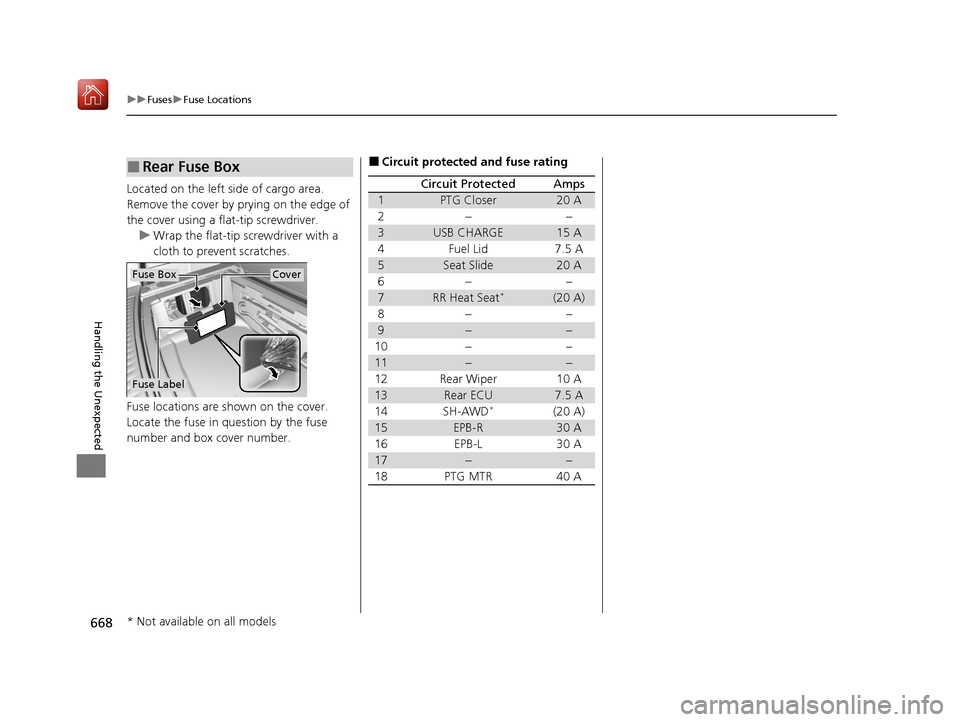
Located on the left side of cargo area.
Remove the cover by prying on the edge of
the cover using a flat-tip screwdriver.
u Wrap the flat-tip screwdriver with a
cloth to prevent scratches.
Fuse locations are shown on the cover.
Locate the fuse in question by the fuse
number and box cover number.
■Rear Fuse Box
Fuse Label
Fuse BoxCover
■Circuit protected and fuse rating
Circuit ProtectedAmps
1PTG Closer20 A
2−−
3USB CHARGE15 A
4Fuel Lid7.5 A
5Seat Slide20 A
6−−
7RR Heat Seat*(20 A)
8−−
9−−
10−−
11−−
12Rear Wiper10 A
13Rear ECU7.5 A
14SH-AWD*(20 A)
15EPB-R30 A
16EPB-L30 A
17−−
18PTG MTR40 A
* Not available on all models
20 ACURA MDX-31TZ56600.book 668 ページ 2019年4月24日 水曜日 午後5時44分