oil dipstick ACURA NSX 1991 Service Repair Manual
[x] Cancel search | Manufacturer: ACURA, Model Year: 1991, Model line: NSX, Model: ACURA NSX 1991Pages: 1640, PDF Size: 60.48 MB
Page 91 of 1640
Timing Belt
Removal (cont'd)
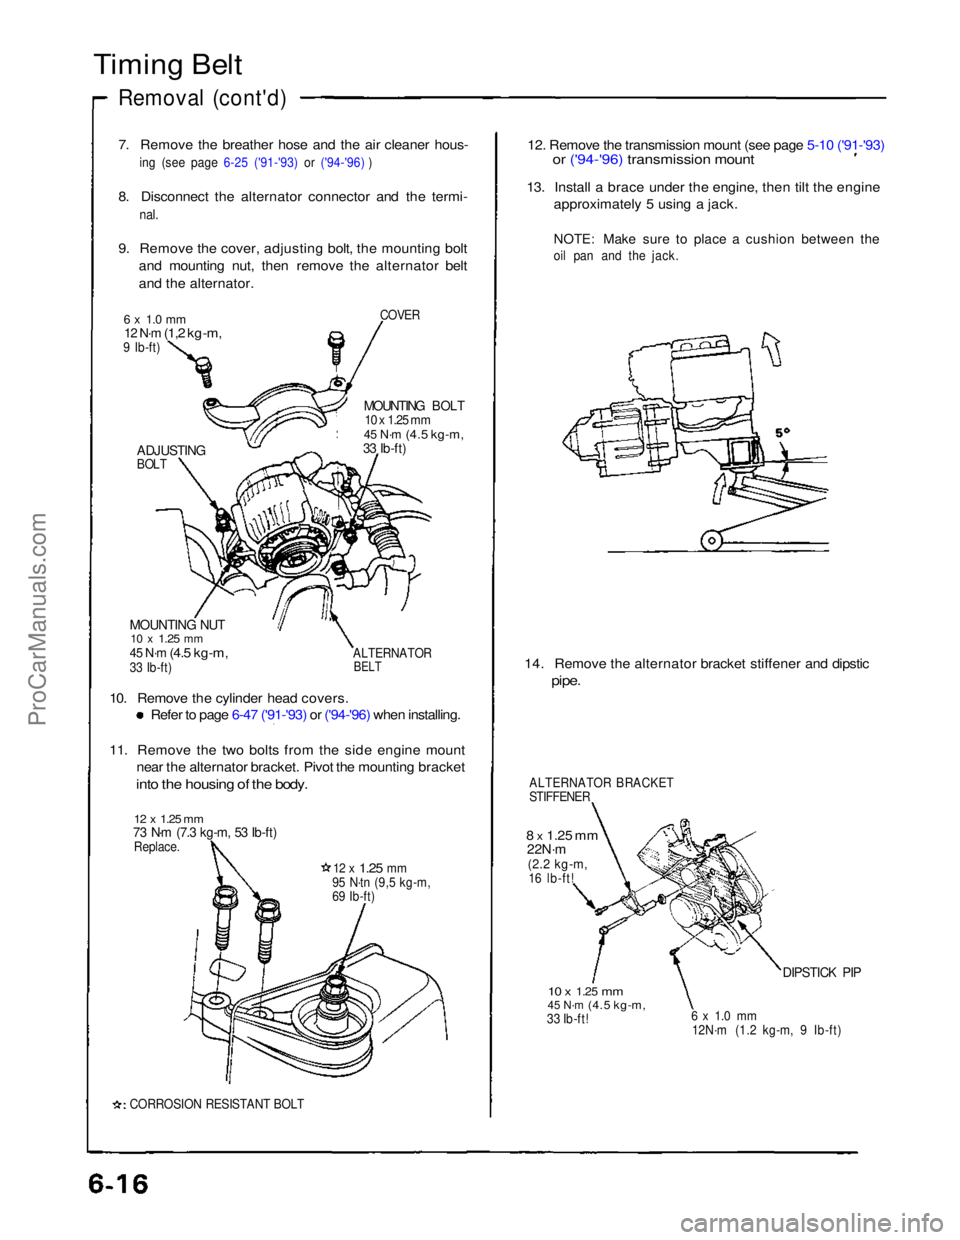
7. Remove the breather hose and the air cleaner hous-
in
g
(see page 6-25 ('91-'93) or ('94-'96) )
8. Disconnect the alternator connector and the termi-
nal.
9. Remove the cover, adjusting bolt, the mounting bolt and mounting nut, then remove the alternator belt
and the alternator.
COVER
6 x 1.0 mm
12 N·m
(1,2 kg-m,
9 Ib-ft)
MOUNTING BOLT
10 x 1.25 mm
45 N·m
(4.5 kg-m,
33 Ib-ft)
ADJUSTING
BOLT
MOUNTING NUT
10 x
1.25
mm
45 N·m
(4.5 kg-m,
33 Ib-ft)
ALTERNATOR
BELT
10. Remove the cylinder head covers.
Refer to page 6-47 ('91-'93) or ('94-'96) when installing.
11. Remove the two bolts from the side engine mount
near the alternator bracket. Pivot the mounting bracket
into the housing of the body.
12 x 1.25 mm
73 N·m (7.3 kg-m, 53 Ib-ft)
Replace.
12 x
1.25
mm
95 N·tn (9,5 kg-m,
69 Ib-ft)
CORROSION RESISTANT BOLT
12. Remove the transmission mount (see page 5-10 ('91-'93)
or ('94-'96) transmission mount
13. Install a brace under the engine, then tilt the engine
approximately 5 using a jack.
NOTE: Make sure to place a cushion between the
oil pan and the jack.
14. Remove the alternator bracket stiffener and dipstic
pipe.
ALTERNATOR BRACKET
STIFFENER
8 x
1.25
mm
22N·m
(2.2 kg-m,
16 lb-ft!
10 x
1.25
mm
45 N·m
(4.5 kg-m,
33 Ib-ft!
6 x 1.0 mm
12N·m (1.2 kg-m, 9 Ib-ft)
DIPSTICK PIPProCarManuals.com
Page 149 of 1640
Engine Oil
Inspection
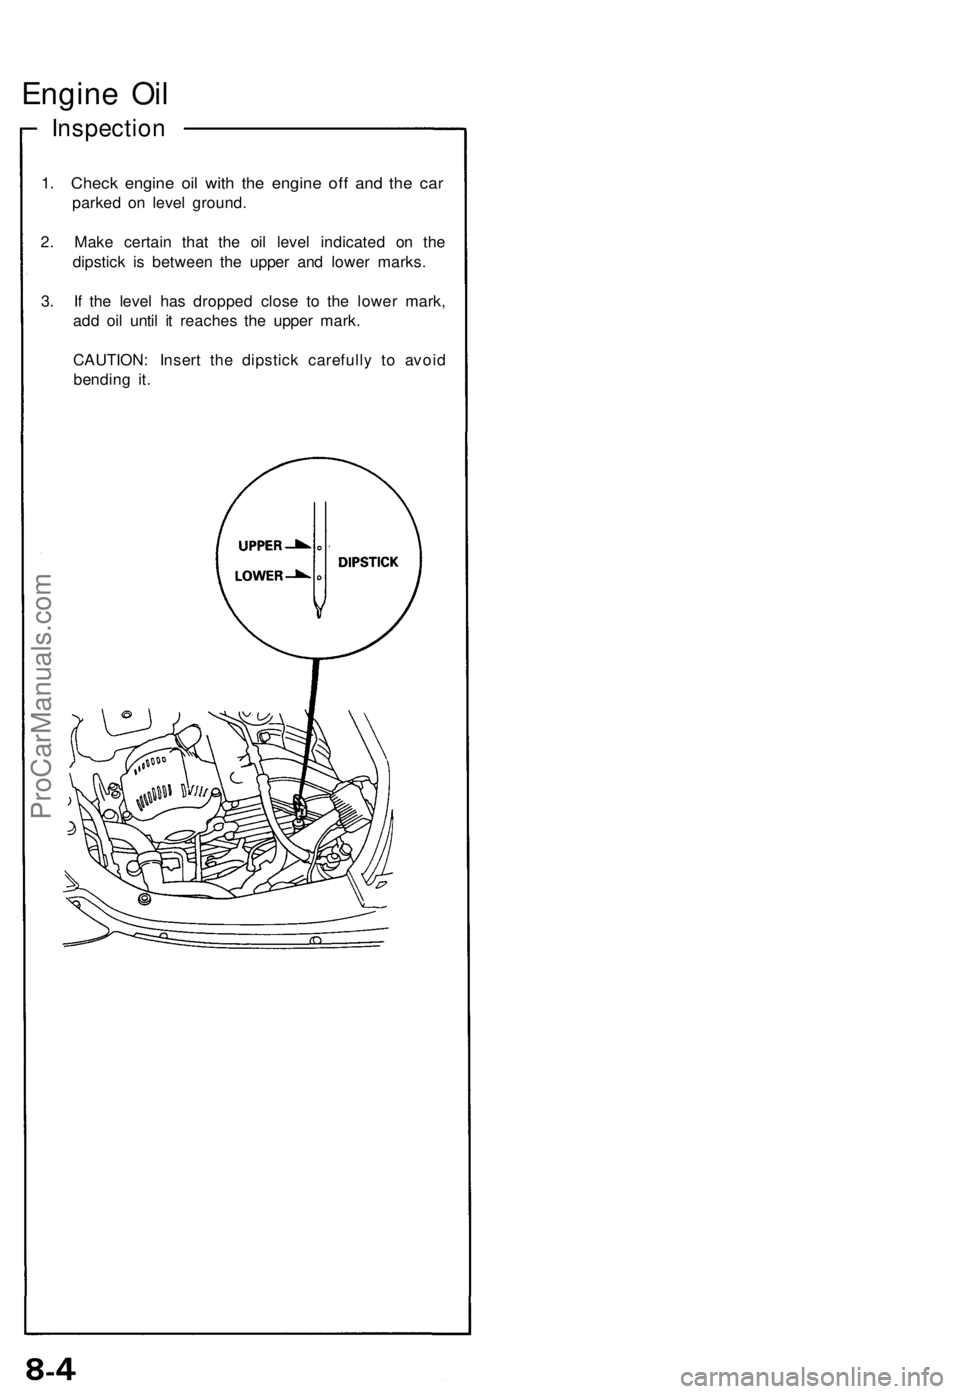
1. Check engine oil with the engine off and the car
parked on level ground.
2. Make certain that the oil level indicated on the
dipstick is between the upper and lower marks.
3. If the level has dropped close to the lower mark,
add oil until it reaches the upper mark.
CAUTION: Insert the dipstick carefully to avoid
bending it.ProCarManuals.com
Page 153 of 1640
Oil Pump
Removal/lnspection/lnstallation
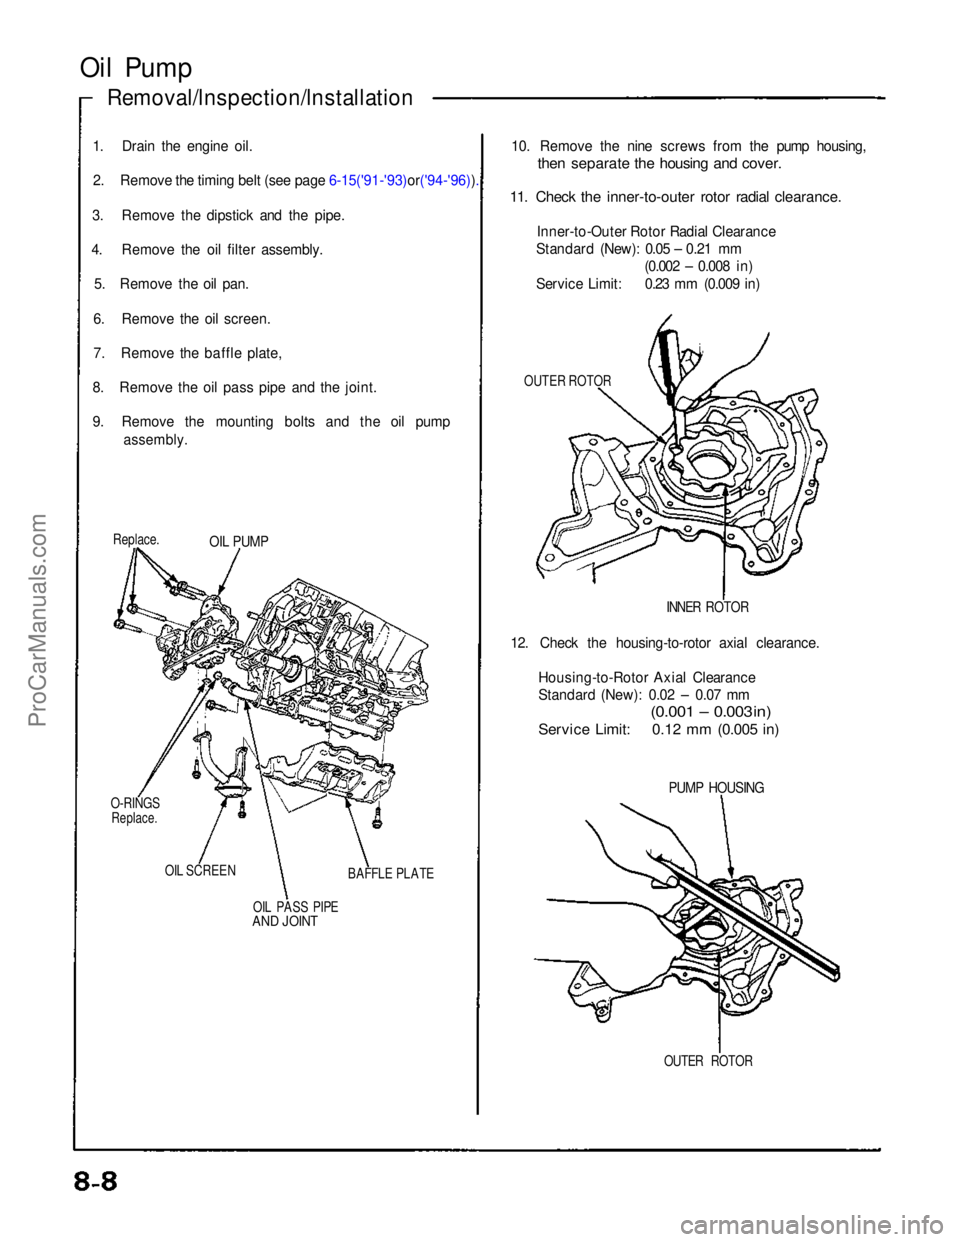
1. Drain the engine oil. 2. Remove the timing belt (see page 6-15('91-'93)or('94-'96)).
3. Remove the dipstick and the pipe.
4. Remove the oil filter assembly.
5. Remove the oil pan.
6. Remove the oil screen.
7. Remove the baffle plate,
8. Remove the oil pass
pipe and the joint.
9. Remove the mounting bolts and the oil pump
assembly.
Replace.
O-RINGS
Replace.
OIL SCREEN OIL PASS PIPE
AND JOINT
BAFFLE PLATE
OIL PUMP
10. Remove the nine screws from the pump housing,
then separate the housing and cover.
11. Check the inner-to-outer rotor radial clearance.
Inner-to-Outer Rotor Radial Clearance
Standard (New): 0.05 – 0.21 mm (0.002 – 0.008 in)
Service Limit: 0.23 mm (0.009 in)
OUTER ROTOR
INNER ROTOR
12. Check the housing-to-rotor axial clearance. Housing-to-Rotor Axial Clearance
Standard (New): 0.02 – 0.07 mm
(0.001 – 0.003 in)
Service Limit: 0.12 mm (0.005 in)
PUMP HOUSING
OUTER ROTORProCarManuals.com
Page 1044 of 1640
Engine Oil
Inspection
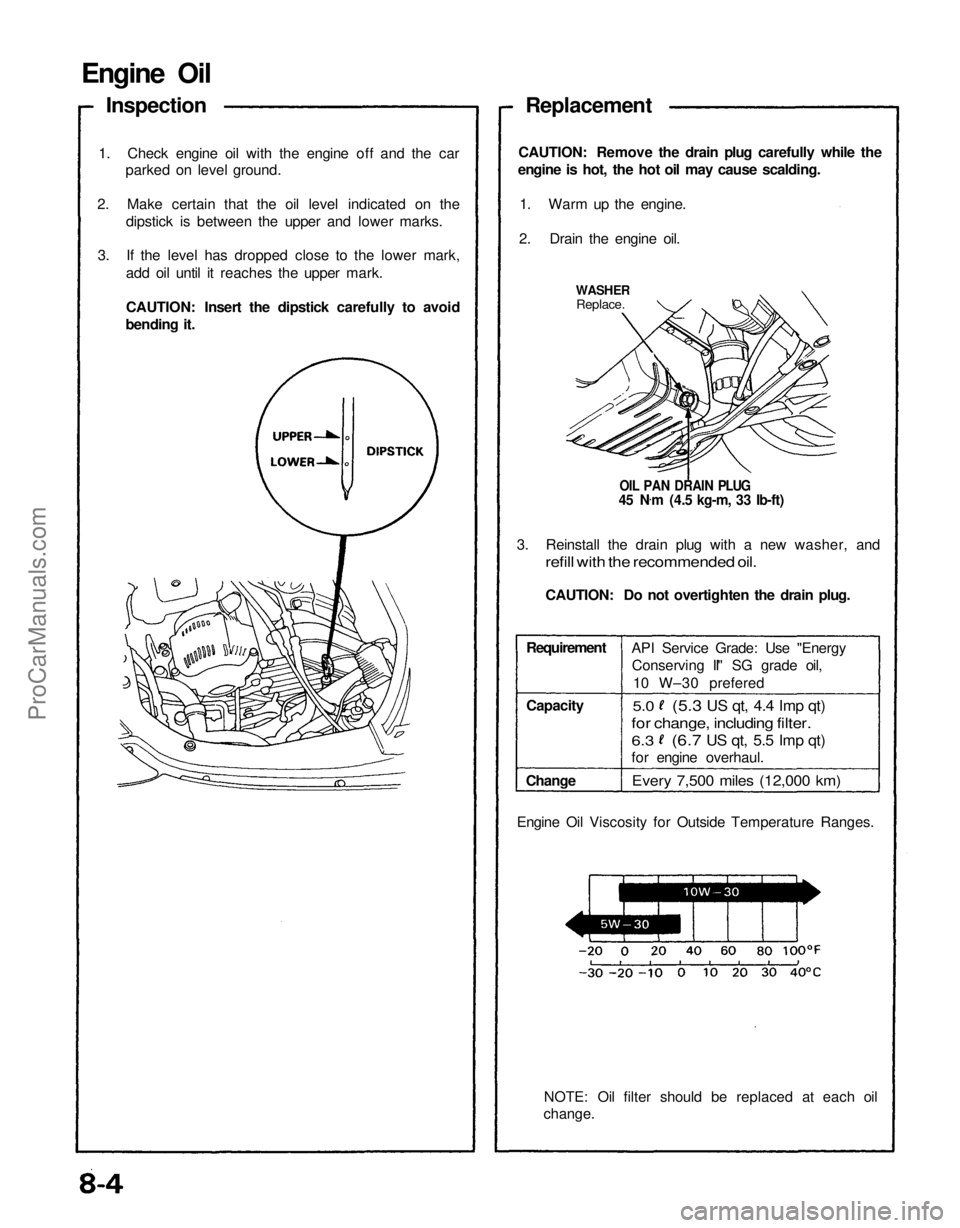
1. Check engine oil with the engine off and the car parked on level ground.
2. Make certain that the oil level indicated on the dipstick is between the upper and lower marks.
3. If the level has dropped close to the lower mark, add oil until it reaches the upper mark.
CAUTION: Insert the dipstick carefully to avoid
bending it. Replacement
CAUTION: Remove the drain plug carefully while the
engine is hot, the hot oil may cause scalding.
1. Warm up the engine.
2. Drain the engine oil.
WASHER
Replace.
OIL PAN DRAIN PLUG
45 N .
m (4.5 kg-m, 33 Ib-ft)
3. Reinstall the drain plug with a new washer, and
refill with the recommended oil.
CAUTION: Do not overtighten the drain plug.
Requirement
Capacity
Change API Service Grade: Use "Energy
Conserving II" SG grade oil,
10 W–30 prefered
5.0
Every 7,500 miles (12,000 km)
NOTE: Oil filter should be replaced at each oil
change.
Engine Oil Viscosity for Outside Temperature Ranges.
(5.3
US qt, 4.4 Imp qt)
for change, including filter.
6.3
(6.7
US qt, 5.5 Imp qt)
for engine overhaul.ProCarManuals.com
Page 1462 of 1640
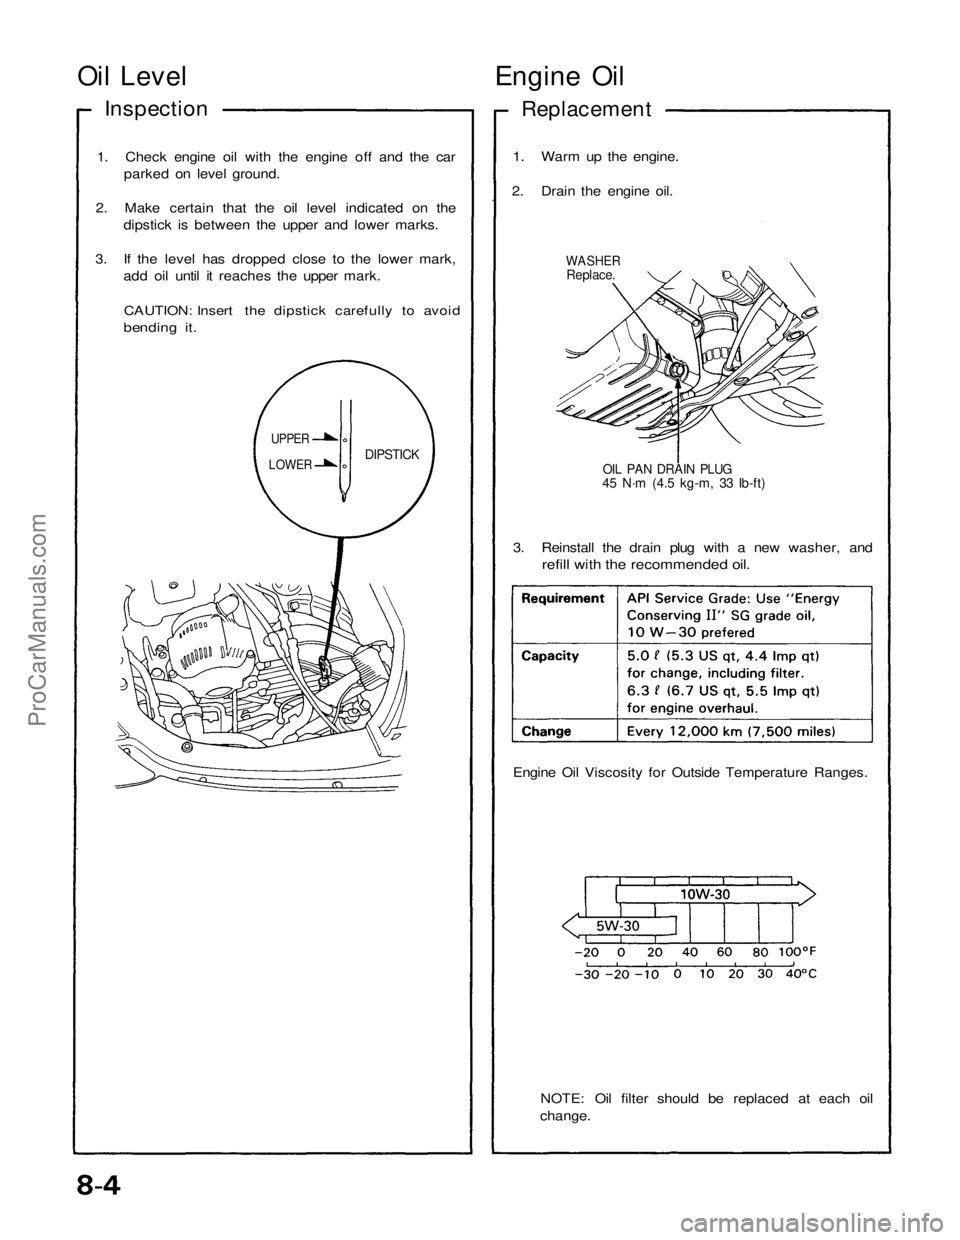
Oil Level
Engine Oil
Inspection
Replacement
1. Check engine oil with the engine off and the car parked on level ground.
2. Make certain that the oil level indicated on the dipstick is between the upper and lower marks.
3. If the level has dropped close to the lower mark, add oil until it reaches the upper mark.
CAUTION: Insert the dipstick carefully to avoid
bending it.
1. Warm up the engine.
2. Drain the engine oil.
WASHER
Replace.
OIL PAN DRAIN PLUG
45 N·m (4.5 kg-m, 33 Ib-ft)
DIPSTICK
UPPER
LOWER
3. Reinstall the drain plug with a new washer, and
refill with the recommended oil.
Engine Oil Viscosity for Outside Temperature Ranges.
NOTE: Oil filter should be replaced at each oil
change.ProCarManuals.com