ad blue ACURA NSX 1997 Service Repair Manual
[x] Cancel search | Manufacturer: ACURA, Model Year: 1997, Model line: NSX, Model: ACURA NSX 1997Pages: 1503, PDF Size: 57.08 MB
Page 364 of 1503

1-2
Chassis and Paint Codes
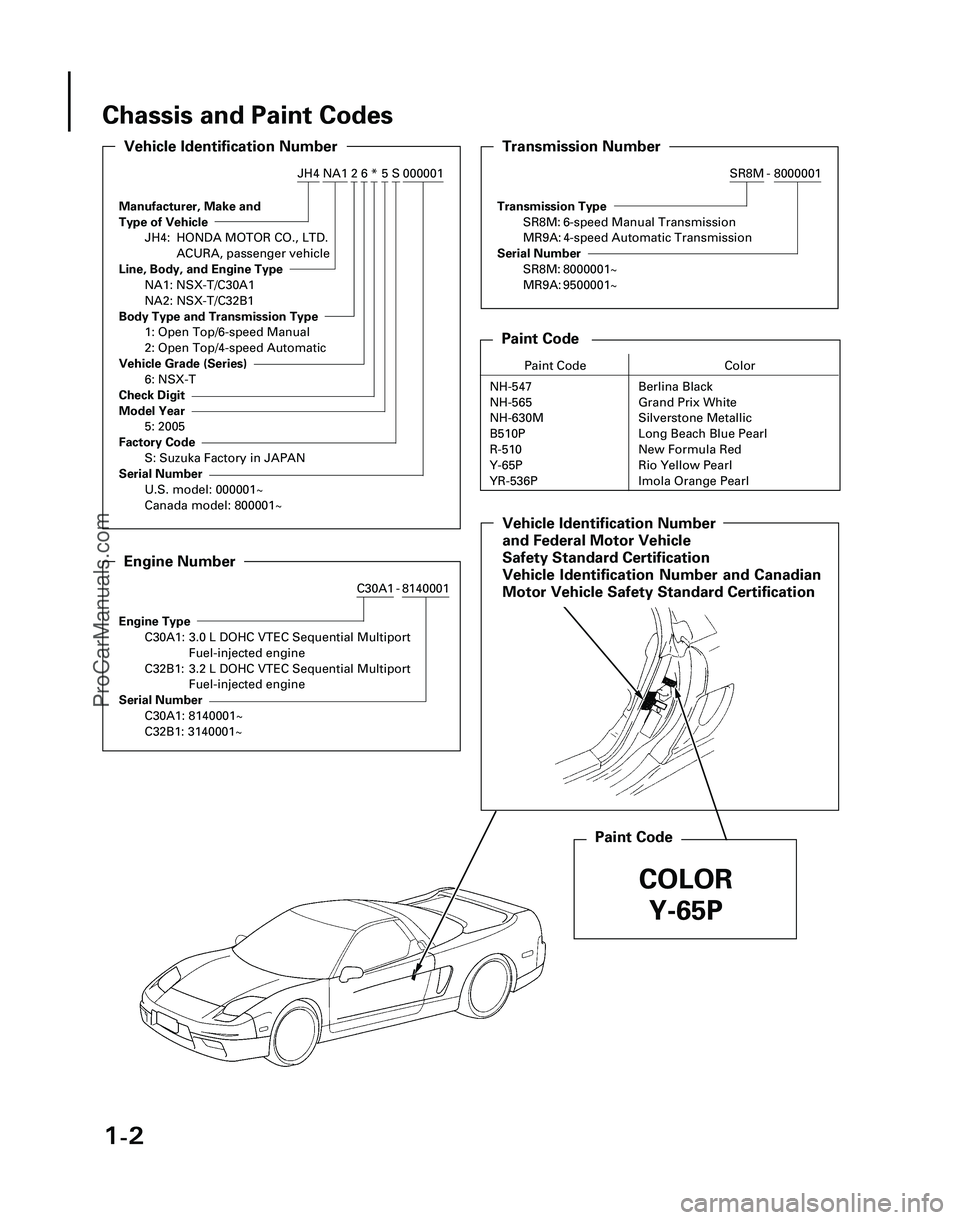
Manufacturer, Make and
Type of Vehicle
JH4: HONDA MOTOR CO., LTD.ACURA, passenger vehicle
Line, Body, and Engine Type
NA1: NSX-T/C30A1
NA2: NSX-T/C32B1
Body Type and Transmission Type
1: Open Top/6-speed Manual
2: Open Top/4-speed Automatic
Vehicle Grade (Series)
6: NSX-T
Check Digit
Model Year
5: 2005
Factory Code
S: Suzuka Factory in JAPAN
Serial Number
U.S. model: 000001~
Canada model: 800001~
Vehicle Identification Number
000001S5*62NA1JH4
Engine Type
C30A1: 3.0 L DOHC VTEC Sequential Multiport Fuel-injected engine
C32B1: 3.2 L DOHC VTEC Sequential Multiport Fuel-injected engine
Serial Number
C30A1: 8140001~
C32B1: 3140001~
Engine Number
8140001-C30A1
Transmission Type
SR8M: 6-speed Manual Transmission
MR9A: 4-speed Automatic Transmission
Serial Number
SR8M: 8000001~
MR9A: 9500001~
Transmission Number
8000001-SR8M
Paint Code
Paint Code Color
NH-547 Berlina Black
NH-565 Grand Prix White
NH-630M Silverstone Metallic
B510P Long Beach Blue Pearl
R-510 New Formula Red
Y-65P
YR-536P
Paint Code
Vehicle Identification Number
Safety Standard Certification
Vehicle Identification Number and Canadian
Motor Vehicle Safety Standard Certification
COLOR Y-65P
*03-NSX (61SW004)SEC01(01-04) 9/22/04 1:48 PM Page 1-2
Rio Yellow Pearl
and Federal Motor Vehicle
Imola Orange Pearl
ProCarManuals.com
Page 431 of 1503

Timing Bel t
Inspectio n
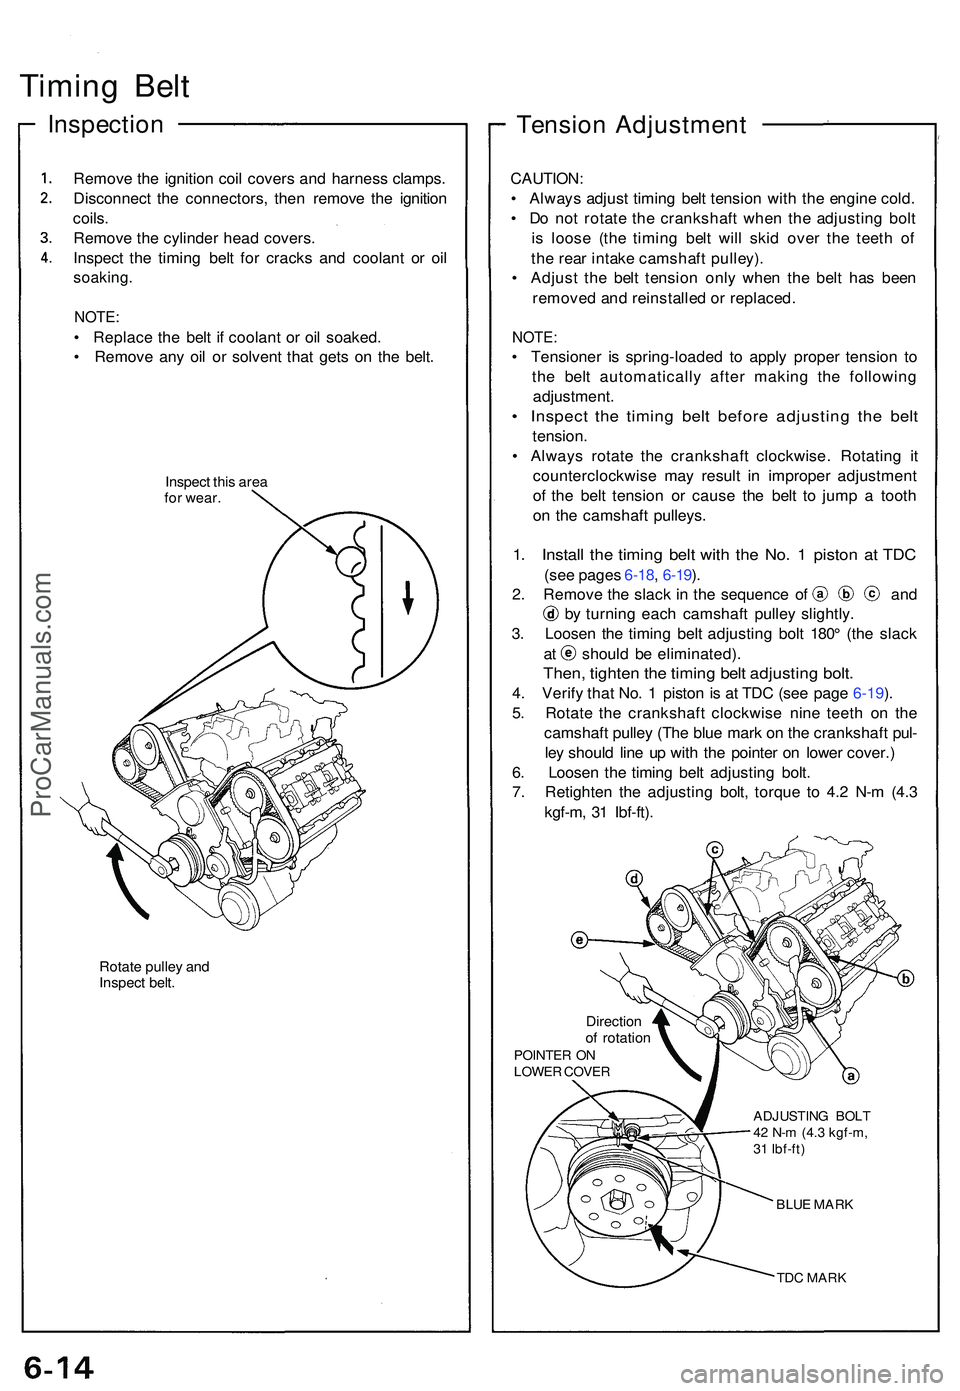
Remove th e ignitio n coi l cover s an d harnes s clamps .
Disconnec t th e connectors , the n remov e th e ignitio n
coils .
Remov e th e cylinde r hea d covers .
Inspec t th e timin g bel t fo r crack s an d coolan t o r oi l
soaking .
NOTE:
• Replac e th e bel t i f coolan t o r oi l soaked .
• Remov e an y oi l o r solven t tha t get s o n th e belt .
Inspec t thi s are a
fo r wear .
Rotate pulle y an d
Inspec t belt .
Tensio n Adjustmen t
CAUTION:
• Alway s adjus t timin g bel t tensio n wit h th e engin e cold .
• D o no t rotat e th e crankshaf t whe n th e adjustin g bol t
i s loos e (th e timin g bel t wil l ski d ove r th e teet h o f
th e rea r intak e camshaf t pulley) .
• Adjus t th e bel t tensio n onl y whe n th e bel t ha s bee n
remove d an d reinstalle d o r replaced .
NOTE:
• Tensione r i s spring-loade d t o appl y prope r tensio n t o
th e bel t automaticall y afte r makin g th e followin g
adjustment .
• Inspec t th e timin g bel t befor e adjustin g th e bel t
tension .
• Alway s rotat e th e crankshaf t clockwise . Rotatin g i t
counterclockwis e ma y resul t i n imprope r adjustmen t
o f th e bel t tensio n o r caus e th e bel t t o jum p a toot h
o n th e camshaf t pulleys .
1. Instal l th e timin g bel t wit h th e No . 1 pisto n a t TD C
(see page s 6-18 , 6-19 ).
2 . Remov e th e slac k i n th e sequenc e o f an d
by turnin g eac h camshaf t pulle y slightly .
3 . Loose n th e timin g bel t adjustin g bol t 180 ° (th e slac k
at shoul d b e eliminated) .
Then, tighte n th e timin g bel t adjustin g bolt .
4. Verif y tha t No . 1 pisto n i s a t TD C (se e pag e 6-19 ).
5 . Rotat e th e crankshaf t clockwis e nin e teet h o n th e
camshaf t pulle y (Th e blu e mar k o n th e crankshaf t pul -
le y shoul d lin e u p wit h th e pointe r o n lowe r cover. )
6 . Loose n th e timin g bel t adjustin g bolt .
7 . Retighte n th e adjustin g bolt , torqu e t o 4. 2 N- m (4. 3
kgf-m , 3 1 Ibf-ft) .
Directio nof rotatio nPOINTE R O NLOWE R COVE R
ADJUSTING BOL T
42 N- m (4. 3 kgf-m ,
3 1 Ibf-ft )
BLUE MAR K
TDC MAR K
ProCarManuals.com
Page 850 of 1503

Differential
Reassembl y
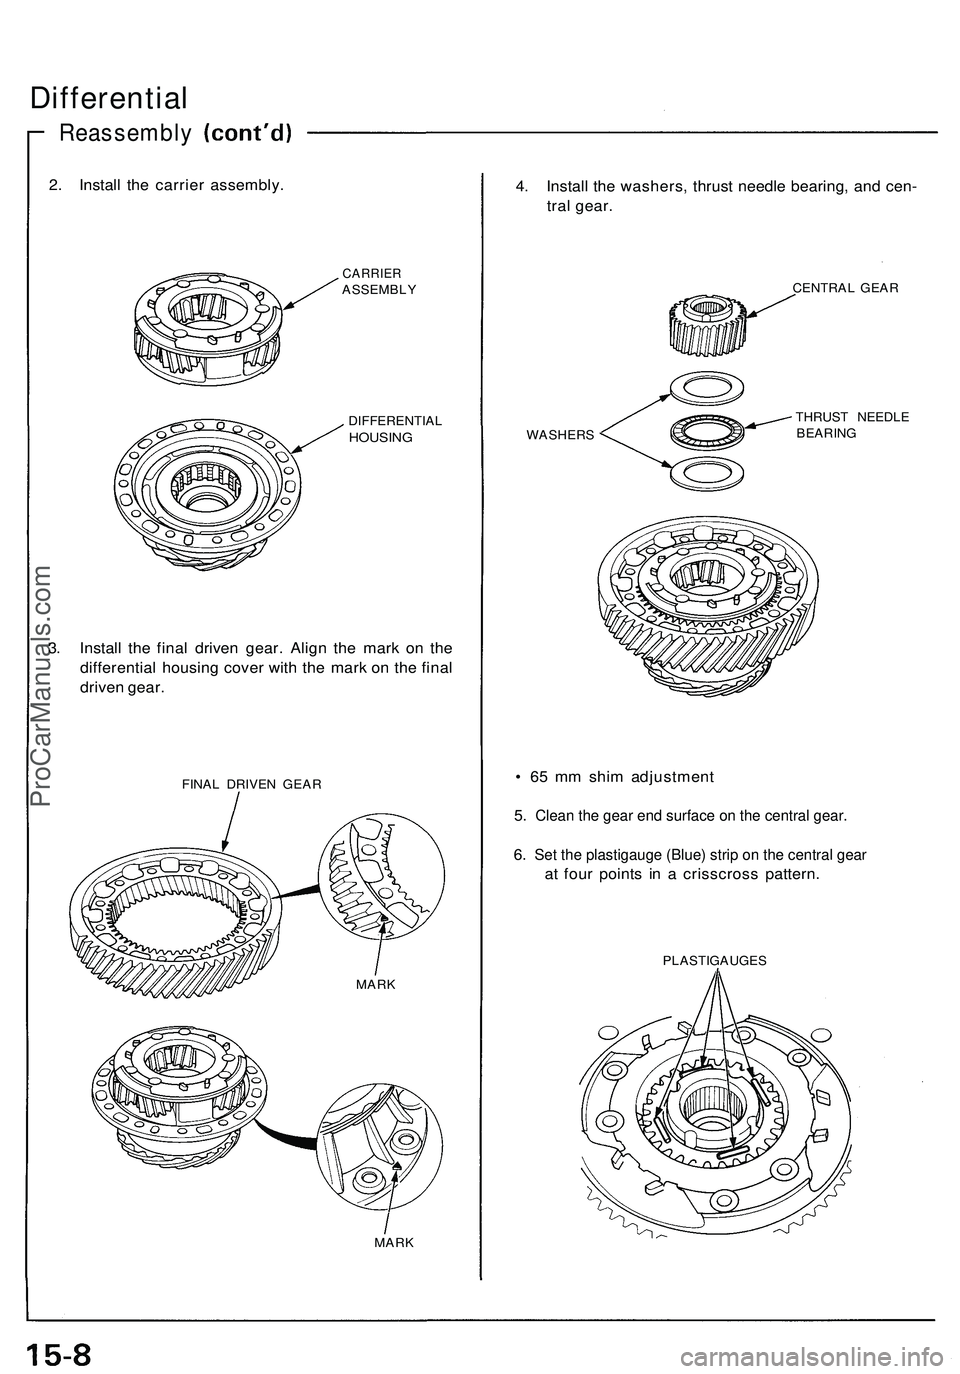
2. Instal l th e carrie r assembly .
CARRIERASSEMBL Y
DIFFERENTIA L
HOUSING
3. Instal l th e fina l drive n gear . Alig n th e mar k o n th e
differentia l housin g cove r wit h th e mar k o n th e fina l
drive n gear .
FINAL DRIVE N GEA R
MARK
4. Instal l th e washers , thrus t needl e bearing , an d cen -
tra l gear .
CENTRA L GEA R
WASHER S THRUS
T NEEDL E
BEARIN G
• 6 5 m m shi m adjustmen t
5 .
Clean the gear end surface on the central gear.
6. Set the plastigauge (Blue) strip on the central gear
a t fou r point s i n a crisscros s pattern .
PLASTIGAUGE S
MAR K
ProCarManuals.com