oil filter ACURA NSX 1997 Service Repair Manual
[x] Cancel search | Manufacturer: ACURA, Model Year: 1997, Model line: NSX, Model: ACURA NSX 1997Pages: 1503, PDF Size: 57.08 MB
Page 40 of 1503
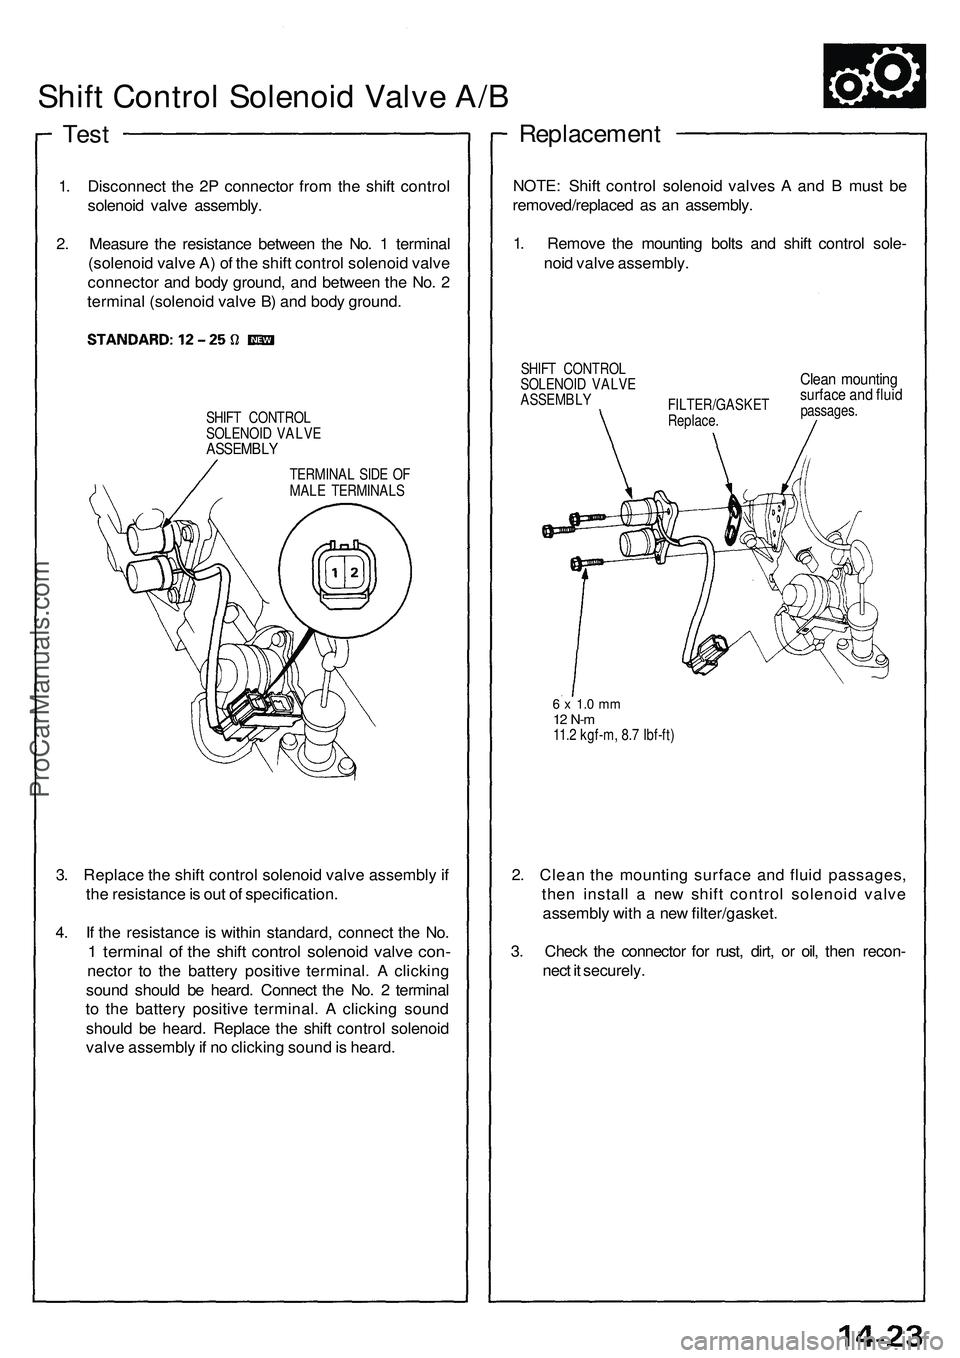
Shift Contro l Solenoi d Valv e A/ B
Tes t
1. Disconnec t th e 2 P connecto r fro m th e shif t contro l
solenoi d valv e assembly .
2 . Measur e th e resistanc e betwee n th e No . 1 termina l
(solenoi d valv e A ) o f th e shif t contro l solenoi d valv e
connecto r an d bod y ground , an d betwee n th e No . 2
termina l (solenoi d valv e B ) an d bod y ground .
SHIFT CONTRO L
SOLENOI D VALV E
ASSEMBL Y
TERMINAL SID E O F
MAL E TERMINAL S
3. Replac e th e shif t contro l solenoi d valv e assembl y if
th e resistanc e is ou t o f specification .
4 . I f th e resistanc e is withi n standard , connec t th e No .
1 termina l o f th e shif t contro l solenoi d valv e con -
necto r t o th e batter y positiv e terminal . A clickin g
soun d shoul d b e heard . Connec t th e No . 2 termina l
t o th e batter y positiv e terminal . A clickin g soun d
shoul d b e heard . Replac e th e shif t contro l solenoi d
valv e assembl y if n o clickin g soun d is heard .
Replacemen t
NOTE: Shif t contro l solenoi d valve s A an d B mus t b e
removed/replace d a s a n assembly .
1 . Remov e th e mountin g bolt s an d shif t contro l sole -
noi d valv e assembly .
SHIFT CONTRO L
SOLENOI D VALV E
ASSEMBL Y
FILTER/GASKE T
Replace .Clean mountin gsurface an d flui dpassages .
6 x 1. 0 m m12 N- m11. 2 kgf-m , 8. 7 Ibf-ft )
2. Clea n th e mountin g surfac e an d flui d passages ,
the n instal l a ne w shif t contro l solenoi d valv e
assembl y wit h a ne w filter/gasket .
3 . Chec k th e connecto r fo r rust , dirt , o r oil , the n recon -
nec t i t securely .
ProCarManuals.com
Page 374 of 1503
4-5
Y
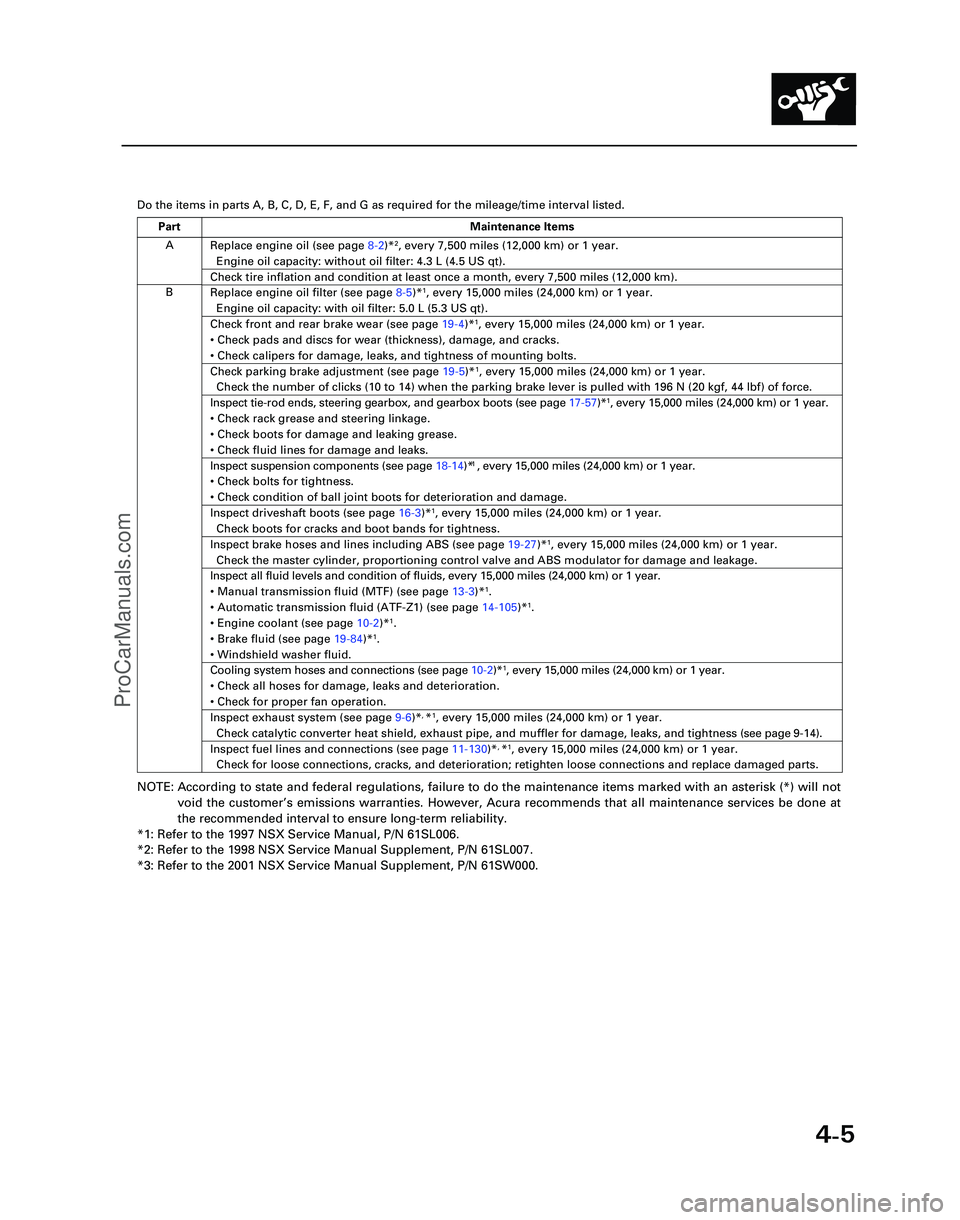
Do the items in parts A, B, C, D, E, F, and G as required for the mileag\
e/time interval listed.
NOTE: According to state and federal regulations, failure to do the maintenanc\
e items marked with an asterisk (*) will not
void the customer ’s emissions warranties. However, Acura recommends that all maintenance s\
ervices be done at
the recommended interval to ensure long-term reliability.
*1: Refer to the 1997 NSX Service Manual, P/N 61SL006.
*2: Refer to the 1998 NSX Service Manual Supplement, P/N 61SL007.
*3: Refer to the 2001 NSX Service Manual Supplement, P/N 61SW000.
A
B Replace engine oil (see page
8-2)*
2, every 7,500 miles (12,000 km) or 1 year.
Engine oil capacity: without oil filter: 4.3 L (4.5 US qt).
Check tire inflation and condition at least once a month, every 7,500 mi\
les (12,000 km).
Replace engine oil filter (see page 8-5)*1, every 15,000 miles (24,000 km) or 1 year.
Engine oil capacity: with oil filter: 5.0 L (5.3 US qt).
Check front and rear brake wear (see page 19-4)*1, every 15,000 miles (24,000 km) or 1 year.
• Check pads and discs for wear (thickness), damage, and cracks.
• Check calipers for damage, leaks, and tightness of mounting bolts.
Check parking brake adjustment (see page 19-5)*1, every 15,000 miles (24,000 km) or 1 year.
Check the number of clicks (10 to 14) when the parking brake lever is pulled with 196 N (20 kgf,\
44 lbf) of force.
Inspect tie-rod ends, steering gearbox, and gearbox boots (see page 17-57)*1, every 15,000 miles (24,000 km) or 1 year.
• Check rack grease and steering linkage.
• Check boots for damage and leaking grease.
• Check fluid lines for damage and leaks.1
• Check bolts for tightness.
• Check condition of ball joint boots for deterioration and damage.
Inspect driveshaft boots (see page 16-3)*1, every 15,000 miles (24,000 km) or 1 year.
Check boots for cracks and boot bands for tightness.
Inspect brake hoses and lines including ABS (see page 19-27)*1, every 15,000 miles (24,000 km) or 1 year.
Check the master cylinder, proportioning control valve and ABS modulator\
for damage and leakage.
Inspect all fluid levels and condition of fluids, every 15,000 miles (2\
4,000 km) or 1 year.
• Manual transmission fluid (MTF) (see page 13-3)*
1.
• Automatic transmission fluid (ATF-Z1) (see page 14-105)*1.
• Engine coolant (see page 10-2)*1.
• Brake fluid (see page 19-84)*1.
• Windshield washer fluid.
Cooling system hoses and connections (see page 10-2)*1, every 15,000 miles (24,000 km) or 1 year.
• Check all hoses for damage, leaks and deterioration.
• Check for proper fan operation.
Inspect exhaust system (see page 9-6)*, *1, every 15,000 miles (24,000 km) or 1 year.
Check catalytic converter heat shield, exhaust pipe, and muffler for dam\
age, leaks, and tightness ( see page 9-14 ).
Inspect fuel lines and connections (see page 11-130)*, *1, every 15,000 miles (24,000 km) or 1 year.
Check for loose connections, cracks, and deterioration; retighten loose \
connections and replace damaged parts.
Part Maintenance Items
*05-NSX (61SW004)SEC04(01-10) 9/22/04 1:49 PM Page 4-5
Inspect suspension components (see page 18-14)* , every 15,000 miles (24,000 km) or 1 year.
ProCarManuals.com
Page 422 of 1503
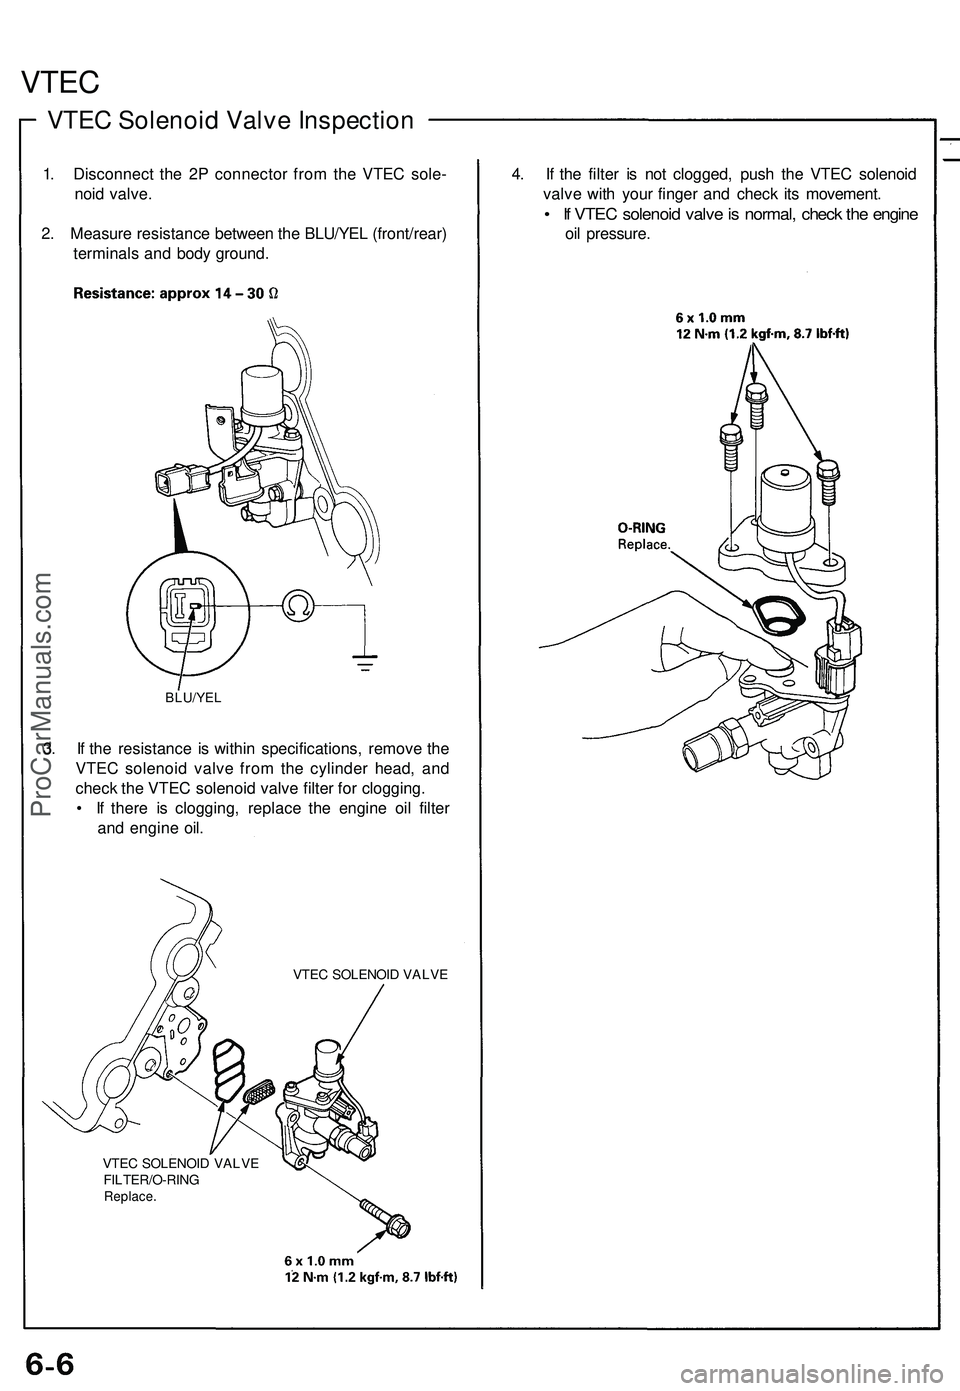
VTEC
VTEC Solenoid Valve Inspection
1. Disconnect the 2P connector from the VTEC sole-
noid valve.
2. Measure resistance between the BLU/YEL (front/rear)
terminals and body ground.
BLU/YEL
3. If the resistance is within specifications, remove the
VTEC solenoid valve from the cylinder head, and
check the VTEC solenoid valve filter for clogging.
• If there is clogging, replace the engine oil filter
and engine oil.
VTEC SOLENOID VALVE
VTEC SOLENOID VALVE
FILTER/O-RING
Replace.
4. If the filter is not clogged, push the VTEC solenoid
valve with your finger and check its movement.
• If VTEC solenoid valve is normal, check the engine
oil pressure.ProCarManuals.com
Page 448 of 1503
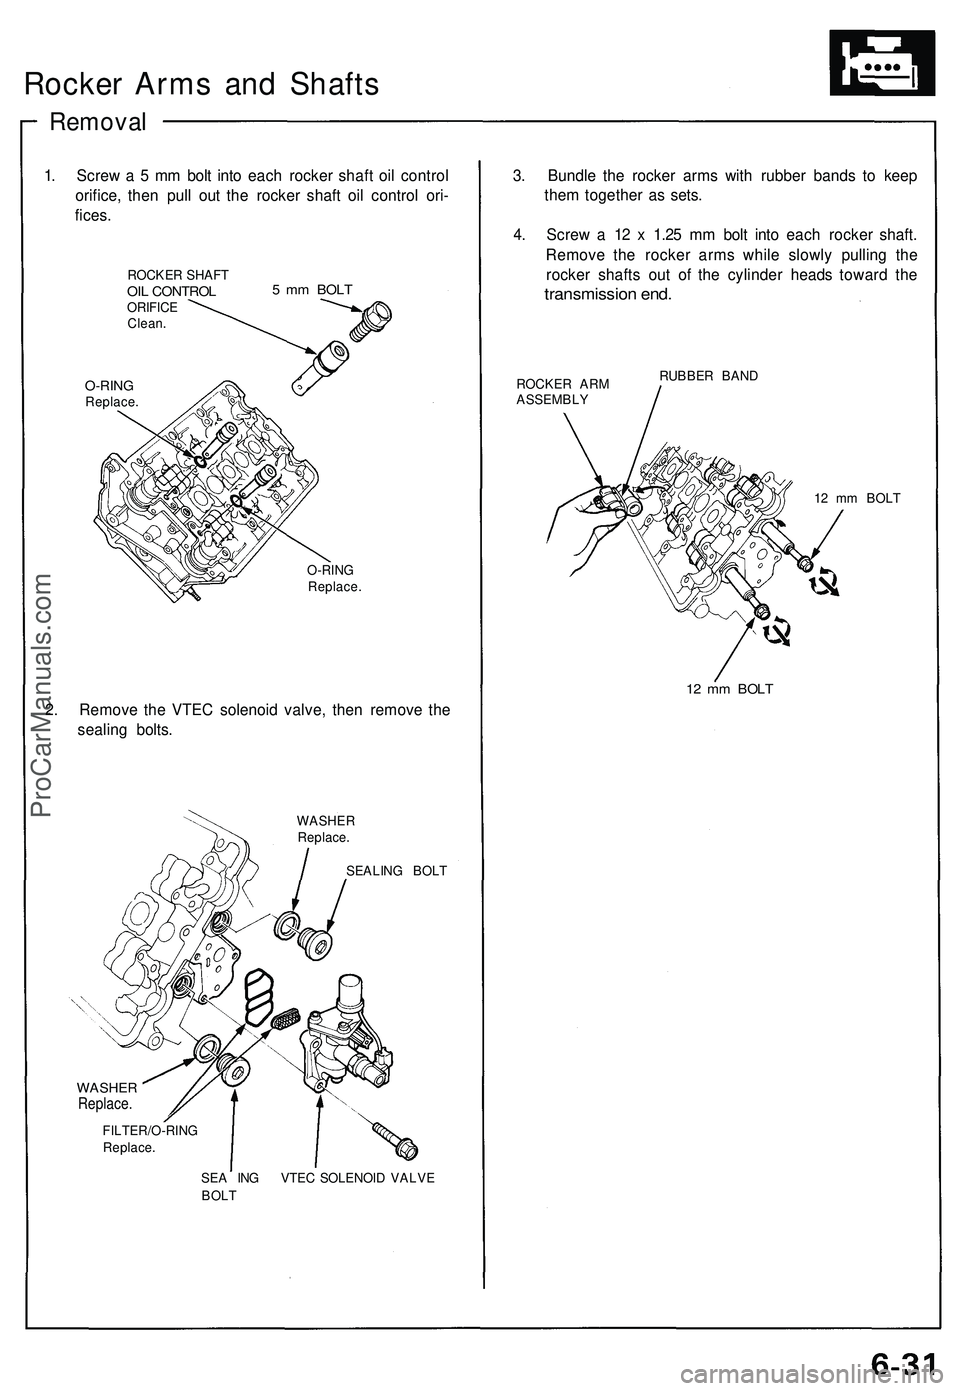
Rocker Arm s an d Shaft s
Remova l
1. Scre w a 5 m m bol t int o eac h rocke r shaf t oi l contro l
orifice , the n pul l ou t th e rocke r shaf t oi l contro l ori -
fices .
ROCKE R SHAF TOIL CONTRO LORIFICEClean.
5 m m BOL T
O-RIN GReplace .
O-RING
Replace .
2. Remov e th e VTE C solenoi d valve , the n remov e th e
sealin g bolts .
WASHE R
Replace .
SEALIN G BOL T
WASHE RReplace .
FILTER/O-RIN GReplace.
SEA IN G VTE C SOLENOI D VALV E
BOL T
3. Bundl e th e rocke r arm s wit h rubber bands t o kee p
the m togethe r a s sets .
4 . Scre w a 1 2 x 1.2 5 m m bol t int o eac h rocke r shaft .
Remov e th e rocke r arm s whil e slowl y pullin g th e
rocke r shaft s ou t o f th e cylinde r head s towar d th e
transmissio n end .
ROCKE R AR M
ASSEMBL Y RUBBE
R BAN D
12 m m BOL T
12 m m BOL T
ProCarManuals.com
Page 502 of 1503
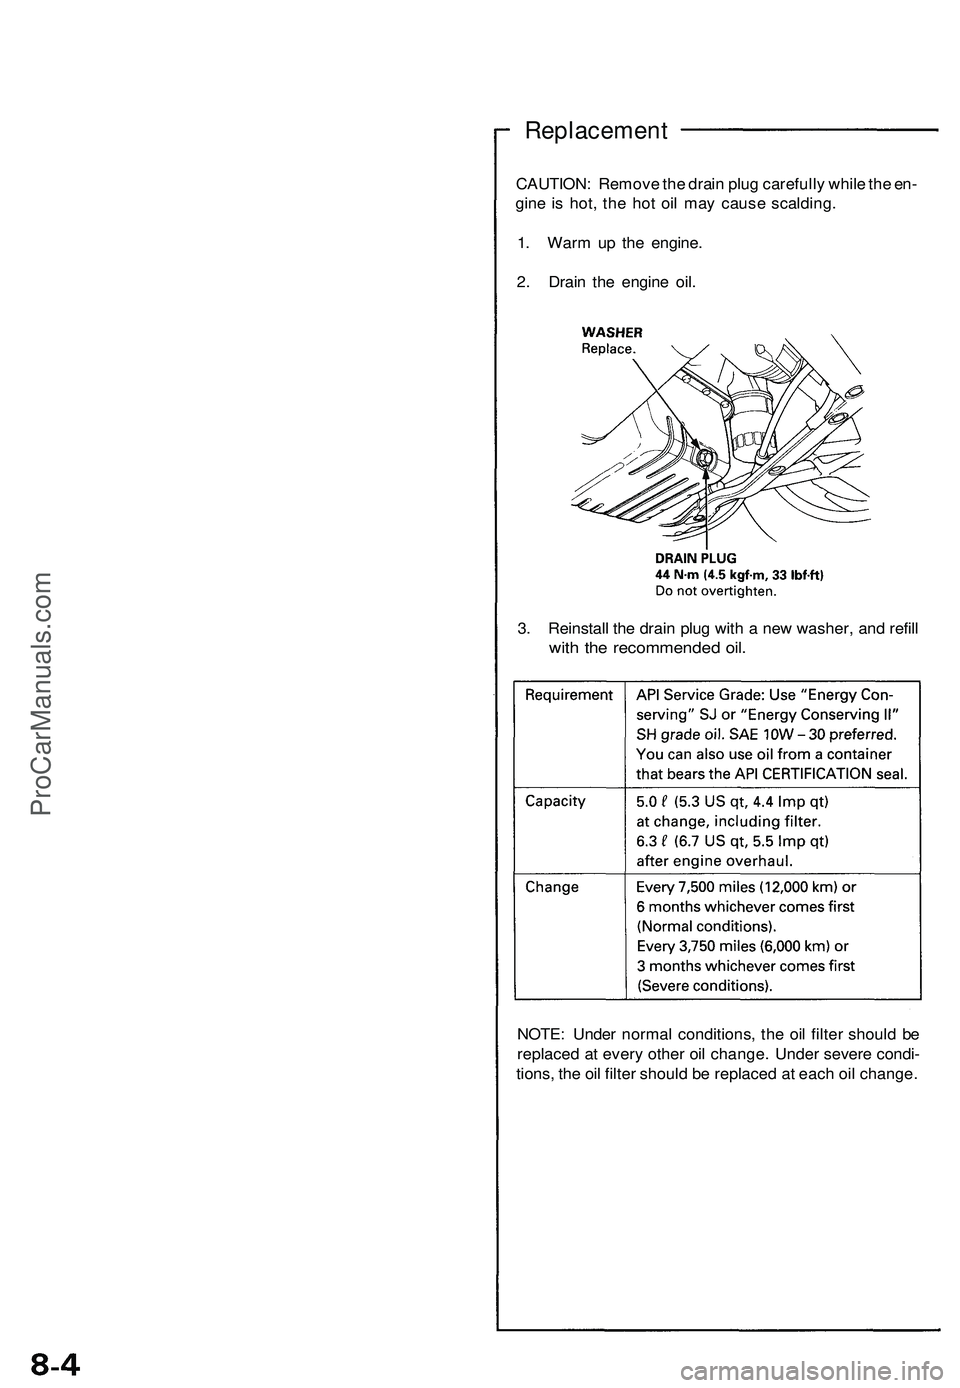
Replacement
CAUTION: Remove the drain plug carefully while the en-
gine is hot, the hot oil may cause scalding.
1. Warm up the engine.
2. Drain the engine oil.
3. Reinstall the drain plug with a new washer, and refill
with the recommended oil.
NOTE: Under normal conditions, the oil filter should be
replaced at every other oil change. Under severe condi-
tions, the oil filter should be replaced at each oil change.ProCarManuals.com
Page 504 of 1503
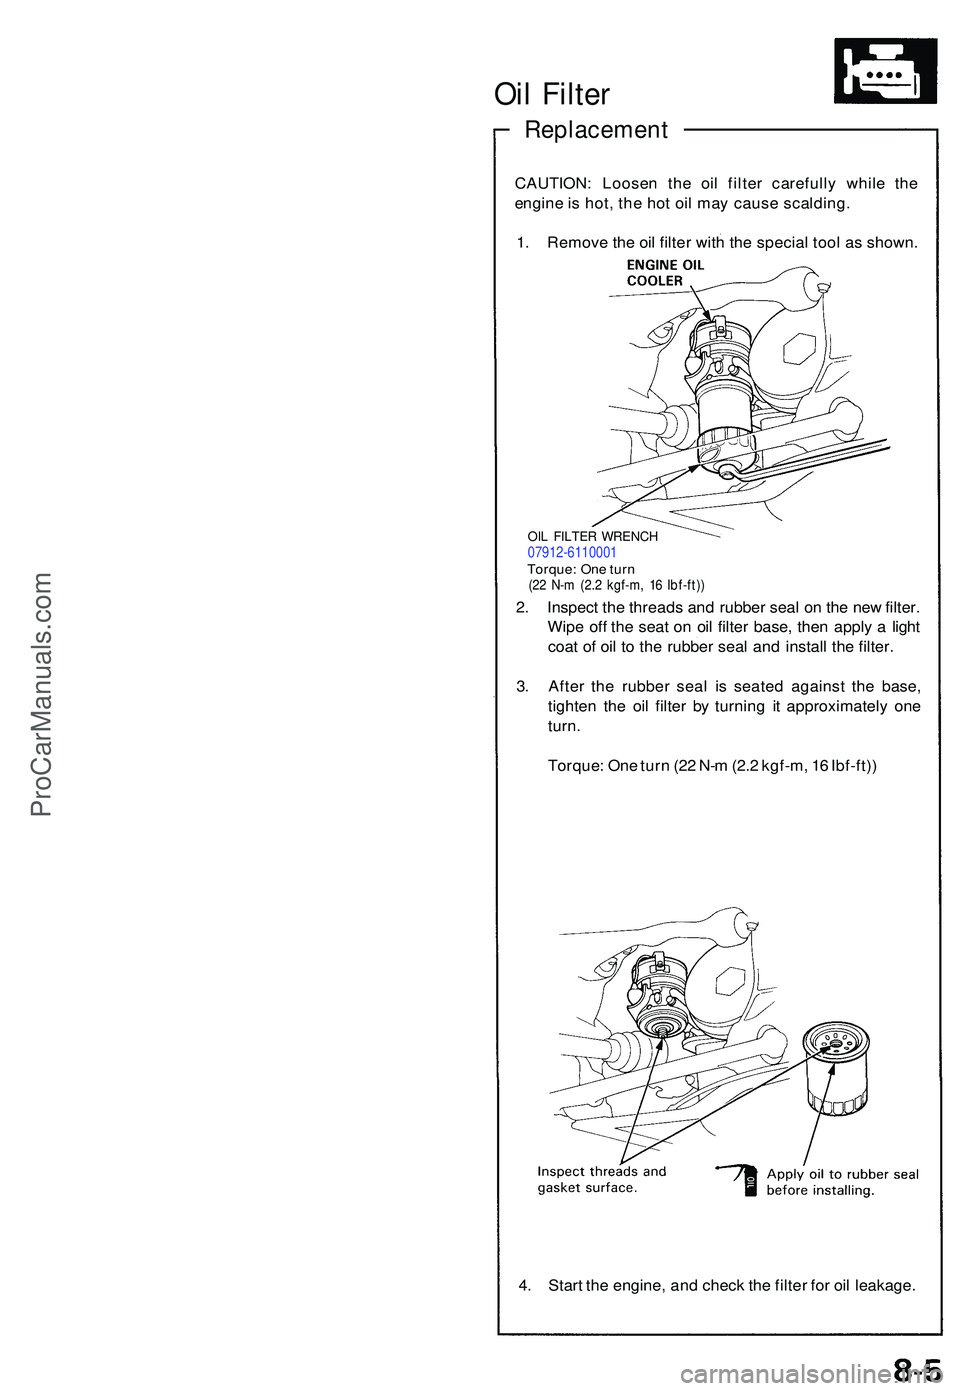
Oil Filte r
Replacemen t
CAUTION: Loose n th e oi l filte r carefull y whil e th e
engin e is hot , the hot oi l ma y cause scalding .
1 . Remov e th e oi l filte r wit h th e specia l too l a s shown .
OIL FILTE R WRENC H07912-611000 1Torque: On e tur n(22 N- m (2. 2 kgf-m , 1 6 Ibf-ft) )
2. Inspec t th e thread s an d rubbe r sea l o n th e ne w filter .
Wip e of f th e sea t o n oi l filte r base , the n appl y a ligh t
coa t o f oi l t o th e rubber seal an d instal l th e filter .
3 . Afte r th e rubbe r sea l i s seate d agains t th e base ,
tighte n th e oi l filte r b y turnin g i t approximatel y on e
turn .
Torque : On e tur n (2 2 N- m (2. 2 kgf-m , 1 6 Ibf-ft) )
4 . Star t th e engine , an d chec k th e filte r fo r oi l leakage .
ProCarManuals.com