display Acura NSX 2017 User Guide
[x] Cancel search | Manufacturer: ACURA, Model Year: 2017, Model line: NSX, Model: Acura NSX 2017Pages: 473, PDF Size: 16.01 MB
Page 102 of 473

Continued101
uuGauges and Displays uDriver Information Interface
Instrument Panel
Shows the estimated average fuel econom y of each trip meter in mpg (U.S.) or
l/100 km (Canada). The display is updated at set intervals. When a trip meter is reset,
the average fuel economy is also reset.
Shows the instant fuel economy as a bar gr aph in mpg (U.S.) or l/100 km (Canada).
Shows the estimated distance you can travel on the remaining power and fuel. This
distance is estimated from the fuel economy of your previous trips.
Shows the time elapsed since Trip A or Trip B was reset.
Shows the average speed in mph (U.S.) or km/h (Canada) since Trip A or Trip B was
reset.
■Average Fuel Economy
■Instant Fuel Economy
■Range
■Elapsed Time
■Average Speed
1 Average Fuel Economy
You can change when to reset the average fuel
economy.
2 Customized Features P. 232
1Range
The displayed range may change even when the
vehicle is stationary.
1 Elapsed Time
You can change when to reset the elapsed time.
2 Customized Features P. 232
1Average Speed
You can change when to reset the average speed.
2 Customized Features P. 232
17 NSX-31T6N6000.book 101 ページ 2016年4月22日 金曜日 午後3時44分
Page 103 of 473

uuGauges and Displays uDriver Information Interface
102
Instrument Panel
Shows you turn-by-turn driving directions to your destination linked with the
navigation system*.
2 Refer to the Navigation System Manual
Shows the remaining oil life and Maintenance MinderTM.
2Maintenance MinderTM P. 365
Shows the engine oil level check assist display.
2Oil Check P. 377
Shows each tire’s pressure.
2Tire Pressure Monitoring System (TPMS) P. 339
■Turn-by-Turn Directions
■Engine Oil Life
■Oil Level Check Assist
■Tire Pressure Monitor
1Turn-by-Turn Directions
The driver information in terface shows a compass
when the route guidance is not in use.
You can select whether th e turn-by-turn display
comes on or not during the route guidance.
2 Customized Features P. 232
* Not available on all models
17 NSX-31T6N6000.book 102 ページ 2016年4月22日 金曜日 午後3時44分
Page 105 of 473

104
Controls
Clock
Adjusting the Clock
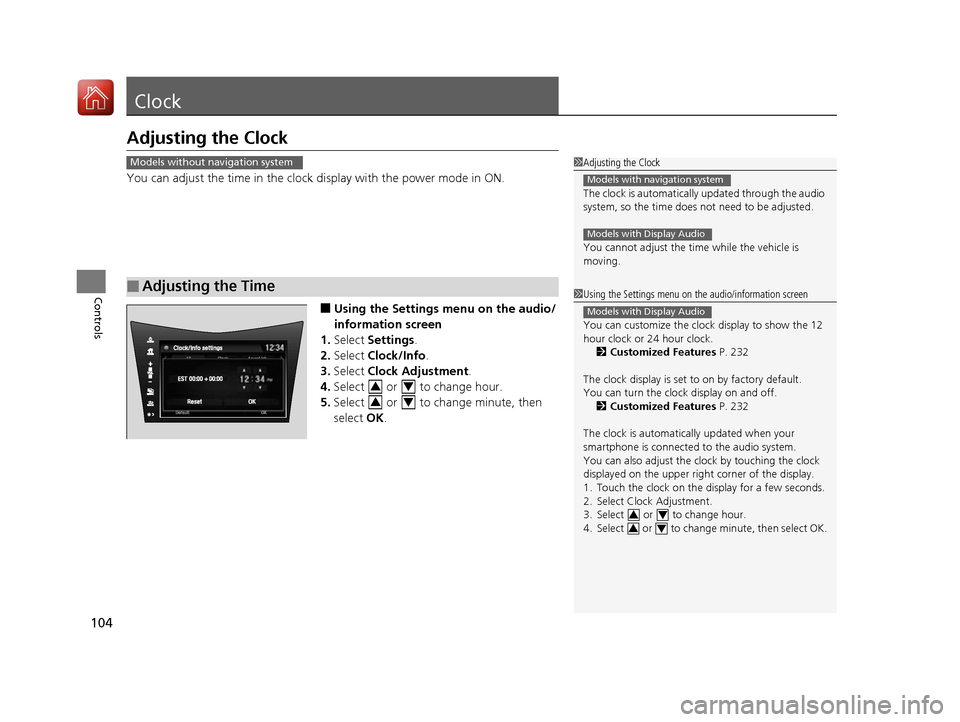
You can adjust the time in the clock display with the power mode in ON.
■Using the Settings menu on the audio/
information screen
1. Select Settings .
2. Select Clock/Info .
3. Select Clock Adjustment .
4. Select or to change hour.
5. Select or to change minute, then
select OK.
■Adjusting the Time
1Adjusting the Clock
The clock is automatically updated through the audio
system, so the time does not need to be adjusted.
You cannot adjust the time while the vehicle is
moving.
Models with navigation system
Models with Display Audio
Models without navigation system
1 Using the Settings menu on the audio/information screen
You can customize the clock display to show the 12
hour clock or 24 hour clock.
2 Customized Features P. 232
The clock display is set to on by factory default.
You can turn the clock display on and off. 2 Customized Features P. 232
The clock is automatica lly updated when your
smartphone is connected to the audio system.
You can also adjust the clock by touching the clock
displayed on the upper right corner of the display.
1. Touch the clock on the display for a few seconds.
2. Select Clock Adjustment.
3. Select or to change hour.
4. Select or to change minute, then select OK.
Models with Display Audio
34
34
34
34
17 NSX-31T6N6000.book 104 ページ 2016年4月22日 金曜日 午後3時44分
Page 137 of 473

136
uuOperating the Switches Around the Steering Wheel uBrightness Control
Controls
Brightness Control
When the power mode is in ON, you can use
the
(+ or (- button to adjust instrument
panel brightness.
To brighten: Press the
(+ button.
To dim: Press the
(- button.
You will hear a beep when the brightness
reaches minimum or maximum. Several
seconds after you have adjusted the
brightness, you will be returned to the
previous screen.
■Brightness level indicator
The brightness level is shown on the driver
information interface wh ile you are adjusting
it.
1 Brightness Control
Instrument panel brightne ss varies, depending on
whether the exterior lights are on or off. The
instrument panel dims to reduce glare when they are
on.
When it is bright out side and the headlight
integration with the wiper is activated, the
instrument panel bri ghtness does not change. If you press the (+ button until the brightness display
is up to max
, the beeper sounds. This cancels the
reduced instrument panel brightness when the
exterior lights are on.
The brightness can be set differently for when the
exterior lights are on, and when they are off.
( + Button
(- Button
17 NSX-31T6N6000.book 136 ページ 2016年4月22日 金曜日 午後3時44分
Page 157 of 473

156
Controls
Climate Control System
Using Automatic Climate Control
The automatic climate control system maintains the interior temperature you select.
The system also selects the proper mix of heated or cooled air to raise or lower the
interior temperature to your pr eference as quickly as possible. Use the system when the power system is ON.
1.
Press the AUTO button.
2. Adjust the interior temperature using the dr iver’s side or passenger’s side control
buttons.
3. Press the button to cancel.
1Using Automatic Climate Control
Press the CLIMATE button to display A/C, MODE, fan
control information on the audio/information screen
for several seconds. Select icon to turn on or off A/C,
change the vent mode, or change the fan speed.
If any buttons are presse d while using the climate
control system in auto, the function of the button
that was pressed will take priority.
The AUTO indicator will go off, but functions
unrelated to the button th at was pressed will be
controlled automatically.
To prevent cold air from bl owing in from outside, the
fan may not start i mmediately when the AUTO
button is pressed.
If the interior is very warm, you can cool it down
more rapidly by partial ly opening the windows,
turning the system to AUTO, and setting the
temperature to low. Change the fresh mode to
recirculation mode until the temperature cools down.
When you set the temperat ure to the lower or upper
limit, Lo or Hi is displayed.
Pressing the button switches the climate control
system on or off. When turned on, the system returns
to your last selection.
*1: MID vents provide supple mental air to the lower
body of the occupant(s). MID vents can be used
together with any other vent mode.
Dashboard
vents Dashboard
and floor
vents Floor vents Floor and
defroster
ventsMID vents*1
17 NSX-31T6N6000.book 156 ページ 2016年4月22日 金曜日 午後3時44分
Page 162 of 473

161
Features
This chapter describes how to operate technology features.
Audio SystemAbout Your Audio System ................ 162
USB Ports ......................................... 163
Audio System Theft Protection ......... 164
Audio Remote Controls .................... 165
Audio System Basic Operation ........ 166
Audio/Information Screen ................ 167
Adjusting the Sound ........................ 181
Display Setup ................................... 182
Voice Control Operation .................. 184
Playing FM Radio ............................. 188
Playing SiriusXM ® Radio
*................. 192
Playing an iPod ................................ 199 Song By Voice
TM (SBV) ...................... 202
Playing Pandora ®*............................ 206
Playing a USB Flash Drive ................. 208
Playing Bluetooth ® Audio................. 211
Wi-Fi Connection ............................. 213
Siri Eyes Free .................................... 215
Apple CarPlay .................................. 216
Android Auto................................... 219
Audio Error Messages iPod/USB Flash Drive ........................ 223
Pandora ®......................................... 224
Android/Apps .................................. 225
General Information on the Audio SystemSiriusXM ® Radio Service*................. 226 Compatible iPod, iP
hone, and USB Flash
Drives ............................................ 227
Legal Information on Apple CarPlay/
Android Auto................................. 228
About Open Source Licenses............ 230
License Information ......................... 231
Customized Features ........................ 232
Defaulting All the Settings ............... 254
HomeLink ® Universal Transceiver ... 255
Bluetooth® HandsFreeLink®
Using HFL ........................................ 258
HFL Menus ...................................... 261
AcuraLink®
*....................................... 292
* Not available on all models
17 NSX-31T6N6000.book 161 ページ 2016年4月22日 金曜日 午後3時44分
Page 164 of 473

163
uuAudio System uUSB Ports
Features
USB Ports
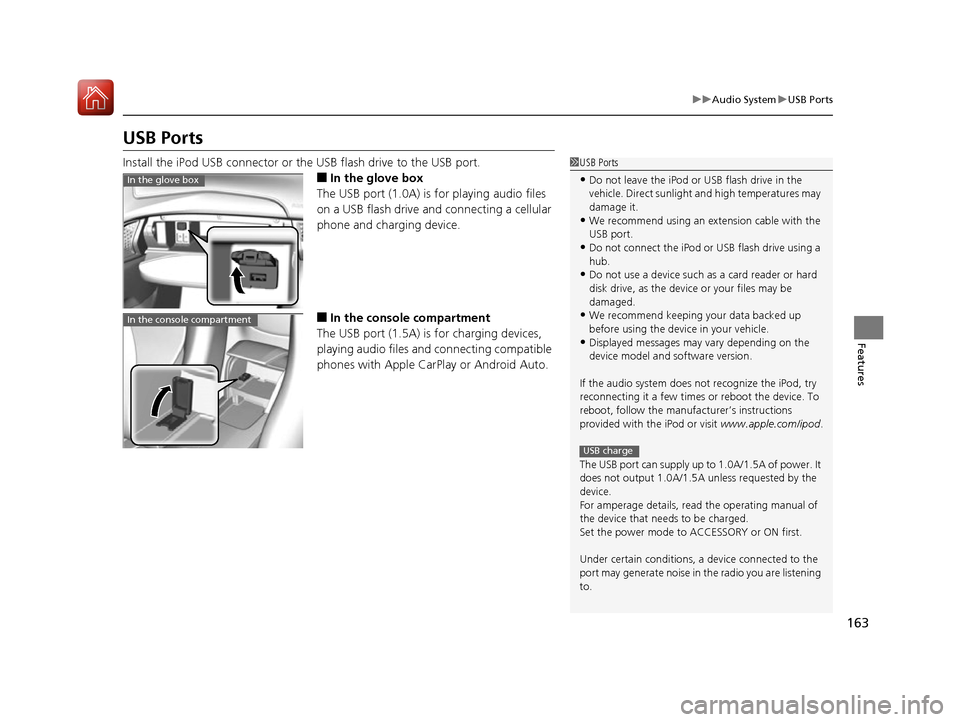
Install the iPod USB connector or the USB flash drive to the USB port.
■In the glove box
The USB port (1.0A) is for playing audio files
on a USB flash drive and connecting a cellular
phone and charging device.
■In the consol e compartment
The USB port (1.5A) is for charging devices,
playing audio files and connecting compatible
phones with Apple CarPlay or Android Auto.
1 USB Ports
•Do not leave the iPod or USB flash drive in the
vehicle. Direct sunlight and high temperatures may
damage it.
•We recommend using an ex tension cable with the
USB port.
•Do not connect the iPod or USB flash drive using a
hub.
•Do not use a device such as a card reader or hard
disk drive, as the device or your files may be
damaged.
•We recommend k eeping your data backed up
before using the device in your vehicle.
•Displayed messages may vary depending on the
device model and software version.
If the audio system does not recognize the iPod, try
reconnecting it a few times or reboot the device. To
reboot, follow the manufac turer’s instructions
provided with the iPod or visit www.apple.com/ipod.
The USB port can supply up to 1.0A/1.5A of power. It
does not output 1.0A/1.5A unless requested by the
device.
For amperage details, read the operating manual of
the device that ne eds to be charged.
Set the power mode to ACCESSORY or ON first.
Under certain condi tions, a device connected to the
port may generate noi se in the radio you are listening
to.
USB charge
In the glove box
In the console compartment
17 NSX-31T6N6000.book 163 ページ 2016年4月22日 金曜日 午後3時44分
Page 165 of 473

164
uuAudio System uAudio System Theft Protection
Features
Audio System Theft Protection
The audio system is disabled when it is di sconnected from the power source, such as
when the 12-volt battery is disconnected or goes dead. In certain conditions, the
system may display a code entry screen. If this occurs, reactivate the audio system.
■Reactivating th e audio system
1. Set the power mode to ON.
2. Turn on the audio system.
3. Select and hold the (power/audio) icon for more than two seconds.
u The audio system is reac tivated when the audio co ntrol unit establishes a
connection with the vehicle control unit. If the control unit fails to recognize
the audio unit, you must go to an authorized Acura NSX dealer and have the
audio unit checked.
17 NSX-31T6N6000.book 164 ページ 2016年4月22日 金曜日 午後3時44分
Page 167 of 473

166
Features
Audio System Basic Operation
To use the audio system function, the power mode must be in ACCESSORY or ON.
: Select to go to the home screen.
2Switching the Display P. 167
: Select to display available options
including Sound, View Radio Text , Music
Search , and playback modes.
: Select to go back to the previous screen.
: Select to change the audio/information
screen brightness.
Select once and select
(- or (+ to make
an adjustment. u Each time you select , the mode
switches among the daytime mode,
nighttime mode and off mode.
1Audio System Basic Operation
Audio Menu Items
2 Station List P. 189, 191
2 Music Search List P. 200, 209
2 Scan P. 190, 191, 198, 210
2 Play Mode P. 201, 210
(Home) Icon
(Menu) Icon
(Day/Night) Icon
(Back) Icon
17 NSX-31T6N6000.book 166 ページ 2016年4月22日 金曜日 午後3時44分
Page 168 of 473

167
uuAudio System Basic Operation uAudio/Information Screen
Continued
Features
Audio/Information Screen
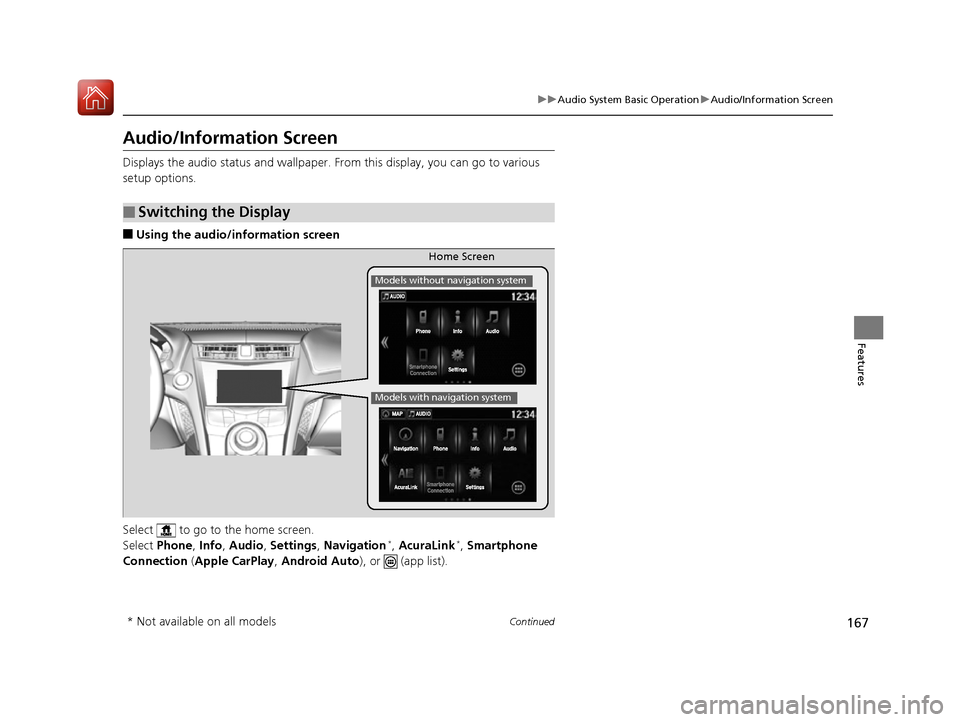
Displays the audio status and wallpaper. From this display, you can go to various
setup options.
■Using the audio/in formation screen
Select to go to the home screen.
Select Phone , Info , Audio , Settings , Navigation
*, AcuraLink*, Smartphone
Connection (Apple CarPlay, Android Auto), or (app list).
■Switching the Display
Home Screen
Models without navigation system
Models with navigation system
* Not available on all models
17 NSX-31T6N6000.book 167 ページ 2016年4月22日 金曜日 午後3時44分