ACURA RDX 2010 Owners Manual
Manufacturer: ACURA, Model Year: 2010, Model line: RDX, Model: ACURA RDX 2010Pages: 514, PDF Size: 30.21 MB
Page 301 of 514

2. Select‘‘CAL ’’by pressing preset 1
to enter the calibration mode. If
you want to cancel this mode,
select ‘‘R ’’ by pressing preset 3.
The display will return to the
normal display.
3. Select ‘‘CAL START ’’by pressing
preset 1. The system will start the
calibration. ‘‘CAL ’’will appear on
the display, then the direction will
also begin to blink. If you select
‘‘ R ’’ by pressing preset 3, the
display will return to the compass
setting mode.
4. When the direction stops blinking, the calibration mode is completed.
The display will return to the
normal display.
Compass Zone SelectionIn most areas, there is a variation
between magnetic north and true
north. Zone selection is required so
the compass can compensate for this
variation. To check and select the
zone set into the compass, do the
procedure on the following pages.
CONTINUEDCompass
297
Features
09/07/07 15:02:04 10 ACURA RDX MMC North America Owner's M 50 31STK630 enu
ProCarManuals.com
2010 RDX
Page 302 of 514

1. Press and hold the SOUND/CLOCK and RPT buttons at the
same time for about 2 seconds.
You will hear a beep, then the
center display will change to the
compass setting mode as shown
above. 2. Select
‘‘ZONE ’’by pressing preset
2 to enter the zone setting mode.
The display will change to zone
setting mode, and show you the
current zone setting. If you want to
cancel this mode, select ‘‘R ’’ by
pressing preset 3. The display will
return to the normal display.
3. Find the zone for your area on the map (see nextpage).
4. If the zone is incorrect, press
preset 1 (- ) or preset 2 (+ ) to get
the zone number to count up and
down. When you finish setting the
correct zone, or want to cancel this
mode without changing the
current setting, select ‘‘SET ’’by
pressing preset 3. The display will
return to the normal display.
Compass29809/07/07 15:02:04 10 ACURA RDX MMC North America Owner's M 50 31STK630 enu
ProCarManuals.com
2010 RDX
Page 303 of 514
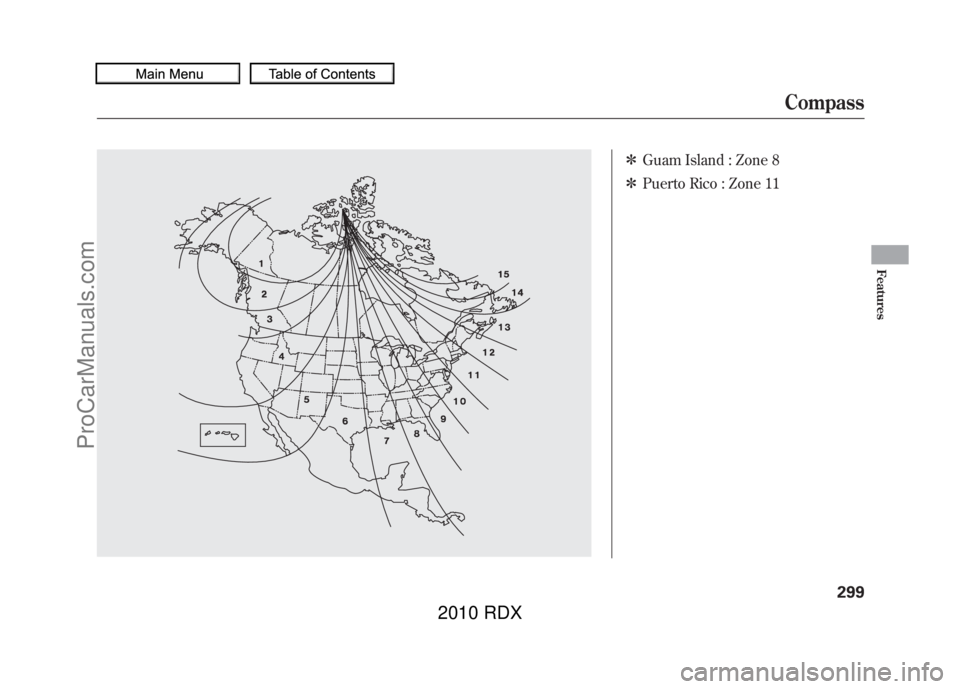
ꭧGuam Island : Zone 8
ꭧ Puerto Rico : Zone 11
Compass
299
Features
09/07/07 15:02:04 10 ACURA RDX MMC North America Owner's M 50 31STK630 enu
ProCarManuals.com
2010 RDX
Page 304 of 514
Cruise control allows you to maintain
a set speed above 25 mph (40 km/h)
without keeping your foot on the
accelerator pedal. It should be used
for cruising on straight, open
highways. It is not recommended for
city driving, winding roads, slippery
roads, heavy rain, or bad weather.
Improper use of the cruise
control can lead to a crash.
Use the cruise control only
when traveling on open
highways in good weather.Using Cruise Control
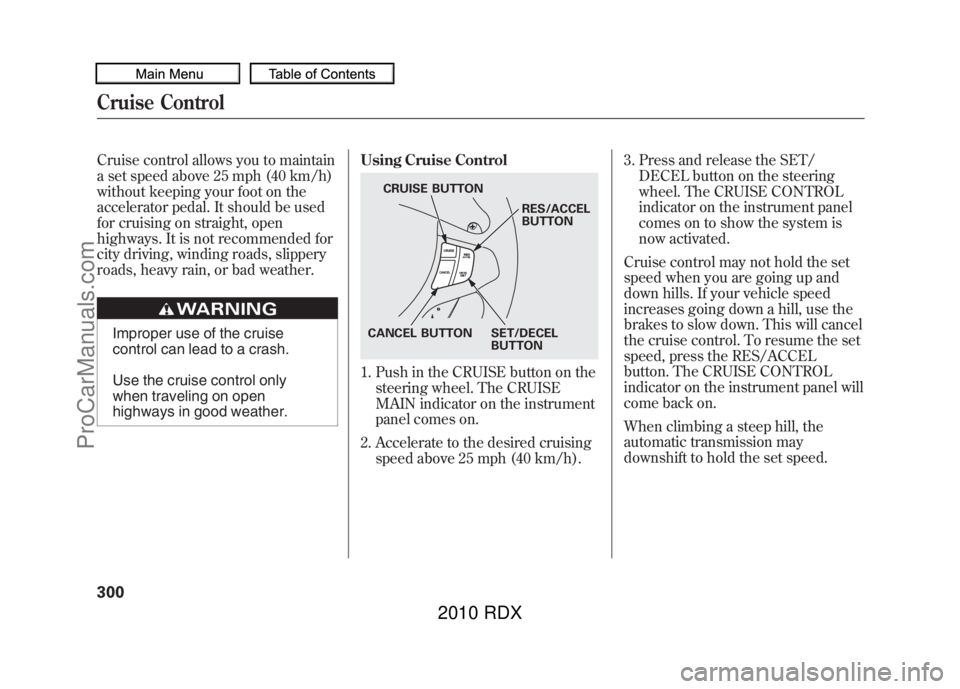
1. Push in the CRUISE button on the
steering wheel. The CRUISE
MAIN indicator on the instrument
panel comes on.
2. Accelerate to the desired cruising speed above 25 mph (40 km/h). 3. Press and release the SET/
DECEL button on the steering
wheel. The CRUISE CONTROL
indicator on the instrument panel
comes on to show the system is
now activated.
Cruise control may not hold the set
speed when you are going up and
down hills. If your vehicle speed
increases going down a hill, use the
brakes to slow down. This will cancel
the cruise control. To resume the set
speed, press the RES/ACCEL
button. The CRUISE CONTROL
indicator on the instrument panel will
come back on.
When climbing a steep hill, the
automatic transmission may
downshift to hold the set speed.
CRUISE BUTTON
RES/ACCEL
BUTTON
SET/DECEL
BUTTON
CANCEL BUTTON
Cruise Control30009/07/07 15:02:04 10 ACURA RDX MMC North America Owner's M 50 31STK630 enu
ProCarManuals.com
2010 RDX
Page 305 of 514
Changing the Set Speed
You can increase the set cruising
speed in any of these ways:●Press and hold the RES/ACCEL
button. When you reach the
desired cruising speed, release the
button.●Push on the accelerator pedal.
Accelerate to the desired cruising
speed, then press the SET/
DECEL button.●To increase your speed in very
small amounts, tap the RES/
ACCEL button. Each time you do
this, the vehicle speeds up about 1
mph (1.6 km/h).You can decrease the set cruising
speed in any of these ways:
NOTE
: If you need to decrease your
speed quickly, use the brakes as you
normally would.
●Press and hold the SET/DECEL
button. Release the button when
you reach the desired speed.●To slow down in very small
amounts, tap the SET/DECEL
button. Each time you do this,
your vehicle will slow down about
1 mph (1.6 km/h).●Tap the brake pedal lightly with
your foot. The CRUISE CONTROL
indicator on the instrument panel
will go out. When the vehicle
slows to the desired speed, press
the SET/DECEL button. Even with cruise control on, you can
still use the accelerator pedal to
speed up for passing. After
completing the pass, take your foot
off the accelerator pedal. The vehicle
will return to the set cruising speed.
Resting your foot on the brake pedal
causes cruise control to cancel.
CONTINUED
Cruise Control
301
Features
09/07/07 15:02:04 10 ACURA RDX MMC North America Owner's M 50 31STK630 enu
ProCarManuals.com
2010 RDX
Page 306 of 514
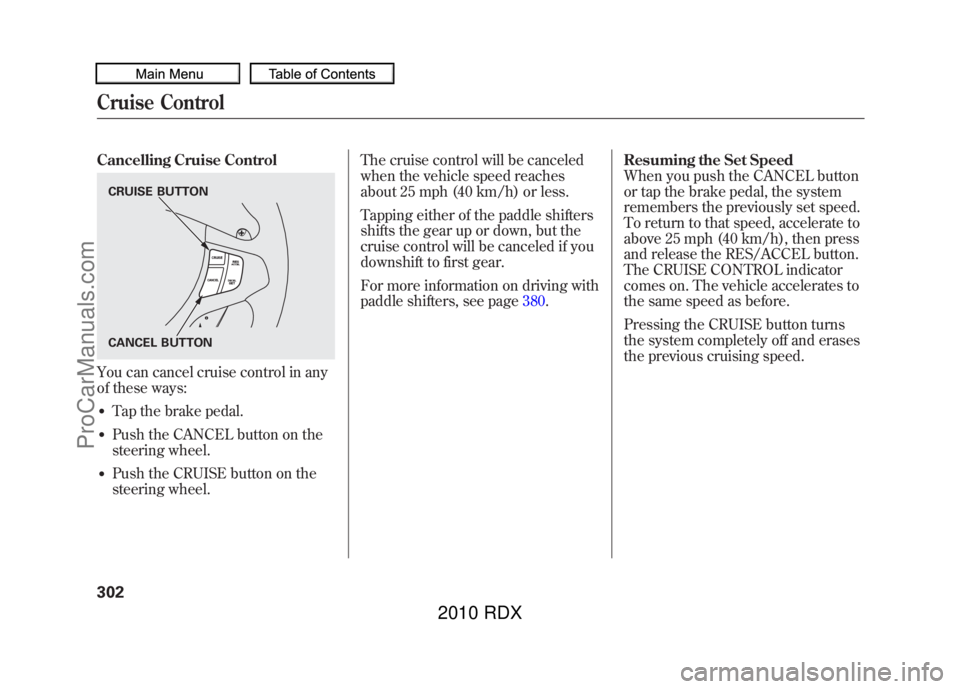
Cancelling Cruise ControlYou can cancel cruise control in any
of these ways:●Tap the brake pedal.●Push the CANCEL button on the
steering wheel.●Push the CRUISE button on the
steering wheel.The cruise control will be canceled
when the vehicle speed reaches
about 25 mph (40 km/h) or less.
Tapping either of the paddle shifters
shifts the gear up or down, but the
cruise control will be canceled if you
downshift to first gear.
For more information on driving with
paddle shifters, see page
380.Resuming the Set Speed
When you push the CANCEL button
or tap the brake pedal, the system
remembers the previously set speed.
To return to that speed, accelerate to
above 25 mph (40 km/h), then press
and release the RES/ACCEL button.
The CRUISE CONTROL indicator
comes on. The vehicle accelerates to
the same speed as before.
Pressing the CRUISE button turns
the system completely off and erases
the previous cruising speed.CRUISE BUTTON
CANCEL BUTTONCruise Control30209/07/07 15:02:04 10 ACURA RDX MMC North America Owner's M 50 31STK630 enu
ProCarManuals.com
2010 RDX
Page 307 of 514
The HomeLink
®Universal Transceiver
built into your vehicle can be
programmed to operate up to three
remote controlled devices around your
home, such as garage doors, lighting,
or home security systems.
General Safety InformationBefore programming your HomeLink
to operate a garage door opener,
confirm that the opener has an
external entrapment protection
system, such as an ‘‘electronic eye, ’’or
other safety and reverse stop features.
If your garage door was manufactured
before April 1, 1982, you may not be
able to program HomeLink to operate
it. These units do not have safety
features that cause the motor to stop
and reverse it if an obstacle is detected
during closing, increasing the risk of
injury. Do not use HomeLink with any
garage door opener that lacks safety
stop and reverse features. Units manufactured between April 1,
1982 and January 1, 1993 may be
equipped with safety stop and reverse
features. If your unit does not have an
external entrapment protection
system, an easy test to confirm the
function and performance of the safety
stop and reverse feature is to lay a 2
╳
4 under the closing door. The door
should stop and reverse upon
contacting the piece of wood. As an
additional safety feature, garage door
openers manufactured after January 1,
1993 are required to have external
entrapment protection systems, such
as an electronic eye, which detect an
object obstructing the door.
Important Safety PrecautionsRefer to the safety information that
came with your garage door opener to
test that the safety features are
functioning properly. If you do not
have this information, contact the
manufacturer of the equipment.Before
programming HomeLink to a garage
door or gate opener, make sure that
people and objects are out of the way
of the device to prevent potential
injury or damage. When programming
a garage door opener, park just
outside the garage.Training HomeLinkBefore you begin
- If you just
received your vehicle and have not
trained any of the buttons in
HomeLink before, you should erase
any previously learned codes before
training the first button. To do this,
press and hold the two outside buttons
on the HomeLink transceiver for about
20 seconds, until the red indicator
flashes. Release the buttons, then
proceed to step 1.
CONTINUED
HomeLink
®Universal Transceiver
303
Features
09/07/07 15:02:04 10 ACURA RDX MMC North America Owner's M 50 31STK630 enu
ProCarManuals.com
2010 RDX
Page 308 of 514
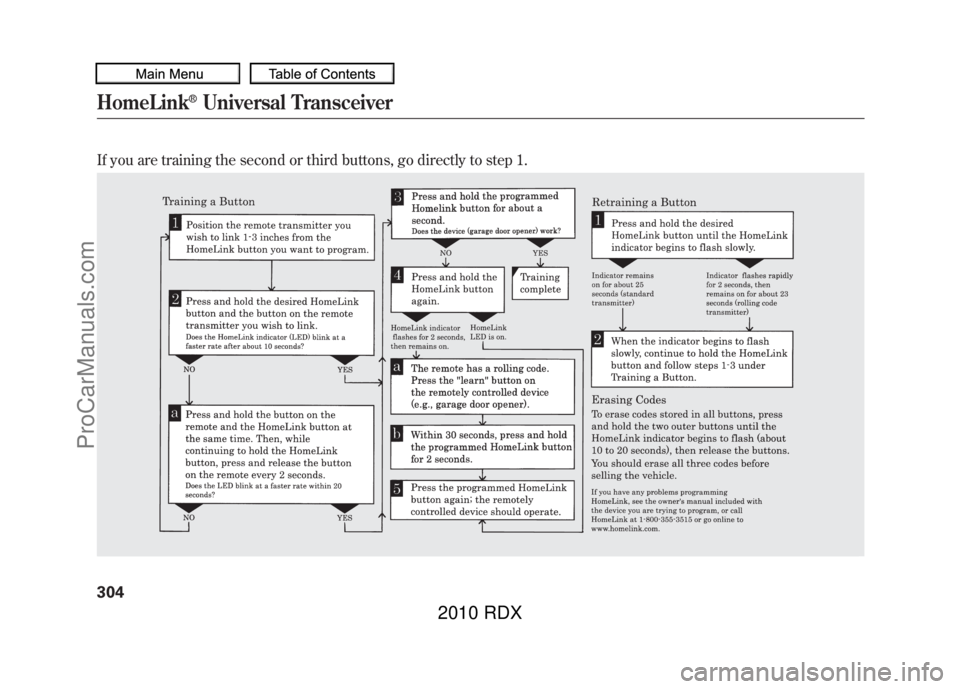
If you are training the second or third buttons, go directly to step 1.HomeLink
®Universal Transceiver
30409/07/07 15:02:04 10 ACURA RDX MMC North America Owner's M 50 31STK630 enu
ProCarManuals.com
2010 RDX
Page 309 of 514
HomeLink
®is a registered trademark
of Johnson Controls, Inc.
As required by the FCC:
This device complies with Part 15 of theFCC rules. Operation is subject to the
following two conditions: (1) This devicemay not cause harmful interference, and(2) this device must accept any
interference received, includinginterference that may cause undesiredoperation.
Changes or modifications not expresslyapproved by the party responsible for
compliance could void the user'sauthority to operate the equipment.
This device complies with IndustryCanada Standard RSS-210.
Operation is subject to the following twoconditions: (1) this device may not causeinterference, and (2) this device must
accept any interference that may causeundesired operation of the device.
HomeLink
®Universal Transceiver
305
Features
09/07/07 15:02:04 10 ACURA RDX MMC North America Owner's M 50 31STK630 enu
ProCarManuals.com
2010 RDX
Page 310 of 514

Bluetooth
®HandsFreeLink
®(HFL)
allows you to place and receive
phone calls using voice commands,
without handling your cell phone.
To use HFL, you need a Bluetooth-
compatible cell phone. For a list of
compatible phones, pairing
procedures, and special feature
capabilities:
In the U.S., visit
www.acura.com/
handsfreelink,or call (888) 528-7876.
In Canada, visitwww.acura.ca,
or call
(888) 9-ACURA-9. Using HFL
HFL buttonsHFL Talk button
ꭚPress and
release to give a command or answer
a call.
HFL Back button ꭚPress and
release to end a call, go back to the
previous command, or cancel the
command.
Below the HFL buttons is another set
of voice control buttons for the
navigation, climate control, and audio
systems. To use the voice control
system, refer to the navigation
system manual.
On models without navigation system HFL TALK
BUTTON
HFL BACK
BUTTON
On models with navigation system HFL BACK
BUTTON
HFL TALK
BUTTON
VOICE CONTROL
BUTTONS
Bluetooth
®HandsFreeLink
®
30609/07/07 15:02:04 10 ACURA RDX MMC North America Owner's M 50 31STK630 enu
ProCarManuals.com
2010 RDX