Rear Acura RDX 2011 Owner's Guide
[x] Cancel search | Manufacturer: ACURA, Model Year: 2011, Model line: RDX, Model: Acura RDX 2011Pages: 517, PDF Size: 27.89 MB
Page 53 of 517
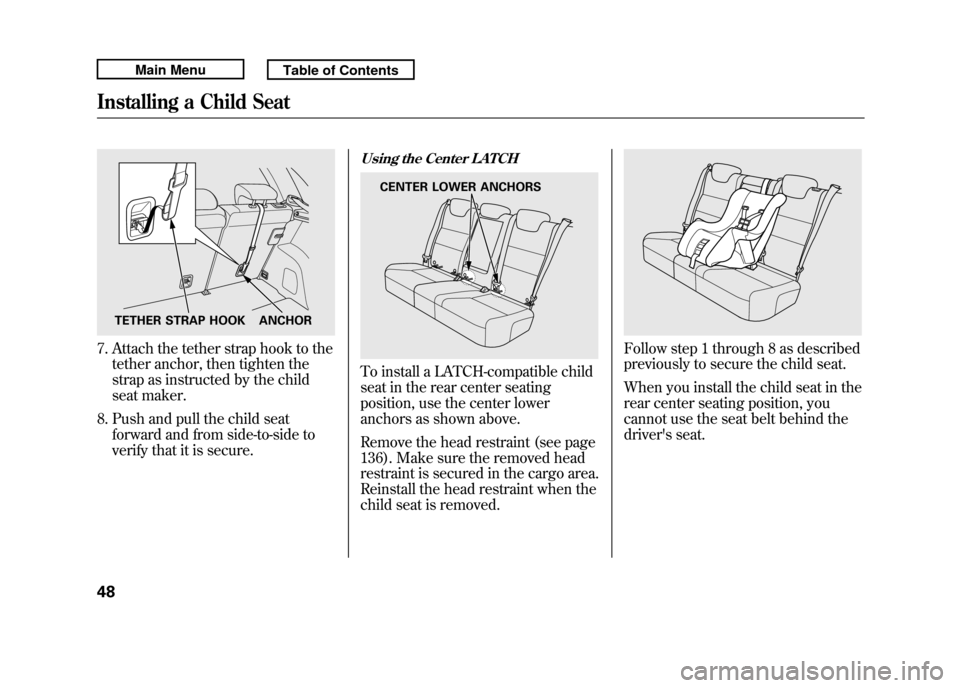
7. Attach the tether strap hook to thetether anchor, then tighten the
strap as instructed by the child
seat maker.
8. Push and pull the child seat forward and from side-to-side to
verify that it is secure.
Using the Center LATCHTo install a LATCH-compatible child
seat in the rear center seating
position, use the center lower
anchors as shown above.
Remove the head restraint (see page
136). Make sure the removed head
restraint is secured in the cargo area.
Reinstall the head restraint when the
child seat is removed.
Follow step 1 through 8 as described
previously to secure the child seat.
When you install the child seat in the
rear center seating position, you
cannot use the seat belt behind the
driver's seat.
TETHER STRAP HOOK ANCHOR
CENTER LOWER ANCHORS
Installing a Child Seat4810/06/08 17:42:32 11 ACURA RDX MMC North America Owner's M 50 31STK640 enu
Page 54 of 517
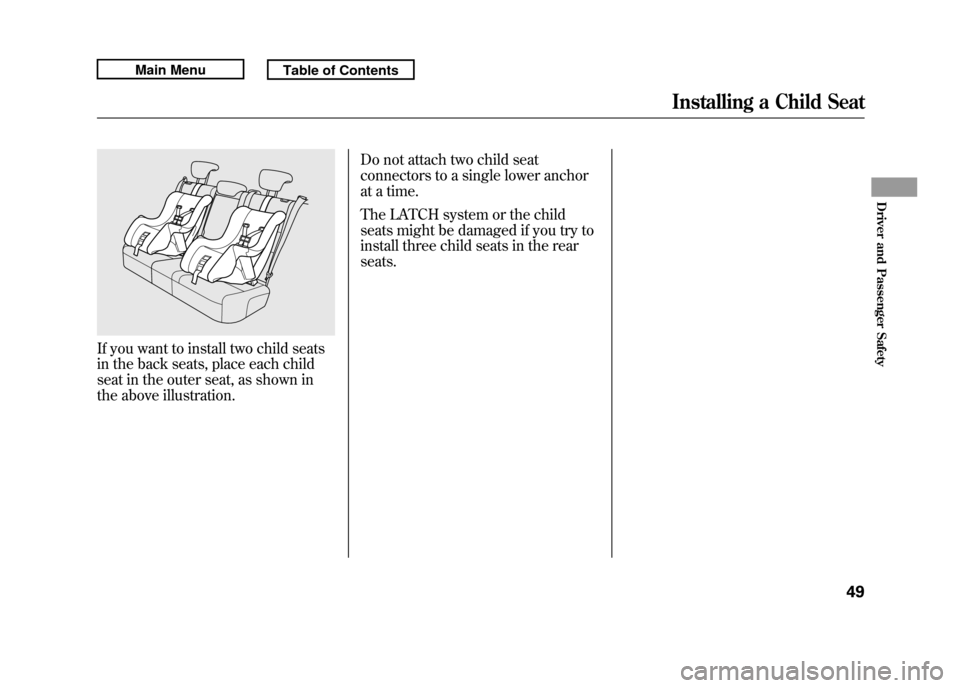
If you want to install two child seats
in the back seats, place each child
seat in the outer seat, as shown in
the above illustration.Do not attach two child seat
connectors to a single lower anchor
at a time.
The LATCH system or the child
seats might be damaged if you try to
install three child seats in the rear
seats.
Installing a Child Seat
49
Driver and Passenger Safety
10/06/08 17:42:32 11 ACURA RDX MMC North America Owner's M 50 31STK640 enu
Page 57 of 517
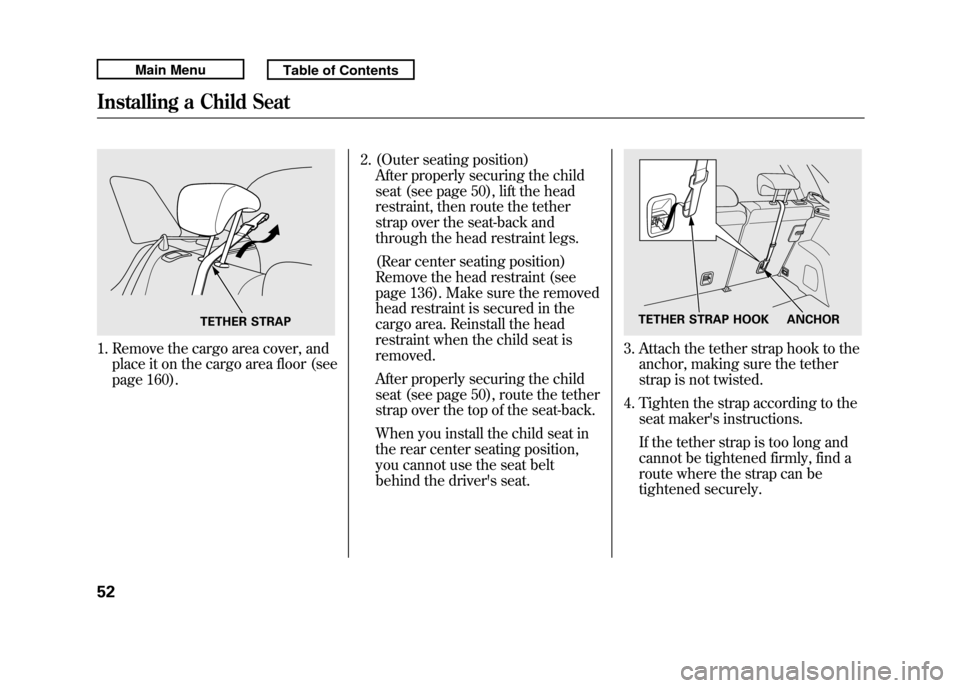
1. Remove the cargo area cover, andplace it on the cargo area floor (see
page 160). 2. (Outer seating position)
After properly securing the child
seat (see page 50), lift the head
restraint, then route the tether
strap over the seat-back and
through the head restraint legs.
(Rear center seating position)
Remove the head restraint (see
page 136). Make sure the removed
head restraint is secured in the
cargo area. Reinstall the head
restraint when the child seat is
removed.
After properly securing the child
seat (see page 50), route the tether
strap over the top of the seat-back.
When you install the child seat in
the rear center seating position,
you cannot use the seat belt
behind the driver's seat.
3. Attach the tether strap hook to theanchor, making sure the tether
strap is not twisted.
4. Tighten the strap according to the seat maker's instructions.
If the tether strap is too long and
cannot be tightened firmly, find a
route where the strap can be
tightened securely.
TETHER STRAP
TETHER STRAP HOOK ANCHOR
Installing a Child Seat5210/06/08 17:42:32 11 ACURA RDX MMC North America Owner's M 50 31STK640 enu
Page 61 of 517

If you decide that a child can safely
ride up front, be sure to:●Carefully read the owner's manual,
and make sure you understand all
seat belt instructions and all safety
information.●Move the vehicle seat to the rear-
most position.●Have the child sit up straight, back
against the seat, and feet on or
near the floor.●Check that the child's seat belt is
properly and securely positioned.●Supervise the child. Even mature
children sometimes need to be
reminded to fasten the seat belts
or sit properly.Additional Safety Precautions
●Do not let a child wear a seat belt
across the neck.
This could result
in serious neck injuries during a
crash.
●Do not let a child put the shoulder part of a seat belt behind the back
or under the arm.
This could cause
very serious injuries during a
crash. It also increases the chance
that the child will slide under the
belt in a crash and be injured.
●Two children should never use the
same seat belt.
If they do, they
could be very seriously injured in a
crash.
●Do not put any accessories on a
seat belt.
Devices intended to
improve a child's comfort or
reposition the shoulder part of a
seat belt can make the belt less
effective and increase the chance
of serious injury in a crash.
Protecting Larger Children5610/06/08 17:42:32 11 ACURA RDX MMC North America Owner's M 50 31STK640 enu
Page 66 of 517

This section gives information about
the controls and displays that
contribute to the daily operation of
your vehicle. All the essential
controls are within easy reach.
Control Locations
..........................
62
Instrument Panel
..........................
63
Instrument Panel Indicators
..........
64
Gauges
..........................................
73
Turbo Boost Meter
...................
73
Fuel Gauge
...............................
73
Multi-Information Display
.............
74
System Messages
.....................
79
Customized Settings
.................
82
Controls Near the Steering
Wheel
.....................................
113
Windshield Wipers and
Washers
..............................
114
Rear Window Wiper and Washer
...............................
115 Turn Signals and Headlights
.......
116
Instrument Panel Brightness
......
120
Rear Window Defogger
...............
121
Hazard Warning Button
..............
121
Steering Wheel Adjustments
.......
122
Keys and Locks
...........................
122
Immobilizer System
....................
124
Ignition Switch
............................
125
Door Locks
.................................
126
Power Door Locks
..................
126
Childproof Door Locks
............
127
Tailgate
.......................................
128
Remote Transmitter
....................
130
Seats
...........................................
134
Front Seat Power
Adjustments
........................
134
Head Restraints
.......................
135
Armrests
.................................
138
Folding the Rear Seats Down
..................................
138
Seat Heaters
................................
141
Power Windows
..........................
142
Moonroof
....................................
144 Mirrors
.......................................
146
Adjusting the Power
Mirrors
...............................
146
Reverse Tilt Door Mirror
........
147
Heated Mirrors
.......................
147
Driving Position Memory
System
....................................
148
Parking Brake
.............................
150
Interior Lights
.............................
151
Ceiling Lights
.........................
151
Individual Map Lights
.............
152
Courtesy Lights
......................
153
Cargo Area Light
.....................
153
Interior Convenience Items
.........
154
Glove Box
...............................
155
Front Door Pockets
.................
155
Beverage Holders
...................
156
Accessory Power Sockets
.......
157
Sun Visor
................................
157
Vanity Mirror
..........................
158
Console Compartment
............
158
Cargo Area Cover
...................
160
Coat Hook
...............................
161
Instruments and Controls
61
Instruments and Controls
10/06/08 17:42:32 11 ACURA RDX MMC North America Owner's M 50 31STK640 enu
Page 67 of 517
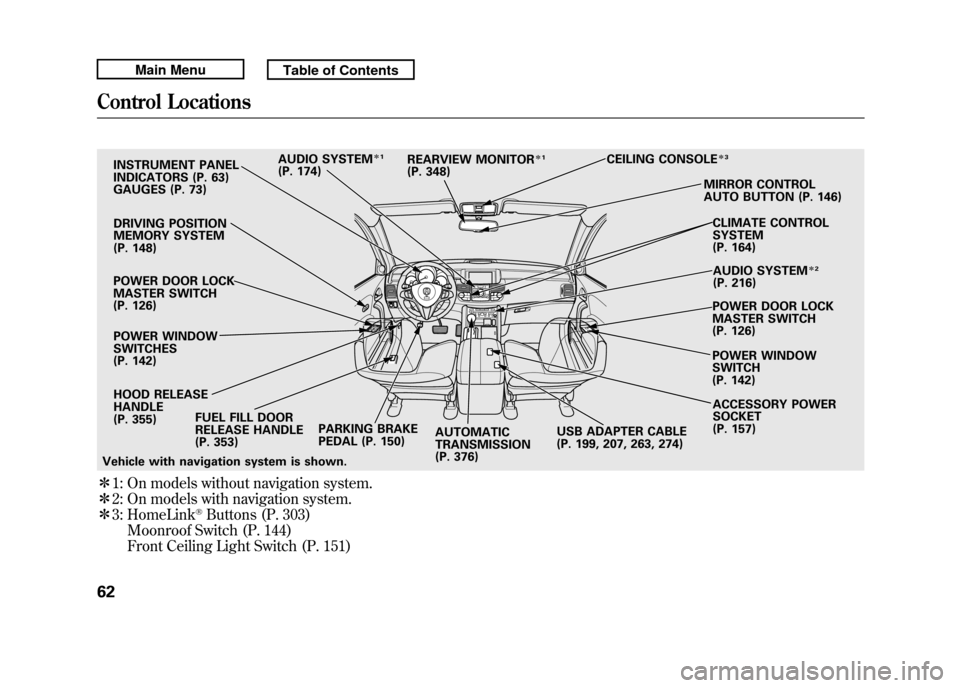
ꭧ1: On models without navigation system.
ꭧ 2: On models with navigation system.
ꭧ 3: HomeLink
®Buttons (P. 303)
Moonroof Switch (P. 144)
Front Ceiling Light Switch (P. 151)
INSTRUMENT PANEL
INDICATORS (P. 63)
GAUGES (P. 73)
DRIVING POSITION
MEMORY SYSTEM
(P. 148)
POWER DOOR LOCK
MASTER SWITCH
(P. 126) POWER WINDOW
SWITCHES
(P. 142)
HOOD RELEASE
HANDLE
(P. 355) FUEL FILL DOOR
RELEASE HANDLE
(P. 353) PARKING BRAKE
PEDAL (P. 150)
AUTOMATIC
TRANSMISSION
(P. 376) ACCESSORY POWER
SOCKET
(P. 157)
AUDIO SYSTEM
ꭧ
1
(P. 174) CEILING CONSOLE
ꭧ
3MIRROR CONTROL
AUTO BUTTON (P. 146)
CLIMATE CONTROL
SYSTEM
(P. 164)AUDIO SYSTEM
ꭧ 2
(P. 216)
POWER DOOR LOCK
MASTER SWITCH
(P. 126)
POWER WINDOW
SWITCH
(P. 142)
REARVIEW MONITOR
ꭧ
1
(P. 348)
Vehicle with navigation system is shown. USB ADAPTER CABLE
(P. 199, 207, 263, 274)
Control Locations6210/06/08 17:42:32 11 ACURA RDX MMC North America Owner's M 50 31STK640 enu
Page 118 of 517
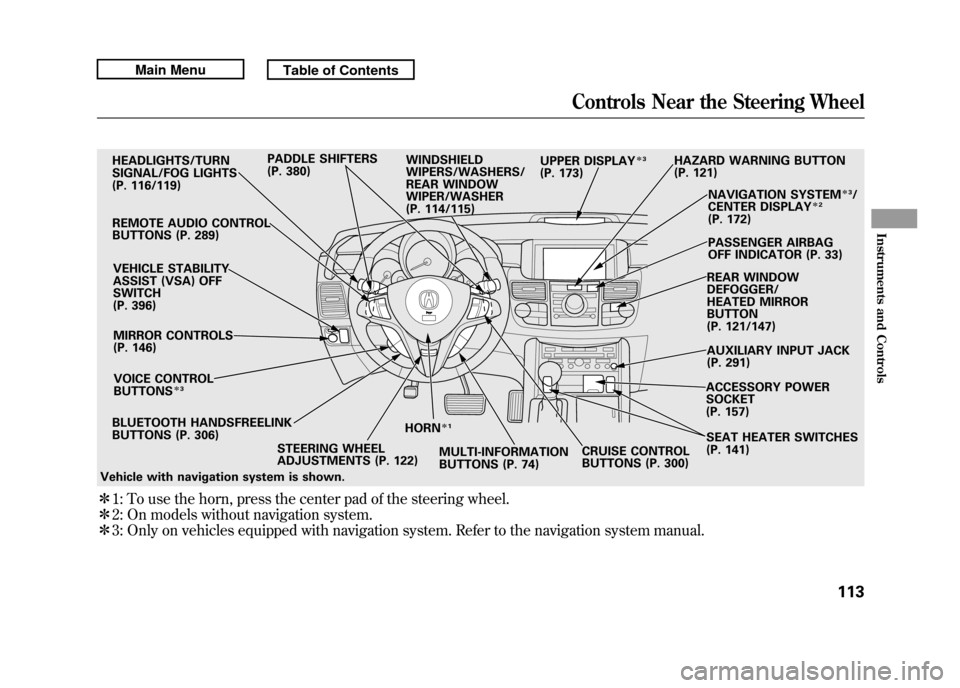
ꭧ1: To use the horn, press the center pad of the steering wheel.
ꭧ 2: On models without navigation system.
ꭧ 3: Only on vehicles equipped with navigation system. Refer to the navigation system manual.BLUETOOTH HANDSFREELINK
BUTTONS (P. 306) HORN
ꭧ
1
STEERING WHEEL
ADJUSTMENTS (P. 122) MULTI-INFORMATION
BUTTONS (P. 74)CRUISE CONTROL
BUTTONS (P. 300)SEAT HEATER SWITCHES
(P. 141)
HEADLIGHTS/TURN
SIGNAL/FOG LIGHTS
(P. 116/119)
REMOTE AUDIO CONTROL
BUTTONS (P. 289) VEHICLE STABILITY
ASSIST (VSA) OFF
SWITCH
(P. 396)MIRROR CONTROLS
(P. 146)
VOICE CONTROL
BUTTONS
ꭧ 3
HAZARD WARNING BUTTON
(P. 121)
PADDLE SHIFTERS
(P. 380)
WINDSHIELD
WIPERS/WASHERS/
REAR WINDOW
WIPER/WASHER
(P. 114/115) NAVIGATION SYSTEM
ꭧ
3/
CENTER DISPLAY
ꭧ 2
(P. 172)
PASSENGER AIRBAG
OFF INDICATOR (P. 33)
REAR WINDOW
DEFOGGER/
HEATED MIRROR
BUTTON
(P. 121/147)
AUXILIARY INPUT JACK
(P. 291)
ACCESSORY POWER
SOCKET
(P. 157)
UPPER DISPLAY
ꭧ
3
(P. 173)
Vehicle with navigation system is shown.
Controls Near the Steering Wheel
113
Instruments and Controls
10/06/08 17:42:32 11 ACURA RDX MMC North America Owner's M 50 31STK640 enu
Page 120 of 517
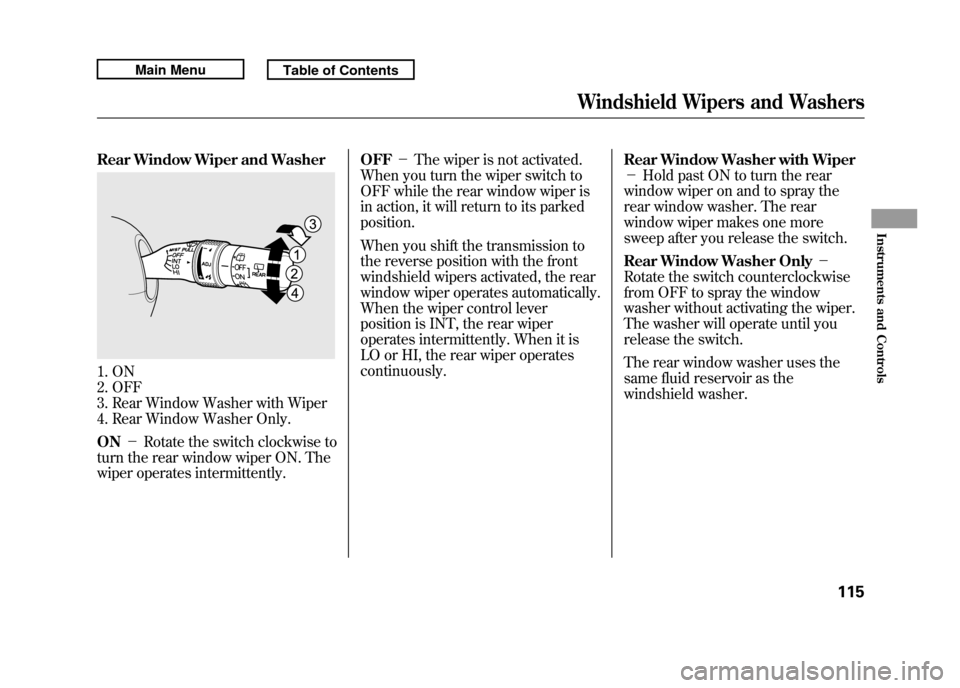
Rear Window Wiper and Washer1. ON
2. OFF
3. Rear Window Washer with Wiper
4. Rear Window Washer Only.
ON-Rotate the switch clockwise to
turn the rear window wiper ON. The
wiper operates intermittently. OFF
-The wiper is not activated.
When you turn the wiper switch to
OFF while the rear window wiper is
in action, it will return to its parked
position.
When you shift the transmission to
the reverse position with the front
windshield wipers activated, the rear
window wiper operates automatically.
When the wiper control lever
position is INT, the rear wiper
operates intermittently. When it is
LO or HI, the rear wiper operates
continuously. Rear Window Washer with Wiper
-
Hold past ON to turn the rear
window wiper on and to spray the
rear window washer. The rear
window wiper makes one more
sweep after you release the switch.
Rear Window Washer Only -
Rotate the switch counterclockwise
from OFF to spray the window
washer without activating the wiper.
The washer will operate until you
release the switch.
The rear window washer uses the
same fluid reservoir as the
windshield washer.
Windshield Wipers and Washers
115
Instruments and Controls
10/06/08 17:42:32 11 ACURA RDX MMC North America Owner's M 50 31STK640 enu
Page 121 of 517
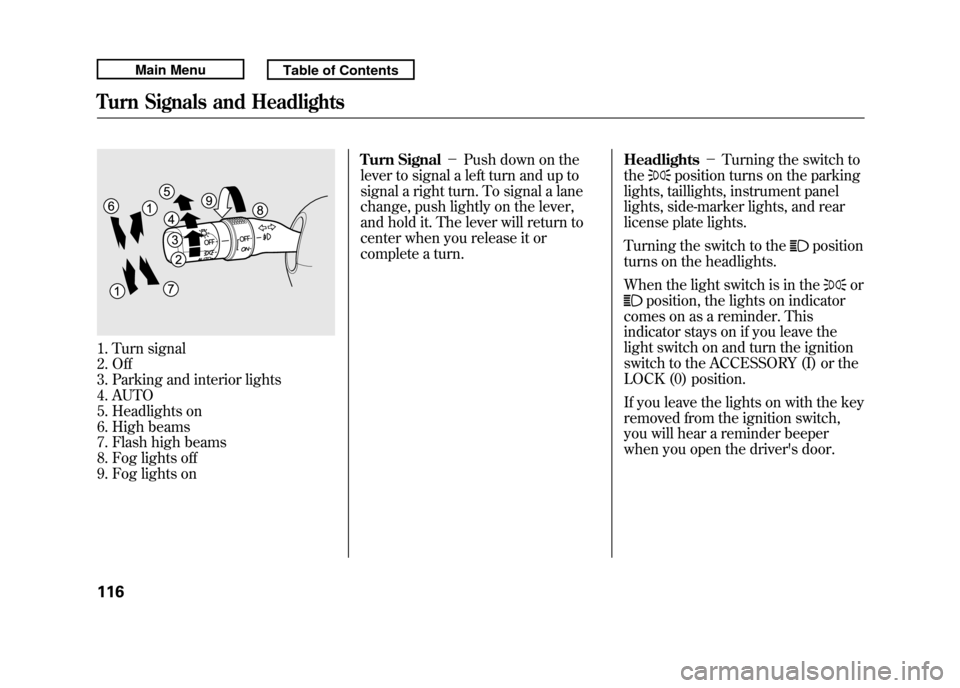
1. Turn signal
2. Off
3. Parking and interior lights
4. AUTO
5. Headlights on
6. High beams
7. Flash high beams
8. Fog lights off
9. Fog lights onTurn Signal
-Push down on the
lever to signal a left turn and up to
signal a right turn. To signal a lane
change, push lightly on the lever,
and hold it. The lever will return to
center when you release it or
complete a turn. Headlights
-Turning the switch to
the
position turns on the parking
lights, taillights, instrument panel
lights, side-marker lights, and rear
license plate lights.
Turning the switch to the
position
turns on the headlights.
When the light switch is in the
or
position, the lights on indicator
comes on as a reminder. This
indicator stays on if you leave the
light switch on and turn the ignition
switch to the ACCESSORY (I) or the
LOCK (0) position.
If you leave the lights on with the key
removed from the ignition switch,
you will hear a reminder beeper
when you open the driver's door.
Turn Signals and Headlights11610/06/08 17:42:32 11 ACURA RDX MMC North America Owner's M 50 31STK640 enu
Page 126 of 517

Rear Window DefoggerThe rear window defogger clears fog,
frost, and thin ice from the window.
Push the defogger button to turn it on
and off. The indicator in the button
comes on to show the defogger is on. If
you do not turn it off, the defogger will
shut itself off within about 5 to 30
minutes according to the outside
temperature. It also shuts off when you
turn off the ignition switch. You have to
turn it on again when you restart the
vehicle.
In cold weather, the defogger will not
automatically shut itself off. You must
manually shut off the rear window
defogger when it is no longer
needed.
Make sure the rear window is clear
and you have good visibility before
starting to drive.
The defogger wires on the inside of
the rear window can be accidentally
damaged. When cleaning the glass,
always wipe side-to-side.
Pushing this button also turns the
mirror heaters on or off. For more
information, see page 147.Hazard Warning Button
Push the button between the center
vents to turn on the hazard warning
lights (four-way flashers). This
causes all outside turn signals and
both indicators in the instrument
panel to flash. Use the hazard
warning lights if you need to park in
a dangerous area near heavy traffic,
or if your vehicle is disabled.
Rear Window Defogger, Hazard Warning Button
121
Instruments and Controls
10/06/08 17:42:32 11 ACURA RDX MMC North America Owner's M 50 31STK640 enu