low power mode Acura RDX 2018 Owner's Guide
[x] Cancel search | Manufacturer: ACURA, Model Year: 2018, Model line: RDX, Model: Acura RDX 2018Pages: 453, PDF Size: 20.13 MB
Page 172 of 453
171Continued
Controls
Interior Lights/Interior Convenience Items
Interior Lights
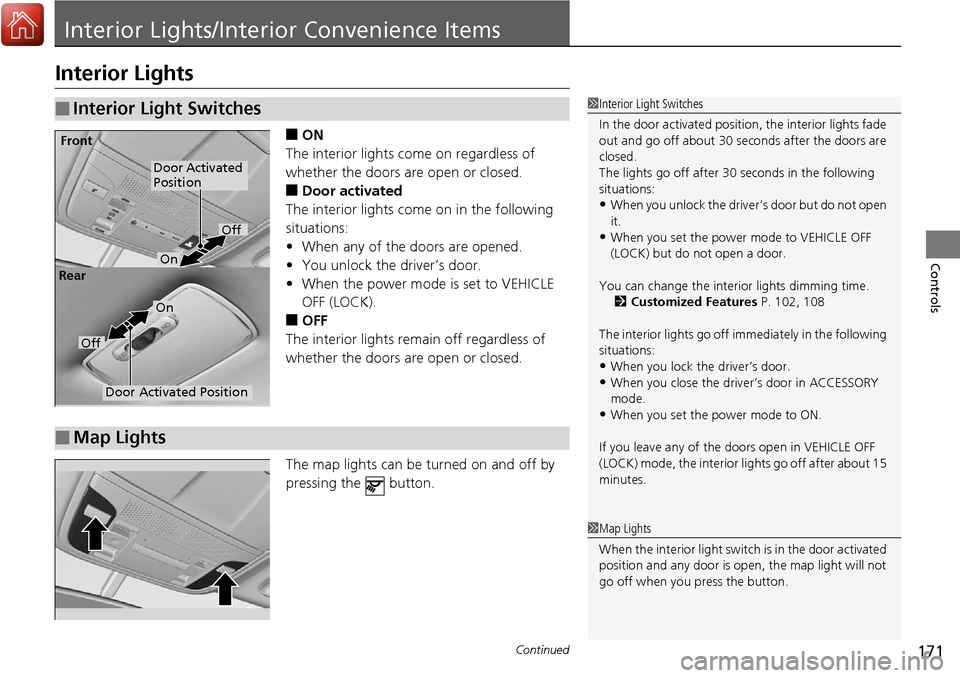
■ON
The interior lights come on regardless of
whether the doors are open or closed.
■Door activated
The interior lights come on in the following
situations:
• When any of the doors are opened.
• You unlock the driver’s door.
• When the power mode is set to VEHICLE
OFF (LOCK).
■OFF
The interior lights remain off regardless of
whether the doors are open or closed.
The map lights can be turned on and off by
pressing the button.
■Interior Light Switches1 Interior Light Switches
In the door activated position, the interior lights fade
out and go off about 30 se conds after the doors are
closed.
The lights go off after 30 seconds in the following
situations:
•When you unlock the driver’s door but do not open
it.
•When you set the power mode to VEHICLE OFF
(LOCK) but do not open a door.
You can change the interi or lights dimming time.
2 Customized Features P. 102, 108
The interior lights go off i mmediately in the following
situations:
•When you lock the driver’s door.
•When you close the driver’s door in ACCESSORY
mode.
•When you set the power mode to ON.
If you leave any of the doors open in VEHICLE OFF
(LOCK) mode, the interior lights go off after about 15
minutes.
Door Activated
Position
Off
Front
Door Activated Position
On
Off
Rear
On
■Map Lights
1
Map Lights
When the interior light swit ch is in the door activated
position and any door is open, the map light will not
go off when you press the button.
Page 180 of 453
Continued179
uuInterior Lights/Interior Convenience Items uInterior Convenience Items
Controls
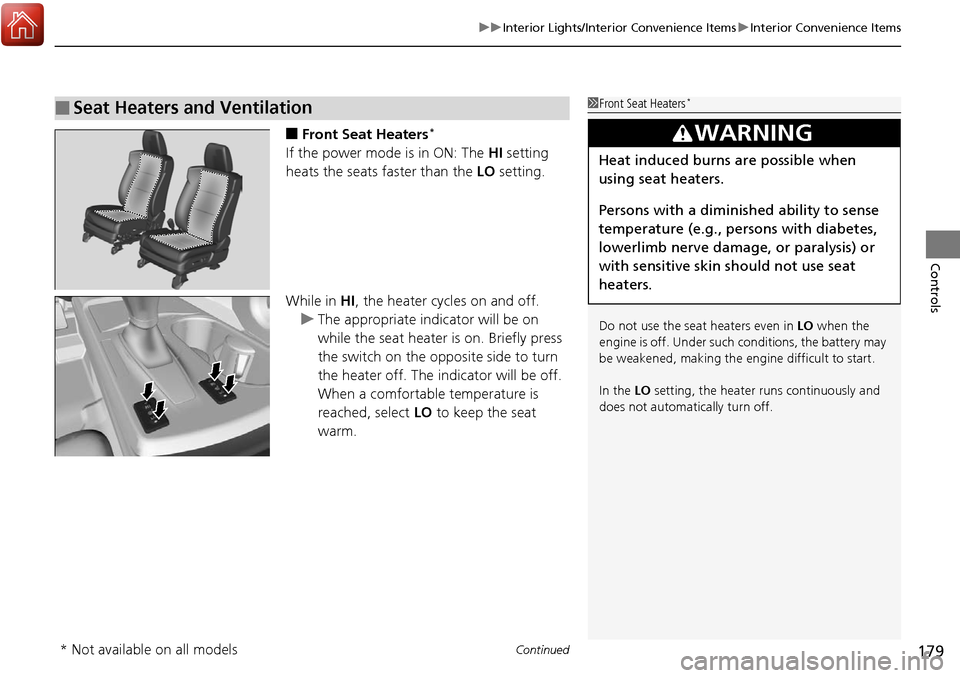
■Front Seat Heaters*
If the power mode is in ON: The HI setting
heats the seats faster than the LO setting.
While in HI , the heater cycles on and off.
u The appropriate indicator will be on
while the seat heater is on. Briefly press
the switch on the opposite side to turn
the heater off. The indicator will be off.
When a comfortable temperature is
reached, select LO to keep the seat
warm.
■Seat Heaters and Ventilation1 Front Seat Heaters*
Do not use the seat heaters even in LO when the
engine is off. Under such conditions, the battery may
be weakened, making the engine difficult to start.
In the LO setting, the heater runs continuously and
does not automatically turn off.
3WARNING
Heat induced burns are possible when
using seat heaters.
Persons with a diminished ability to sense
temperature (e.g., persons with diabetes,
lowerlimb nerve damage, or paralysis) or
with sensitive skin should not use seat
heaters.
* Not available on all models
Page 181 of 453
uuInterior Lights/Interior Convenience Items uInterior Convenience Items
180
Controls
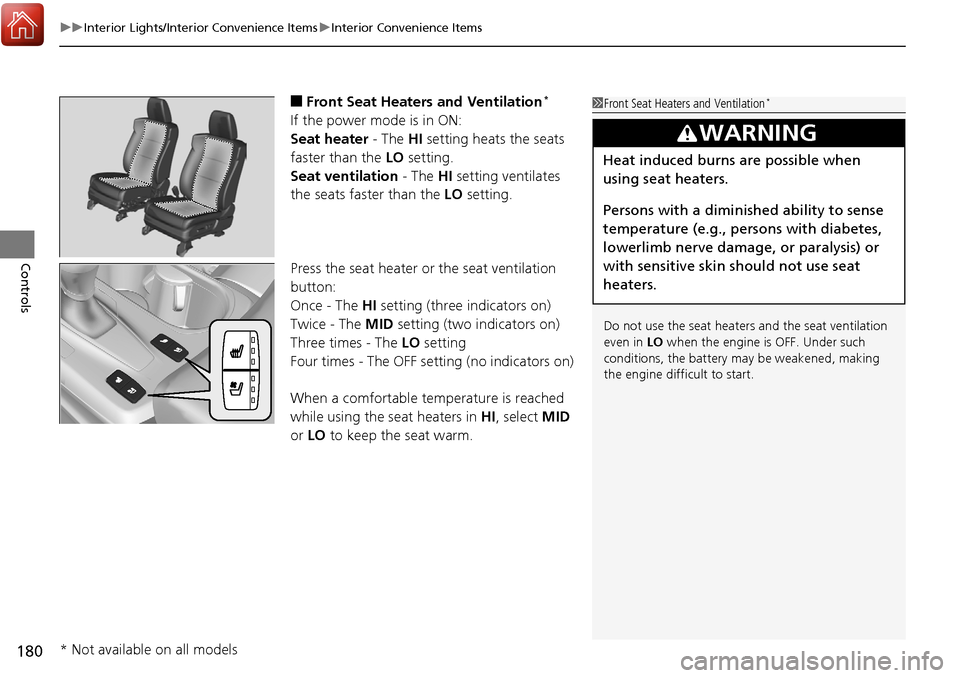
■Front Seat Heaters and Ventilation*
If the power mode is in ON:
Seat heater - The HI setting heats the seats
faster than the LO setting.
Seat ventilation - The HI setting ventilates
the seats faster than the LO setting.
Press the seat heater or the seat ventilation
button:
Once - The HI setting (three indicators on)
Twice - The MID setting (two indicators on)
Three times - The LO setting
Four times - The OFF se tting (no indicators on)
When a comfortable temperature is reached
while using the s eat heaters in HI, select MID
or LO to keep the seat warm.
1Front Seat Heaters and Ventilation*
Do not use the seat heater s and the seat ventilation
even in LO when the engine is OFF. Under such
conditions, the battery ma y be weakened, making
the engine difficult to start.
3WARNING
Heat induced burns are possible when
using seat heaters.
Persons with a diminished ability to sense
temperature (e.g., persons with diabetes,
lowerlimb nerve damage, or paralysis) or
with sensitive skin should not use seat
heaters.
* Not available on all models
Page 182 of 453
181
uuInterior Lights/Interior Convenience Items uInterior Convenience Items
Controls
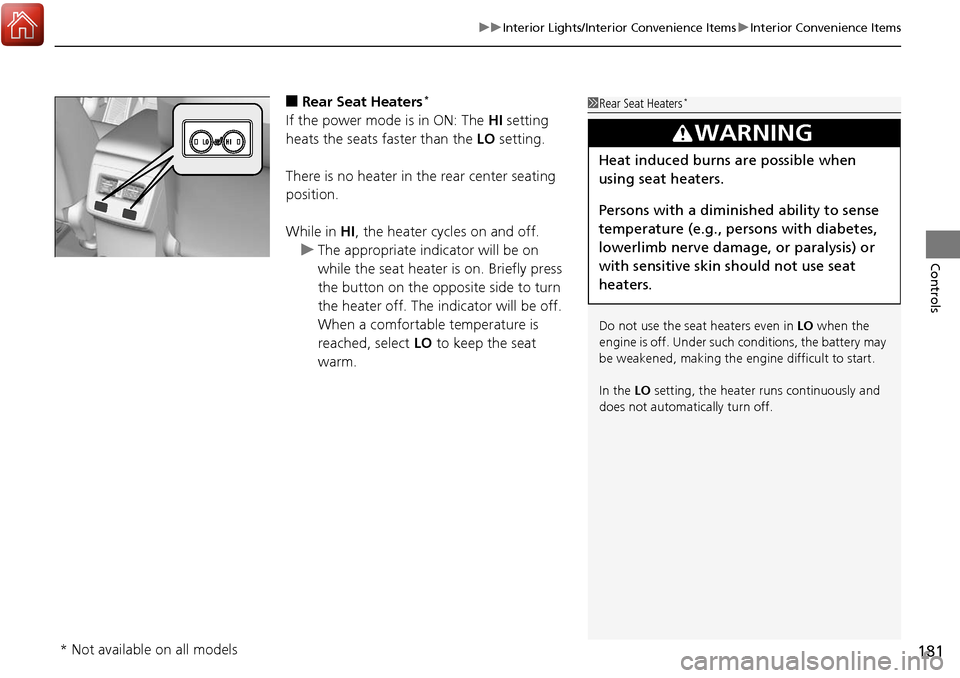
■Rear Seat Heaters*
If the power mode is in ON: The HI setting
heats the seats faster than the LO setting.
There is no heater in the rear center seating
position.
While in HI , the heater cycles on and off.
u The appropriate indicator will be on
while the seat heater is on. Briefly press
the button on the opposite side to turn
the heater off. The indicator will be off.
When a comfortable temperature is
reached, select LO to keep the seat
warm.
1 Rear Seat Heaters*
Do not use the seat heaters even in LO when the
engine is off. Under such conditions, the battery may
be weakened, making the engine difficult to start.
In the LO setting, the heater runs continuously and
does not automatically turn off.
3WARNING
Heat induced burns are possible when
using seat heaters.
Persons with a diminished ability to sense
temperature (e.g., persons with diabetes,
lowerlimb nerve damage, or paralysis) or
with sensitive skin should not use seat
heaters.
* Not available on all models
Page 216 of 453
215
uuAudio System Basic Operation*uPlaying Bluetooth ® Audio
Continued
Features
Playing Bluetooth ® Audio
Your audio system allows you to listen to music from your Bluetooth-compatible
phone.
This function is available when the phone is paired and linked to the vehicle’s
Bluetooth ® HandsFreeLink ® (HFL) system.
2Phone Setup P. 233
1Playing Bluetooth ® Audio
Not all Bluetooth -enabled phones with streaming
audio capabilities are compatible with the system.
For a list of compatible phones:
•U.S.: Visit www.acura.com/handsfreelink , or call 1-
888-528-7876.
•Canada: Visit www.handsfreelink.ca , or call 1-888-
528-7876.
In some states, it may be il legal to perform some data
device functions while driving.
If more than one phone is paired to the HFL system,
there will be a delay before the system begins to play.
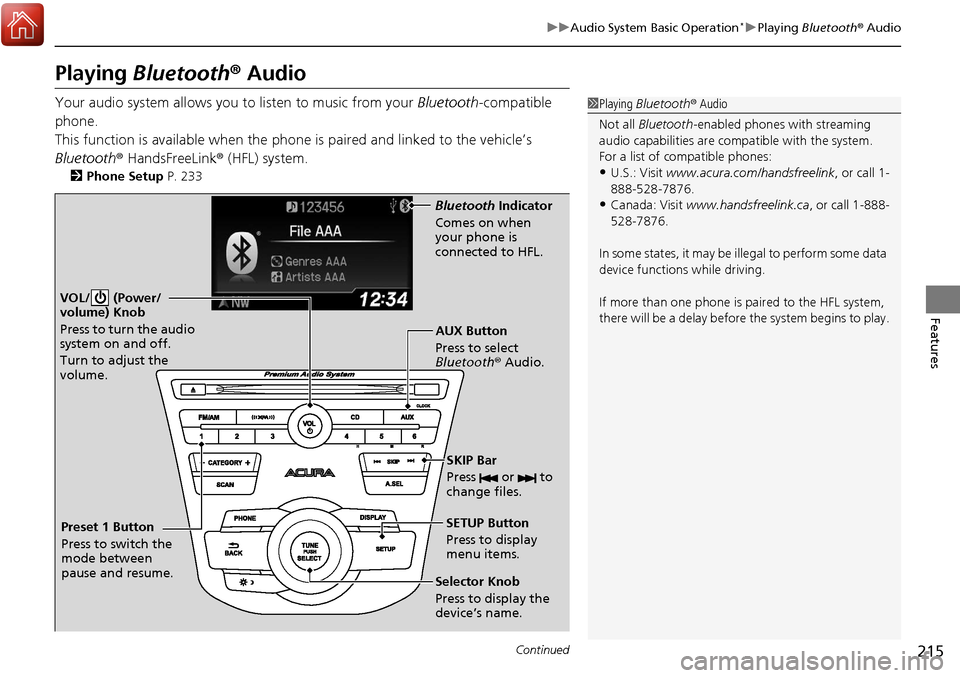
VOL/ (Power/
volume) Knob
Press to turn the audio
system on and off.
Turn to adjust the
volume.
SETUP Button
Press to display
menu items.
Selector Knob
Press to display the
device’s name. AUX Button
Press to select
Bluetooth® Audio.
SKIP Bar
Press or to
change files.
Bluetooth Indicator
Comes on when
your phone is
connected to HFL.
Preset 1 Button
Press to switch the
mode between
pause and resume.
Page 256 of 453
255
Features
Compass*
When you set the power mode to ON, the compass self-calibrates, and the compass
display appears.
Compass Calibration
If the compass indicates the wrong direction, or the CAL. indicator blinks, you need
to manually calibrate the system.
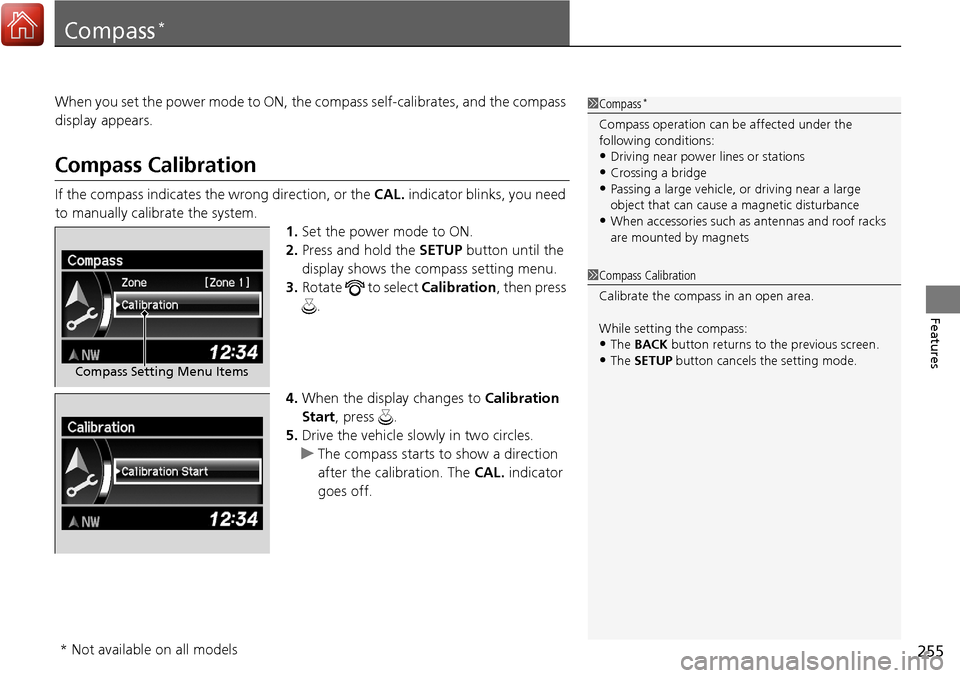
1.Set the power mode to ON.
2. Press and hold the SETUP button until the
display shows the compass setting menu.
3. Rotate to select Calibration, then press
.
4. When the display changes to Calibration
Start, press .
5. Drive the vehicle slow ly in two circles.
u The compass starts to show a direction
after the calibration. The CAL. indicator
goes off.
1 Compass*
Compass operation can be affected under the
following conditions:
•Driving near power lines or stations•Crossing a bridge
•Passing a large vehicle, or driving near a large
object that can cause a magnetic disturbance
•When accessories such as antennas and roof racks
are mounted by magnets
Compass Setting Menu Items
1 Compass Calibration
Calibrate the compass in an open area.
While setting the compass:
•The BACK button returns to the previous screen.•The SETUP button cancels the setting mode.
* Not available on all models
Page 276 of 453
275
uuWhen Driving uPrecautions While Driving
Driving
Precautions While Driving
Utility vehicles have a significantly higher rollover rate than other types of vehicles.
To prevent rollovers or loss of control:
• Take corners at slower speeds than yo u would with a passenger vehicle.
• Avoid sharp turns and abrupt maneuvers whenever possible.
• Do not modify your vehicle in any way th at you would raise the center of gravity.
• Never carry more than 165 lbs (75 kg) of ca rgo on the roof rack (Acura accessory).
Avoid driving in deep water and on flooded roads. This can damage the engine,
driveline, or cause electrical component failure.
If there is a strong impact with something un der the vehicle, stop in a safe location.
Check the underside of the vehicle for damage or any fluid leaks.
■Driving Guidelines for Your Utility Vehicle
■In Rain
■Other Precautions
1 Driving Guidelines for Your Utility Vehicle
Failure to operate your vehicle correctly might result
in a crash or a rollover. 2 Important Handling Information P. 28
1Precautions While Driving
NOTICE
Do not operate the shift lever while pressing the
accelerator pedal. You could damage the transmission.
NOTICE
If you repeatedly turn the steering wheel at an
extremely low speed, or hold the steering wheel on the
full left or right position for a while, the electric power
steering (EPS) system heats up . The system goes into a
protective mode, and limits its performance. The
steering wheel becomes harder and harder to operate.
Once the system cools down, the EPS system is restored.
Repeated operation under these conditions can
eventually damage the system.
If the power mode is set to ACCESSORY while
driving, the engine will shut down and all steering
and brake power assist functi ons will stop, making it
difficult to control the vehicle.
Do not put the shift lever in
( N, as you will lose
engine braking (and acce leration) performance.
During the first 600 miles (1,000 km) of operation,
avoid sudden acceleration or full throttle operation so
as not to damage the engine or powertrain.
Avoid hard braking for the first 200 miles (300 km). You
should also follow this when the brake pads are replaced.
Page 305 of 453
uuWhen Driving uLane Keeping Assist System (LKAS)*
304
Driving
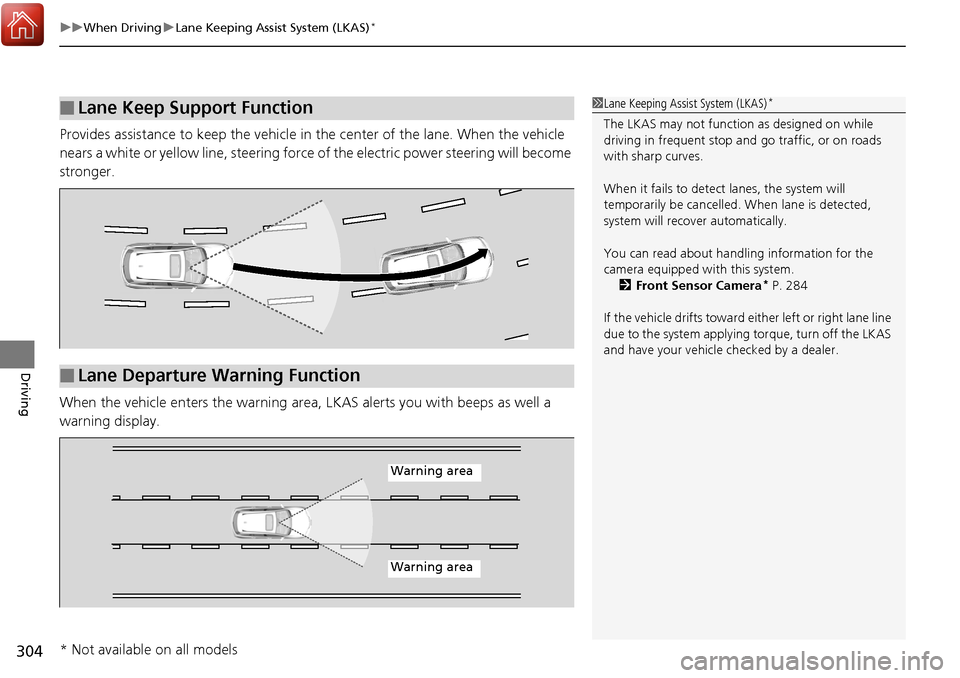
Provides assistance to keep the vehicle in the center of the lane. When the vehicle
nears a white or yellow line, steering force of the electric power steering will become
stronger.
When the vehicle enters th e warning area, LKAS alerts you with beeps as well a
warning display.
■Lane Keep Support Function1 Lane Keeping Assist System (LKAS)*
The LKAS may not functi on as designed on while
driving in frequent stop and go traffic, or on roads
with sharp curves.
When it fails to detect lanes, the system will
temporarily be cancelled. When lane is detected,
system will recover automatically.
You can read about handling information for the
camera equipped with this system. 2 Front Sensor Camera
* P. 284
If the vehicle drifts toward ei ther left or right lane line
due to the system applying torque, turn off the LKAS
and have your vehicle checked by a dealer.
■Lane Departure Warning Function
Warning area
Warning area
* Not available on all models
Page 317 of 453
316
uuWhen Driving uAll-Wheel Drive (AWD) with Intelligent Control System*
Driving
All-Wheel Drive (AWD) with Intelligent Control System*
Your vehicle is equipped with the AWD wi th intelligent control system. When the
system senses a loss of front wheel tracti on, it automatically transfers some power
to the rear wheels. This allows you to ut ilize all available traction and may increase
mobility.
You still need to exercise the same care when accelerating, steering, and braking
that you would in a two wheel drive vehicle.
If you excessively spin all four wheels and overheat the AWD with intelligent control
system, only the front wheels receive power. Stop until the system cools down.
Tire Pressure Monitoring System (TPMS)
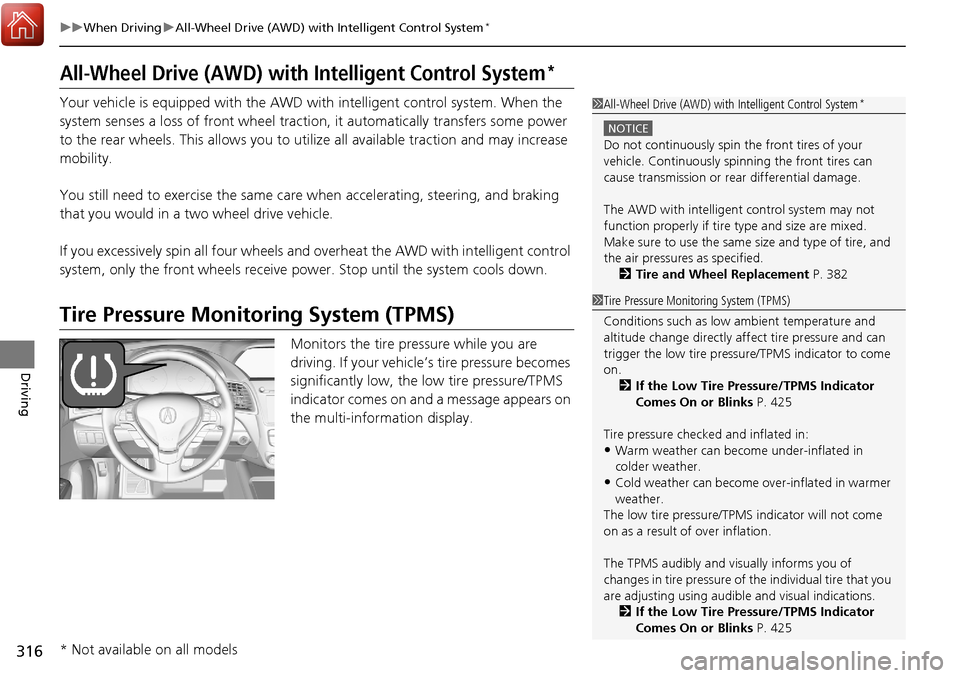
Monitors the tire pressure while you are
driving. If your vehicle’s tire pressure becomes
significantly low, the low tire pressure/TPMS
indicator comes on and a message appears on
the multi-information display.
1 All-Wheel Drive (AWD) with Intelligent Control System*
NOTICE
Do not continuously spin the front tires of your
vehicle. Continuously spinning the front tires can
cause transmission or re ar differential damage.
The AWD with intelligent control system may not
function properly if tire ty pe and size are mixed.
Make sure to use the same size and type of tire, and
the air pressures as specified.
2 Tire and Wheel Replacement P. 382
1Tire Pressure Monitoring System (TPMS)
Conditions such as low ambient temperature and
altitude change directly affect tire pressure and can
trigger the low tire pressure/TPMS indicator to come
on.
2 If the Low Tire Pressure/TPMS Indicator
Comes On or Blinks P. 425
Tire pressure checked and inflated in:
•Warm weather can beco me under-inflated in
colder weather.
•Cold weather can become over-inflated in warmer
weather.
The low tire pressure/TPMS indicator will not come
on as a result of over inflation.
The TPMS audibly and visually informs you of
changes in tire pressure of the individual ti re that you
are adjusting using audibl e and visual indications.
2 If the Low Tire Pressure/TPMS Indicator
Comes On or Blinks P. 425
* Not available on all models
Page 318 of 453
317
uuWhen Driving uTire Pressure Monitoring System (TPMS)
Driving
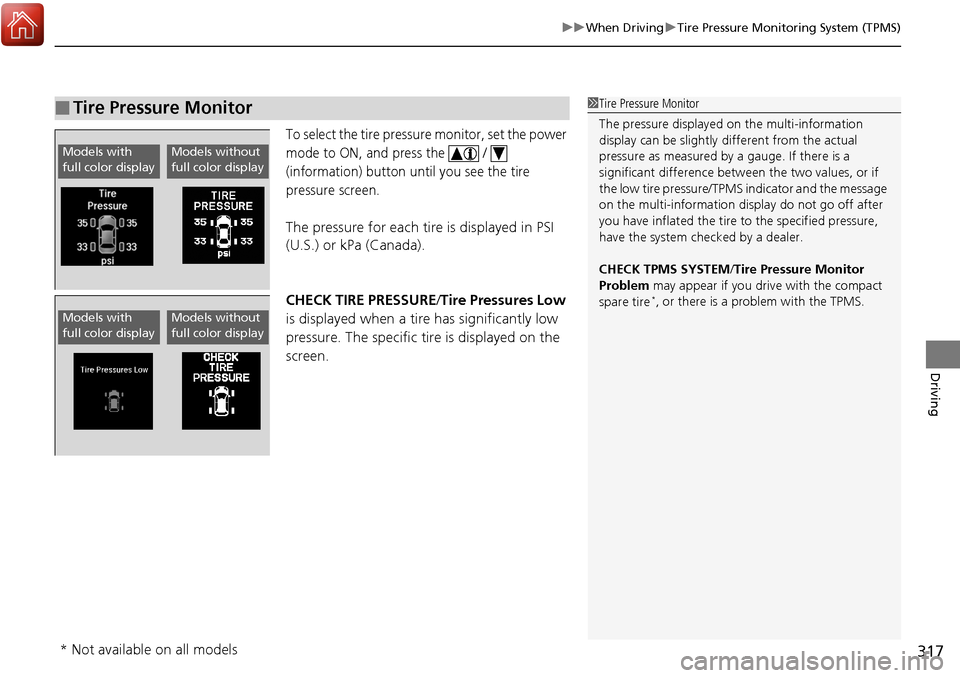
To select the tire pressure monitor, set the power
mode to ON, and press the /
(information) button until you see the tire
pressure screen.
The pressure for each tire is displayed in PSI
(U.S.) or kPa (Canada).
CHECK TIRE PRESSURE /Tire Pressures Low
is displayed when a tire has significantly low
pressure. The specific tire is displayed on the
screen.
■Tire Pressure Monitor1 Tire Pressure Monitor
The pressure displayed on the multi-information
display can be slightly different from the actual
pressure as measured by a gauge. If there is a
significant di fference between the two values, or if
the low tire pressure/TPMS indicator and the message
on the multi-information di splay do not go off after
you have inflated the tire to the specified pressure,
have the system checked by a dealer.
CHECK TPMS SYSTEM /Tire Pressure Monitor
Problem may appear if you drive with the compact
spare tire
*, or there is a problem with the TPMS.
Models with
full color displayModels without
full color display
Models with
full color displayModels without
full color display
* Not available on all models