low power mode Acura RDX 2018 Service Manual
[x] Cancel search | Manufacturer: ACURA, Model Year: 2018, Model line: RDX, Model: Acura RDX 2018Pages: 453, PDF Size: 20.13 MB
Page 339 of 453
uuParking Your Vehicle uCross Traffic Monitor*
338
Driving
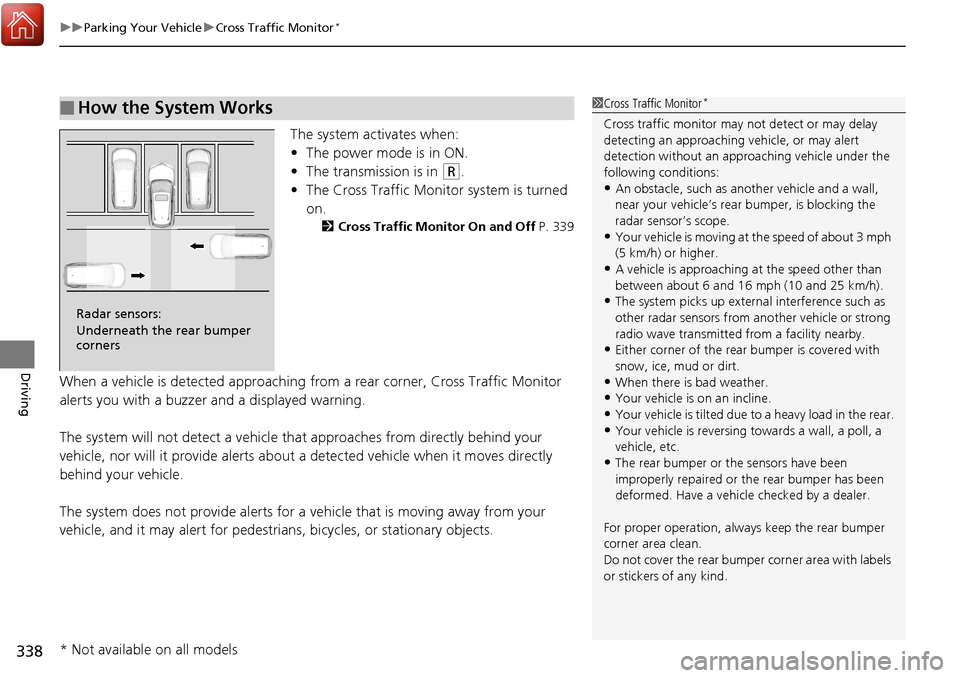
The system activates when:
• The power mode is in ON.
• The transmission is in
(R.
• The Cross Traffic Monitor system is turned
on.
2 Cross Traffic Monitor On and Off P. 339
When a vehicle is detected approaching from a rear corner, Cross Traffic Monitor
alerts you with a buzzer and a displayed warning.
The system will not detect a vehicle that approaches from directly behind your
vehicle, nor will it provide alerts about a detected vehicle when it moves directly
behind your vehicle.
The system does not provide alerts for a vehicle that is moving away from your
vehicle, and it may alert for pedestri ans, bicycles, or stationary objects.
■How the System Works1Cross Traffic Monitor*
Cross traffic monitor may not detect or may delay
detecting an approaching vehicle, or may alert
detection without an appr oaching vehicle under the
following conditions:
•An obstacle, such as a nother vehicle and a wall,
near your vehicle’s rear bumper, is blocking the
radar sensor’s scope.
•Your vehicle is moving at the speed of about 3 mph
(5 km/h) or higher.
•A vehicle is approaching at the speed other than
between about 6 and 16 mph (10 and 25 km/h).
•The system picks up external interference such as
other radar sensors from an other vehicle or strong
radio wave transmitted fr om a facility nearby.
•Either corner of the rear bumper is covered with
snow, ice, mud or dirt.
•When there is bad weather.
•Your vehicle is on an incline.
•Your vehicle is tilted due to a heavy load in the rear.
•Your vehicle is reversing towards a wall, a poll, a
vehicle, etc.
•The rear bumper or the sensors have been
improperly repaired or the rear bumper has been
deformed. Have a vehicle checked by a dealer.
For proper operation, always keep the rear bumper
corner area clean.
Do not cover the rear bumper corner area with labels
or stickers of any kind.
Radar sensors:
Underneath the rear bumper
corners
* Not available on all models
Page 352 of 453
351
uuMaintenance MinderTMuTo Use Maintenance MinderTM
Continued
Maintenance
■Maintenance Service Items1Maintenance Service Items
•Independent of the Maintenance Minder
information, replace the brake fluid every 3 years.
•Inspect idle speed every 16 0,000 miles (256,000 km).
•Adjust the valves during services A, B, 1, 2, or 3 if
they are noisy.
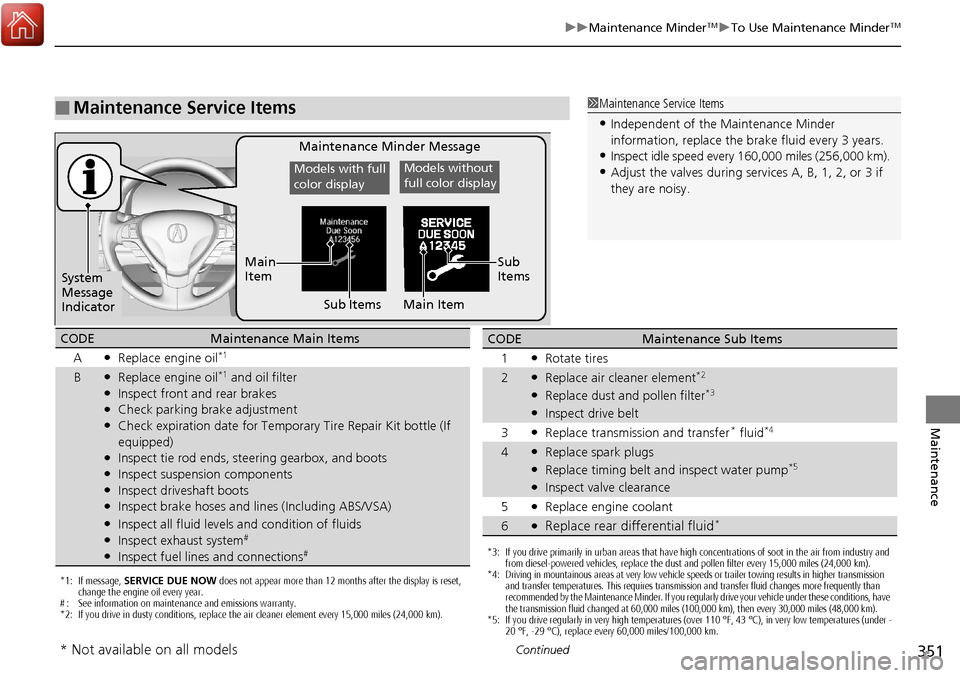
Maintenance Minder Message
System
Message
Indicator Sub Items
Main
Item
*1: If message,
SERVICE DUE NOW does not appear more than 12 months after the display is reset,
change the engine oil every year.
# : See information on maintenance and emissions warranty.
*2: If you drive in dusty conditions, replace the air cleaner element every 15,000 miles (24,000 km).
CODEMaintenance Main Items
A
●Replace engine oil*1
B●Replace engine oil*1 and oil filter●Inspect front and rear brakes●Check parking brake adjustment●Check expiration date for Temporary Tire Repair Kit bottle (If
equipped)
●Inspect tie rod ends, steering gearbox, and boots●Inspect suspension components●Inspect driveshaft boots●Inspect brake hoses and lin es (Including ABS/VSA)●Inspect all fluid levels and condition of fluids●Inspect exhaust system#
●Inspect fuel lines and connections#*3: If you drive primarily in urban areas that have high concentrations of soot in the air from industry and
from diesel-powered vehicles, replace the dust and pollen filter every 15,000 miles (24,000 km).
*4: Driving in mountainous areas at very low vehicle speeds or trailer towing results in higher transmission and transfer temperatures. This requires transmission and transfer fluid changes more frequently than
recommended by the Maintenance Minder. If you regularly drive your vehicle under these conditions, have
the transmission fluid changed at 60,000 miles (100,000 km), then every 30,000 miles (48,000 km).
*5: If you drive regularly in very high temperatures (over 110 °F, 43 °C), in very low temperatures (under -
20 °F, -29 °C), replace every 60,000 miles/100,000 km.
CODEMaintenance Sub Items
1
●Rotate tires
2●Replace air cleaner element*2
●Replace dust and pollen filter*3
●Inspect drive belt
3
●Replace transmission and transfer* fluid*4
4●Replace spark plugs●Replace timing belt an d inspect water pump*5
●Inspect valve clearance
5
●Replace engine coolant
6●Replace rear differential fluid*
Models with full
color displayModels without
full color display
Sub
Items
Main Item
* Not available on all models
Page 396 of 453
395
Handling the Unexpected
This chapter explains how to handle unexpected troubles.
ToolsTypes of Tools .................................. 396
If a Tire Goes Flat Changing a Flat Tire
*....................... 397
Temporarily Repair ing a Flat Tire*..... 403
Engine Does Not Start Checking the Engine ........................ 414
If the Keyless Access Remote Battery is Weak ............................................. 415
Emergency Engine Stop ................... 416
Jump Starting .................................... 417
Shift Lever Does Not Move .............. 419Overheating
How to Handle Overheating............. 420
Indicator, Coming On/Blinking
If the Low Oil Pressure Indicator Comes On ............................................. 422
If the Charging System Indicator Comes
On ................................................. 422
If the Malfunction Indicator Lamp Comes On or Blinks ................................... 423
If the Brake System Indicator (Red) Comes On .................................................... 424
If the Electric Power Steering (EPS) System
Indicator Comes On............................ 424
If the Low Tire Pressure/TPMS Indicator Comes On or Blinks ....................... 425
Fuses Fuse Locations ................................. 426
Inspecting and Changing Fuses ........ 428
Emergency Towing ........................... 429
When You Cannot Open the Tailgate..... 430
* Not available on all models
Page 404 of 453
403
uuIf a Tire Goes Flat uTemporarily Repairing a Flat Tire*
Continued
Handling the Unexpected
Temporarily Repairing a Flat Tire*
If the tire has a large cut or is otherwise severely damaged, you will need to have the
vehicle towed. If the tire only has a small puncture, from a nail for instance, you can
use the temporary tire repair kit so that you can drive to the nearest service station
for a more permanent repair.
If a tire goes flat while driving, grasp the steering wheel firmly, and brake gradually
to reduce speed. Then stop in a safe place.
1. Park the vehicle on a firm, level, and n on-slippery surface and apply the parking
brake.
2. Move the shift lever to
(P.
3. Turn on the hazard warning lights and set the power mode to VEHICLE OFF
(LOCK).
1Temporarily Repairing a Flat Tire*
The kit should not be used in the following situations.
Instead, contact a dealer or a roadside assistant to
have the vehicle towed.
•The tire sealant has expired.
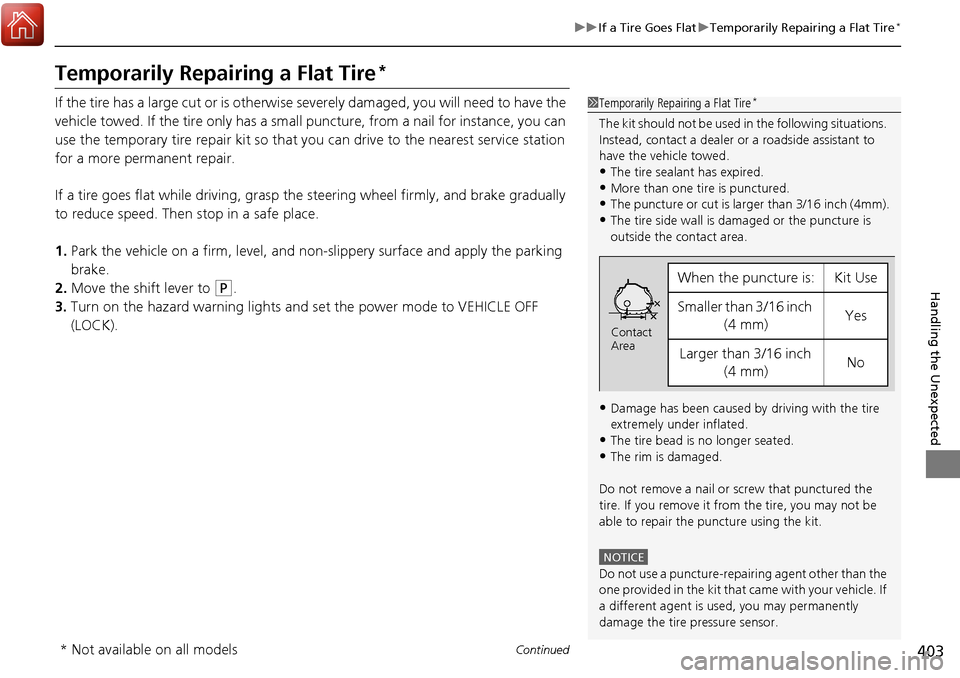
•More than one tire is punctured.•The puncture or cut is larger than 3/16 inch (4mm).
•The tire side wall is da maged or the puncture is
outside the contact area.
•Damage has been caused by driving with the tire
extremely under inflated.
•The tire bead is no longer seated.
•The rim is damaged.
Do not remove a nail or screw that punctured the
tire. If you remove it from the tire, you may not be
able to repair the puncture using the kit.
NOTICE
Do not use a puncture-repairing agent other than the
one provided in the kit that came with your vehicle. If
a different agent is used, you may permanently
damage the tire pressure sensor.
When the puncture is:Kit Use
Smaller than 3/16 inch (4 mm)Yes
Larger than 3/16 inch (4 mm)No
Contact
Area
* Not available on all models
Page 417 of 453
416
uuEngine Does Not Start uEmergency Engine Stop
Handling the Unexpected
Emergency Engine Stop
The ENGINE START/STOP button may be used to stop the engine due to an
emergency situation even while driving. If you must stop the engine, do either of the
following operations:
• Press and hold the ENGINE START/STOP button for two seconds.
• Firmly press the ENGINE START/STOP button twice.
The steering wheel will not lock. However, because turning off the engine disables
the power assist the engine provides to the steering and braking systems, it will
require significantly more physical effort an d time to steer and slow the vehicle. Use
both feet on the brake pedal to slow down the vehicle and stop immediately in a
safe place.
The power mode is in ACCESSORY when the engine is stopped.
To change the mode to VEHICLE OF F, change the gear position to
(P after the
vehicle comes to a complete stop. Then press the ENGINE START/STOP button
twice without depressing the brake pedal.
1 Emergency Engine Stop
Do not press the button while driving unless it is
absolutely necessary for th e engine to be switched
off.
Page 427 of 453
426
Handling the Unexpected
Fuses
Fuse Locations
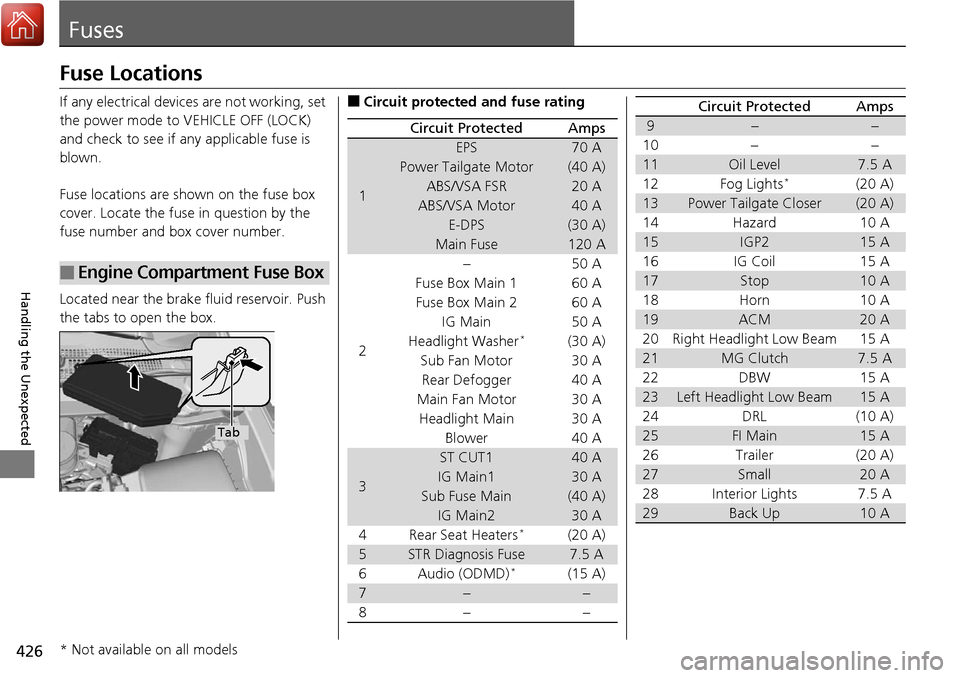
If any electrical devices are not working, set
the power mode to VEHICLE OFF (LOCK)
and check to see if any applicable fuse is
blown.
Fuse locations are shown on the fuse box
cover. Locate the fuse in question by the
fuse number and box cover number.
Located near the brake fluid reservoir. Push
the tabs to open the box.
■Engine Compartment Fuse Box
Tab
■Circuit protected and fuse rating
Circuit ProtectedAmps
1
EPS70 A
Power Tailgate Motor(40 A)
ABS/VSA FSR20 A
ABS/VSA Motor40 A
E-DPS(30 A)
Main Fuse120 A
2
−50 A
Fuse Box Main 1 60 A
Fuse Box Main 260 A
IG Main 50 A
Headlight Washer*(30 A)
Sub Fan Motor 30 A Rear Defogger 40 A
Main Fan Motor 30 A Headlight Main 30 A Blower 40 A
3
ST CUT140 A
IG Main130 A
Sub Fuse Main(40 A)
IG Main230 A
4 Rear Seat Heaters*(20 A)
5STR Diagnosis Fuse7.5 A
6Audio (ODMD)*(15 A)
7−−
8− −
9−−
10 − −
11Oil Level7.5 A
12 Fog Lights*(20 A)
13Power Tailgate Closer(20 A)
14 Hazard 10 A
15IGP215 A
16 IG Coil 15 A
17Stop10 A
18 Horn 10 A
19ACM20 A
20 Right Headlight Low Beam 15 A
21MG Clutch7.5 A
22 DBW 15 A
23Left Headlight Low Beam15 A
24 DRL (10 A)
25FI Main15 A
26 Trailer (20 A)
27Small20 A
28 Interior Lights 7.5 A
29Back Up10 A
Circuit ProtectedAmps
* Not available on all models
Page 429 of 453
428
uuFuses uInspecting and Changing Fuses
Handling the Unexpected
Inspecting and Changing Fuses
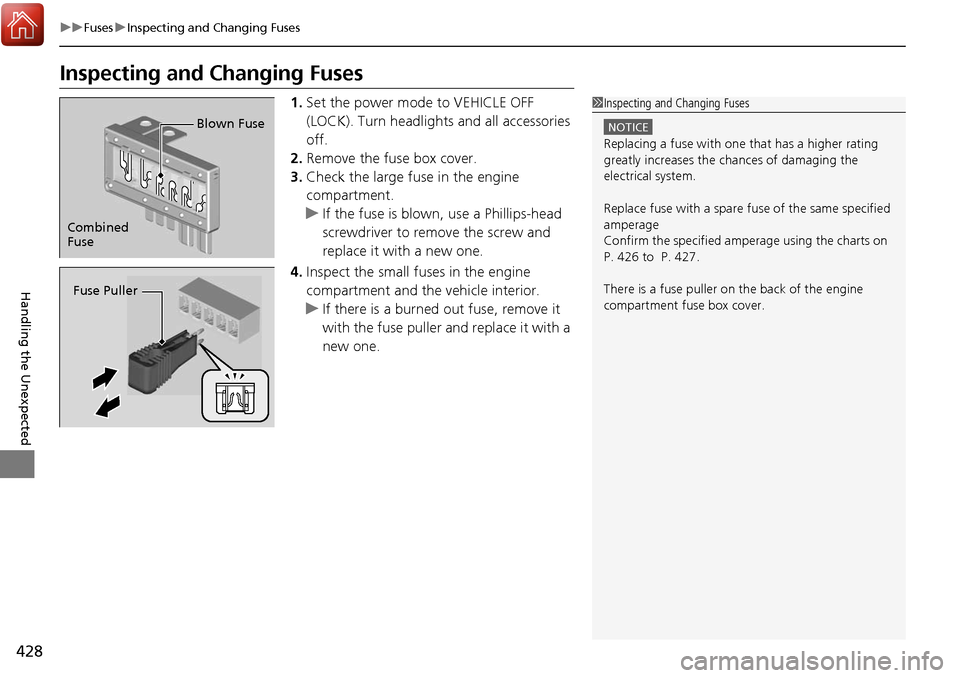
1. Set the power mode to VEHICLE OFF
(LOCK). Turn headlight s and all accessories
off.
2. Remove the fuse box cover.
3. Check the large fuse in the engine
compartment.
u If the fuse is blown, use a Phillips-head
screwdriver to remo ve the screw and
replace it with a new one.
4. Inspect the small fuses in the engine
compartment and the vehicle interior.
u If there is a burned out fuse, remove it
with the fuse puller and replace it with a
new one.1Inspecting and Changing Fuses
NOTICE
Replacing a fuse with on e that has a higher rating
greatly increases the chances of damaging the
electrical system.
Replace fuse with a spare fuse of the same specified
amperage
Confirm the specified amperage using the charts on
P. 426 to P. 427.
There is a fuse puller on the back of the engine
compartment fuse box cover.
Combined
Fuse Blown Fuse
Fuse Puller
Page 449 of 453
448
Index
Mirrors....................................................... 161
Adjusting ................................................. 161
Door ........................................................ 162
Exterior .................................................... 162
Interior Rearview...................................... 161
Modifications (and Accessories) ............... 394
Moonroof .................................................. 145
MP3 .................................................... 204, 212
Multi-Information Display .......................... 96
Multi-View Rear Camera .......................... 340
N
Numbers (Identification).......................... 434
O
Odometer.................................................... 99
Off-Highway Driving Guidelines .............. 268
Oil (Engine) ............................................... 355
Adding .................................................... 357
Checking ................................................. 356
Displaying Oil Life .................................... 349
Low Oil Pressure Indicator .................. 69, 422
Recommended Engine Oil ................ 355, 433
Viscosity .......................................... 355, 433
On Demand Multi-Use Display
TM................. 4
Opening/Closing Hood ....................................................... 354
Moonroof ................................................ 145
Power Windows ...................................... 142 Tailgate ................................................... 133
Outside Temperature Display .................. 100
Overheating .............................................. 420
P
Paddle Shifters
(Sequential Shift Mode) ......................... 279
Pandora® ................................................... 210
Panic Mode ............................................... 141
Parking ...................................................... 332
Parking Brake ........................................... 320
Parking Brake and Brake System
Indicator ............................................ 68, 424
Parking Sensor System ............................. 333
Passenger Airbag Off Indicator ................. 50
Passing Indicators ..................................... 149
Power Tailgate ......................................... 135
Power Windows ....................................... 142
Precautions While Driving ....................... 275
Driving Guidelines for Your Utility
Vehicle .................................................. 275
Rain ........................................................ 275
Pregnant Women ....................................... 37
Puncture (Tire) .................................. 397, 403
R
Radiator.................................................... 361
Radio (AM/FM) ......................................... 200
Radio (SiriusXM ®)..................................... 202
Radio Data System (RDS) ......................... 201
Range ........................................................ 101
RDS (Radio Data System) ......................... 201
Readiness Codes (Emissions Testing) ...... 437
Rear Defogger/Heated Door Mirror Button ..................................................... 157
Rear Seat Heaters ..................................... 181
Rear Seats (Folding Down) ...................... 169
Rearview Mirror ....................................... 161
Refueling .................................................. 341
Fuel Gauge ............................................... 95
Gasoline ......................................... 341, 432
Low Fuel Indicator..................................... 71
Regulations .............................. 318, 379, 435
Remote Engine Start with Vehicle
Feedback ................................................. 272
Remote Transmitter ................................. 127
Replacement
Battery ............................................ 386, 387
Bulbs ...................................................... 365
Front Wiper Blade Rubber ....................... 372
Fuses .............................................. 426, 427
Rear Wiper Blade Rubber ........................ 374
Tires........................................................ 382
Reporting Safety Defects ......................... 436
Resetting a Trip Meter ............................. 100
Reverse Tilt Door Mirror .......................... 162