Acura RDX 2019 Owner's Manual
Manufacturer: ACURA, Model Year: 2019, Model line: RDX, Model: Acura RDX 2019Pages: 649, PDF Size: 33 MB
Page 351 of 649

350
uuCustomized Features u
Features
*1:Default SettingSetup Group Customizable Features
Description Selectable Settings
Vehicle Power
Tailgate
SetupPower Tailgate Keyless Open
Mode
Changes the setting to enable the
power tailgate to be opened with the
keyless access remote at anytime or
only when the door
s are unlocked. Anytime
*1/
When
Unlocked
Power Tailgate Open by
Outer Handle Changes the setting to enable or
disable the power tailgate open
operation when the user presses the
outer handle of the power tailgate. Off (Manual only)
/
On (Power/
Manual)
*1
Hands Free Access Power
Tailgate*
Changes the setting to enable or
disable the power tailgate open
operation when a kicking motion
under the rear bumper is detected. On
*1/
Off
Maintenance
Information (Select Reset Items) Resets the Maintenance Minder
TM
display when you have performed the
maintenance service. —
Reset All Due
* Not available on all models
19 ACURA RDX-31TJB6000.book 350 ページ 2018年4月26日 木曜日 午後4時51分
Page 352 of 649
351
uuCustomized Features u
Continued
Features
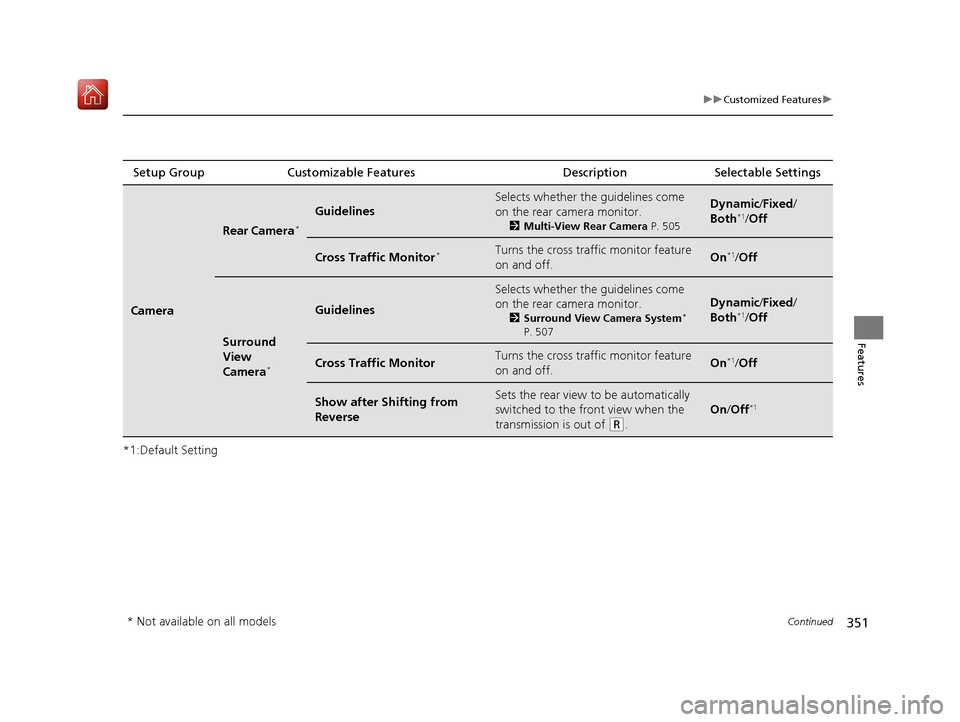
*1:Default SettingSetup Group Customizable Features
Description Selectable Settings
Camera
Rear Camera*
Guidelines
Selects whether the guidelines come
on the rear camera monitor.
2Multi-View Rear Camera P. 505
Dynamic/Fixed /
Both*1/ Off
Cross Traffic Monitor*Turns the cross traffic monitor feature
on and off.On*1/Off
Surround
View
Camera
*
Guidelines
Selects whether the guidelines come
on the rear camera monitor.
2 Surround View Camera System*
P. 507
Dynamic /Fixed /
Both*1/ Off
Cross Traffic MonitorTurns the cross traffic monitor feature
on and off.On*1/Off
Show after Sh ifting from
ReverseSets the rear view to be automatically
switched to the front view when the
transmission is out of
(R.
On /Off*1
* Not available on all models
19 ACURA RDX-31TJB6000.book 351 ページ 2018年4月26日 木曜日 午後4時51分
Page 353 of 649
352
uuCustomized Features u
Features
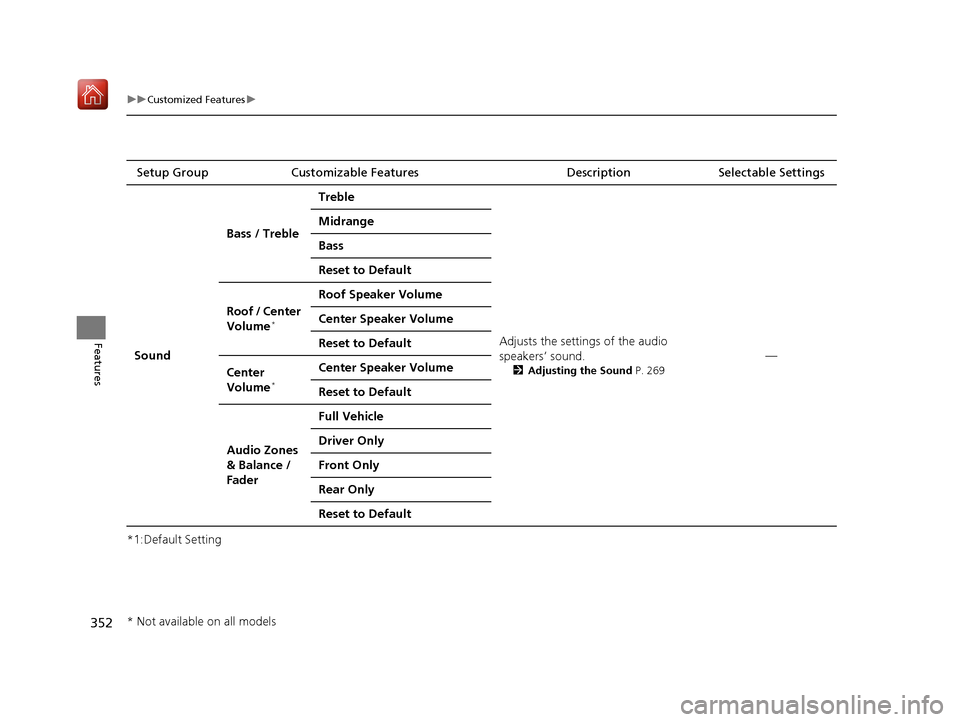
*1:Default SettingSetup Group Customizable Features
Description Selectable Settings
Sound Bass / Treble
Treble
Adjusts the settings of the audio
speakers’ sound.
2Adjusting the Sound P. 269
—
Midrange
Bass
Reset to Default
Roof / Center
Volume
*
Roof Speaker Volume
Center Speaker Volume
Reset to Default
Center
Volume
*
Center Speaker Volume
Reset to Default
Audio Zones
& Balance /
Fader Full Vehicle
Driver Only
Front Only
Rear Only
Reset to Default
* Not available on all models
19 ACURA RDX-31TJB6000.book 352 ページ 2018年4月26日 木曜日 午後4時51分
Page 354 of 649
353
uuCustomized Features u
Features
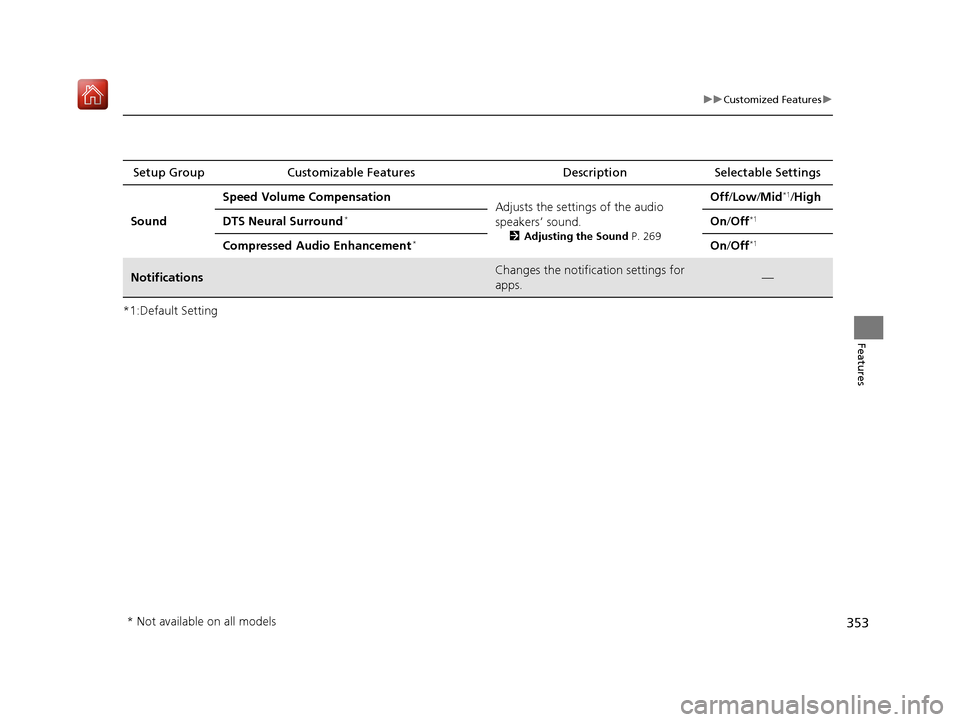
*1:Default SettingSetup Group Customizable Features
Description Selectable Settings
Sound Speed Volume Compensation
Adjusts the settings of the audio
speakers’ sound.
2Adjusting the Sound P. 269
Off /Low /Mid*1/High
DTS Neural Surround
*On /Off*1
Compressed Audio Enhancement*On /Off*1
NotificationsChanges the notification settings for
apps.—
* Not available on all models
19 ACURA RDX-31TJB6000.book 353 ページ 2018年4月26日 木曜日 午後4時51分
Page 355 of 649
354
uuCustomized Features uDefaulting All the Settings
Features
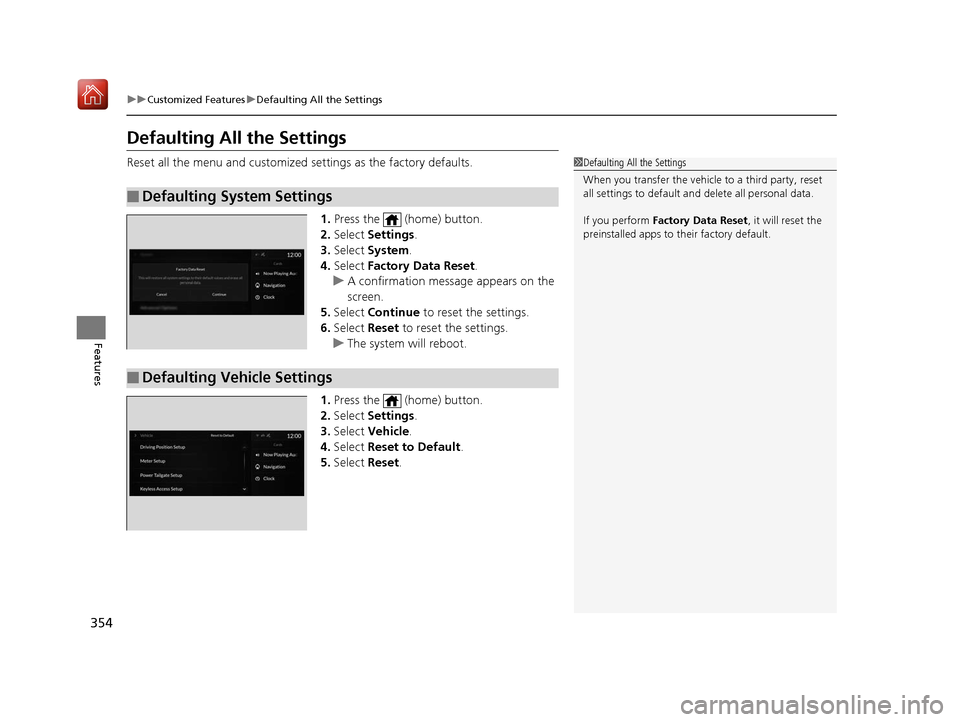
Defaulting All the Settings
Reset all the menu and customized settings as the factory defaults.
1. Press the (home) button.
2. Select Settings .
3. Select System .
4. Select Factory Data Reset .
u A confirmation message appears on the
screen.
5. Select Continue to reset the settings.
6. Select Reset to reset the settings.
u The system will reboot.
1. Press the (home) button.
2. Select Settings .
3. Select Vehicle .
4. Select Reset to Default .
5. Select Reset.
■Defaulting System Settings
1Defaulting All the Settings
When you transfer the vehicle to a third party, reset
all settings to default a nd delete all personal data.
If you perform Factory Data Reset , it will reset the
preinstalled apps to their factory default.
■Defaulting Vehicle Settings
19 ACURA RDX-31TJB6000.book 354 ページ 2018年4月26日 木曜日 午後4時51分
Page 356 of 649
355
Features
HomeLink® Universal Transceiver
The HomeLink ® Universal Transceiver can be programmed to operate up to three
remote controlled devices around your home, such as garage doors, lighting, or
home security systems.
Refer to the safety information that came wi th your garage door opener to test that
the safety features are functioning properly. If you do not have the safety
information, contact the manufacturer.
Before programming HomeLink, make sure that people and objects are out of the
way of the garage or gate to prevent potential injury or damage.
When programming a garage door opener, pa rk just outside the garage door’s path.
■Important Safety Precautions
1HomeLink ® Universal Transceiver
Before programming HomeLi nk to operate a garage
door opener, confirm that the opener has an external
entrapment protection system, such as an “electronic
eye,” or other safety and re verse stop features. If it
does not, HomeLink may not be able to operate it.
19 ACURA RDX-31TJB6000.book 355 ページ 2018年4月26日 木曜日 午後4時51分
Page 357 of 649
356
uuHomeLink ® Universal Transceiver uTraining HomeLink
Features
Training HomeLink
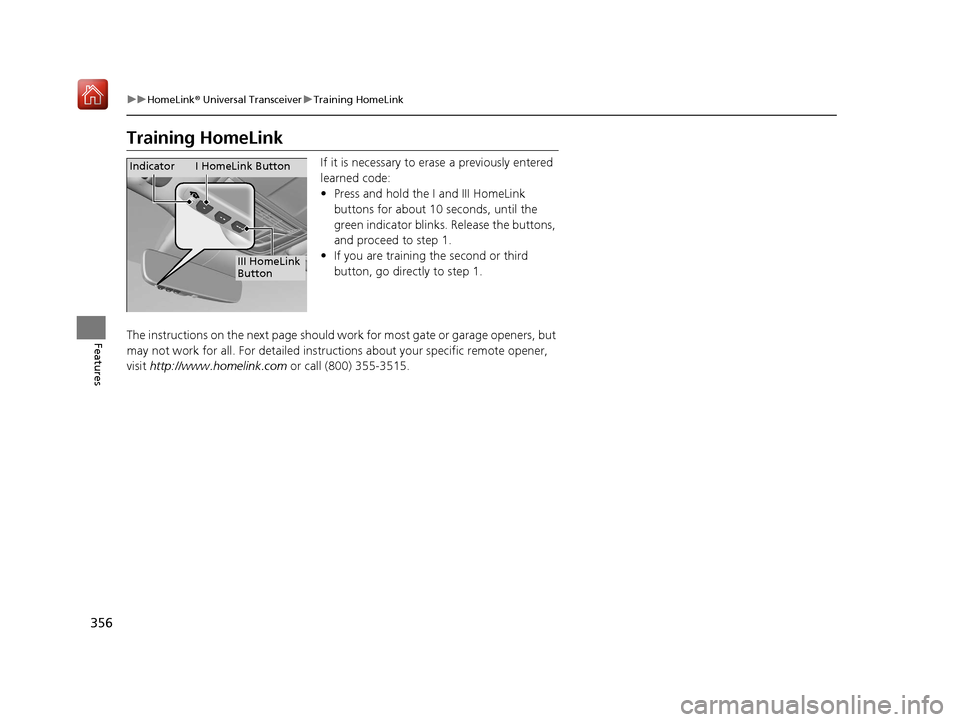
If it is necessary to erase a previously entered
learned code:
• Press and hold the I and III HomeLink
buttons for about 10 seconds, until the
green indicator blinks. Release the buttons,
and proceed to step 1.
• If you are training the second or third
button, go directly to step 1.
The instructions on the next page should work for most gate or garage openers, but
may not work for all. For detailed instruct ions about your specific remote opener,
visit http://www.homelink.com or call (800) 355-3515.
III HomeLink
Button
Indicator I HomeLink Button
19 ACURA RDX-31TJB6000.book 356 ページ 2018年4月26日 木曜日 午後4時51分
Page 358 of 649
357
uuHomeLink ® Universal Transceiver uTraining HomeLink
Features
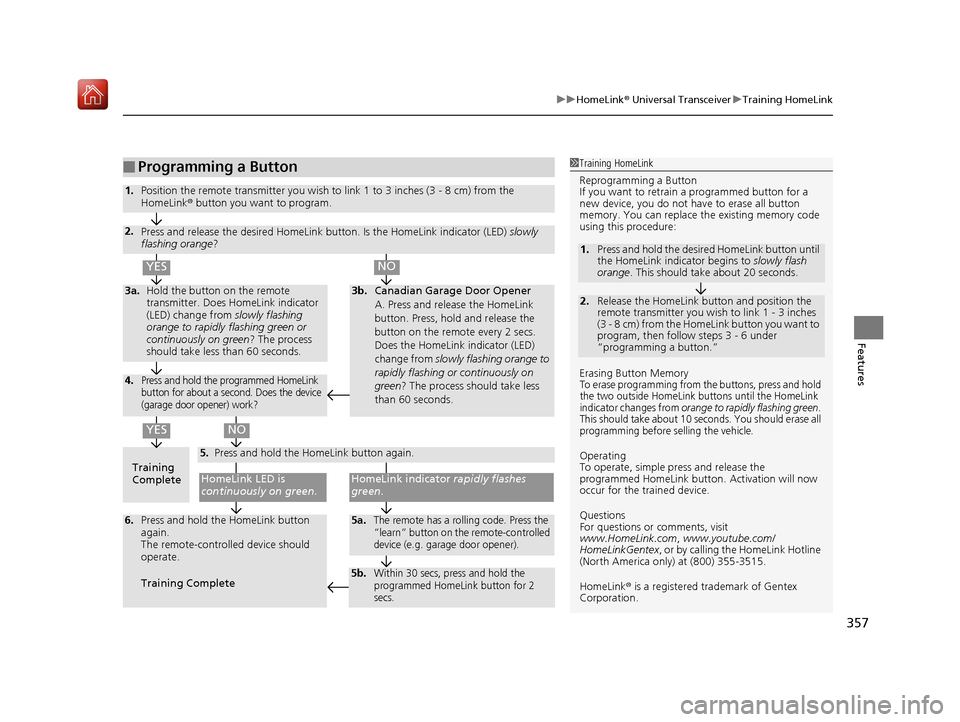
■Programming a Button1Training HomeLink
Reprogramming a Button
If you want to retrain a programmed button for a
new device, you do not ha ve to erase all button
memory. You can replace the existing memory code
using this procedure:
Erasing Button Memory
To erase programming from the buttons, press and hold
the two outside HomeLink buttons until the HomeLink
indicator changes from
orange to rapidly flashing green.
This should take about 10 seconds. You should erase all
programming before selling the vehicle.
Operating
To operate, simple pr ess and release the
programmed HomeLink butto n. Activation will now
occur for the trained device.
Questions
For questions or comments, visit
www.HomeLink.com, www.youtube.com/
HomeLinkGentex , or by calling the HomeLink Hotline
(North America only) at (800) 355-3515.
HomeLink® is a registered tra demark of Gentex
Corporation.
2.
1. Press and hold the desired HomeLink button until
the HomeLink indi
cator begins to slowly flash
orange . This should take about 20 seconds.
Release the HomeLink button and position the
remote transmitter you wish to link 1 - 3 inches
(3 - 8 cm) from the HomeLink button you want to
program, then follow steps 3 - 6 under
“programming a button.”
Training
CompleteHomeLink LED is
continuously on green .
YES
YES
1.Position the remote transmitter you wish to link 1 to 3 inches (3 - 8 cm) from the
HomeLink® button you want to program.
3b.Canadian Garage Door Opener
A. Press and release the HomeLink
button. Press, hold and release the
button on the remote every 2 secs.
Does the HomeLink indicator (LED)
change from slowly flashing orange to
rapidly flashing or continuously on
green ? The process should take less
than 60 seconds.
NO
2. Press and release the desired HomeLink but ton. Is the HomeLink indicator (LED) slowly
flashing orange ?
NO
3a.Hold the button on the remote
transmitter. Does HomeLink indicator
(LED) change from slowly flashing
orange to rapidly flashing green or
continuously on green ? The process
should take less than 60 seconds.
5. Press and hold the HomeLink button again.
HomeLink indicator rapidly flashes
green .
5a.The remote has a rolling code. Press the
“learn” button on the remote-controlled
device (e.g. garage door opener).6.Press and hold the HomeLink button
again.
The remote-controll ed device should
operate.
Training Complete
5b.Within 30 secs, press and hold the
programmed HomeLink button for 2
secs.
4.Press and hold the programmed HomeLink
button for about a second. Does the device
(garage door opener) work?
19 ACURA RDX-31TJB6000.book 357 ページ 2018年4月26日 木曜日 午後4時51分
Page 359 of 649
358
Features
Bluetooth® HandsFreeLink ®
Bluetooth® HandsFreeLink ® (HFL) allows you to place and receive phone calls using
your vehicle’s audio system, without handling your cell phone.
Using HFL
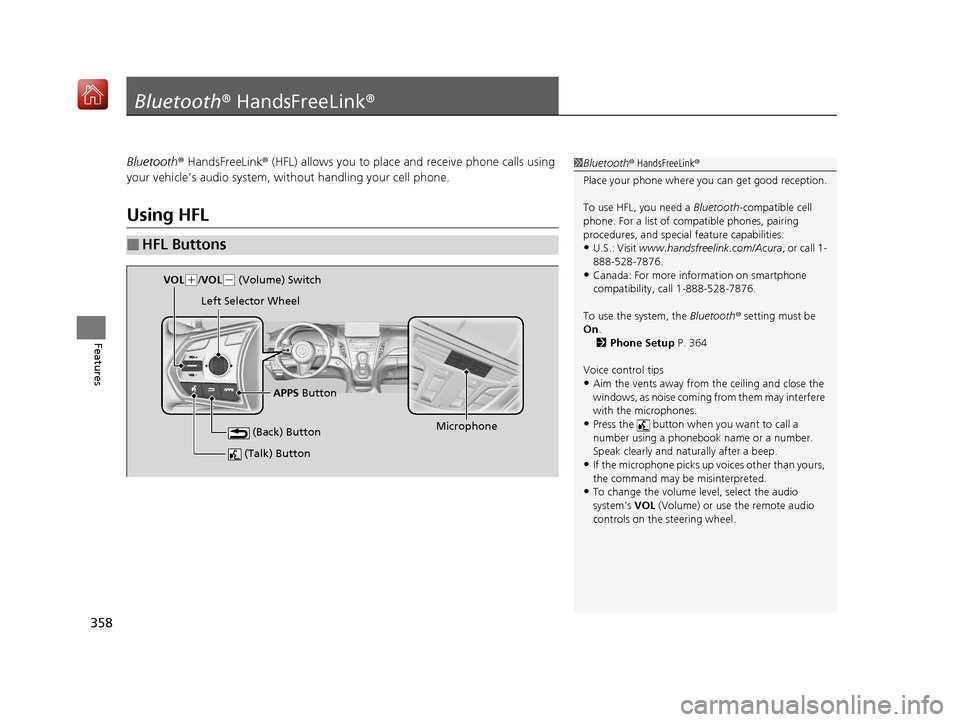
■HFL Buttons
1 Bluetooth ® HandsFreeLink ®
Place your phone where y ou can get good reception.
To use HFL, you need a Bluetooth-compatible cell
phone. For a list of compatible phones, pairing
procedures, and special feature capabilities:
•U.S.: Visit www.handsfreelink.com/Acura, or call 1-
888-528-7876.
•Canada: For more info rmation on smartphone
compatibility, call 1-888-528-7876.
To use the system, the Bluetooth® setting must be
On .
2 Phone Setup P. 364
Voice control tips
•Aim the vents away from the ceiling and close the
windows, as noise coming fr om them may interfere
with the microphones.
•Press the button when you want to call a
number using a phonebook name or a number.
Speak clearly and naturally after a beep.
•If the microphone picks up vo ices other than yours,
the command may be misinterpreted.
•To change the volume level, select the audio
system’s VOL (Volume) or use the remote audio
controls on the steering wheel.
(Talk) Button
Microphone
(Back) Button
VOL( +/VOL(- (Volume) Switch
Left Selector Wheel
APPS Button
19 ACURA RDX-31TJB6000.book 358 ページ 2018年4月26日 木曜日 午後4時51分
Page 360 of 649
Continued359
uuBluetooth ® HandsFreeLink ®u Using HFL
Features
Left Selector Wheel:
• Incomming call: Move the selector wheel to the ri ght to answer the call. Move it
to the left to decline the call.
• During a call: Move the selector wheel to the ri ght to display the call options
menu. Move it to the left to end the call.
• (back) button: Press the button to go back to the previous screen or to
cancel a command.
• (talk) button: Press the button to start voice recognition.
To go to the phone screen of the multi-information display or the head-up display
*:
1. Press the APPS button on the steering wheel.
2. Using the selector wheel, scroll to Phone on the multi-information display or the
head-up display
*, and then press the left selector wheel.
u You can select Favorites or Recents by moving the selector wheel to the left
or the right.
1 Bluetooth ® HandsFreeLink ®
Bluetooth ® Wireless Technology
The Bluetooth ® word mark and logos are registered
trademarks owned by Bluetooth SIG, Inc., and any
use of such marks by Honda Motor Co., Ltd., is under
license. Other trademarks and trade names are those
of their respective owners.
HFL Limitations
An incoming call on HFL will interrupt the audio
system when it is playing. It will resume when the call
is ended.
* Not available on all models
19 ACURA RDX-31TJB6000.book 359 ページ 2018年4月26日 木曜日 午後4時51分