Acura RL 2000 3.5 Owner's Manual
Manufacturer: ACURA, Model Year: 2000, Model line: RL, Model: Acura RL 2000Pages: 330, PDF Size: 4.53 MB
Page 131 of 330
Climat
e Control System
Semi-automati c Operatio n
You can manually select various functions of the Climate Control system when it is in FULL AUTO.
All other features remain auto- matically controlled. Making any
manual selection causes the word
FULL to go out.
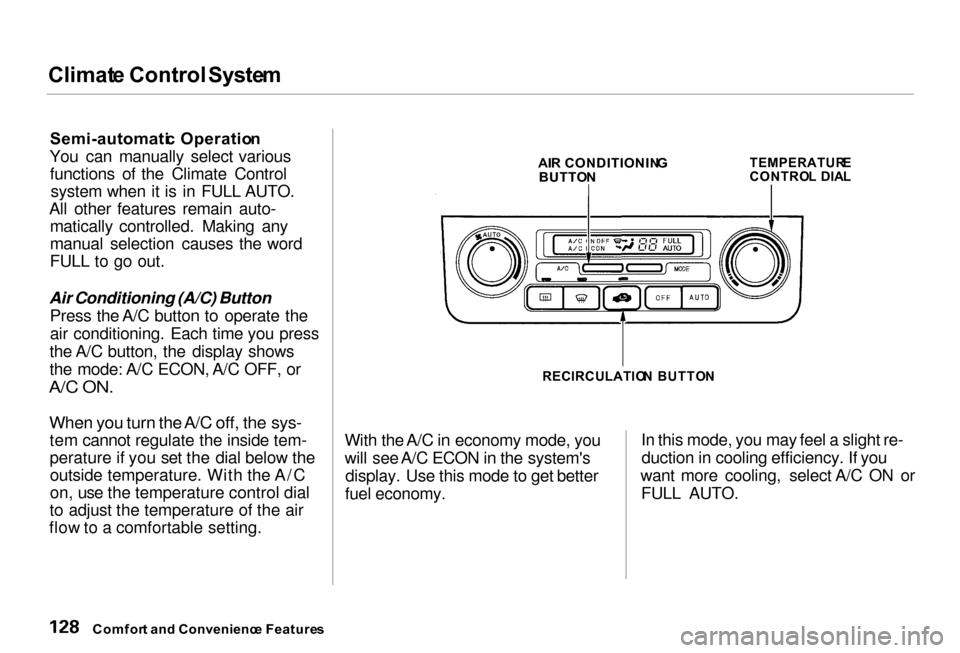
Air Conditioning (A/C) Button Press the A/C button to operate the
air conditioning. Each time you press
the A/C button, the display shows
the mode: A/C ECON, A/C OFF, or
A/C ON.
When you turn the A/C off, the sys-
tem cannot regulate the inside tem-
perature if you set the dial below the outside temperature. With the A/C
on, use the temperature control dial
to adjust the temperature of the air
flow to a comfortable setting. AI
R CONDITIONIN G
BUTTO N
TEMPERATUR
E
CONTRO L DIA L
RECIRCULATIO N BUTTO N
With the A/C in economy mode, you
will see A/C ECON in the system's display. Use this mode to get better
fuel economy.
In this mode, you may feel a slight re-
duction in cooling efficiency. If you
want more cooling, select A/C ON or FULL AUTO.
Comfor t an d Convenienc e Feature s
Page 132 of 330
Climat
e Control System
Recirculation Button
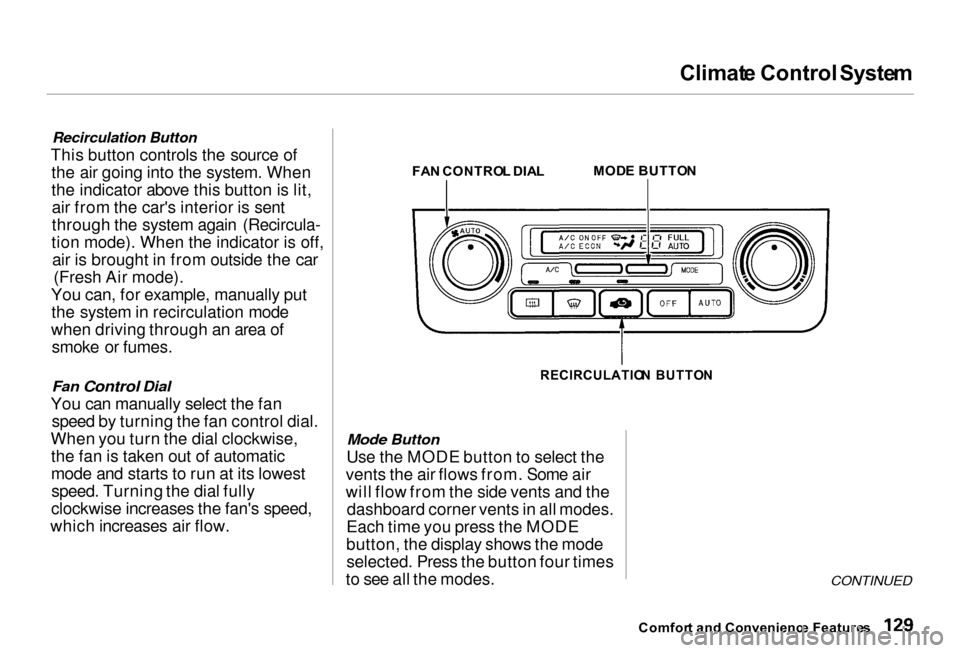
This button controls the source of the air going into the system. When
the indicator above this button is lit,air from the car's interior is sent
through the system again (Recircula-
tion mode). When the indicator is off, air is brought in from outside the car (Fresh Air mode).
You can, for example, manually put the system in recirculation mode
when driving through an area of smoke or fumes.
Fan Control Dial
You can manually select the fan speed by turning the fan control dial.
When you turn the dial clockwise, the fan is taken out of automatic
mode and starts to run at its lowestspeed. Turning the dial fully
clockwise increases the fan's speed,
which increases air flow. FA
N CONTRO L DIA L MOD
E BUTTO N
RECIRCULATIO N BUTTO N
Mode Button
Use the MODE button to select the
vents the air flows from. Some air
will flow from the side vents and the dashboard corner vents in all modes.
Each time you press the MODE
button, the display shows the mode selected. Press the button four times
to see all the modes.
CONTINUED
Comfor t an d Convenienc e Feature s
Page 133 of 330
Climat
e Control System
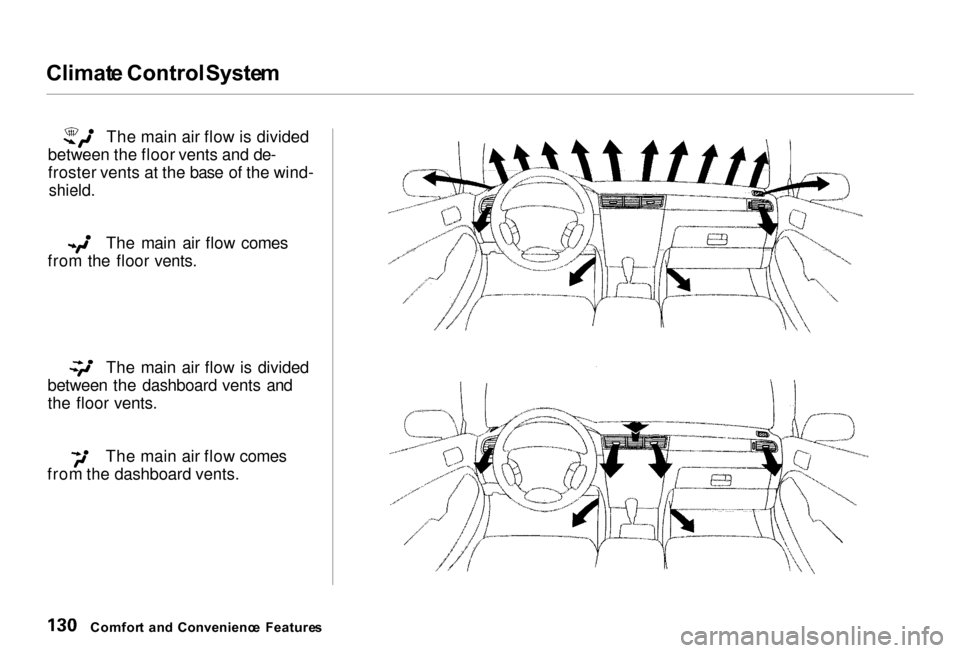
The main air flow is divided
between the floor vents and de-
froster vents at the base of the wind-
shield.
The main air flow comes
from the floor vents.
The main air flow is divided
between the dashboard vents and
the floor vents.
The main air flow comes
from the dashboard vents.
Comfor t an d Convenienc e Feature s
Page 134 of 330
Climat
e Contro l Syste m
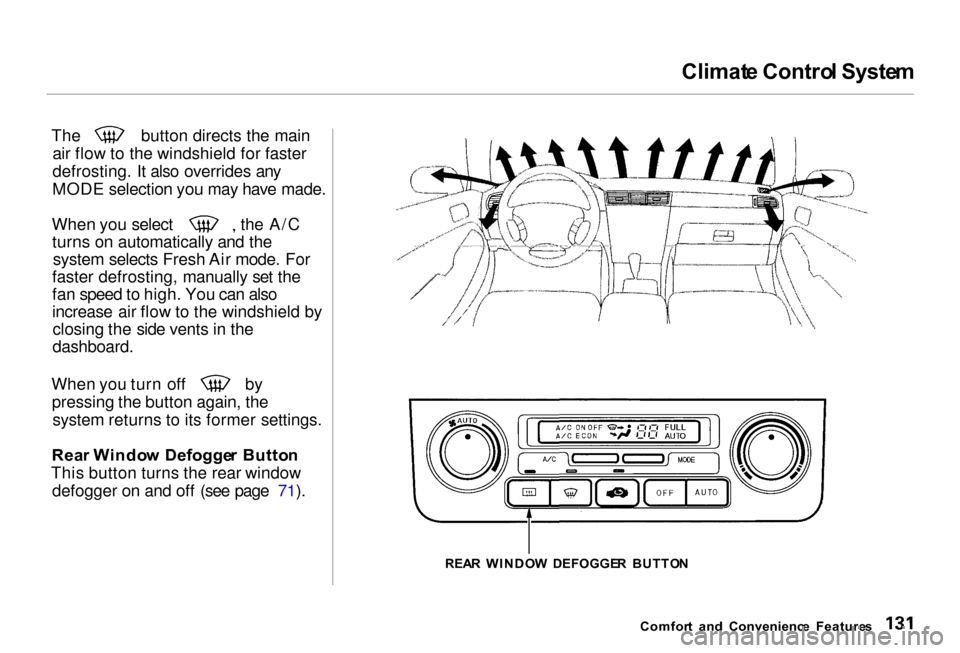
The button directs the main
air flow to the windshield for faster
defrosting. It also overrides any
MODE selection you may have made. When you select the A/C
turns on automatically and the system selects Fresh Air mode. For
faster defrosting, manually set the
fan speed to high. You can also
increase air flow to the windshield by closing the side vents in the
dashboard.
When you turn off by
pressing the button again, the system returns to its former settings.
Rea r Windo w Defogge r Butto n
This button turns the rear window defogger on and off (see page 71).
REAR WINDO W DEFOGGE R BUTTO N
Comfor t an d Convenienc e Feature s
Page 135 of 330

Climat
e Contro l Syste m
Rea r Ventilatio n
The air flow from the rear vents can
be adjusted when the climate control system is on. You can adjust the direction of the
air coming from the upper vents in
the center console by moving the tab in the center of each vent up-and-down and side-to-side.
You can also adjust the amount of the air flow by sliding the air flow
control lever under the upper vents.
Slide this lever upward to increase
the amount of air flow.
(Upper position): Maximum
(Center position): Moderate (Lower position): Off
Mode Control Lever
Use the mode control lever to select
the air flow level. Air flows into the rear seat at three levels. (Upper position):
Air flows from the upper vents in the back of the center console.
— (Center position):
Air flow is divided between the upper
vents and the lower vents in the back of the center console.
(Lower position):
Air flows from the lower vents.
Comfor t an d Convenienc e Feature s
AI
R FLO W
CONTRO L
LEVE R
UPPE
R
VENT S
MOD E
CONTRO L
LEVE R
LOWE R
VENT S
Page 136 of 330
Climat
e Contro l Syste m
Sunligh t Sensor/Temperatur e
Senso r
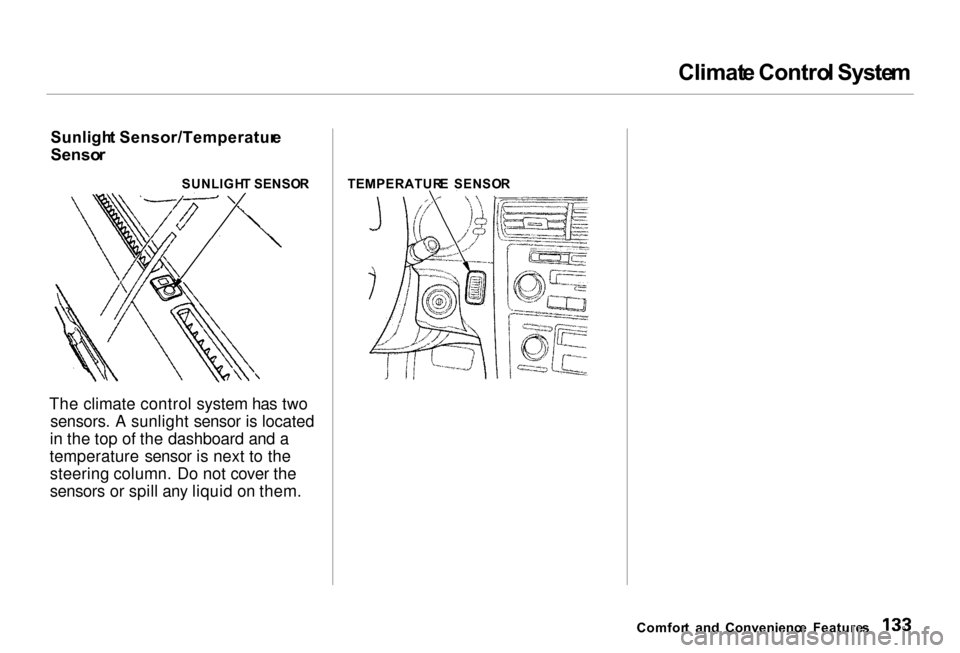
The climate control system has two sensors. A sunlight sensor is located
in the top of the dashboard and a
temperature sensor is next to the steering column. Do not cover the
sensors or spill any liquid on them.
Comfort an d Convenienc e Feature s
SUNLIGH
T SENSO R TEMPERATUR E SENSO R
Page 137 of 330
Audi
o Syste m
AM/FM/Cassett e Stere o Audi o
Syste m
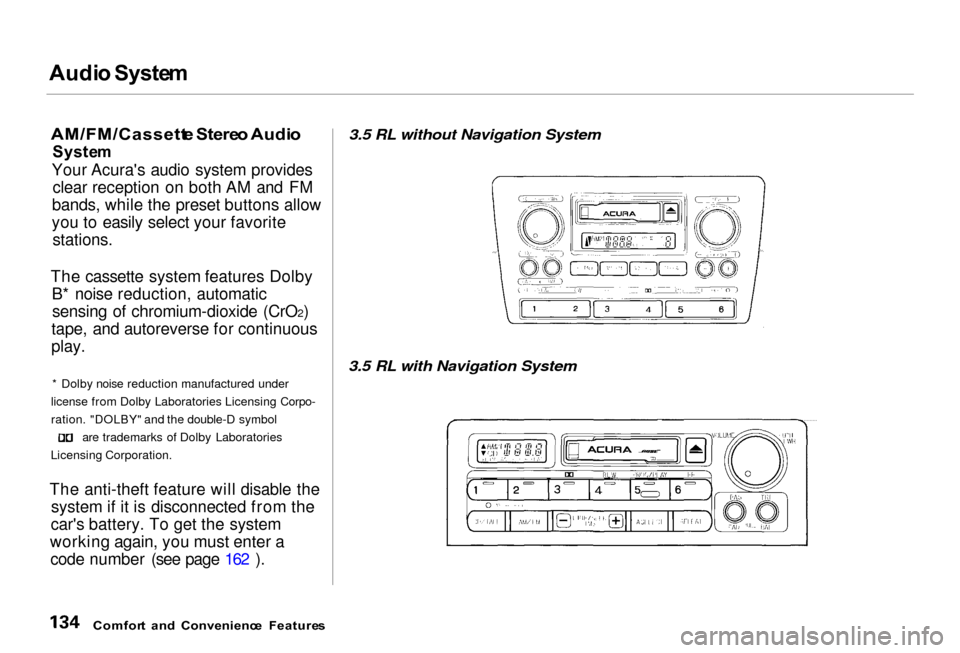
Your Acura's audio system provides clear reception on both AM and FM
bands, while the preset buttons allow
you to easily select your favorite stations.
The cassette system features Dolby B* noise reduction, automatic
sensing of chromium-dioxide (CrO2)
tape, and autoreverse for continuous
play.
* Dolby noise reduction manufactured under
license from Dolby Laboratories Licensing Corpo-
ration. "DOLBY" and the double-D symbol are trademarks of Dolby Laboratories
Licensing Corporation.
The anti-theft feature will disable the system if it is disconnected from the
car's battery. To get the system
working again, you must enter a code number (see page 162 ).
3.5 RL without Navigation System
3.5 RL with Navigation System
Comfor t an d Convenienc e Feature s
Page 138 of 330

Audi
o Syste m
3.5 RL without Navigation System
Operatin g th e Radi o
The ignition switch must be inACCESSORY (I) or ON (II) to operate the audio system. Turn thesystem on by pushing the PWR/
VOL knob or the AM/FM button.
Adjust the volume by turning the
knob.
The band and frequency that the ra-
dio was last tuned to is displayed. To
change bands, press the AM/FM but-
ton. On the FM band, ST will be dis-
played if the station is broadcasting
in stereo. ST will flash if you are driv-
ing in an area where the radio signal
is weak. Stereo reproduction on AM
is not available. You can use any of three methods to
find radio stations on the selected
band: TUNE, SEEK, or the Preset
buttons.
TUN E — Use the TUNE knob to
tune the radio to a desired frequency.
Turn the TUNE knob to the right to tune to a higher frequency, or to the
left to tune to a lower frequency.
Turn the knob right or left until the
display reaches the desired frequen-
cy.
SEE K — The SEEK function
searches the band for a station with
a strong signal. To activate it, push ei-
ther of the SEEK/SKIP buttons (— or +). Push the + button to scan up
from the current frequency, and the — button to scan down. It stops
when it finds a station with a strong
signal.
Prese
t — You can store the
frequencies of your favorite radio stations in the six preset buttons.
Each button will store one frequency
on the AM band, and two
frequencies on the FM band.
CONTINUED
Comfor t an d Convenienc e Feature s
Page 139 of 330
Audi
o Syste m
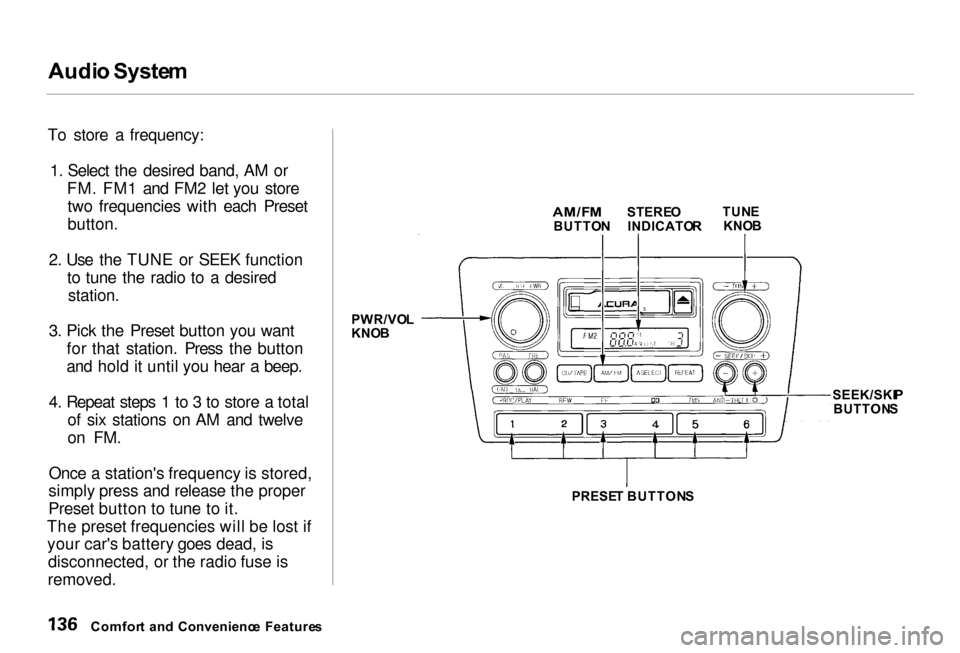
To store a frequency: 1. Select the desired band, AM or
FM. FM1 and FM2 let you storetwo frequencies with each Preset
button.
2. Use the TUNE or SEEK function
to tune the radio to a desired station.
3. Pick the Preset button you want
for that station. Press the button
and hold it until you hear a beep.
4. Repeat steps 1 to 3 to store a total
of six stations on AM and twelve
on FM.
Once a station's frequency is stored,
simply press and release the proper
Preset button to tune to it.
The preset frequencies will be lost if your car's battery goes dead, is
disconnected, or the radio fuse is
removed. PWR/VO
L
KNO B
SEEK/SKIP
BUTTON S
PRESE T BUTTON S
Comfor t an d Convenienc e Feature s
AM/F
M
BUTTO NSTERE
O
INDICATO RTUN
E
KNO B
Page 140 of 330
Audi
o Syste m
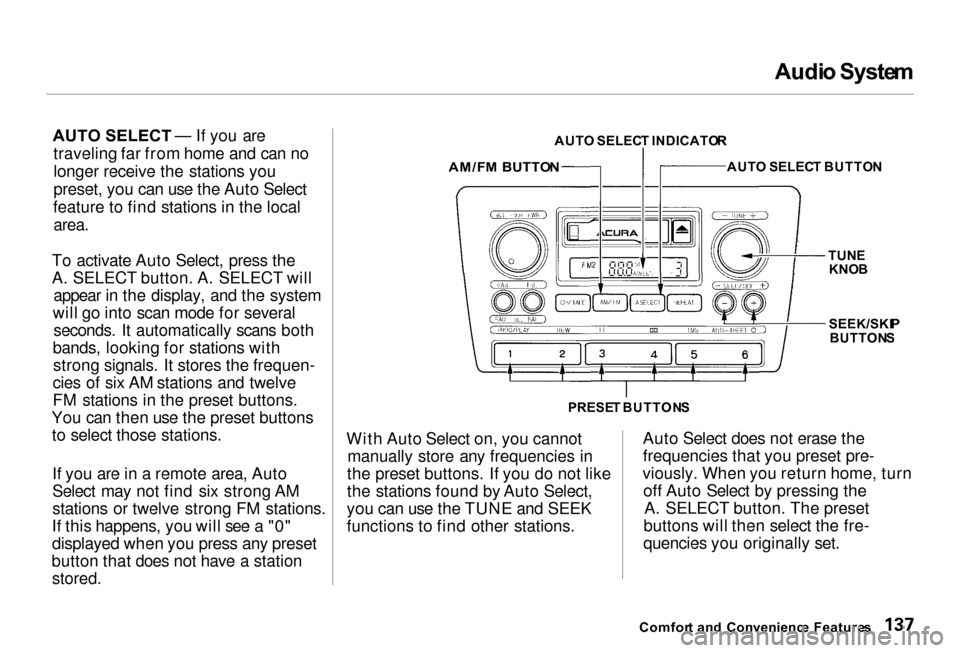
AUTO SELECT — If you are
traveling far from home and can no
longer receive the stations you
preset, you can use the Auto Select
feature to find stations in the local
area.
To activate Auto Select, press the
A. SELECT button. A. SELECT will appear in the display, and the system
will go into scan mode for several seconds. It automatically scans both
bands, looking for stations with strong signals. It stores the frequen-
cies of six AM stations and twelve
FM stations in the preset buttons.
You can then use the preset buttons to select those stations.
If you are in a remote area, Auto
Select may not find six strong AM
stations or twelve strong FM stations.
If this happens, you will see a "0"
displayed when you press any preset
button that does not have a station
stored.
AUT
O SELEC T INDICATO R
AM/F M BUTTO N
AUT
O SELEC T BUTTO N
SEEK/SKI P
BUTTON S
PRESE T BUTTON S
With Auto Select on, you cannot manually store any frequencies in
the preset buttons. If you do not like
the stations found by Auto Select,
you can use the TUNE and SEEK
functions to find other stations. Auto Select does not erase the
frequencies that you preset pre-
viously. When you return home, turn off Auto Select by pressing the A. SELECT button. The preset
buttons will then select the fre-
quencies you originally set.
Comfor t an d Convenienc e Feature s
TUN
E
KNO B