ignition Acura RL 2000 3.5 Service Manual
[x] Cancel search | Manufacturer: ACURA, Model Year: 2000, Model line: RL, Model: Acura RL 2000Pages: 330, PDF Size: 4.53 MB
Page 138 of 330

Audi
o Syste m
3.5 RL without Navigation System
Operatin g th e Radi o
The ignition switch must be inACCESSORY (I) or ON (II) to operate the audio system. Turn thesystem on by pushing the PWR/
VOL knob or the AM/FM button.
Adjust the volume by turning the
knob.
The band and frequency that the ra-
dio was last tuned to is displayed. To
change bands, press the AM/FM but-
ton. On the FM band, ST will be dis-
played if the station is broadcasting
in stereo. ST will flash if you are driv-
ing in an area where the radio signal
is weak. Stereo reproduction on AM
is not available. You can use any of three methods to
find radio stations on the selected
band: TUNE, SEEK, or the Preset
buttons.
TUN E — Use the TUNE knob to
tune the radio to a desired frequency.
Turn the TUNE knob to the right to tune to a higher frequency, or to the
left to tune to a lower frequency.
Turn the knob right or left until the
display reaches the desired frequen-
cy.
SEE K — The SEEK function
searches the band for a station with
a strong signal. To activate it, push ei-
ther of the SEEK/SKIP buttons (— or +). Push the + button to scan up
from the current frequency, and the — button to scan down. It stops
when it finds a station with a strong
signal.
Prese
t — You can store the
frequencies of your favorite radio stations in the six preset buttons.
Each button will store one frequency
on the AM band, and two
frequencies on the FM band.
CONTINUED
Comfor t an d Convenienc e Feature s
Page 142 of 330
Audi
o Syste m
Audi o Syste m Lightin g
You can use the instrument panel brightness control dial to adjust the il-
lumination of the audio system (see
page 66 ). The audio system illuminates when the parking lights
are on, even if the radio is turned off.
Radi o Frequencie s an d Reception
For information, See page 149 .
Operatin
g th e Cassett e Playe r
The ignition switch must be in
ACCESSORY (I) or ON (II). Make sure the tape opening on the
cassette is facing to the right, then
insert the cassette most of the way
into the slot. The system will pull it
in the rest of the way, and begin to
play.
The tape direction indicator will light to show you which side of the cassette is playing. The indicates
the side you inserted facing upward is now playing. If you want to play
the other side, press the PROG/PLAY button.
Dolby B noise reduction turns on
when you insert a cassette. The indicator will light in the dis-
play. If the tape was not recorded
with Dolby B noise reduction, turn it off by pressing the button.When the system reaches the end of
the tape, it will automatically reversedirection and play the other side. If
you want to remove the cassette from the drive, press the EJECT
button.
If you turn the system off while a
tape is playing, either with the PWR/
VOL knob or by turning off the ignition, the cassette will remain in
the drive. When you turn the system
back on, the tape will begin playing
where it left off.
To switch to the radio or CD changer while listening to a tape,
press the AM/FM or CD/TAPE but-
ton. To change back to the cassette
player, press the CD/TAPE button.
Comfor t an d Convenienc e Feature s
Page 147 of 330
Audi
o Syste m
You can use the SEEK/SKIP buttons to select tracks within a disc. If you
push and release either of the
SEEK/SKIP buttons ( — or +), thesystem will move to the beginning of
a track. Push the + button to move
to the beginning of the next track, and push the — button to move to
the beginning of the current track.
If you push and hold the SEEK/
SKIP button, you will hear a beep
and the system will continue to move
across tracks. Release the button
when you think it has reached the de- sired place on the disc. REPEA
T — When you activate the
Repeat feature by pressing the
REPEAT button, the system continu-
ously replays the current track. You
will see RPT in the display as a reminder. Press the REPEAT buttonagain to turn it off.
RANDOM PLAY — This feature,
when activated, plays the tracks on a CD in random order, rather than in
the order they are recorded on the CD. To activate Random Play, press
the A. SELECT button. You will see
A. SELECT in the display. The sys- tem will then select and play tracksrandomly on the current disc. When
all tracks on that disc have been
played, the next disc is loaded and
played randomly. This continues un-
til you deactivate Random Play by
pressing A. SELECT again. To take the system out of CD mode,
press the AM/FM button or insert acassette in the player. If a tape is
already in the cassette player, press
the CD/TAPE button. When you return to CD mode, play will contin-
ue at the same point that it left off.
If you turn the system off while a CD
is playing, either with the PWR/VOL
knob or the ignition switch, play will continue at the same point when you
turn it back on.
Protectin g Compac t Disc s
For information on how to handle
and protect compact discs, see page
159.
Comfor t an d Convenienc e Feature s
Page 148 of 330

Audi
o Syste m
3.5 RL with Navigation System
Operatin g th e Radi oThe ignition switch must be in
ACCESSORY (I) or ON (II) to
operate the audio system. Turn the
system on by pushing the PWR/
VOL knob or the AM/FM button.
Adjust the volume by turning the knob.
The band and frequency that the ra-
dio was last tuned to is displayed. To
change bands, press the AM/FM but-
ton. On the FM band, ST will be dis-
played if the station is broadcastingin stereo. ST will flash if you are driv-
ing in an area where the radio signal
is weak. Stereo reproduction on AM
is not available. You can use any of three methods to
find radio stations on the selectedband: TUNE, SEEK, or the Preset
buttons.
TUN E — Use the TUNE bar to tune
the radio to a desired frequency.
Push and release the appropriate side of the bar quickly. The
frequency numbers will change in small increments.
SEE K — The SEEK function
searches the band for a station with
a strong signal. To activate it, push either of the SEEK bar ( — or +)
until you hear a beep. Push the bar on the + side to scan up from the
current frequency, and on the —
side to scan down. It stops when it
finds a station with a strong signal. Prese
t — You can store the
frequencies of your favorite radio stations in the six preset buttons.
Each button will store one frequency
on the AM band, and two
frequencies on the FM band.
CONTINUED
Comfor t an d Convenienc e Feature s
Page 154 of 330
Audi
o Syste m
Operatin g th e Cassett e Playe r
The ignition switch must be in
ACCESSORY (I) or ON (II) Make sure the tape opening on the
cassette is facing to the right, then
insert the cassette most of the way
into the slot. The system will pull it
in the rest of the way, and begin to
play.
The tape direction indicator will light to show you which side of the cassette is playing. The indicates
the side you inserted facing upward is now playing. If you want to play
the other side, press the PROG/PLAY button.
Dolby B noise reduction turns on
when you insert a cassette. The indicator in the button will light.
If the tape was not recorded with
Dolby B noise reduction, turn it off
by pressing the button. When the system reaches the end of
the tape, it will automatically reversedirection and play the other side. If
you want to remove the cassette from the drive, press the EJECT
button.
If you turn the system off while a
tape is playing, either with the PWR/
VOL knob or by turning off the ignition, the cassette will remain in
the drive. When you turn the system
back on, the tape will begin playing
where it left off.
To switch to the radio or CD changer while listening to a tape,
press the AM/FM or CD/TAPE but-
ton. To change back to the cassette
player, press the CD/TAPE button.
Tap
e Searc h Function s
With a cassette playing, you can use the FF, REW, TMS, or REPEAT
function to find a desired program.
FF/RE W — Fast Forward and
Rewind move the tape rapidly. To
rewind the tape, push the REW
button. The indicator in this button
will light. To fast forward the tape, push the FF button. The indicator in
this button will light. Press thePROG/PLAY button to take the
system out of rewind or fast forward.
When the system reaches the end of the tape, it reverses direction and
begins to play if in fast forward, or it
begins to play if in rewind.
CONTINUED
Comfor t an d Convenienc e Feature s
Page 159 of 330
Audi
o Syste m
To select a different disc, press the
appropriate preset button (1 — 6). If
you select an empty slot in the magazine, the changer will, after
finding that slot empty, try to load the CD in the next slot. This
continues until it finds a CD to load
and play.
You can use the SEEK bar to select tracks within a disc. If you push and
release either of the SEEK bar (— or + ), the system will move to the be-
ginning of a track. Push the + but-
ton to move to the beginning of the
next track, and push the — button to
move to the beginning of the current
track. If you push and hold the SEEK bar
(— or +), you will hear a beep and
the system will continue to move across tracks. Release the button
when you think it has reached the desired place on the disc.
REPEA T — When you activate the
Repeat feature by pressing the REPEAT button, the system
continuously replays the current
track. You will see REPEAT in the display as a reminder. Press the
REPEAT button again to turn it off.
RANDOM PLAY — This feature,when activated, plays the tracks on a
CD in random order, rather than in
the order they are recorded on the
CD. To activate Random Play, press
the A. SELECT button. You will see
A. SELECT in the display. The sys- tem will then select and play tracks
randomly on the current disc. Whenall tracks on that disc have been
played, the next disc is loaded and
played randomly. This continues un-
til you deactivate Random Play by
pressing A. SELECT again.
To take the system out of CD mode, press the AM/FM button or insert acassette in the player. If a tape is
already in the cassette player, press
the CD/TAPE button. When you return to CD mode, play will contin-
ue at the same point that it left off.
If you turn the system off while a CD
is playing, either with the PWR/VOL
knob or the ignition switch, play will
continue at the same point when you
turn it back on.
Protecting Compact Discs
For information on how to handle
and protect compact discs, see page
159.
Comfor t an d Convenienc e Feature s
Page 181 of 330
Preparin
g to Driv e
You should do the following checks and adjustments every day before
you drive your car.
1. Make sure all windows, mirrors,
and outside lights are clean and
unobstructed. Remove frost, snow, or ice.
2. Check that the hood and trunk are
fully closed.
3. Visually check the tires. If a tire
looks low, use a gauge to check itspressure.
4. Check that any items you may be
carrying with you inside are stored
properly or fastened down
securely.
5. Check the adjustment of the seat
(see page 93 ).
6. Check the adjustment of the
inside and outside mirrors (see
page 98 ).
7. Check the adjustment of the
steering wheel (see page 71).
8. Make sure the doors are securely
closed and locked.
9. Fasten your seat belt. Check that
your passengers have fastened their seat belts (see page 15 ).
10.Turn the ignition switch ON (II).
Check the indicator lights in the
instrument panel.
11.Start the engine (see page 179 ).
12.Check the gauges and indicator
lights in the instrument panel (see
page 53).
Drivin g
Page 182 of 330

Startin
g th e Engin e
1. Apply the parking brake.
2. In cold weather, turn off all electrical accessories to reduce
the drain on the battery.
3. Make sure the shift lever is in
Park. Press on the brake pedal.
4. Without touching the accelerator
pedal, turn the ignition key to theSTART (III) position. If the enginedoes not start right away, do not
hold the key in START (III) for
more than 15 seconds at a time.
Pause for at least 10 seconds
before trying again.
5. If the engine does not start within
15 seconds, or starts but stalls
right away, repeat step 4 with the
accelerator pedal pressed half-way
down. If the engine starts, release
pressure on the accelerator pedal so the engine does not race.
6. If the engine still does not start,
press the accelerator pedal all the
way down and hold it there whilestarting in order to clear flooding.
As before, keep the ignition key in the START (III) position for nomore than 15 seconds. Return tostep 5 if the engine does not start.
If it starts, lift your foot off the
accelerator pedal so the engine
does not race.
Startin g in Col d Weathe r a t Hig h
Altitud e (Abov e 8,000 feet/
2,400 meters )
An engine is harder to start in cold weather. The thinner air found athigh altitude above 8,000 feet (2,400meters) adds to the problem.
Use the following procedure:
1. Turn off all electrical accessories
to reduce the drain on the battery.
2. Push the accelerator pedal half-
way to the floor and hold it there
while starting the engine. Do nothold the ignition key in START (III) for more than 15 seconds.
When the engine starts, release the accelerator pedal gradually as
the engine speeds up and smoothsout.
3. If the engine fails to start in step 2,
push the accelerator pedal to the
floor and hold it there while youtry to start the engine for no more
than 15 seconds. If the engine does not start, return to step 2.
Drivin g
Page 183 of 330
Automati
c Transmissio n
Your Acura's transmission has four forward speeds, and is electronicallycontrolled for smoother shifting. It
also has a "lock-up" torque converter
for better fuel economy. You may
feel what seems like another shift
when the converter locks.
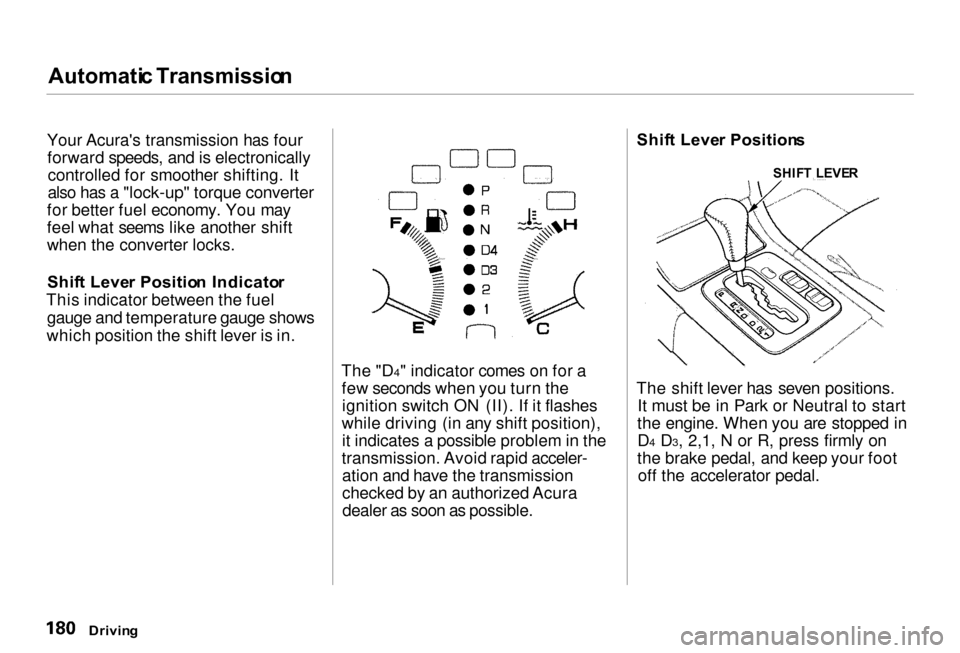
Shif t Leve r Positio n Indicato r
This indicator between the fuel gauge and temperature gauge shows
which position the shift lever is in.
The "D4" indicator comes on for afew seconds when you turn theignition switch ON (II). If it flashes
while driving (in any shift position), it indicates a possible problem in the
transmission. Avoid rapid acceler- ation and have the transmission
checked by an authorized Acuradealer as soon as possible. Shif
t Leve r Position s
The shift lever has seven positions. It must be in Park or Neutral to start
the engine. When you are stopped in
D4 D3, 2,1, N o
r
R, press firmly on
the brake pedal, and keep your foot off the accelerator pedal.
Drivin g
SHIF
T LEVE R
Page 184 of 330
Automati
c Transmissio n
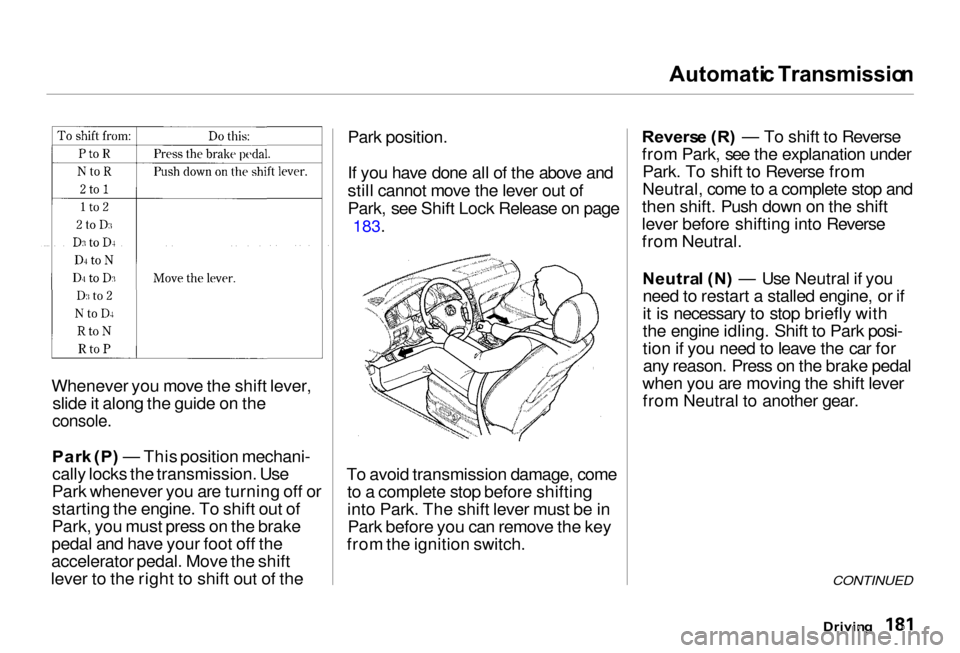
Whenever you move the shift lever, slide it along the guide on the
console.
Par k (P ) — This position mechani-
cally locks the transmission. Use
Park whenever you are turning off or starting the engine. To shift out of
Park, you must press on the brake
pedal and have your foot off the
accelerator pedal. Move the shift
lever to the right to shift out of the Park position.
If you have done all of the above and
still cannot move the lever out of
Park, see Shift Lock Release on page
183.
To avoid transmission damage, come to a complete stop before shifting
into Park. The shift lever must be inPark before you can remove the key
from the ignition switch. Revers
e (R ) — To shift to Reverse
from Park, see the explanation under Park. To shift to Reverse from
Neutral, come to a complete stop and
then shift. Push down on the shift
lever before shifting into Reverse
from Neutral.
Neutra l (N ) — Use Neutral if you
need to restart a stalled engine, or if
it is necessary to stop briefly with
the engine idling. Shift to Park posi-
tion if you need to leave the car for any reason. Press on the brake pedal
when you are moving the shift lever from Neutral to another gear.
CONTINUED
Drivin g