Filter ACURA RL KA9 1996 Service Owner's Manual
[x] Cancel search | Manufacturer: ACURA, Model Year: 1996, Model line: RL KA9, Model: ACURA RL KA9 1996Pages: 1954, PDF Size: 61.44 MB
Page 846 of 1954
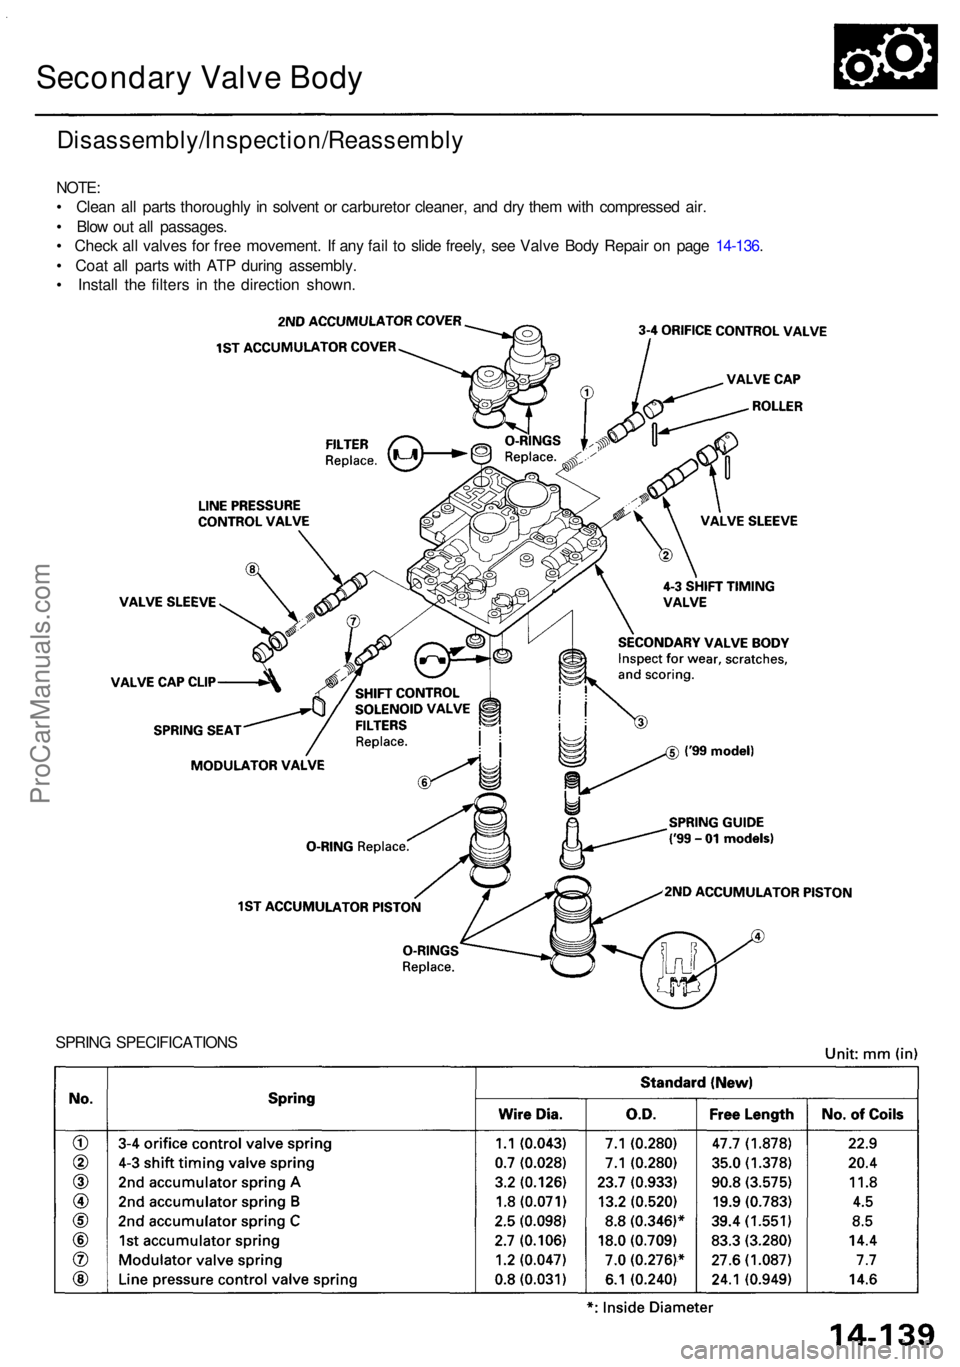
Secondary Valv e Bod y
SPRIN G SPECIFICATION S
Disassembly/lnspection/Reassembl y
NOTE:
• Clea n al l part s thoroughl y i n solven t o r carbureto r cleaner , an d dr y the m wit h compresse d air .
• Blo w ou t al l passages .
• Chec k al l valve s fo r fre e movement . I f an y fai l t o slid e freely , se e Valv e Bod y Repai r o n pag e 14-136 .
• Coa t al l part s wit h AT P durin g assembly .
• Instal l th e filter s i n th e directio n shown .
ProCarManuals.com
Page 847 of 1954
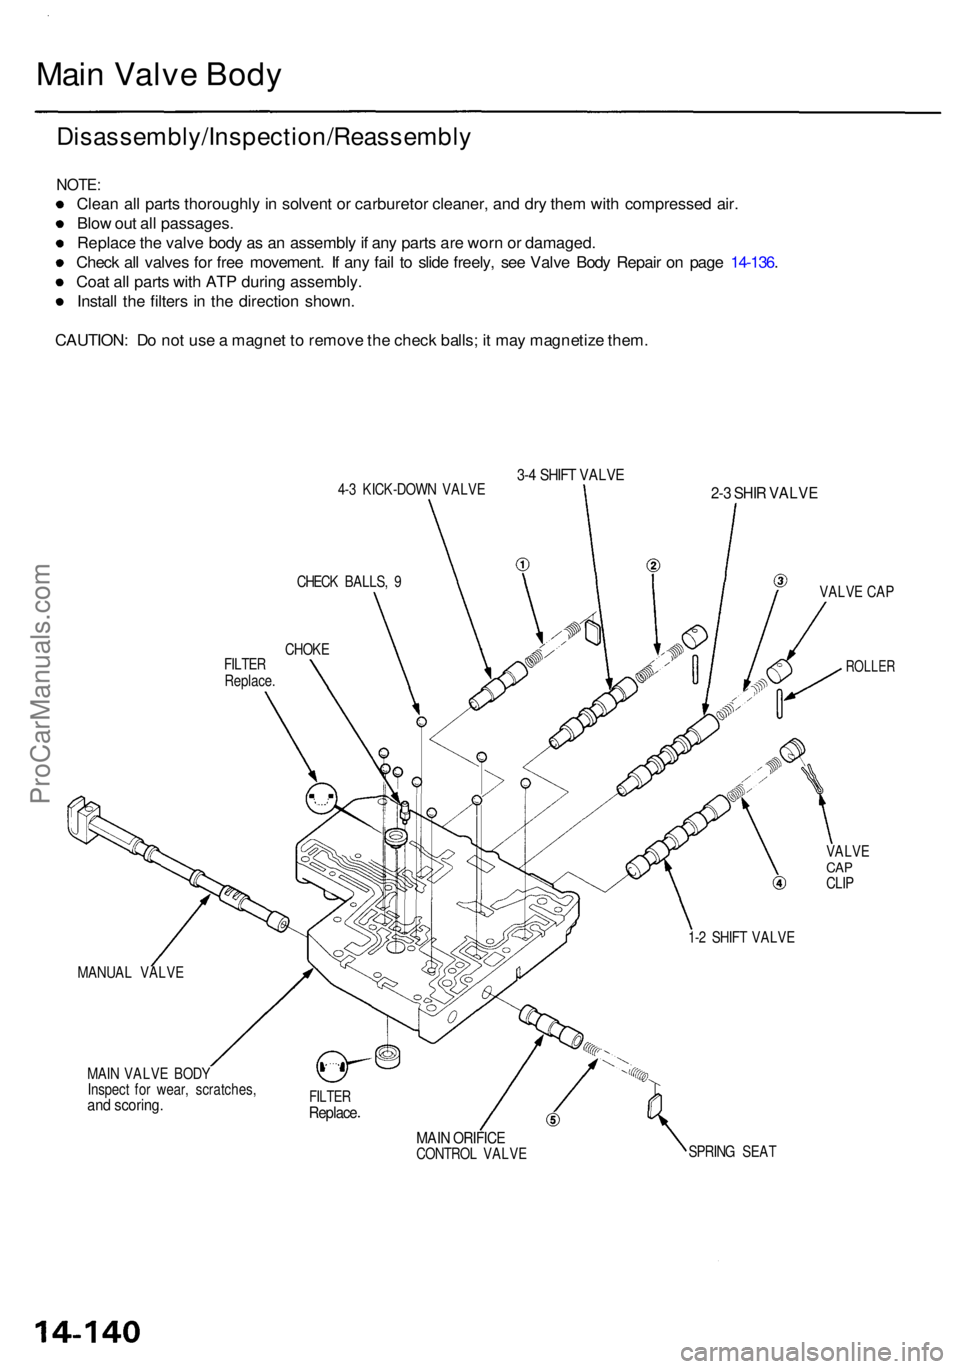
Main Valv e Bod y
Disassembly/Inspection/Reassembl y
NOTE:
Clean al l part s thoroughl y in solven t o r carbureto r cleaner , an d dr y the m wit h compresse d air .
Blo w ou t al l passages .
Replac e th e valv e bod y a s a n assembl y if an y part s ar e wor n o r damaged .
Chec k al l valve s fo r fre e movement . I f an y fai l t o slid e freely , se e Valv e Bod y Repai r o n pag e 14-136 .
Coa t al l part s wit h AT P durin g assembly .
Instal l th e filter s i n th e directio n shown .
CAUTION : D o no t us e a magne t t o remov e th e chec k balls ; i t ma y magnetiz e them .
4-3 KICK-DOW N VALV E3-4 SHIF T VALV E
MANUA L VALV E
MAI N VALV E BOD Y
Inspec t fo r wear , scratches ,
and scoring .FILTERReplac e
MAIN ORIFIC ECONTRO L VALV E
2-3 SHI R VALV E
VALVE CA P
ROLLE R
VALVECAPCLI P
SPRIN G SEA T
1-
2 SHIF T VALV E
FILTE
R
Replace .CHOK
E
CHEC
K BALLS , 9
ProCarManuals.com
Page 848 of 1954
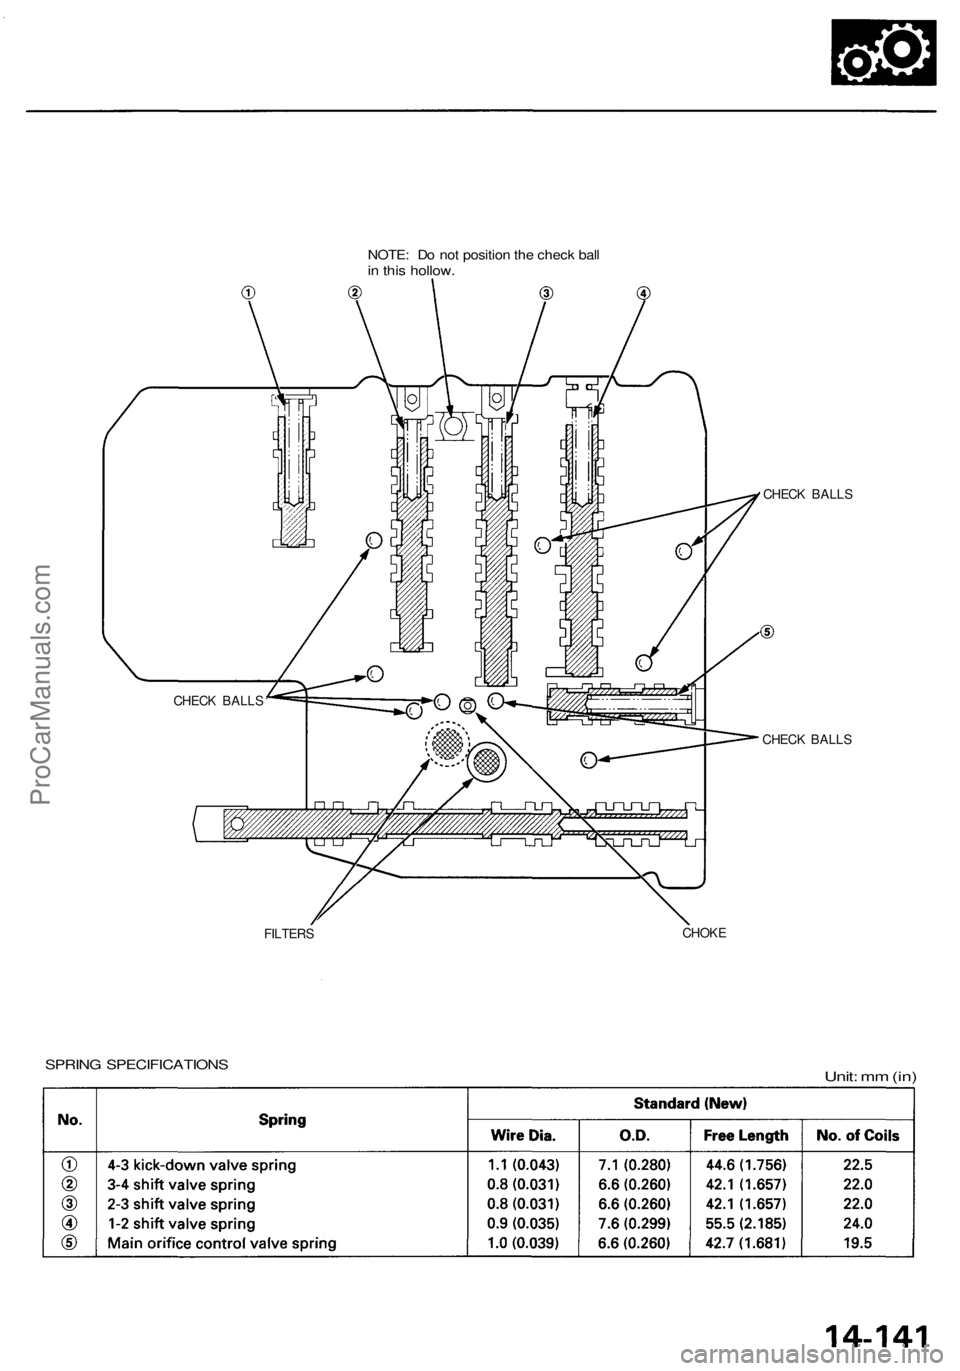
NOTE: Do not position the check ball
in this hollow.
CHECK BALLS
CHECK BALLS
FILTERS
CHOKE
SPRING SPECIFICATIONS
Unit: mm (in)
CHECK BALLSProCarManuals.com
Page 851 of 1954
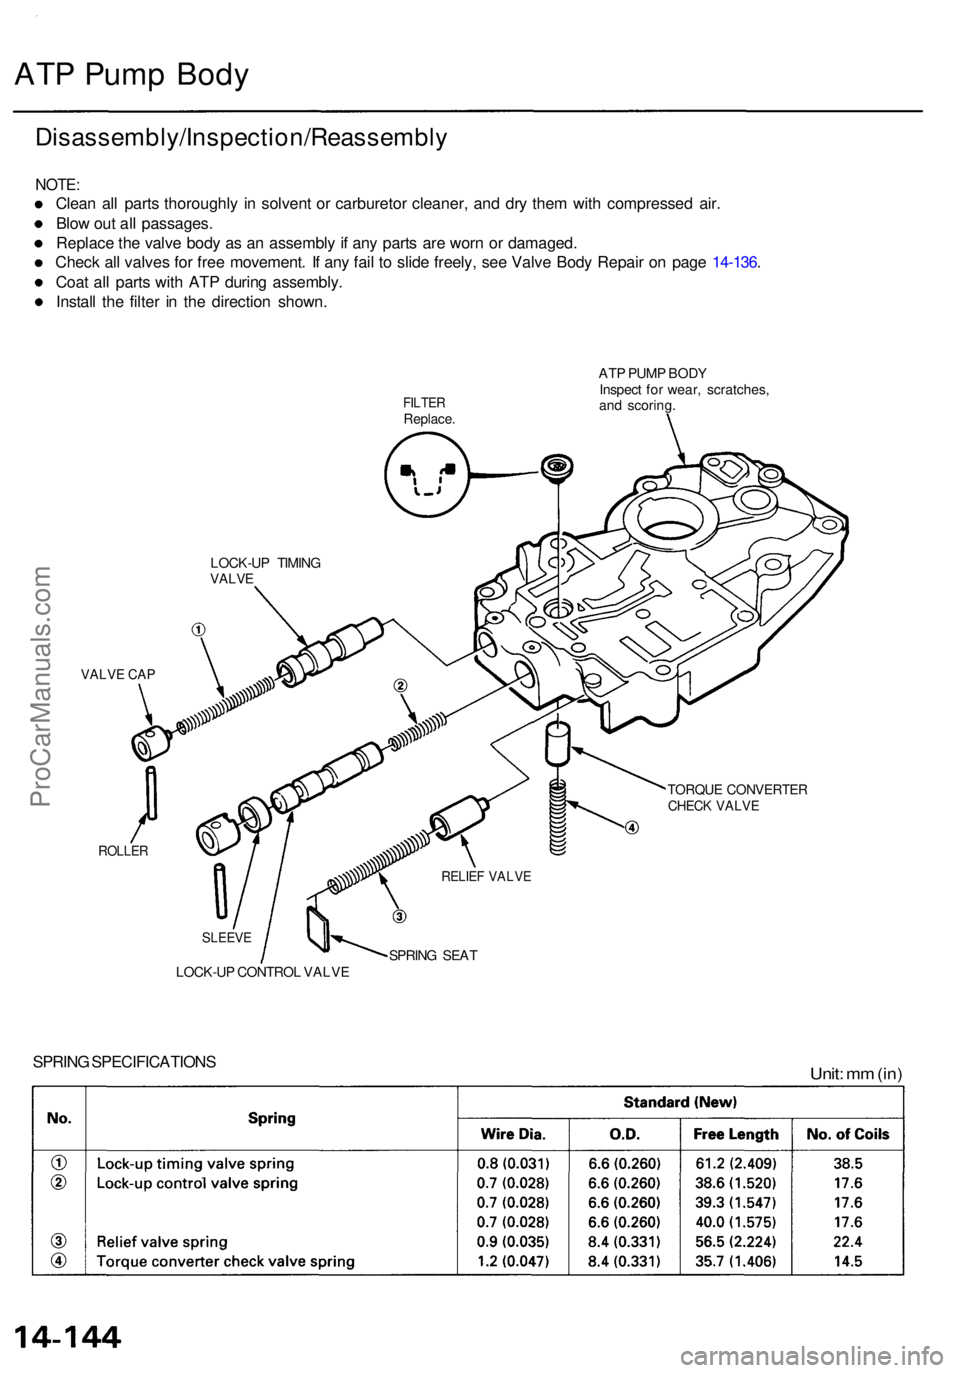
ATP Pum p Bod y
Disassembly/Inspection/Reassembl y
NOTE:
Clean al l part s thoroughl y i n solven t o r carbureto r cleaner , an d dr y the m wit h compresse d air .
Blo w ou t al l passages .
Replac e th e valv e bod y a s a n assembl y i f an y part s ar e wor n o r damaged .
Chec k al l valve s fo r fre e movement . I f an y fai l t o slid e freely , se e Valv e Bod y Repai r o n pag e 14-136 .
Coa t al l part s wit h ATP durin g assembly .
Instal l th e filte r i n th e directio n shown .
FILTERReplace .
ATP PUM P BOD Y
Inspec t fo r wear , scratches ,
an d scoring .
LOCK-U P TIMIN G
VALVE
VALV E CA P
ROLLE R
TORQU E CONVERTE RCHECK VALV E
SLEEV E
SPRING SEA T
LOCK-U P CONTRO L VALV E
SPRIN G SPECIFICATION SUnit: m m (in )
RELIE F VALV E
ProCarManuals.com
Page 905 of 1954
Transmission
Cooler Flushin g (cont'd )
17. Mak e sur e th e transmissio n is in th e position .
Then fil l th e transmissio n wit h ATF , an d ru n th e
engin e fo r 3 0 second s o r unti l approximatel y 0.9 5
(1. 0 U S qt. , 0. 8 Im p qt. ) i s discharged .
18 . Remov e th e drai n hose , an d reconnec t th e coole r
retur n hos e to th e transmissio n (se e nex t column) .
19 . Refil l th e transmissio n wit h th e recommende d AT F
t o th e prope r leve l (se e pag e 14-108 ).
TOO L MAINTENANC E
1 . Empt y an d rins e afte r eac h use . Fil l th e ca n wit h wate r
an d pressuriz e th e can . Flus h th e discharg e lin e t o
ensur e tha t th e uni t i s clean .
2 . I f discharg e liqui d doe s no t foam , th e orific e ma y b e
blocked .
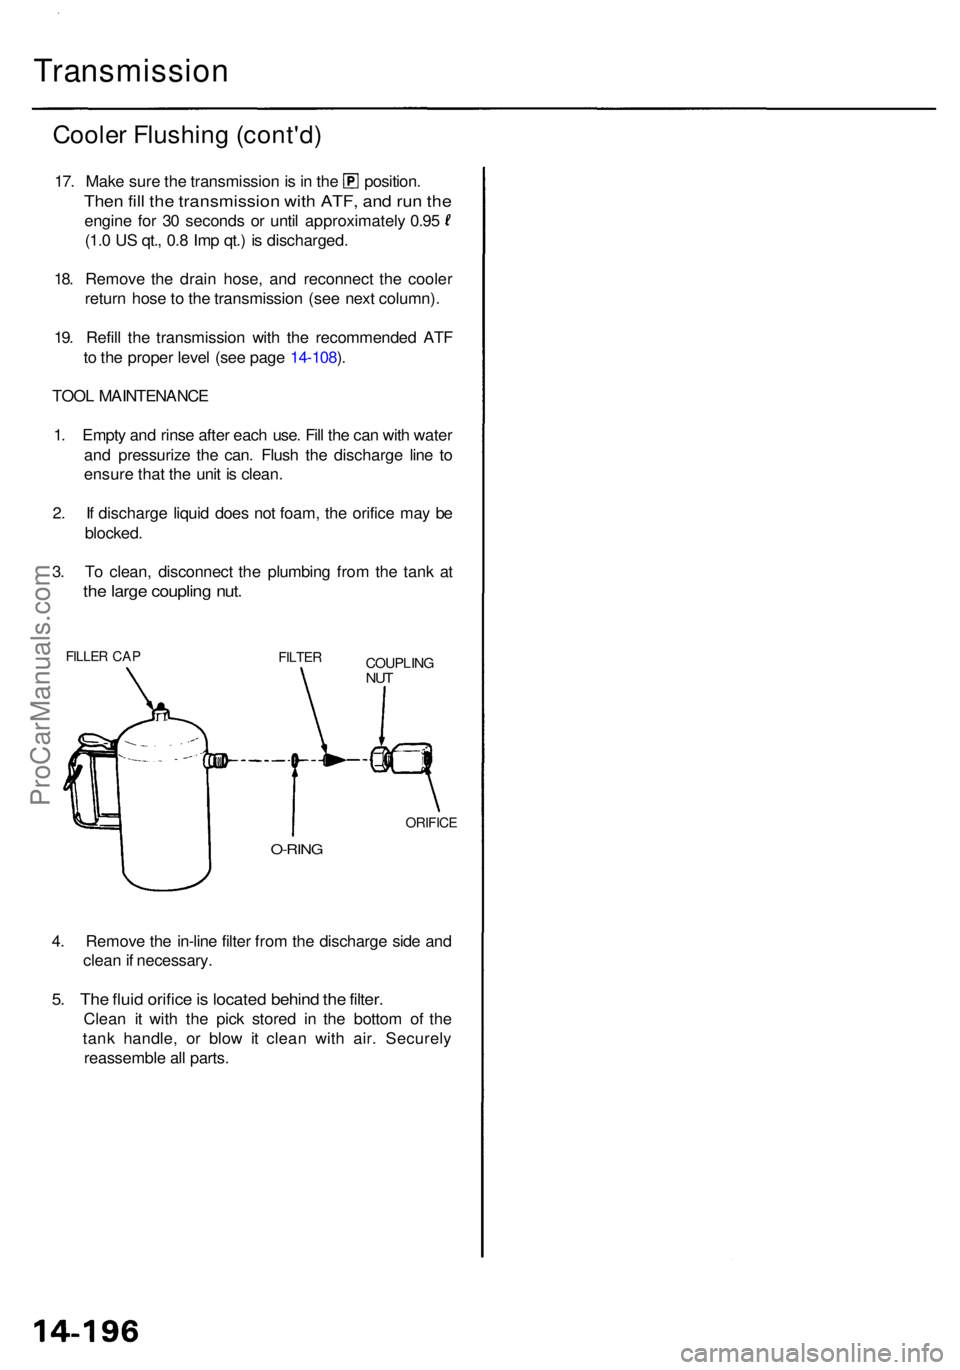
3 . T o clean , disconnec t th e plumbin g fro m th e tan k a t
the larg e couplin g nut .
FILLE R CA PFILTE RCOUPLIN GNUT
O-RIN G
ORIFIC E
4. Remov e th e in-lin e filte r fro m th e discharg e sid e an d
clea n if necessary .
5. Th e flui d orific e is locate d behin d th e filter .
Clea n i t wit h th e pic k store d i n th e botto m o f th e
tan k handle , o r blo w it clea n wit h air . Securel y
reassembl e al l parts .
ProCarManuals.com
Page 1483 of 1954
Dust an d Polle n Filter s
Replacemen t
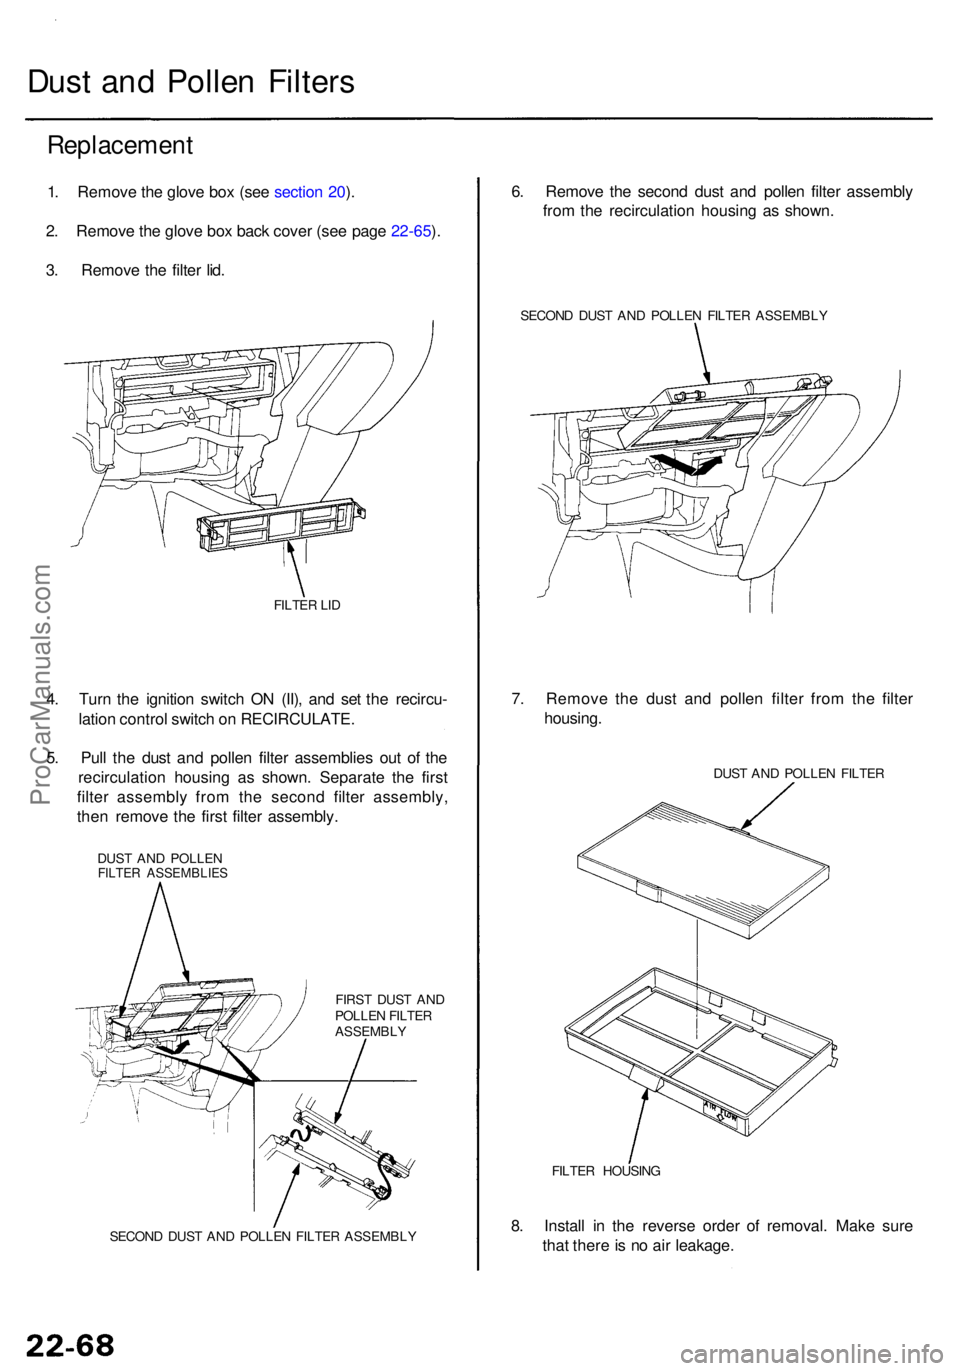
1. Remov e th e glov e bo x (se e sectio n 20 ).
2 . Remov e th e glov e bo x bac k cove r (se e pag e 22-65 ).
3 . Remov e th e filte r lid .
FILTE R LI D
4. Tur n th e ignitio n switc h O N (II) , an d se t th e recircu -
latio n contro l switc h o n RECIRCULATE .
5 . Pul l th e dus t an d polle n filte r assemblie s ou t o f th e
recirculatio n housin g a s shown . Separat e th e firs t
filte r assembl y fro m th e secon d filte r assembly ,
the n remov e th e firs t filte r assembly .
DUST AN D POLLE NFILTER ASSEMBLIE S
FIRST DUS T AN D
POLLE N FILTE R
ASSEMBL Y
SECON D DUS T AN D POLLE N FILTE R ASSEMBL Y
6. Remov e th e secon d dus t an d polle n filte r assembl y
fro m th e recirculatio n housin g a s shown .
SECON D DUS T AN D POLLE N FILTE R ASSEMBL Y
7. Remov e th e dus t an d polle n filte r fro m th e filte r
housing .
DUST AN D POLLE N FILTE R
FILTE R HOUSIN G
8. Instal l i n th e revers e orde r o f removal . Mak e sur e
tha t ther e is n o ai r leakage .
ProCarManuals.com