oil change ACURA RL KA9 1996 Service Repair Manual
[x] Cancel search | Manufacturer: ACURA, Model Year: 1996, Model line: RL KA9, Model: ACURA RL KA9 1996Pages: 1954, PDF Size: 61.44 MB
Page 151 of 1954
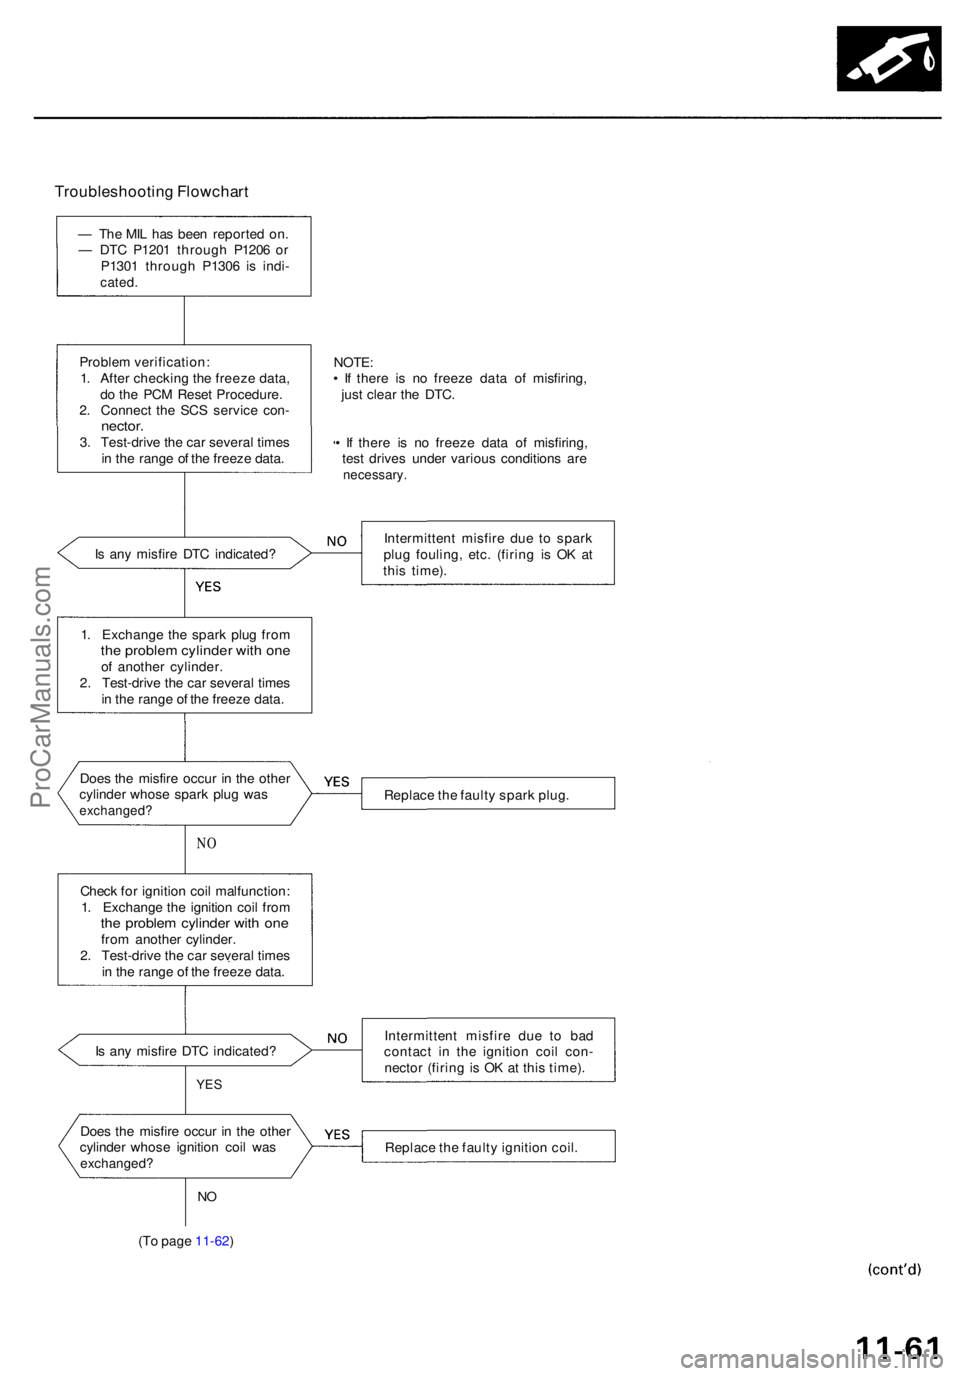
Troubleshooting Flowchar t
— Th e MI L ha s bee n reporte d on .
— DT C P120 1 throug h P120 6 o r
P130 1 throug h P130 6 i s indi -
cated .
Proble m verification :
1 . Afte r checkin g th e freez e data ,
d o th e PC M Rese t Procedure .
2 . Connec t th e SC S servic e con -
nector .3. Test-driv e th e ca r severa l time s
i n th e rang e o f th e freez e data .
I s an y misfir e DT C indicated ?
NO
Chec k fo r ignitio n coi l malfunction :
1 . Exchang e th e ignitio n coi l fro m
the proble m cylinde r wit h on efrom anothe r cylinder .
2 . Test-driv e th e ca r severa l time s
i n th e rang e o f th e freez e data .
I s an y misfir e DT C indicated ?
YES
NO
(T o pag e 11-62 )
NOTE:• I f ther e i s n o freez e dat a o f misfiring ,
jus t clea r th e DTC .
• I f ther e i s n o freez e dat a o f misfiring ,
tes t drive s unde r variou s condition s ar e
necessary .
Intermitten t misfir e du e t o spar k
plu g fouling , etc . (firin g i s O K a t
thi s time) .
Replac e th e fault y spar k plug .
Intermitten t misfir e du e t o ba d
contac t i n th e ignitio n coi l con -
necto r (firin g is O K a t thi s time) .
Replac e th e fault y ignitio n coil .
Doe
s th e misfir e occu r i n th e othe r
cylinde r whos e spar k plu g wa s
exchanged ?
Does th e misfir e occu r i n th e othe r
cylinde r whos e ignitio n coi l wa s
exchanged ?
1. Exchang e th e spar k plu g fro mthe proble m cylinde r wit h on eof anothe r cylinder .
2 . Test-driv e th e ca r severa l time s
i n th e rang e o f th e freez e data .
ProCarManuals.com
Page 421 of 1954
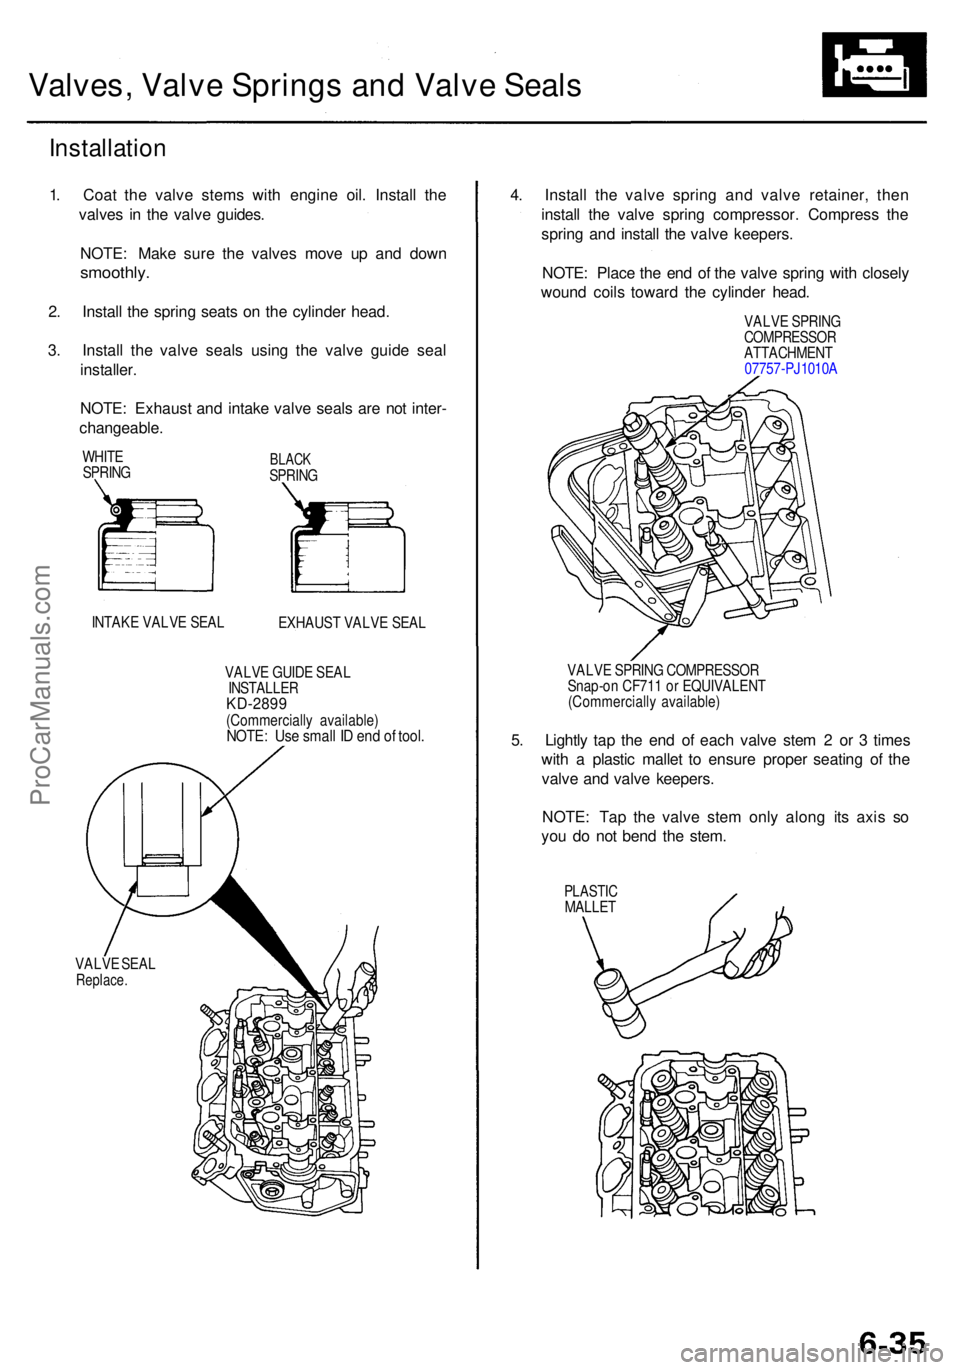
Valves, Valv e Spring s an d Valve Seals
Installatio n
1. Coa t th e valv e stem s wit h engin e oil . Instal l th e
valve s i n th e valv e guides .
NOTE : Mak e sur e th e valve s mov e u p an d dow n
smoothly .
2. Instal l th e sprin g seat s o n th e cylinde r head .
3 . Instal l th e valv e seal s usin g th e valv e guid e sea l
installer .
NOTE : Exhaus t an d intak e valv e seal s ar e no t inter -
changeable .
WHITE
SPRIN GBLACKSPRIN G
INTAK E VALV E SEA L
EXHAUST VALV E SEA L
VALV E GUID E SEA L
INSTALLE RKD-2899(Commerciall y available )NOTE: Us e smal l I D en d o f tool .
VALV E SEA LReplace .
4. Instal l th e valv e sprin g an d valv e retainer , the n
instal l th e valv e sprin g compressor . Compres s th e
sprin g an d instal l th e valv e keepers .
NOTE : Plac e th e en d o f th e valv e sprin g wit h closel y
woun d coil s towar d th e cylinde r head .
VALV E SPRIN GCOMPRESSO RATTACHMENT
0775 7-PJ1010 A
VALV E SPRIN G COMPRESSO R
Snap-o n CF71 1 o r EQUIVALEN T
(Commerciall y available )
5. Lightl y ta p th e en d o f eac h valv e ste m 2 or 3 time s
wit h a plasti c malle t t o ensur e prope r seatin g o f th e
valv e an d valv e keepers .
NOTE : Ta p th e valv e ste m onl y alon g it s axi s s o
yo u d o no t ben d th e stem .
PLASTI CMALLET
ProCarManuals.com
Page 432 of 1954
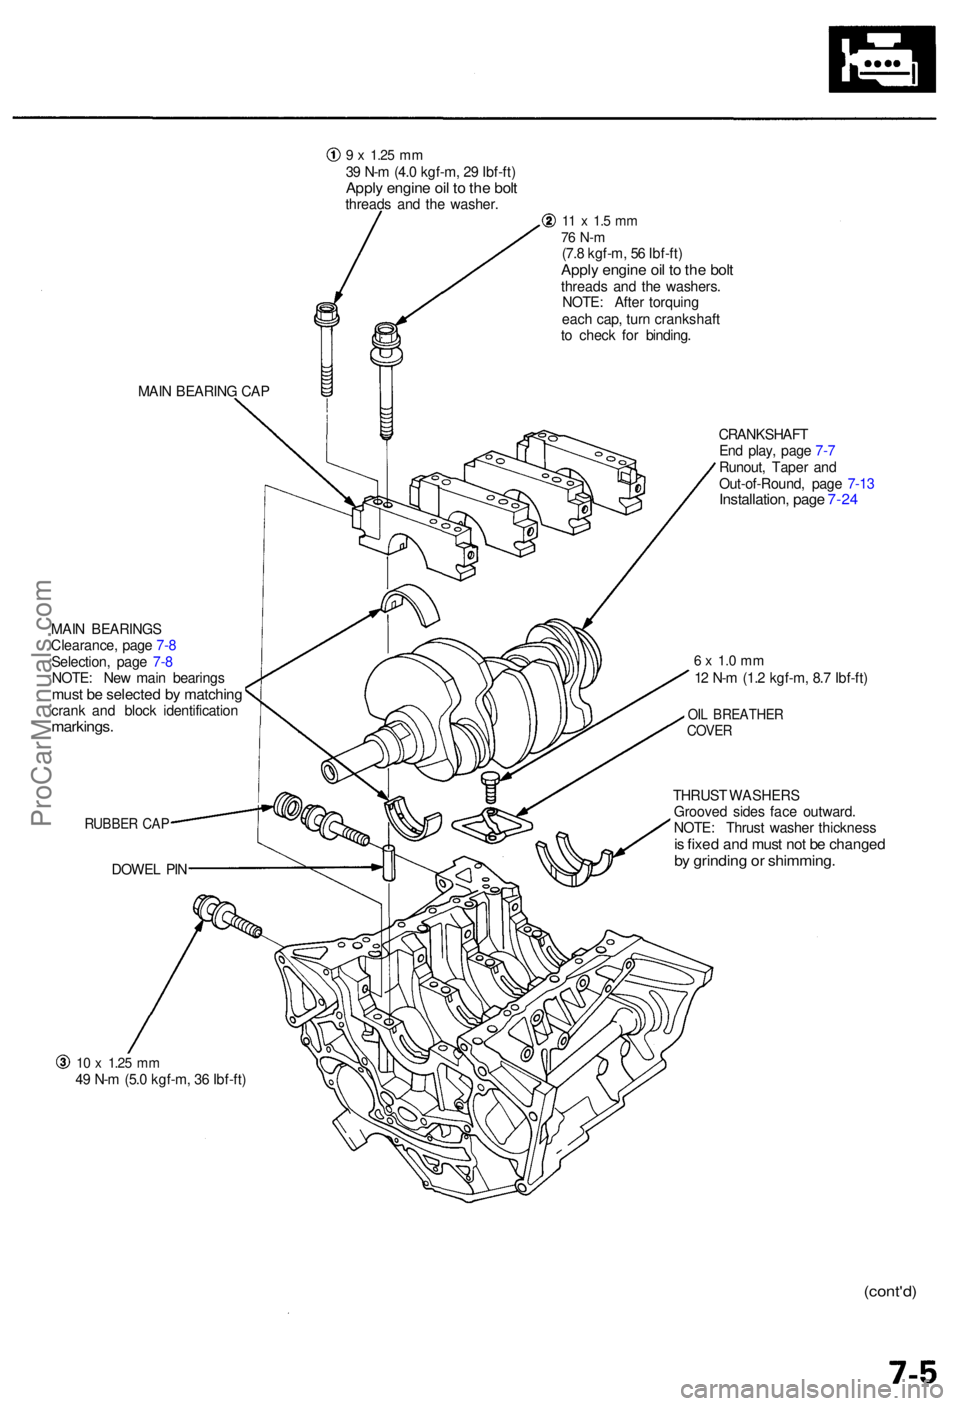
10 x 1.2 5 mm49 N- m (5. 0 kgf-m , 3 6 Ibf-ft )
9 x 1.2 5 mm39 N- m (4. 0 kgf-m , 2 9 Ibf-ft )Apply engin e oi l t o th e bol tthread s an d th e washer .11 x 1. 5 m m76 N- m(7.8 kgf-m , 5 6 Ibf-ft )Apply engin e oi l t o th e bol tthread s an d th e washers .
NOTE : Afte r torquin g
eac h cap , tur n crankshaf t
t o chec k fo r binding .
CRANKSHAF T
En d play , pag e 7- 7
Runout , Tape r an d
Out-of-Round , pag e 7-1 3
Installation , pag e 7-2 4
MAI N BEARIN G CA P
MAI N BEARING S
Clearance , pag e 7- 8
Selection , pag e 7- 8
NOTE : Ne w mai n bearing s
must b e selecte d b y matchin gcrank an d bloc k identificatio nmarkings.
RUBBER CA P
DOWE L PI N
6 x 1. 0 m m12 N- m (1. 2 kgf-m , 8. 7 Ibf-ft )
OIL BREATHE RCOVER
THRUS T WASHER S
Groove d side s fac e outward .
NOTE : Thrus t washe r thicknes s
is fixe d an d mus t no t b e change dby grindin g o r shimming .
(cont'd)
ProCarManuals.com
Page 465 of 1954
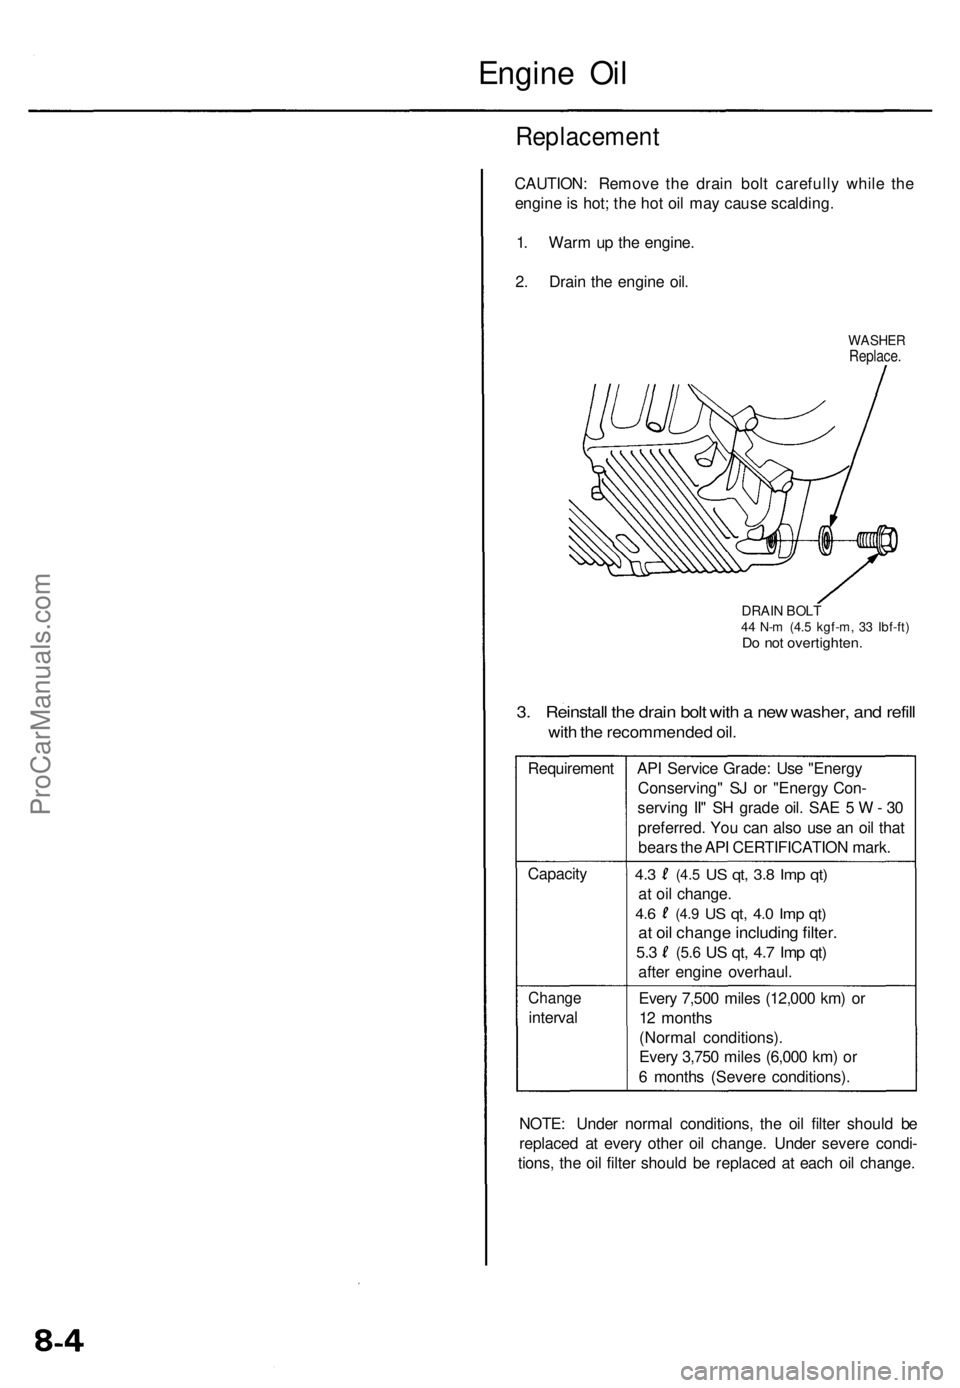
Engine Oi l
Replacemen t
CAUTION: Remov e th e drai n bol t carefull y whil e th e
engin e is hot ; th e ho t oi l ma y caus e scalding .
1 . War m u p th e engine .
2 . Drai n th e engin e oil .
WASHE RReplace.
DRAIN BOL T44 N- m (4. 5 kgf-m , 3 3 Ibf-ft )Do no t overtighten .
3. Reinstal l th e drai n bol t wit h a ne w washer , an d refil l
with th e recommende d oil .
Requiremen tAPI Servic e Grade : Us e "Energ y
Conserving " S J o r "Energ y Con -
servin g II " S H grad e oil . SA E 5 W - 30
preferred . Yo u ca n als o us e a n oi l tha t
bear s th e AP I CERTIFICATIO N mark .
Capacit y
4.3 (4. 5 US qt , 3. 8 Im p qt )
at oi l change .
4.6 (4. 9 US qt , 4. 0 Im p qt )
at oi l chang e includin g filter .
5.3 (5. 6 US qt , 4. 7 Im p qt )
afte r engin e overhaul .
Change
interval Ever
y 7,50 0 mile s (12,00 0 km ) o r
1 2 month s
(Norma l conditions) .
Ever y 3,75 0 mile s (6,00 0 km ) o r
6 month s (Sever e conditions) .
NOTE : Unde r norma l conditions , th e oi l filte r shoul d b e
replace d a t ever y othe r oi l change . Unde r sever e condi -
tions , th e oi l filte r shoul d b e replace d a t eac h oi l change .
ProCarManuals.com
Page 596 of 1954
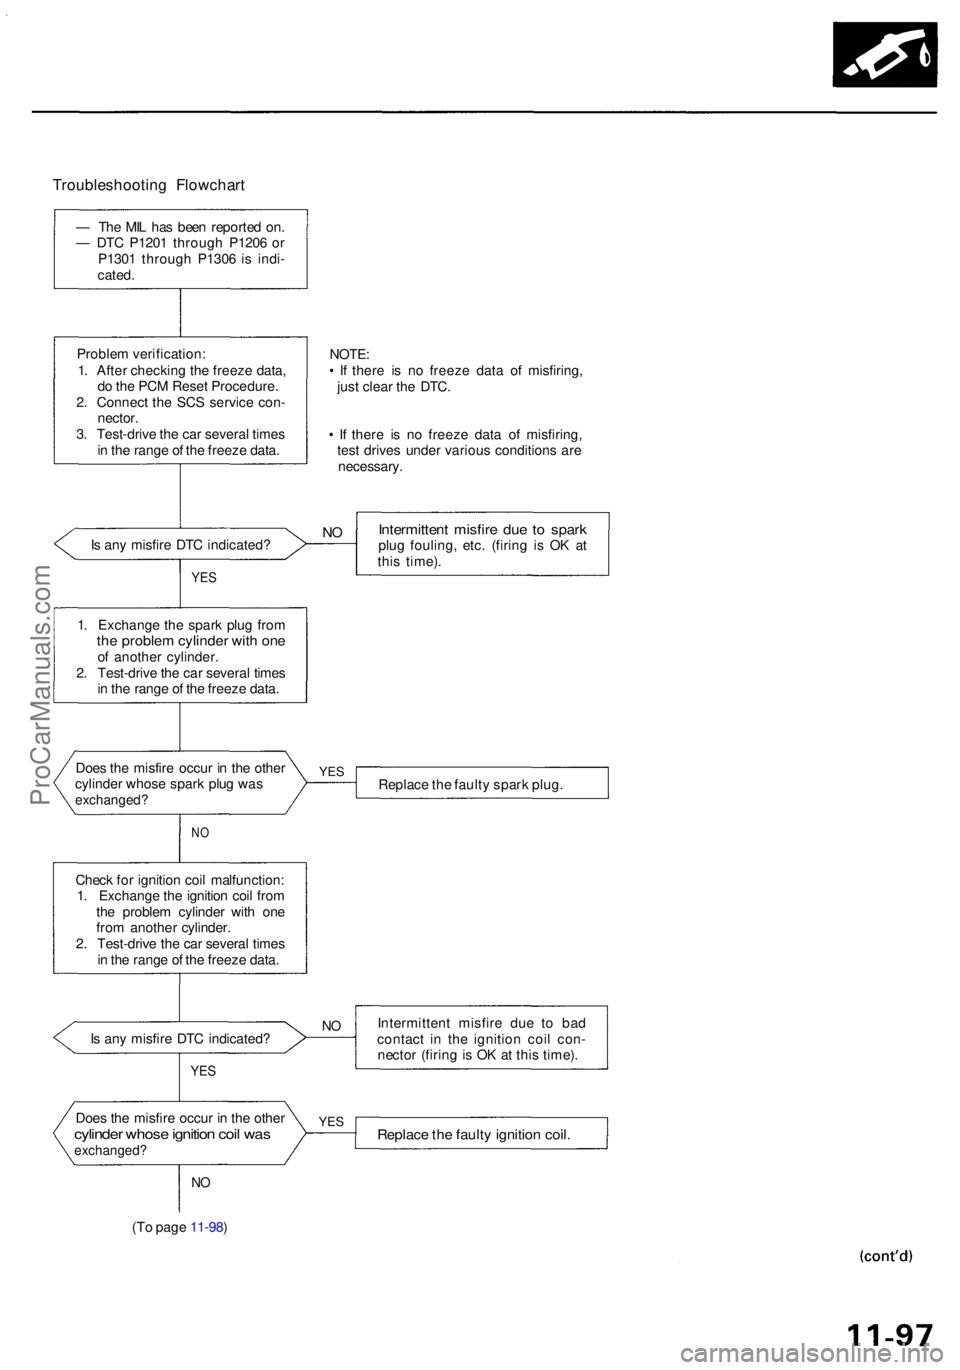
Troubleshooting Flowchar t
— Th e MI L ha s bee n reporte d on .
— DT C P120 1 throug h P120 6 o r
P130 1 throug h P130 6 i s indi -
cated .
Proble m verification :
1 . Afte r checkin g th e freez e data ,
d o th e PC M Rese t Procedure .
2 . Connec t th e SC S servic e con -
nector .
3 . Test-driv e th e ca r severa l time s
i n th e rang e o f th e freez e data .
I s an y misfir e DT C indicated ?
Doe s th e misfir e occu r i n th e othe r
cylinde r whos e spar k plu g wa s
exchanged ?
NO
Chec k fo r ignitio n coi l malfunction :
1 . Exchang e th e ignitio n coi l fro m
th e proble m cylinde r wit h on e
fro m anothe r cylinder .
2 . Test-driv e th e ca r severa l time s
i n th e rang e o f th e freez e data .
I s an y misfir e DT C indicated ?
YES
Doe s th e misfir e occu r i n th e othe rcylinde r whos e ignitio n coi l wa sexchanged ?
NO
(T o pag e 11-98 )
NOTE :• I f ther e i s n o freez e dat a o f misfiring ,
jus t clea r th e DTC .
• I f ther e i s n o freez e dat a o f misfiring ,
tes t drive s unde r variou s condition s ar e
necessary .
Intermittent misfir e du e t o spar kplug fouling , etc . (firin g i s O K a t
thi s time) .
Replac e th e fault y spar k plug .
Intermitten t misfir e du e t o ba d
contac t i n th e ignitio n coi l con -
necto r (firin g is O K a t thi s time) .
Replac e th e fault y ignitio n coil .
YES
NO
YE S
1. Exchang e th e spar k plu g fro mthe proble m cylinde r wit h on eof anothe r cylinder .
2 . Test-driv e th e ca r severa l time s
i n th e rang e o f th e freez e data .
YES
NO
ProCarManuals.com
Page 614 of 1954
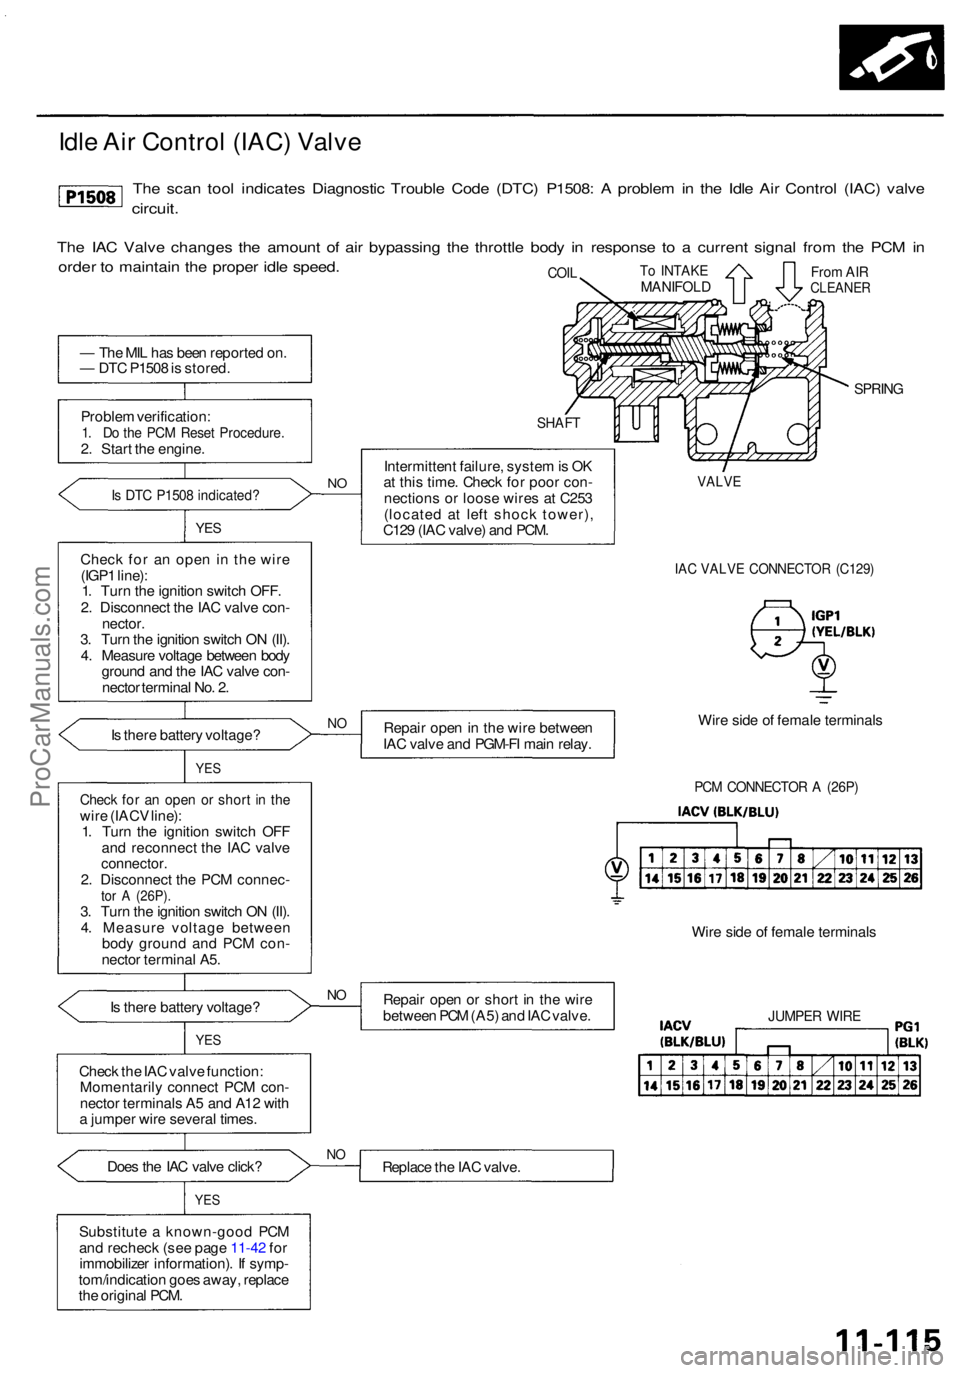
— Th e MI L ha s bee n reporte d on .
— DT C P150 8 is stored .
Proble m verification :
1. D o th e PC M Rese t Procedure .2. Star t th e engine .
Is DT C P150 8 indicated ?
YES
Chec k fo r a n ope n i n the wire
(IGP 1 line) :
1 . Tur n th e ignitio n switc h OFF .
2 . Disconnec t th e IA C valv e con -
nector .
3 . Tur n th e ignitio n switc h O N (II) .
4 . Measur e voltag e betwee n bod y
groun d an d th e IA C valv e con -
necto r termina l No . 2 .
I s ther e batter y voltage ?
I s ther e batter y voltage ?
YES
Chec k th e IA C valv e function :
Momentaril y connec t PC M con -
necto r terminal s A 5 an d A1 2 wit h
a jumpe r wire severa l times .
Doe s th e IA C valv e click ?
YES
Substitut e a known-goo d PC M
an d rechec k (se e pag e 11-42 fo r
immobilize r information) . I f symp -
tom/indicatio n goe s away , replac e
th e origina l PCM .
SHAF T
Intermitten t failure , syste m is O K
a t thi s time . Chec k fo r poo r con -
nection s o r loos e wire s a t C25 3
(locate d a t lef t shoc k tower) ,
C12 9 (IA C valve ) an d PCM .
SPRIN G
IAC VALV E CONNECTO R (C129 )
Repair ope n in th e wir e betwee n
IA C valv e an d PGM-F I mai n relay . Wir
e sid e o f femal e terminal s
PCM CONNECTO R A (26P )
Repai r ope n o r shor t i n th e wir e
betwee n PC M (A5 ) an d IA C valve . Wir
e sid e o f femal e terminal sJUMPER WIR E
Replac e th e IA C valve .NO
NO
Chec k fo r a n ope n o r shor t i n th ewir e (IAC V line) :
1 . Tur n th e ignitio n switc h OF F
an d reconnec t th e IA C valv e
connector .2. Disconnec t th e PC M connec -tor A (26P) .3. Tur n th e ignitio n switc h O N (II) .
4 . Measur e voltag e betwee n
bod y groun d an d PC M con -
necto r termina l A5 .
NO
YE S
VALV E
To INTAK EMANIFOL DFrom AI RCLEANE RCOIL
NO
Idl e Ai r Contro l (IAC ) Valv e
The sca n too l indicate s Diagnosti c Troubl e Cod e (DTC ) P1508 : A proble m in th e Idl e Ai r Contro l (IAC ) valv e
circuit .
The IA C Valv e change s th e amoun t o f ai r bypassin g th e throttl e bod y i n respons e t o a curren t signa l fro m th e PC M in
orde r t o maintai n th e prope r idl e speed .
ProCarManuals.com
Page 915 of 1954
Maintenance
Differential Oil
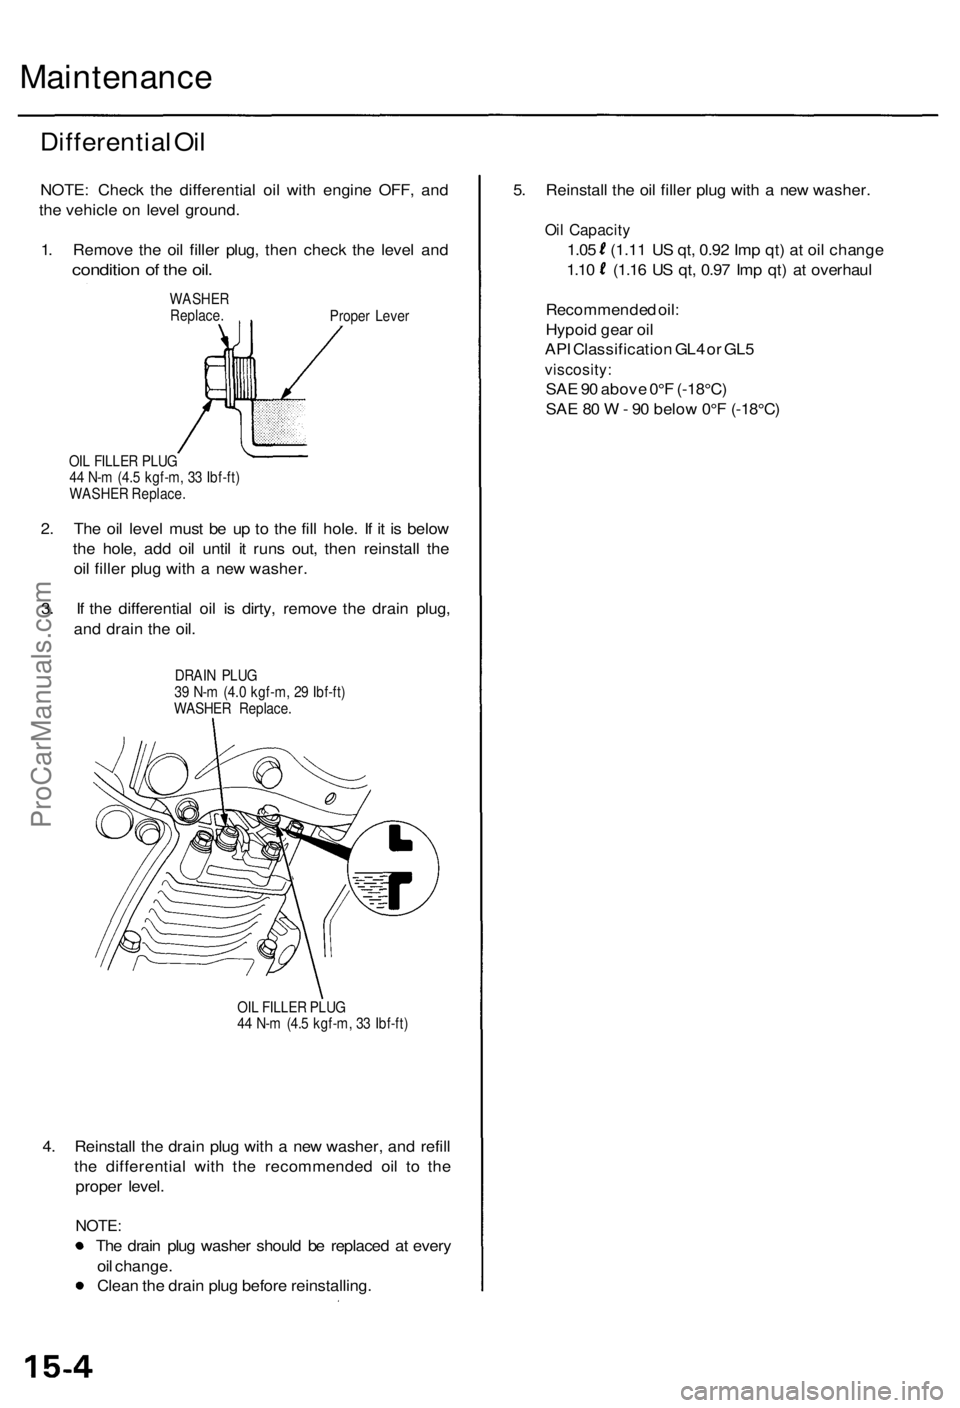
NOTE: Check the differential oil with engine OFF, and
the vehicle on level ground.
1. Remove the oil filler plug, then check the level and
condition of the oil.
WASHER
Replace.
Proper Lever
OIL FILLER PLUG
44 N-m (4.5 kgf-m, 33 Ibf-ft)
WASHER Replace.
2. The oil level must be up to the fill hole. If it is below
the hole, add oil until it runs out, then reinstall the
oil filler plug with a new washer.
3. If the differential oil is dirty, remove the drain plug,
and drain the oil.
DRAIN PLUG
39 N-m (4.0 kgf-m, 29 Ibf-ft)
WASHER Replace.
OIL FILLER PLUG
44 N-m (4.5 kgf-m, 33 Ibf-ft)
4. Reinstall the drain plug with a new washer, and refill
the differential with the recommended oil to the
proper level.
NOTE:
The drain plug washer should be replaced at every
oil change.
Clean the drain plug before reinstalling.
5. Reinstall the oil filler plug with a new washer.
Oil Capacity
1.05 (1.11 US qt, 0.92 Imp qt) at oil change
1.10 (1.16 US qt, 0.97 Imp qt) at overhaul
Recommended oil:
Hypoid gear oil
API Classification GL4 or GL5
viscosity:
SAE 90 above 0°F (-18°C)
SAE 80 W - 90 below 0°F (-18°C)ProCarManuals.com
Page 1037 of 1954
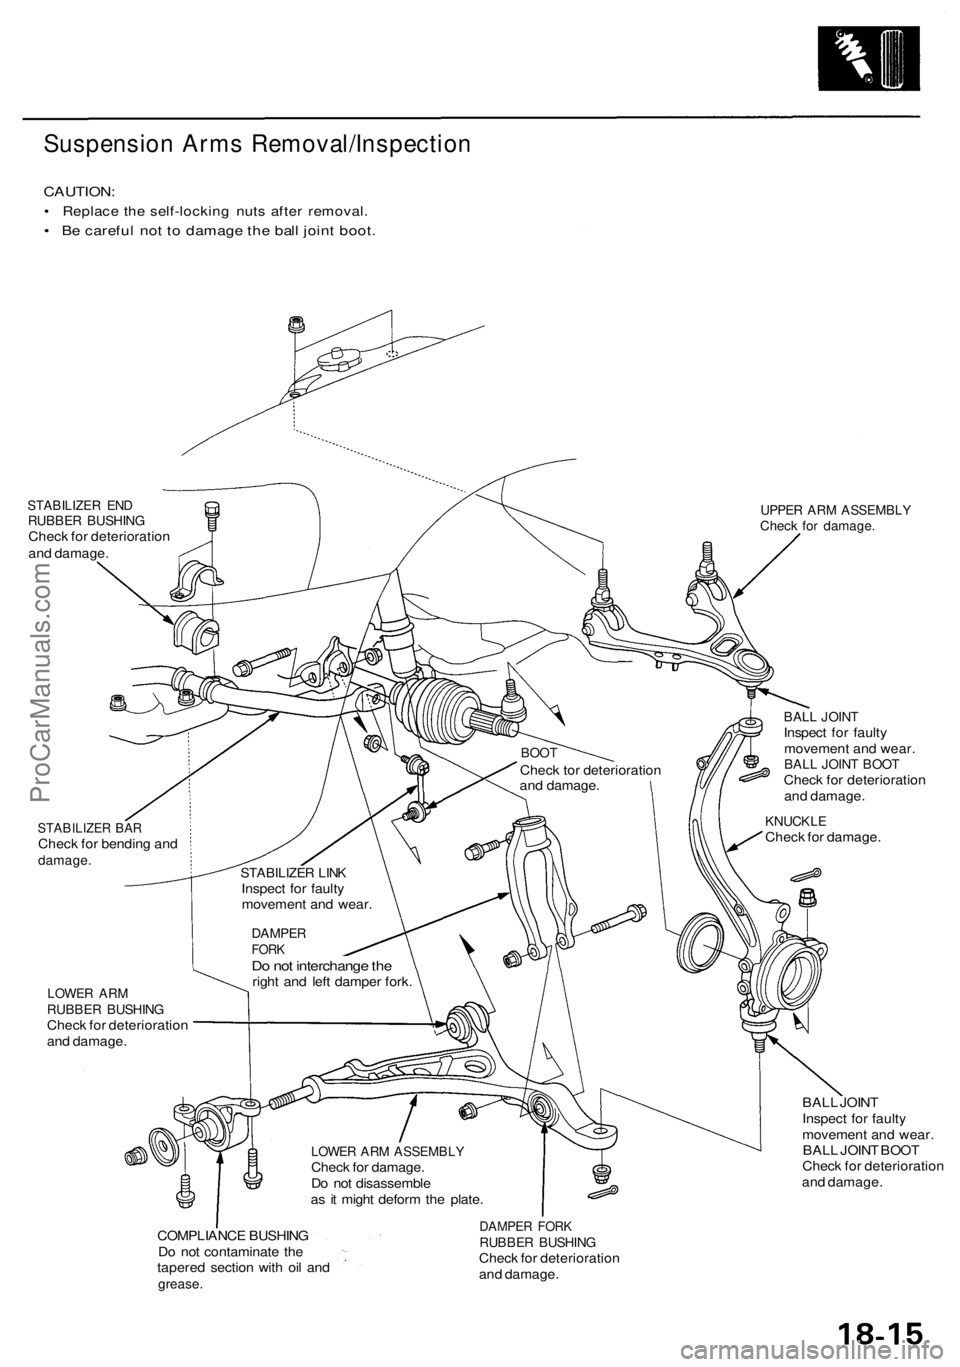
Suspension Arms Removal/Inspection
CAUTION:
• Replace the self-locking nuts after removal.
• Be careful not to damage the ball joint boot.
STABILIZER END
RUBBER BUSHING
Check for deterioration
and damage.
UPPER ARM ASSEMBLY
Check for damage.
STABILIZER BAR
Check for bending and
damage.
BALL JOINT
Inspect for faulty
movement and wear.
BALL JOINT BOOT
Check for deterioration
and damage.
KNUCKLE
Check for damage.
LOWER ARM
RUBBER BUSHING
Check for deterioration
and damage.
BALL JOINT
Inspect for faulty
movement and wear.
BALL JOINT BOOT
Check for deterioration
and damage.
COMPLIANCE BUSHING
Do not contaminate the
tapered section with oil and
grease.
DAMPER FORK
RUBBER BUSHING
Check for deterioration
and damage.
LOWER ARM ASSEMBLY
Check for damage.
Do not disassemble
as it might deform the plate.
DAMPER
FORK
Do not interchange the
right and left damper fork.
STABILIZER LINK
Inspect for faulty
movement and wear.
BOOT
Check tor deterioration
and damage.ProCarManuals.com
Page 1156 of 1954
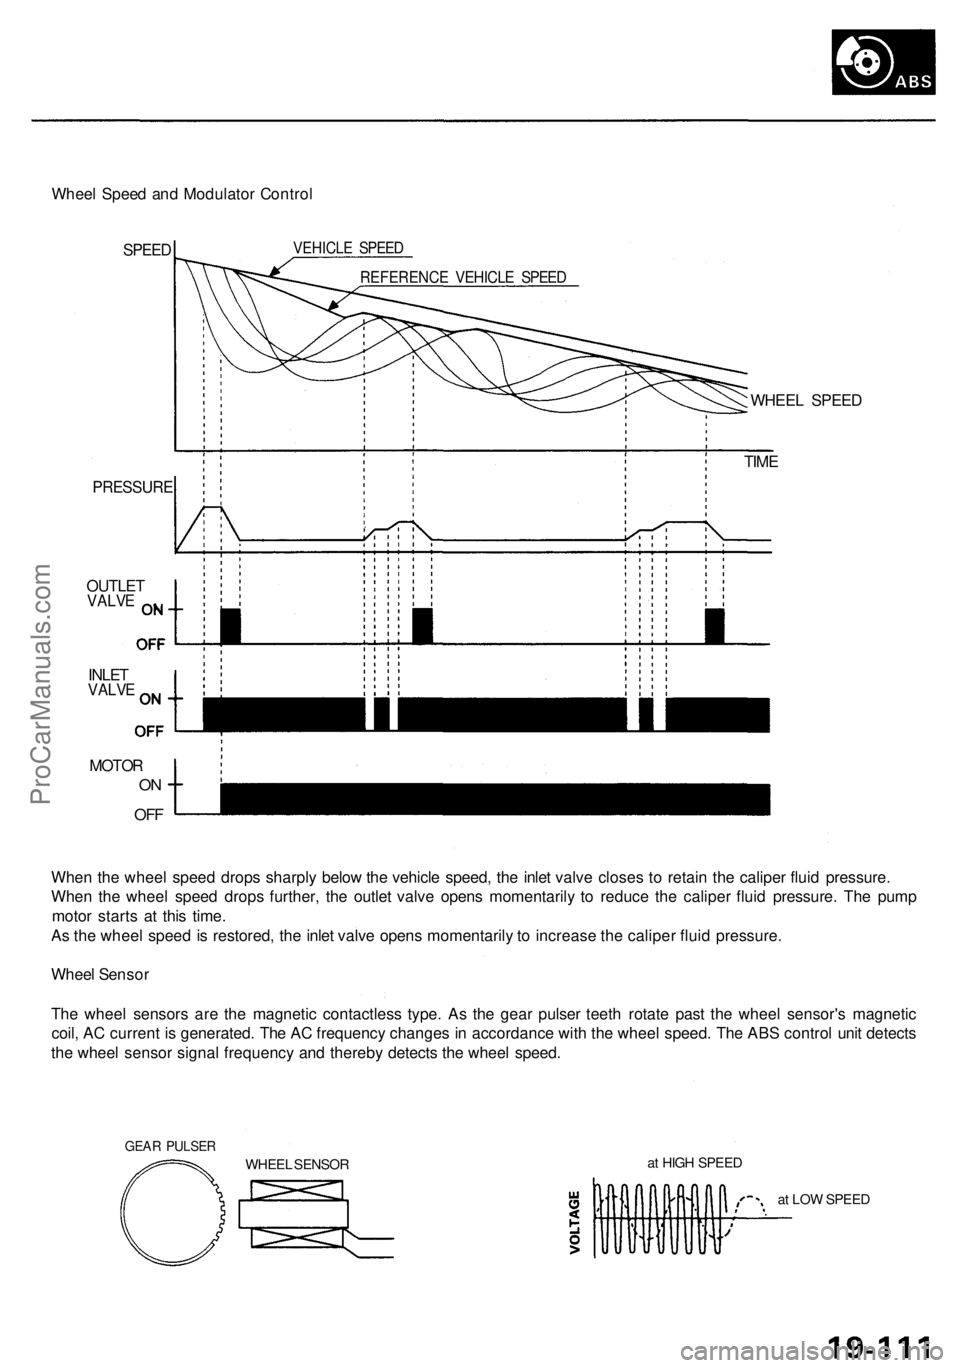
Wheel Spee d an d Modulato r Contro l
SPEED VEHICL E SPEE D
REFERENC E VEHICL E SPEE D
PRESSUR E
OUTLETVALVE
INLETVALV E
MOTO R
ON
OF F
WHEE L SPEE D
TIM E
Whe n th e whee l spee d drop s sharpl y belo w th e vehicl e speed , th e inle t valv e close s t o retai n th e calipe r flui d pressure .
Whe n th e whee l spee d drop s further , th e outle t valv e open s momentaril y t o reduc e th e calipe r flui d pressure . Th e pum p
moto r start s a t thi s time .
A s th e whee l spee d i s restored , th e inle t valv e open s momentaril y t o increas e th e calipe r flui d pressure .
Whee l Senso r
Th e whee l sensor s ar e th e magneti c contactles s type . A s th e gea r pulse r teet h rotat e pas t th e whee l sensor' s magnetic
coil , A C curren t i s generated . Th e A C frequenc y change s i n accordanc e wit h th e whee l speed . Th e AB S contro l uni t detect s
th e whee l senso r signa l frequenc y an d thereb y detect s th e whee l speed .
GEAR PULSE R
WHEEL SENSO R a
t HIG H SPEE D
at LO W SPEE D
ProCarManuals.com
Page 1497 of 1954
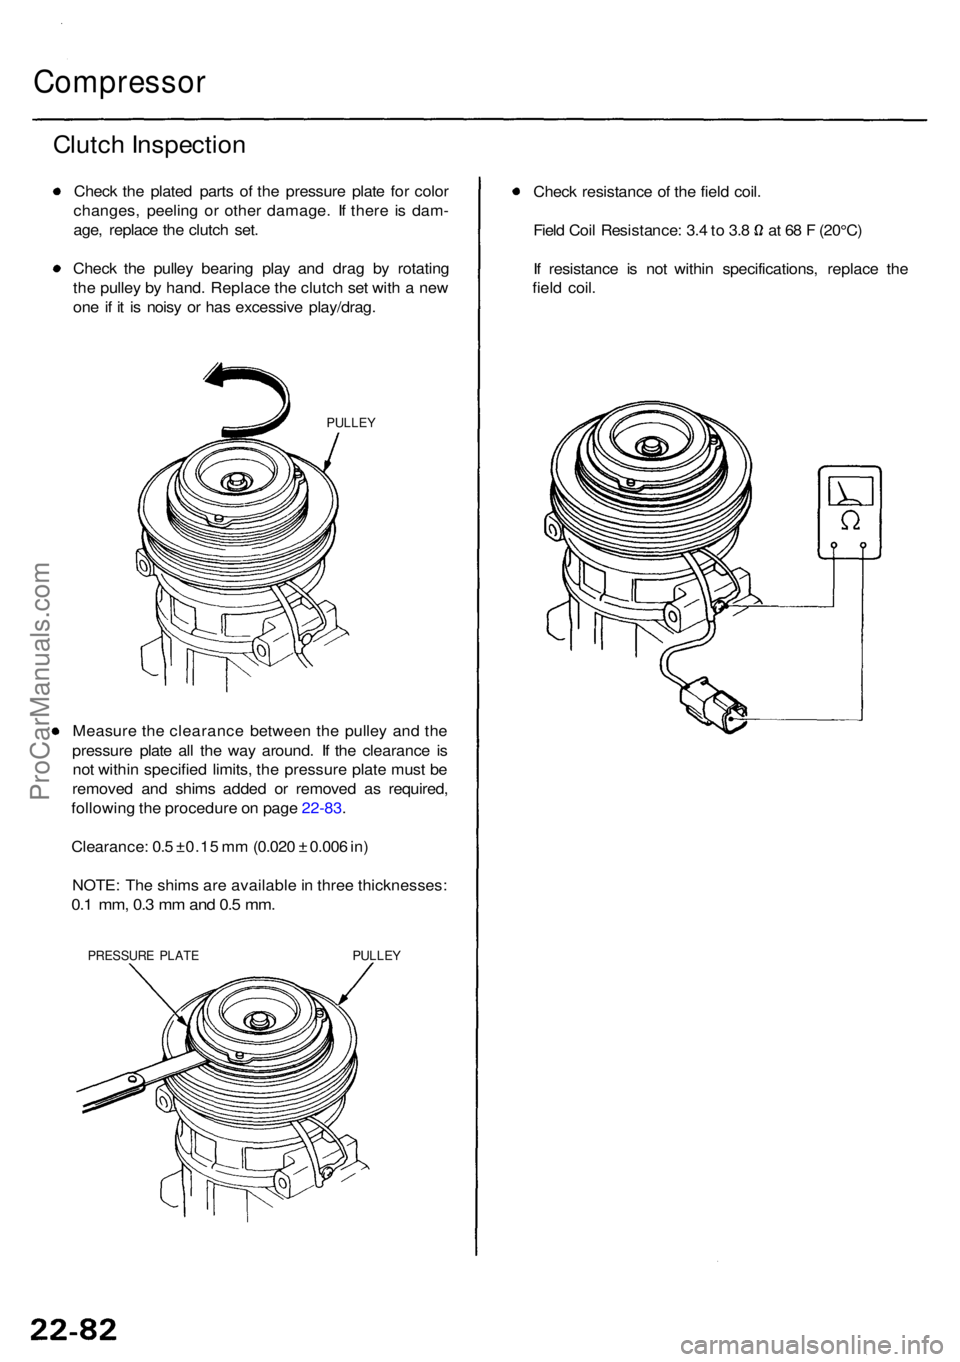
Compressor
Clutch Inspectio n
Check th e plate d part s o f th e pressur e plat e fo r colo r
changes , peelin g o r othe r damage . I f ther e i s dam -
age , replac e th e clutc h set .
Chec k th e pulle y bearin g pla y an d dra g b y rotatin g
th e pulle y b y hand . Replac e th e clutc h se t wit h a ne w
on e if i t i s nois y o r ha s excessiv e play/drag .
PULLEY
Measur e th e clearanc e betwee n th e pulle y an d th e
pressur e plat e al l th e wa y around . I f th e clearanc e i s
no t withi n specifie d limits , th e pressur e plat e mus t b e
remove d an d shim s adde d o r remove d a s required ,
followin g th e procedur e o n pag e 22-83 .
Clearance : 0. 5 ±0.1 5 m m (0.02 0 ± 0.00 6 in )
NOTE : Th e shim s ar e availabl e in thre e thicknesses :
0.1 mm , 0. 3 m m an d 0. 5 mm .
PRESSUR E PLAT EPULLE Y
Check resistanc e o f th e fiel d coil .
Field Coi l Resistance : 3. 4 to 3. 8 a t 6 8 F (20°C )
I f resistanc e i s no t withi n specifications , replac e th e
fiel d coil .
ProCarManuals.com