Screen Acura RLX 2014 Owner's Manual
[x] Cancel search | Manufacturer: ACURA, Model Year: 2014, Model line: RLX, Model: Acura RLX 2014Pages: 518, PDF Size: 15.83 MB
Page 3 of 518
2Quick Reference Guide
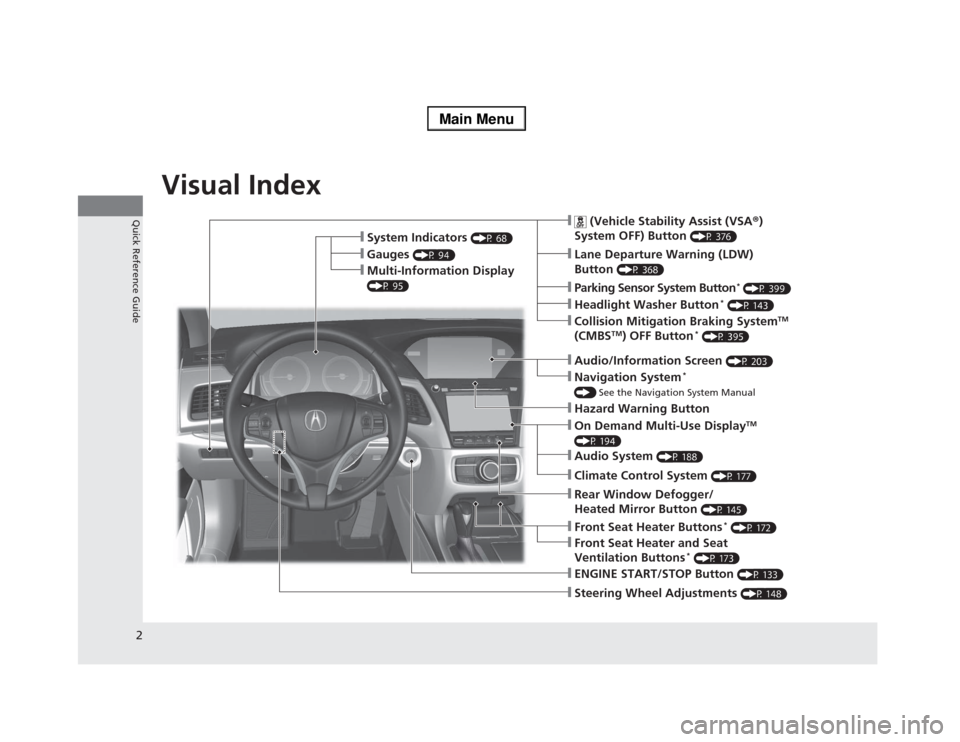
Quick Reference GuideVisual Index
❙Steering Wheel Adjustments
(P 148)
❙ENGINE START/STOP Button
(P 133)
❙
(Vehicle Stability Assist (VSA®)
System OFF) Button
(P 376)
❙Lane Departure Warning (LDW)
Button
(P 368)
❙Parking Sensor System Button
* (P 399)
❙Collision Mitigation Braking System
TM
(CMBS
TM) OFF Button
* (P 395)
❙Navigation System
*
() See the Navigation System Manual❙Audio/Information Screen
(P 203)
❙Hazard Warning Button❙On Demand Multi-Use Display
TM
(P 194)❙Audio System
(P 188)
❙System Indicators
(P 68)
❙Gauges
(P 94)
❙Multi-Information Display (P 95)
❙Climate Control System
(P 177)
❙Rear Window Defogger/
Heated Mirror Button
(P 145)
❙Front Seat Heater Buttons
* (P 172)
❙Headlight Washer Button
* (P 143)
❙Front Seat Heater and Seat
Ventilation Buttons
* (P 173)
Page 10 of 518
9Quick Reference Guide
Controls
(P 113)
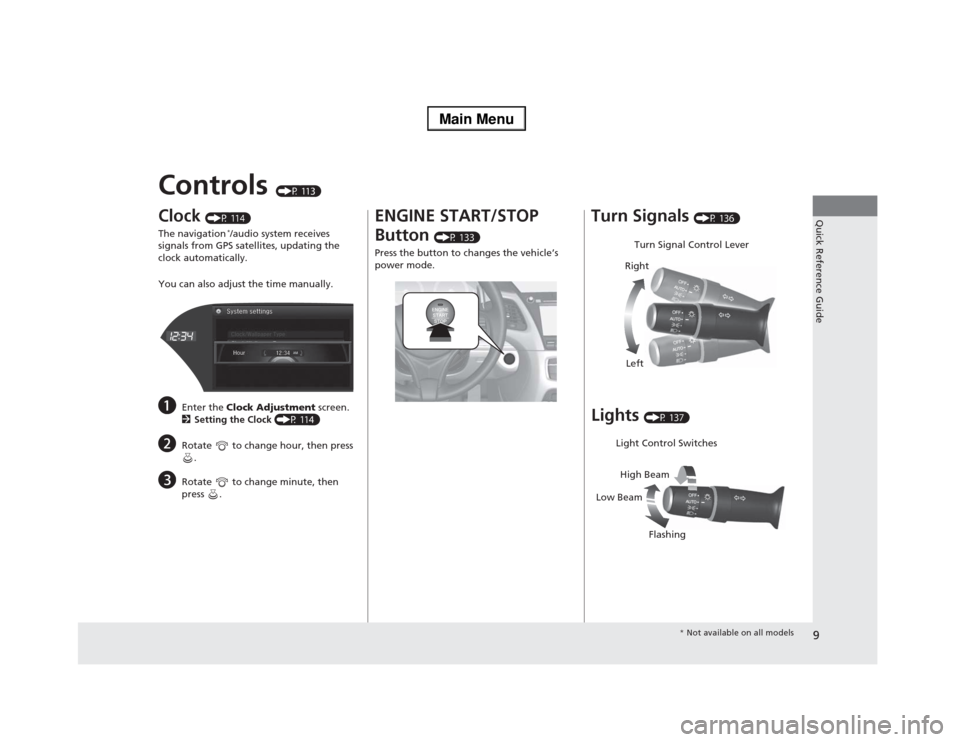
Clock
(P 114)
The navigation
*/audio system receives
signals from GPS satellites, updating the
clock automatically.
You can also adjust the time manually.
a
Enter the Clock Adjustment screen.
2Setting the Clock (P 114)
b
Rotate to change hour, then press
.
c
Rotate to change minute, then
press .
ENGINE START/STOP
Button
(P 133)
Press the button to changes the vehicle’s
power mode.
Turn Signals
(P 136)
Lights
(P 137)Turn Signal Control Lever
Right
Left
Light Control Switches
Low BeamHigh Beam
Flashing
* Not available on all models
Page 14 of 518
13Quick Reference Guide
Features
(P 187)
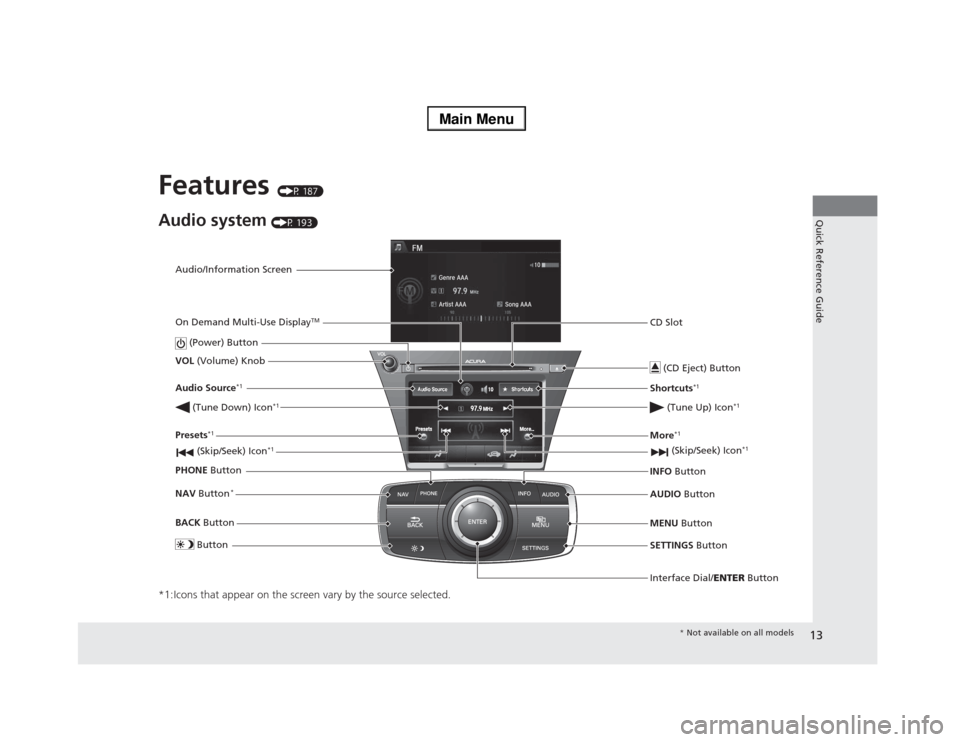
Audio system
(P 193)
*1:Icons that appear on the screen vary by the source selected.
Audio/Information Screen
Interface Dial/ENTER Button (Power) Button
CD Slot
(CD Eject) ButtonSETTINGS Button VOL (Volume) Knob
BACK Button NAV Button
*
MENU Button AUDIO Button INFO Button On Demand Multi-Use Display
TM
PHONE Button (Tune Down) Icon
*1
(Skip/Seek) Icon
*1
Audio Source
*1
(Skip/Seek) Icon
*1
Presets
*1
(Tune Up) Icon
*1
More
*1
Button
Shortcuts
*1
* Not available on all models
Page 77 of 518
76
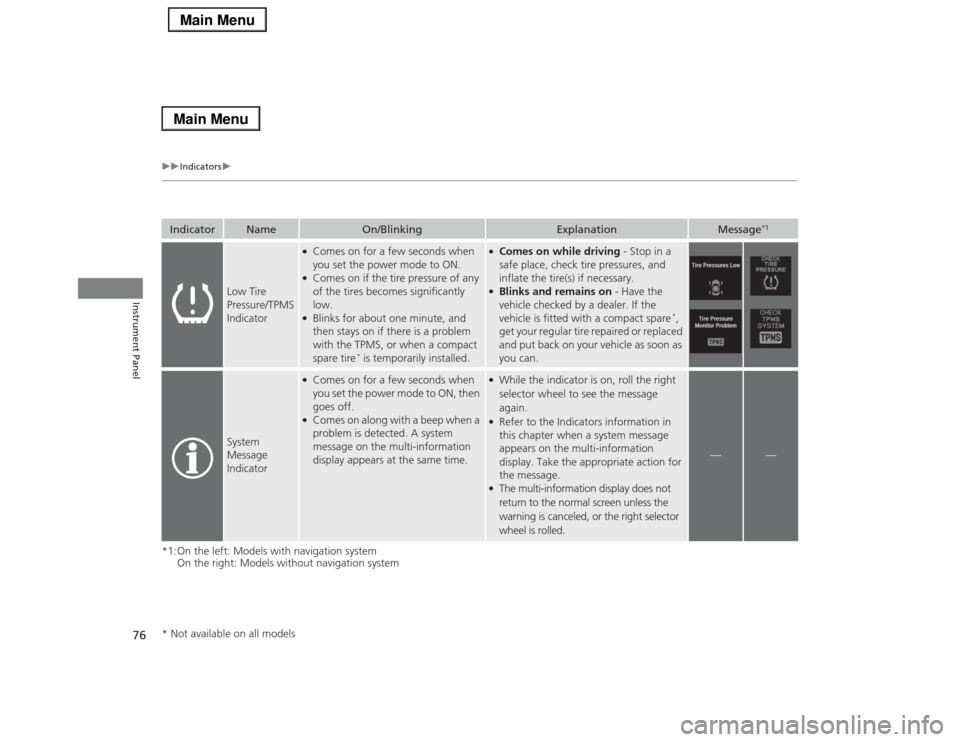
uuIndicatorsu
Instrument Panel
*1:On the left: Models with navigation system
On the right: Models without navigation systemIndicator
Name
On/Blinking
Explanation
Message
*1
Low Tire
Pressure/TPMS
Indicator
●Comes on for a few seconds when
you set the power mode to ON.●Comes on if the tire pressure of any
of the tires becomes significantly
low.●Blinks for about one minute, and
then stays on if there is a problem
with the TPMS, or when a compact
spare tire
* is temporarily installed.
●Comes on while driving - Stop in a
safe place, check tire pressures, and
inflate the tire(s) if necessary.●Blinks and remains on - Have the
vehicle checked by a dealer. If the
vehicle is fitted with a compact spare
*,
get your regular tire repaired or replaced
and put back on your vehicle as soon as
you can.
System
Message
Indicator
●Comes on for a few seconds when
you set the power mode to ON, then
goes off.●Comes on along with a beep when a
problem is detected. A system
message on the multi-information
display appears at the same time.
●While the indicator is on, roll the right
selector wheel to see the message
again.●Refer to the Indicators information in
this chapter when a system message
appears on the multi-information
display. Take the appropriate action for
the message.●The multi-information display does not
return to the normal screen unless the
warning is canceled, or the right selector
wheel is rolled.
—
—
* Not available on all models
Page 103 of 518
uuGauges and Multi-Information DisplayuMulti-Information Display
102Instrument Panel
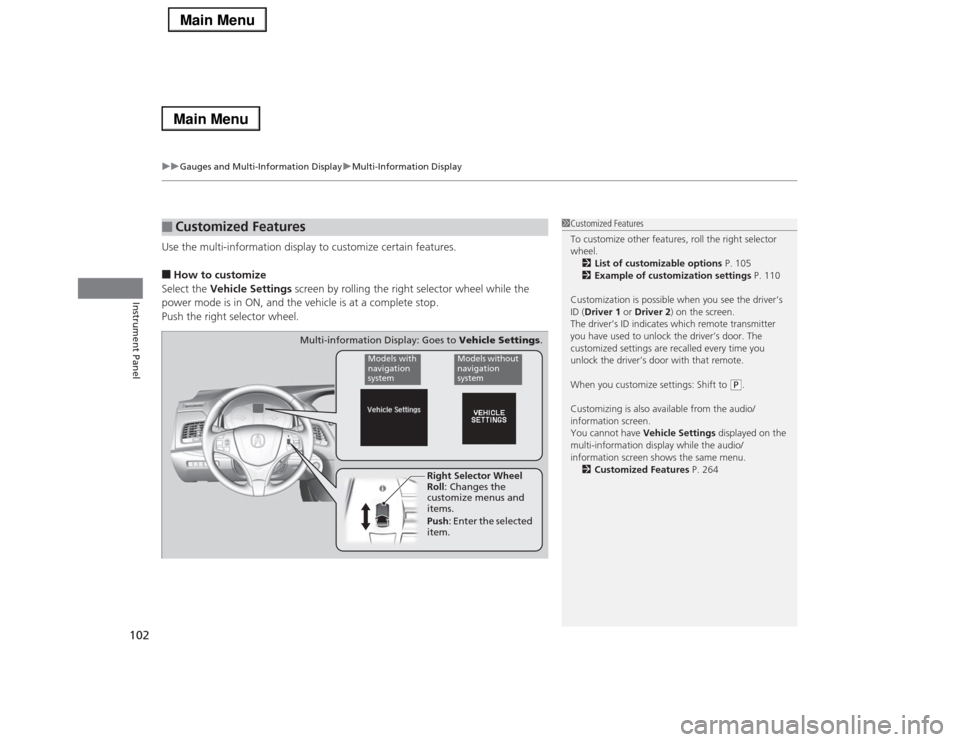
Use the multi-information display to customize certain features.■How to customize
Select the Vehicle Settings screen by rolling the right selector wheel while the
power mode is in ON, and the vehicle is at a complete stop.
Push the right selector wheel.■
Customized Features
1Customized Features
To customize other features, roll the right selector
wheel.
2List of customizable options P. 105
2Example of customization settings P. 110
Customization is possible when you see the driver’s
ID (Driver 1 or Driver 2) on the screen.
The driver’s ID indicates which remote transmitter
you have used to unlock the driver’s door. The
customized settings are recalled every time you
unlock the driver’s door with that remote.
When you customize settings: Shift to
(P.
Customizing is also available from the audio/
information screen.
You cannot have Vehicle Settings displayed on the
multi-information display while the audio/
information screen shows the same menu.
2Customized Features P. 264
Right Selector Wheel
Roll: Changes the
customize menus and
items.
Push: Enter the selected
item.
Models with
navigation
system
Models without
navigation
system
Multi-information Display: Goes to Vehicle Settings.
Page 112 of 518
111
uuGauges and Multi-Information DisplayuMulti-Information Display
Instrument Panel
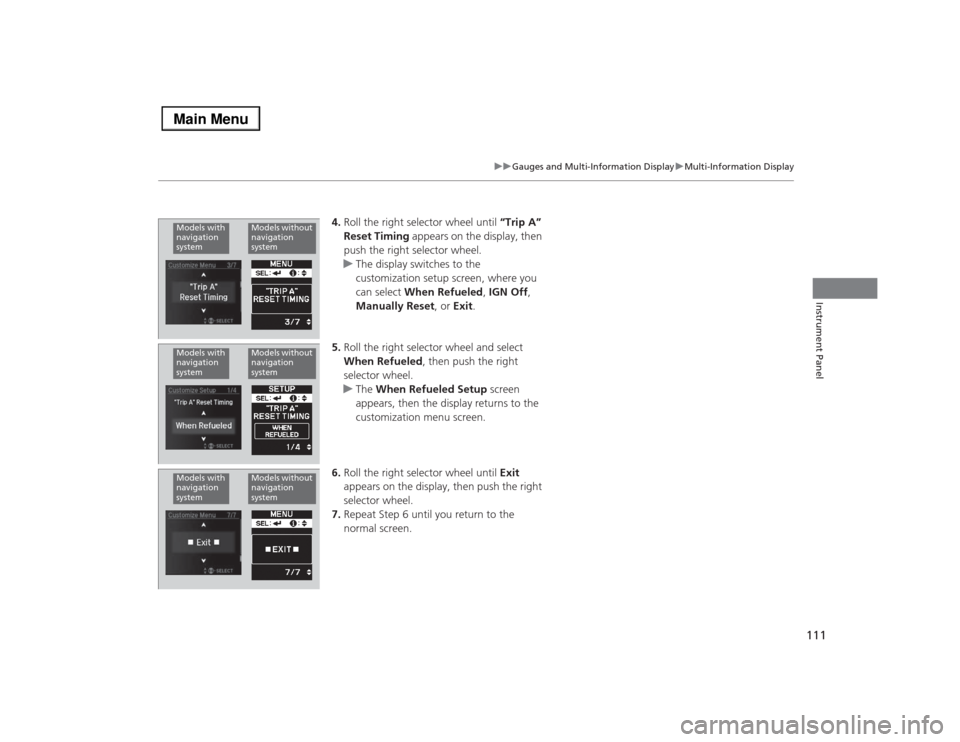
4.Roll the right selector wheel until “Trip A”
Reset Timing appears on the display, then
push the right selector wheel.
uThe display switches to the
customization setup screen, where you
can select When Refueled, IGN Off,
Manually Reset, or Exit.
5.Roll the right selector wheel and select
When Refueled, then push the right
selector wheel.
uThe When Refueled Setup screen
appears, then the display returns to the
customization menu screen.
6.Roll the right selector wheel until Exit
appears on the display, then push the right
selector wheel.
7.Repeat Step 6 until you return to the
normal screen.
Models with
navigation
system
Models without
navigation
system
Models with
navigation
system
Models without
navigation
system
Models with
navigation
system
Models without
navigation
system
Page 115 of 518
114Controls
Setting the ClockClockThe clock is automatically updated through the navigation
*/audio system, so the
time does not need to be adjusted.
You can also adjust the time manually in the audio/information screen, with the
power mode in ON.
■Using the Settings menu on the audio/information screen
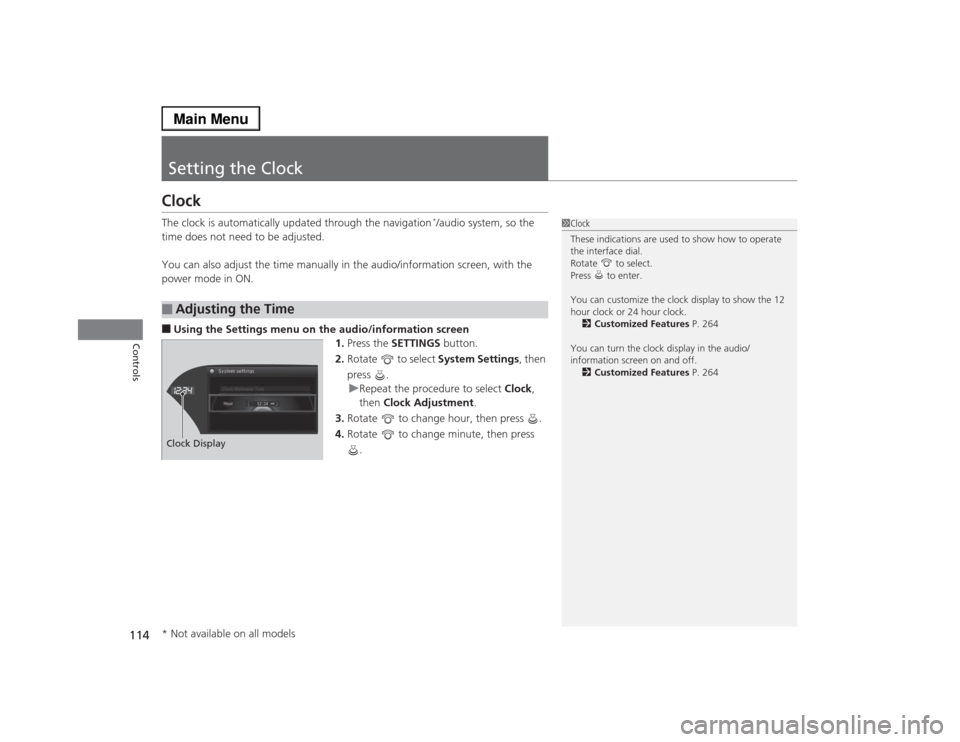
1.Press the SETTINGS button.
2.Rotate to select System Settings, then
press .
uRepeat the procedure to select Clock,
then Clock Adjustment.
3.Rotate to change hour, then press .
4.Rotate to change minute, then press
.■
Adjusting the Time
1Clock
These indications are used to show how to operate
the interface dial.
Rotate to select.
Press to enter.
You can customize the clock display to show the 12
hour clock or 24 hour clock.
2Customized Features P. 264
You can turn the clock display in the audio/
information screen on and off.
2Customized Features P. 264
Hour Clock/Wallpaper TypeSystem settings
Clock Display* Not available on all models
Page 120 of 518
Continued
119
uuLocking and Unlocking the DoorsuLocking/Unlocking the Doors from the Outside
Controls
■Unlocking the vehicle
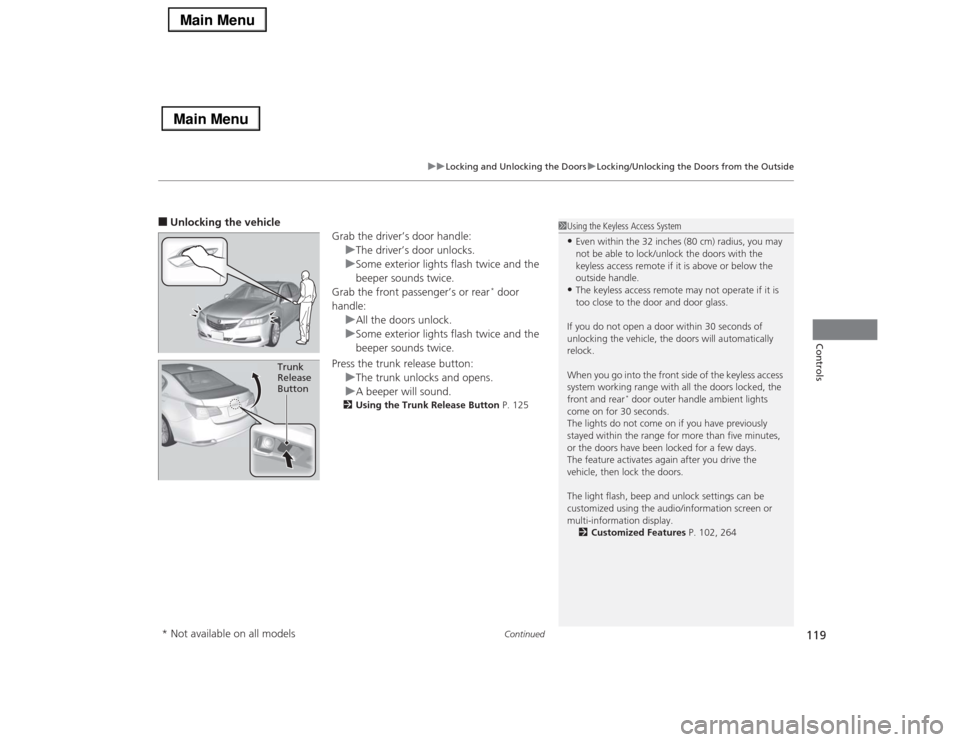
Grab the driver’s door handle:
uThe driver’s door unlocks.
uSome exterior lights flash twice and the
beeper sounds twice.
Grab the front passenger’s or rear
* door
handle:
uAll the doors unlock.
uSome exterior lights flash twice and the
beeper sounds twice.
Press the trunk release button:
uThe trunk unlocks and opens.
uA beeper will sound.
2Using the Trunk Release Button P. 125
Trunk
Release
Button
1Using the Keyless Access System•Even within the 32 inches (80 cm) radius, you may
not be able to lock/unlock the doors with the
keyless access remote if it is above or below the
outside handle.•The keyless access remote may not operate if it is
too close to the door and door glass.
If you do not open a door within 30 seconds of
unlocking the vehicle, the doors will automatically
relock.
When you go into the front side of the keyless access
system working range with all the doors locked, the
front and rear
* door outer handle ambient lights
come on for 30 seconds.
The lights do not come on if you have previously
stayed within the range for more than five minutes,
or the doors have been locked for a few days.
The feature activates again after you drive the
vehicle, then lock the doors.
The light flash, beep and unlock settings can be
customized using the audio/information screen or
multi-information display.
2Customized Features P. 102, 264
* Not available on all models
Page 123 of 518
uuLocking and Unlocking the DoorsuLocking/Unlocking the Doors from the Inside
122Controls
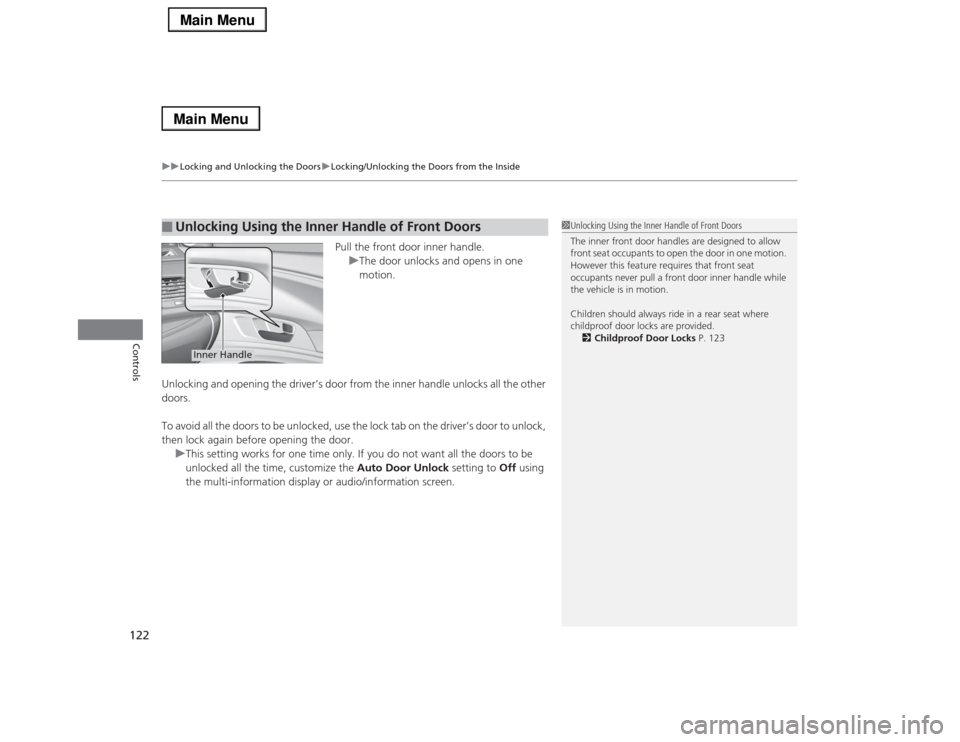
Pull the front door inner handle.
uThe door unlocks and opens in one
motion.
Unlocking and opening the driver’s door from the inner handle unlocks all the other
doors.
To avoid all the doors to be unlocked, use the lock tab on the driver’s door to unlock,
then lock again before opening the door.
uThis setting works for one time only. If you do not want all the doors to be
unlocked all the time, customize the Auto Door Unlock setting to Off using
the multi-information display or audio/information screen.
■
Unlocking Using the Inner Handle of Front Doors
1Unlocking Using the Inner Handle of Front Doors
The inner front door handles are designed to allow
front seat occupants to open the door in one motion.
However this feature requires that front seat
occupants never pull a front door inner handle while
the vehicle is in motion.
Children should always ride in a rear seat where
childproof door locks are provided.
2Childproof Door Locks P. 123
Inner Handle
Page 125 of 518
124
uuLocking and Unlocking the DoorsuAuto Door Locking/Unlocking
Controls
Auto Door Locking/UnlockingYour vehicle locks all doors and unlocks the driver’s door automatically when a
certain condition is met.■Drive lock mode
All doors lock when the vehicle’s speed reaches about 10 mph (15 km/h).■Driver’s door open mode
All doors unlock when the driver’s door is opened.■
Auto Door Locking
■
Auto Door Unlocking
1Auto Door Locking/Unlocking
You can turn off or change to another auto door
locking/unlocking setting using the audio/
information screen or multi-information display.
2Customized Features P. 102, 264