suspension Acura RLX 2017 Quick Guide
[x] Cancel search | Manufacturer: ACURA, Model Year: 2017, Model line: RLX, Model: Acura RLX 2017Pages: 73, PDF Size: 7.37 MB
Page 61 of 73

114 || 115
MAINTENANCE
MAINTENANCE
TABLE OF
CONTENTS
INDEX
VISUAL INDEX
VOICE COMMAND INDEX
SAFETY
INFORMATION
CLIENT
INFORMATION
INSTRUMENT PANEL
SPECIFICATIONS
VEHICLE
CONTROLS
MAINTENANCE
AUDIO AND
CONNECTIVITY
HANDLING THE UNEXPECTED
BLUETOOTH®
HANDSFREELINK®
DRIVING
ACURALINK®
NAVIGATION
Maintenance Minder Service Codes
These codes indicate what services are due on your vehicle.
*1: If a message Maintenance Due Now does not appear more than 12 months after the display is reset, change the engine oil every year.
#: See information on maintenance and emissions warranty.
CODEMaintenance Main Items
A�Replace engine oil*1
B�Replace engine oil*1 and oil �lte r
�Inspect front and rear brakes
�Check parking brake adjustment
�Inspect tie rod ends, steering gearbox, boots, and
drain plug
�Inspect suspension components
�Inspect driveshaft boots
�Inspect brake hoses and li nes (Including ABS/VSA)
�Inspect all �uid levels and condition of �uid s
�Inspect exhaust system#
�Inspect fuel lines and connections#
�Check expiration information for the Temporary Tire
*2: If you drive in dusty conditions, replace the air cleaner element every \
15,000 miles (24,000 km).
*3:If you drive primarily in urban areas that have high concentrations of s\
oot from industry and
diesel-powered vehicles, replace the dust and pollen �lter every 15,0\
00 miles (24,000 km).
*4:If you drive regularly in very high temperatures (over 110°F/43°C\
), in very low temperatures
(under -20°F/-29°C), replace every 60,000 miles/100,000 km.
CODEMaintenance Sub Items
1
�Rotate tires
2�Replace air cleaner element*2
�Replace dust and pollen �lte r*3
�Inspect drive belt
3
�Replace transmission �uid
4�Replace spark plugs
�Replace timing belt and inspect water pump*4
�Inspect valve clearance
5
�Replace engine coolan t
Repair Kit bottle
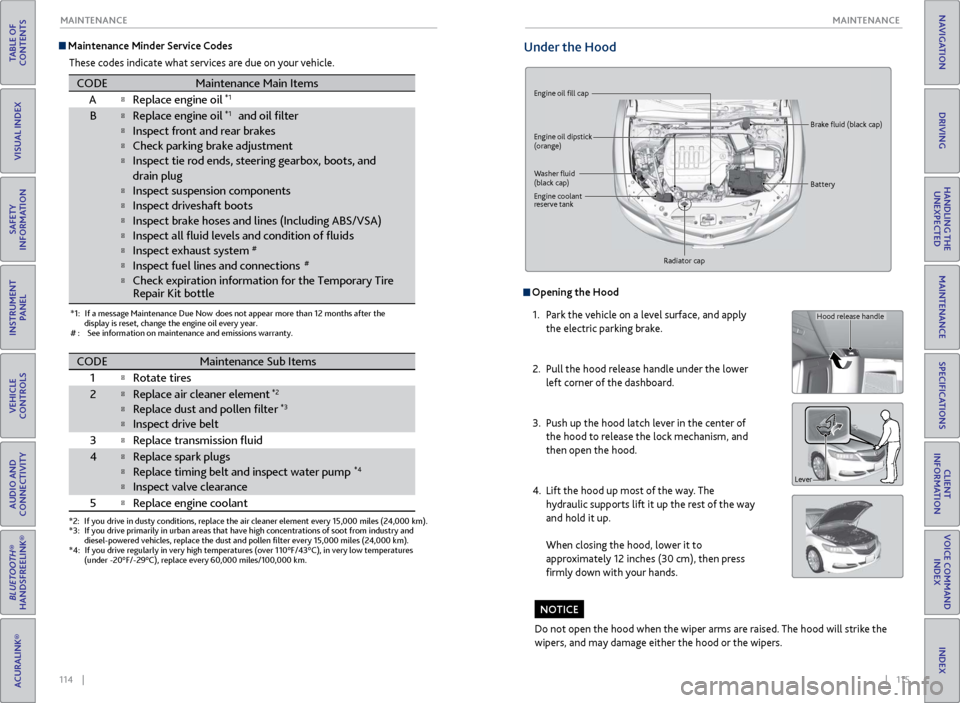
Under the Hood
Engine oil fill cap
Engine oil dipstick
(orange)
Washer fluid
(black cap) Brake fluid (black cap)
Engine coolant
reserve tank Radiator cap Battery
Opening the Hood
1.
P
ark the vehicle on a level surface, and apply
the electric parking brake.
2.
Pull
the hood release handle under the lower
left corner of the dashboard.
3.
Push up
the hood latch lever in the center of
the hood to release the lock mechanism, and
then open the hood.
4.
Lift the
hood up most of the way. The
hydraulic supports lift it up the rest of the way
and hold it up.
When closing the hood, lower it to
approximately 12 inches (30 cm), then press
firmly down with your hands.
Do not open the hood when the wiper arms are raised. The hood will strike the
wipers, and may damage either the hood or the wipers.
NOTICE
Hood release handle
Lever
Page 66 of 73

124 || 125
MAINTENANCE
MAINTENANCE
TABLE OF
CONTENTS
INDEX
VISUAL INDEX
VOICE COMMAND INDEX
SAFETY
INFORMATION
CLIENT
INFORMATION
INSTRUMENT PANEL
SPECIFICATIONS
VEHICLE
CONTROLS
MAINTENANCE
AUDIO AND
CONNECTIVITY
HANDLING THE UNEXPECTED
BLUETOOTH®
HANDSFREELINK®
DRIVING
ACURALINK®
NAVIGATION
Tire Service Life
The life of your tires is dependent on many factors, including driving habits, road
conditions, vehicle loading, inflation pressure, maintenance history, speed, and
environmental conditions (even when the tires are not in use).
In addition to regular inspections and inflation pressure maintenance, it is
recommended that you have annual inspections performed once the tires reach
five years old. All tires, including the spare, should be removed from service after
10 years from the date of manufacture, regardless of their condition or state of
wear.
Winter Tires
If driving on snowy or frozen roads, mount all season tires marked “M+S”, snow
tires, or tire chains; reduce speed; and maintain sufficient distance between
vehicles when driving. For winter tires, select the size and load ranges that are the
same as the original tires, and mount them to all four wheels.
Tire Chains
Install tire chains on the front tires only. Because your vehicle has limited tire
clearance, we strongly recommend using the following chains: Cable type: SCC
Radial Chain SC1040. Mount chains as tightly as you can, and make sure that
they do not touch the brake lines or suspension.
Using the wrong chains, or not properly installing chains, can damage the
brake lines and cause a crash in which you can be seriously injured or killed.
Follow all instructions in this guide regarding the selection and use of tire
chains.
WARNING
Traction devices that are the wrong size or improperly installed can damage
your vehicle’s brake lines, suspension, body, and wheels. Stop driving if they
are hitting any part of the vehicle.
NOTICE
Tire Labeling
The tires that came on your vehicle have a number of markings. Those you
should be aware of are described below.
Here is an example of what each marking means:
P245/40R19 98W
•
P: v
ehicle type (passenger)
•
2
45: tire width in millimeters
•
40: aspect ratio (tir
e section height as a
percentage of its width)
•
R:
tire construction code (radial)
•
19: rim
diameter in inches
•
98: load index (code indicating
maximum load
tire can carry)
•
W: speed symbol (code indicating
maximum speed rating)
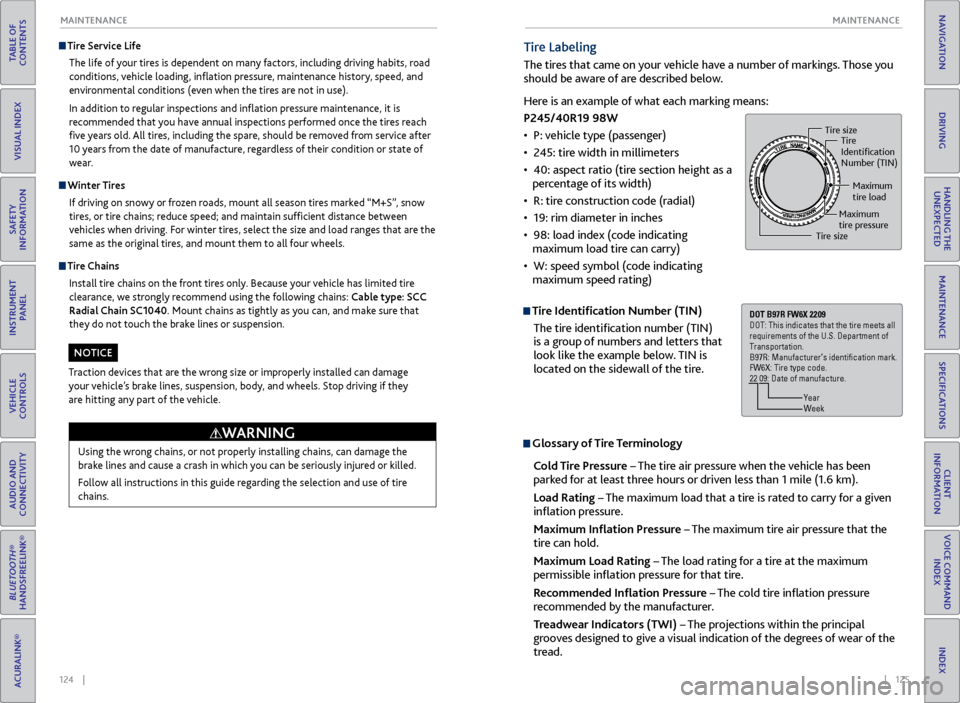
Tire Identification Number (TIN)
The tire identification number (TIN)
is a group of numbers and letters that
look like the example below. TIN is
located on the sidewall of the tire.
Glossary of Tire Terminology
Cold Tire Pressure – The tire air pressure when the vehicle has been
parked for at least three hours or driven less than 1 mile (1.6 km).
Load Rating – The maximum load that a tire is rated to carry for a given
inflation pressure.
Maximum Inflation Pressure – The maximum tire air pressure that the
tire can hold.
Maximum Load Rating – The load rating for a tire at the maximum
permissible inflation pressure for that tire.
Recommended Inflation Pressure – The cold tire inflation pressure
recommended by the manufacturer.
Treadwear Indicators (TWI) – The projections within the principal
grooves designed to give a visual indication of the degrees of wear of the
tread.
Tire size Tire
Identi�cation
Number (TIN)
Maximum
tire load
Maximum
tire pressure
Tire size
DOT B97R FW6X 2209
DOT: This indicates that the tire meets all
requirements of the U.S. Department of
Transportation.
B97R: Manufacturer’s identi�cation mark.
FW6X: Tire type code.
22 09: Date of manufacture.
Year
Week