traction control Acura RLX 2017 Quick Guide
[x] Cancel search | Manufacturer: ACURA, Model Year: 2017, Model line: RLX, Model: Acura RLX 2017Pages: 73, PDF Size: 7.37 MB
Page 32 of 73
| 57
INDEX
VOICE COMMAND INDEX
CLIENT
INFORMATION
SPECIFICATIONS
MAINTENANCE
HANDLING THE UNEXPECTED
DRIVING
NAVIGATION
56 |AUDIO AND CONNECTIVITY
TABLE OF
CONTENTS
VISUAL INDEX
SAFETY
INFORMATION
INSTRUMENT PANEL
VEHICLE
CONTROLS
AUDIO AND
CONNECTIVITY
BLUETOOTH®
HANDSFREELINK®
ACURALINK®
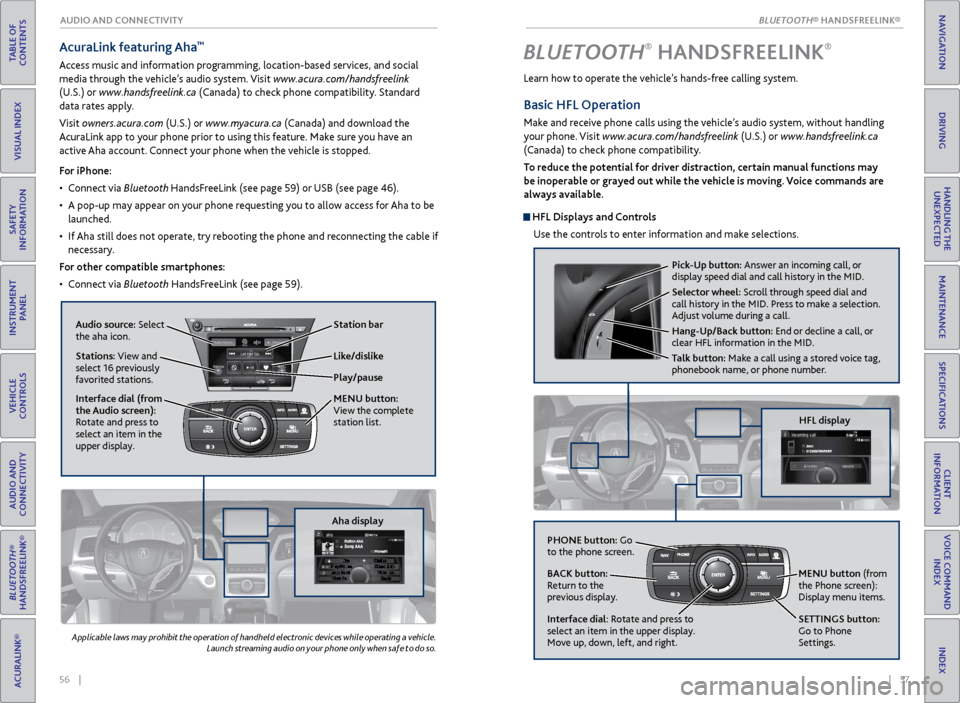
AcuraLink featuring Aha™
Access music and information programming, location-based services, and social
media through the vehicle’s audio system. Visit www.acura.com/handsfreelink
(U.S.) or www.handsfreelink.ca (Canada) to check phone compatibility. Standard
data rates apply.
Visit owners.acura.com (U.S.) or www.myacura.ca (Canada) and download the
AcuraLink app to your phone prior to using this feature. Make sure you have an
active Aha account. Connect your phone when the vehicle is stopped.
Applicable laws may prohibit the operation of handheld electronic devices while operating a vehicle. Launch streaming audio on your phone only when safe to do so.
For iPhone:
•
C
onnect via Bluetooth HandsFreeLink (see page 59) or USB (see page 46).
•
A pop-up may appear
on your phone requesting you to allow access for Aha to be
launched.
•
If
Aha still does not operate, try rebooting the phone and reconnecting the cable if
necessary.
For other compatible smartphones:
•
C
onnect via Bluetooth HandsFreeLink (see page 59).
Aha display
Audio source: Select
the aha icon.
Stations: View and
select 16 previously
favorited stations.
Interface dial (from
the Audio screen):
Rotate and press to
select an item in the
upper display.
Play/pause Station bar
Like/dislike
MENU
button:
View the complete
station list.
BLUETOOTH® HANDSFREELINK®
Learn how to operate the vehicle’s hands-free calling system.
Basic HFL Operation
Make and receive phone calls using the vehicle’s audio system, without handling
your phone. Visit www.acura.com/handsfreelink (U.S.) or www.handsfreelink.ca
(Canada) to check phone compatibility.
To reduce the potential for driver distraction, certain manual functions may
be inoperable or grayed out while the vehicle is moving. Voice commands are
always available.
HFL Displays and Controls
Use the controls to enter information and make selections.
Pick-Up button: Answer an incoming call, or
display speed dial and call history in the MID.
Selector wheel: Scroll through speed dial and
call history in the MID. Press to make a selection.
Adjust volume during a call.
Hang-Up/Back button: End or decline a call, or
clear HFL information in the MID.
Talk button: Make a call using a stored voice tag,
phonebook name, or phone number.
PHONE button: Go
to the phone screen.
BACK button:
Return to the
previous display.
Interface dial: Rotate and press to
select an item in the upper display.
Move up, down, left, and right. MENU button (from
the Phone screen):
Display menu items.
SETTINGS button:
Go to Phone
Settings.
HFL display
BLUETOOTH® HANDSFREELINK®
BLUETOOTH® HANDSFREELINK®
Page 37 of 73
66 || 67
NAVIGATION
NAVIGATION
TABLE OF
CONTENTS
INDEX
VISUAL INDEX
VOICE COMMAND INDEX
SAFETY
INFORMATION
CLIENT
INFORMATION
INSTRUMENT PANEL
SPECIFICATIONS
VEHICLE
CONTROLS
MAINTENANCE
AUDIO AND
CONNECTIVITY
HANDLING THE UNEXPECTED
BLUETOOTH®
HANDSFREELINK®
DRIVING
ACURALINK®
NAVIGATION
Learn how to enter a destination and operate the navigation system.
Basic Navigation Operation
A real-time navigation system uses GPS and a map database to show your current
location and help guide you to a desired destination. You can operate the system
using voice commands or the system controls.
To reduce the potential for driver distraction, certain manual functions may
be inoperable or grayed out while the vehicle is moving. Voice commands are
always available.
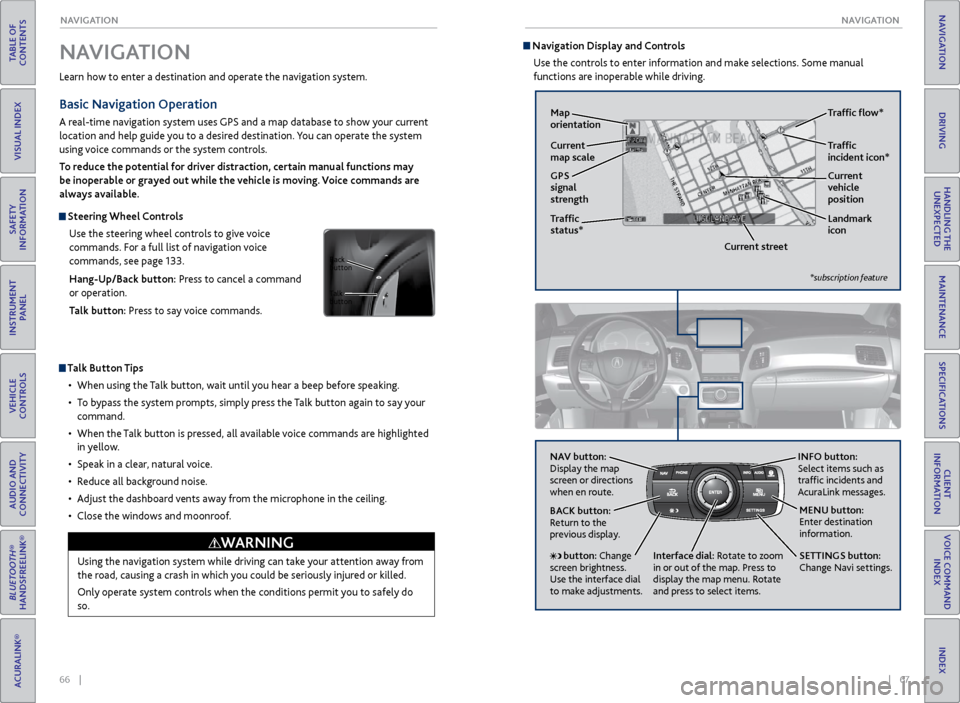
Steering Wheel Controls
Use the steering wheel controls to give voice
commands. For a full list of navigation voice
commands, see page 133.
Hang-Up/Back button: Press to cancel a command
or operation.
Talk button: Press to say voice commands.
Talk Button Tips
•
When using
the Talk button, wait until you hear a beep before speaking.
•
T
o bypass the system prompts, simply press the Talk button again to say your
command.
•
When
the Talk button is pressed, all available voice commands are highlighted
in yellow.
•
Speak in a clear
, natural voice.
•
R
educe all background noise.
•
A
djust the dashboard vents away from the microphone in the ceiling.
•
Close
the windows and moonroof.
Using the navigation system while driving can take your attention away from
the road, causing a crash in which you could be seriously injured or killed.
Only operate system controls when the conditions permit you to safely do
so.
WARNING
NAVIGATION
Talk
button Back
button
Navigation Display and Controls Use the controls to enter information and make selections. Some manual
functions are inoperable while driving.
NAV button:
Display the map
screen or directions
when en route. INFO
button:
Select items such as
traffic incidents and
AcuraLink messages.
BACK button:
Return to the
previous display.
SETTINGS button:
Change Navi settings. MENU button:
Enter destination
information.
button: Change
screen brightness.
Use the interface dial
to make adjustments. Interface dial:
Rotate to zoom
in or out of the map. Press to
display the map menu. Rotate
and press to select items.
GPS
signal
strength Traffic
incident icon*
Traffic
status* Traffic flow*
Current
map scale Current
vehicle
position
Map
orientation
Current streetLandmark
icon
*subscription feature
Page 48 of 73
88 || 89
DRIVING
DRIVING
TABLE OF
CONTENTS
INDEX
VISUAL INDEX
VOICE COMMAND INDEX
SAFETY
INFORMATION
CLIENT
INFORMATION
INSTRUMENT PANEL
SPECIFICATIONS
VEHICLE
CONTROLS
MAINTENANCE
AUDIO AND
CONNECTIVITY
HANDLING THE UNEXPECTED
BLUETOOTH®
HANDSFREELINK®
DRIVING
ACURALINK®
NAVIGATION
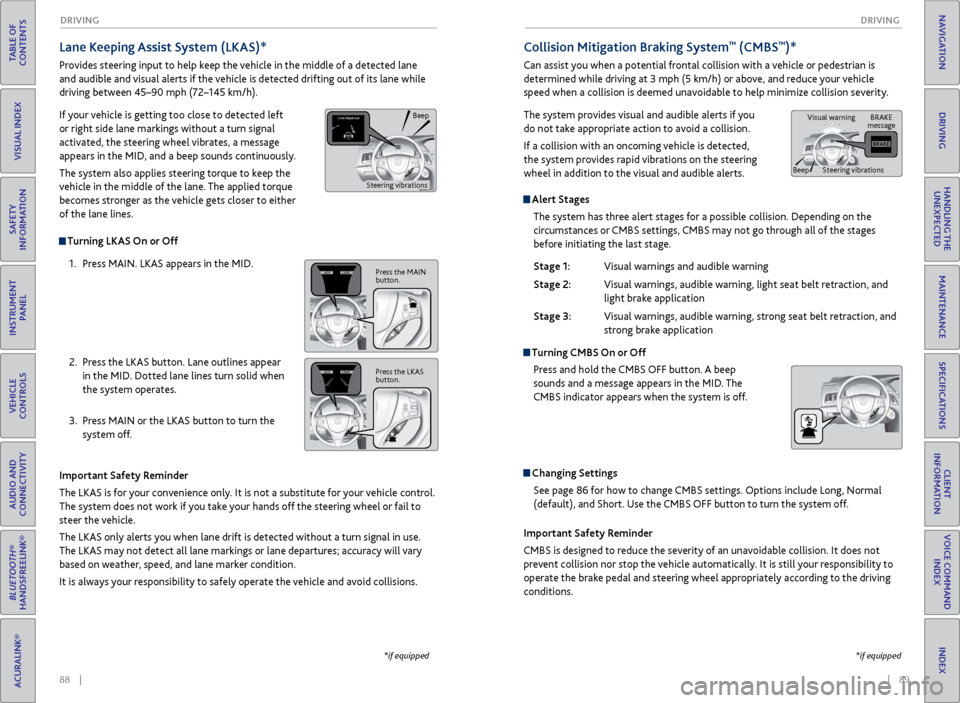
Alert Stages
The system has three alert stages for a possible collision. Depending on the
circumstances or CMBS settings, CMBS may not go through all of the stages
before initiating the last stage.
Stage 1:
Visual warnings
and audible warning
Stage 2:
Visual
warnings, audible warning, light seat belt retraction, and
light brak
e application
Stage 3:
Visual
warnings, audible warning, strong seat belt retraction, and
str
ong brake application
Turning CMBS On or OffPress and hold the CMBS OFF button. A beep
sounds and a message appears in the MID. The
CMBS indicator appears when the system is off.
Changing SettingsSee page 86 for how to change CMBS settings. Options include Long, Normal
(default), and Short. Use the CMBS OFF button to turn the system off.
Lane Keeping Assist System (LKAS)*
Provides steering input to help keep the vehicle in the middle of a detected lane
and audible and visual alerts if the vehicle is detected drifting out of its lane while
driving between 45–90 mph (72–145 km/h).
If your vehicle is getting too close to detected left
or right side lane markings without a turn signal
activated, the steering wheel vibrates, a message
appears in the MID, and a beep sounds continuously.
The system also applies steering torque to keep the
vehicle in the middle of the lane. The applied torque
becomes stronger as the vehicle gets closer to either
of the lane lines.
Important Safety Reminder
The LKAS is for your convenience only. It is not a substitute for your vehicle control.
The system does not work if you take your hands off the steering wheel or fail to
steer the vehicle.
The LKAS only alerts you when lane drift is detected without a turn signal in use.
The LKAS may not detect all lane markings or lane departures; accuracy will vary
based on weather, speed, and lane marker condition.
It is always your responsibility to safely operate the vehicle and avoid collisions.
Turning LKAS On or Off
1.
Pr
ess MAIN. LKAS appears in the MID.
2.
Pr
ess the LKAS button. Lane outlines appear
in the MID. Dotted lane lines turn solid when
the system operates.
3.
Pr
ess MAIN or the LKAS button to turn the
system off.
*if equipped
Collision Mitigation Braking System™ (CMBS™)*
Can assist you when a potential frontal collision with a vehicle or pedestrian is
determined while driving at 3 mph (5 km/h) or above, and reduce your vehicle
speed when a collision is deemed unavoidable to help minimize collision severity.
The system provides visual and audible alerts if you
do not take appropriate action to avoid a collision.
If a collision with an oncoming vehicle is detected,
the system provides rapid vibrations on the steering
wheel in addition to the visual and audible alerts.
Important Safety Reminder
CMBS is designed to reduce the severity of an unavoidable collision. It does not
prevent collision nor stop the vehicle automatically. It is still your responsibility to
operate the brake pedal and steering wheel appropriately according to the driving
conditions.
*if equipped
Beep
Steering vibrations
Press the MAIN
button.
Press the LKAS
button.
BRAKE
message
Beep Visual warning
Steering vibrations
Page 50 of 73
92 || 93
DRIVING
DRIVING
TABLE OF
CONTENTS
INDEX
VISUAL INDEX
VOICE COMMAND INDEX
SAFETY
INFORMATION
CLIENT
INFORMATION
INSTRUMENT PANEL
SPECIFICATIONS
VEHICLE
CONTROLS
MAINTENANCE
AUDIO AND
CONNECTIVITY
HANDLING THE UNEXPECTED
BLUETOOTH®
HANDSFREELINK®
DRIVING
ACURALINK®
NAVIGATION
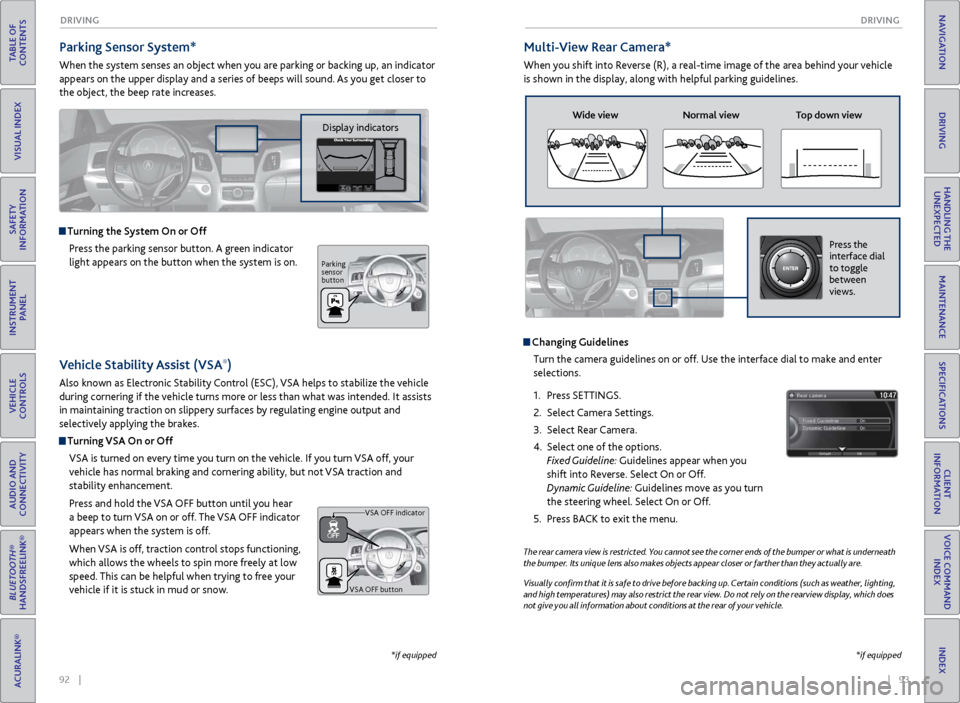
Parking Sensor System*
When the system senses an object when you are parking or backing up, an indicator
appears on the upper display and a series of beeps will sound. As you get closer to
the object, the beep rate increases.
Turning the System On or Off
Press the parking sensor button. A green indicator
light appears on the button when the system is on.
*if equipped
Multi-View Rear Camera*
When you shift into Reverse (R), a real-time image of the area behind your vehicle
is shown in the display, along with helpful parking guidelines.
The rear camera view is restricted. You cannot see the corner ends of the bumper or what is underneath
the bumper. Its unique lens also makes objects appear closer or farther than they actually are.
Visually confirm that it is safe to drive before backing up. Certain conditions (such as weather, lighting,
and high temperatures) may also restrict the rear view. Do not rely on the rearview display, which does
not give you all information about conditions at the rear of your vehicle.
Changing GuidelinesTurn the camera guidelines on or off. Use the interface dial to make and enter
selections.
1.
Pr
ess SETTINGS.
2.
Select Camera
Settings.
3.
Select
Rear Camera.
4.
Select one of the options.
Fixed Guideline: Guidelines appear when you
shift into Reverse. Select On or Off.
Dynamic Guideline: Guidelines move as you turn
the steering wheel. Select On or Off.
5.
Pr
ess BACK to exit the menu.
Wide view Normal view Top down view
Press the
interface dial
to toggle
between
views.
*if equipped
Vehicle Stability Assist (VSA®)
Also known as Electronic Stability Control (ESC), VSA helps to stabilize the vehicle
during cornering if the vehicle turns more or less than what was intended. It assists
in maintaining traction on slippery surfaces by regulating engine output and
selectively applying the brakes.
Turning VSA On or Off
VSA is turned on every time you turn on the vehicle. If you turn VSA off, your
vehicle has normal braking and cornering ability, but not VSA traction and
stability enhancement.
Press and hold the VSA
OFF button until
you hear
a beep to turn VSA on or off. The VSA OFF indicator
appears when the system is off.
When VSA is off, traction control stops functioning,
which allows the wheels to spin more freely at low
speed. This can be helpful when trying to free your
vehicle if it is stuck in mud or snow.
VSA OFF button VSA OFF indicator
Display indicators
Parking
sensor
button
Page 65 of 73
122 || 123
MAINTENANCE
MAINTENANCE
TABLE OF
CONTENTS
INDEX
VISUAL INDEX
VOICE COMMAND INDEX
SAFETY
INFORMATION
CLIENT
INFORMATION
INSTRUMENT PANEL
SPECIFICATIONS
VEHICLE
CONTROLS
MAINTENANCE
AUDIO AND
CONNECTIVITY
HANDLING THE UNEXPECTED
BLUETOOTH®
HANDSFREELINK®
DRIVING
ACURALINK®
NAVIGATION
Tire Information
To safely operate your vehicle, your tires must be of the proper type and size, in
good condition with adequate tread, and properly inflated.
Inflation Guidelines
•
Pr
operly inflated tires provide the best combination of handling, tread life, and
comfort. Refer to the driver’s doorjamb label or the specifications (see page
129) for the specified pressure.
•
Underinflated
tires wear unevenly, adversely affect handling and fuel economy,
and are more likely to fail from overheating.
•
Ov
erinflated tires make your vehicle ride harshly, are more prone to road
hazards, and wear unevenly.
•
Ev
ery day before you drive, look at each of the tires. If one looks lower than the
others, check the pressure with a tire gauge.
•
Measur
e the air pressure when tires are cold. This means the vehicle has been
parked for at least 3 hours, or driven less than 1 mile (1.6 km). If necessary, add
or release air until the specified pressure is reached. If checked when hot, tire
pressure can be as much as 4-6 psi (30-40 kPa, 0.3-0.5 kgf/cm
2) higher than
checked when cold.
•
A
t least once a month or before long trips, use a gauge to measure the pressure
in all tires, including the spare. Even tires in good condition can lose 1-2 psi
(10-20 kPa, 0.1-0.2 kgf/cm
2) per month.
Inspection Guidelines
Every time you inflate the tires, check for the following:
•
An
y damage to tires, including bumps, bulges, cuts, splits, or cracks in the side
or tread. Remove any foreign objects and inspect for air leaks. Replace tires if
you see fabric or cord.
•
Unev
en or excessive tread wear. Have a dealer check the wheel alignment.
•
Cracks or other damage
around the valve stems.
Wear IndicatorsThe groove where the wear indicator is located is
1/16 inch (1.6 mm) shallower than elsewhere on the
tire. If the tread has worn so low that the indicator
is exposed, replace the tire. Worn out tires have
poor traction on wet roads.
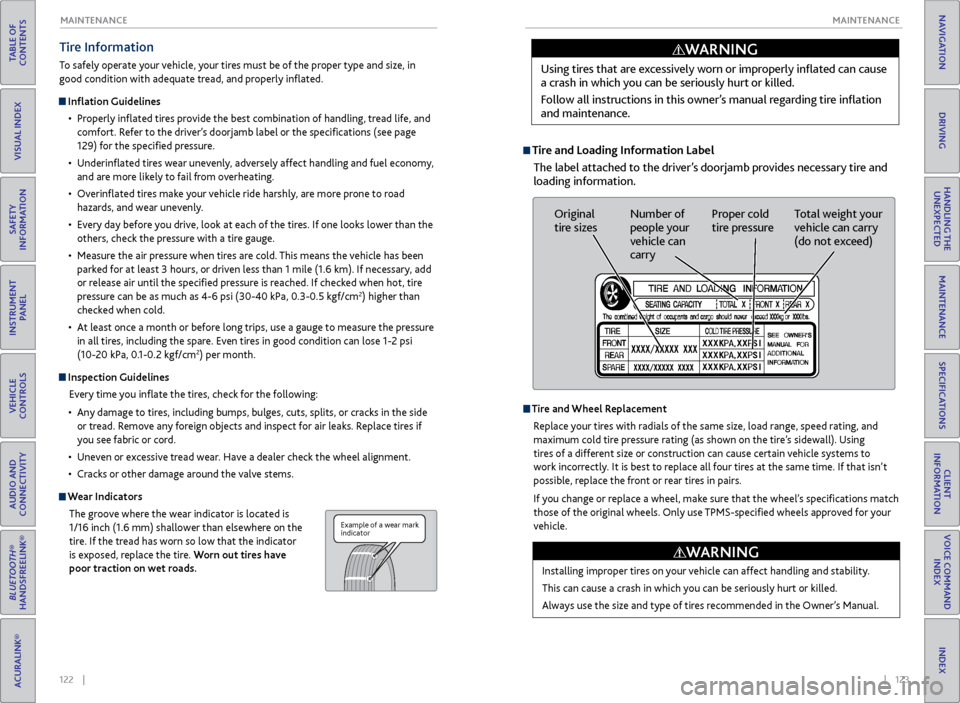
Example of a wear mark
indicator
Tire and Loading Information Label
The label attached to the driver’s doorjamb provides necessary tire and
loading information. Using tires that are excessively worn or improperly inflated can cause
a crash in which you can be seriously hurt or killed.
Follow all instructions in this owner’s manual regarding tire inflation
and maintenance.
WARNING
Original
tire sizes
Number of
people your
vehicle can
carry Proper cold
tire pressure
Total weight your
vehicle can carry
(do not exceed)
Tire and Wheel Replacement
Replace your tires with radials of the same size, load range, speed rating, and
maximum cold tire pressure rating (as shown on the tire’s sidewall). Using
tires of a different size or construction can cause certain vehicle systems to
work incorrectly. It is best to replace all four tires at the same time. If that isn’t
possible, replace the front or rear tires in pairs.
If you change or replace a wheel, make sure that the wheel’s specifications match
those of the original wheels. Only use TPMS-specified wheels approved for your
vehicle.
Installing improper tires on your vehicle can affect handling and stability.
This can cause a crash in which you can be seriously hurt or killed.
Always use the size and type of tires recommended in the Owner’s Manual.
WARNING
Page 66 of 73
124 || 125
MAINTENANCE
MAINTENANCE
TABLE OF
CONTENTS
INDEX
VISUAL INDEX
VOICE COMMAND INDEX
SAFETY
INFORMATION
CLIENT
INFORMATION
INSTRUMENT PANEL
SPECIFICATIONS
VEHICLE
CONTROLS
MAINTENANCE
AUDIO AND
CONNECTIVITY
HANDLING THE UNEXPECTED
BLUETOOTH®
HANDSFREELINK®
DRIVING
ACURALINK®
NAVIGATION
Tire Service Life
The life of your tires is dependent on many factors, including driving habits, road
conditions, vehicle loading, inflation pressure, maintenance history, speed, and
environmental conditions (even when the tires are not in use).
In addition to regular inspections and inflation pressure maintenance, it is
recommended that you have annual inspections performed once the tires reach
five years old. All tires, including the spare, should be removed from service after
10 years from the date of manufacture, regardless of their condition or state of
wear.
Winter Tires
If driving on snowy or frozen roads, mount all season tires marked “M+S”, snow
tires, or tire chains; reduce speed; and maintain sufficient distance between
vehicles when driving. For winter tires, select the size and load ranges that are the
same as the original tires, and mount them to all four wheels.
Tire Chains
Install tire chains on the front tires only. Because your vehicle has limited tire
clearance, we strongly recommend using the following chains: Cable type: SCC
Radial Chain SC1040. Mount chains as tightly as you can, and make sure that
they do not touch the brake lines or suspension.
Using the wrong chains, or not properly installing chains, can damage the
brake lines and cause a crash in which you can be seriously injured or killed.
Follow all instructions in this guide regarding the selection and use of tire
chains.
WARNING
Traction devices that are the wrong size or improperly installed can damage
your vehicle’s brake lines, suspension, body, and wheels. Stop driving if they
are hitting any part of the vehicle.
NOTICE
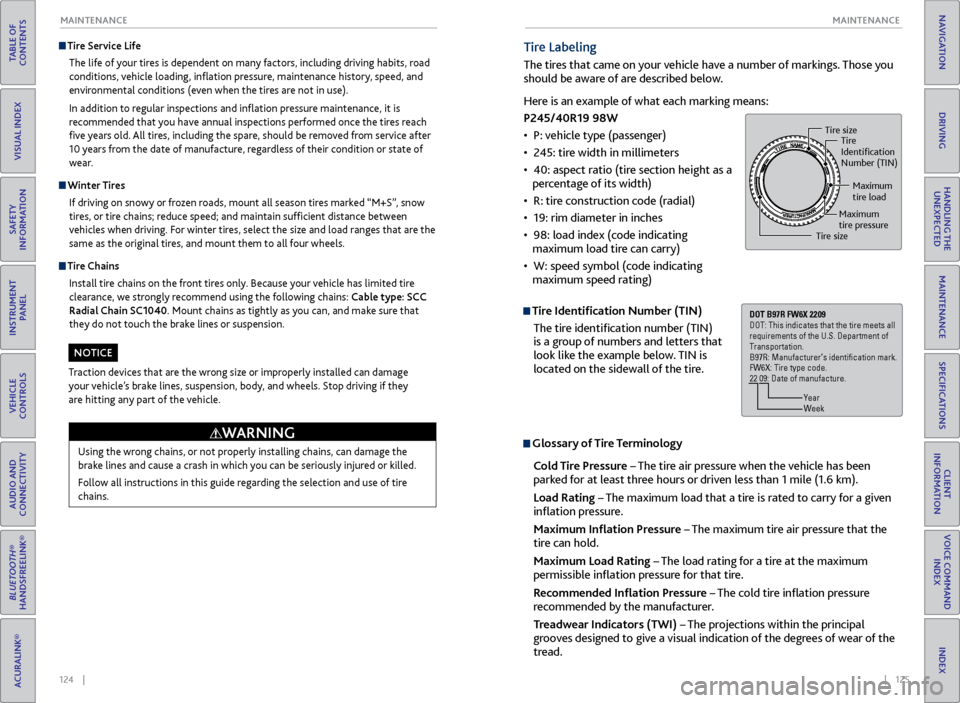
Tire Labeling
The tires that came on your vehicle have a number of markings. Those you
should be aware of are described below.
Here is an example of what each marking means:
P245/40R19 98W
•
P: v
ehicle type (passenger)
•
2
45: tire width in millimeters
•
40: aspect ratio (tir
e section height as a
percentage of its width)
•
R:
tire construction code (radial)
•
19: rim
diameter in inches
•
98: load index (code indicating
maximum load
tire can carry)
•
W: speed symbol (code indicating
maximum speed rating)
Tire Identification Number (TIN)
The tire identification number (TIN)
is a group of numbers and letters that
look like the example below. TIN is
located on the sidewall of the tire.
Glossary of Tire Terminology
Cold Tire Pressure – The tire air pressure when the vehicle has been
parked for at least three hours or driven less than 1 mile (1.6 km).
Load Rating – The maximum load that a tire is rated to carry for a given
inflation pressure.
Maximum Inflation Pressure – The maximum tire air pressure that the
tire can hold.
Maximum Load Rating – The load rating for a tire at the maximum
permissible inflation pressure for that tire.
Recommended Inflation Pressure – The cold tire inflation pressure
recommended by the manufacturer.
Treadwear Indicators (TWI) – The projections within the principal
grooves designed to give a visual indication of the degrees of wear of the
tread.
Tire size Tire
Identi�cation
Number (TIN)
Maximum
tire load
Maximum
tire pressure
Tire size
DOT B97R FW6X 2209
DOT: This indicates that the tire meets all
requirements of the U.S. Department of
Transportation.
B97R: Manufacturer’s identi�cation mark.
FW6X: Tire type code.
22 09: Date of manufacture.
Year
Week
Page 67 of 73
126 || 127
MAINTENANCE
MAINTENANCE
TABLE OF
CONTENTS
INDEX
VISUAL INDEX
VOICE COMMAND INDEX
SAFETY
INFORMATION
CLIENT
INFORMATION
INSTRUMENT PANEL
SPECIFICATIONS
VEHICLE
CONTROLS
MAINTENANCE
AUDIO AND
CONNECTIVITY
HANDLING THE UNEXPECTED
BLUETOOTH®
HANDSFREELINK®
DRIVING
ACURALINK®
NAVIGATION
DOT Tire Quality Grading
The tires on your vehicle meet all U.S. Federal Safety Requirements. All tires are
also graded for treadwear, traction, and temperature performance according to
Department of Transportation (DOT) standards. The following explains these
gradings.
Uniform Tire Quality Grading
Quality grades can be found where applicable on the tire sidewall between tread
shoulder and maximum section width.
For example:
Treadwear 200
Traction AA
Temperature A
All passenger car tires must conform to Federal Safety Requirements in addition
to these grades.
TreadwearThe treadwear grade is a comparative rating based on the wear rate of the tire
when tested under controlled conditions on a specified government test course.
For example, a tire graded 150 would wear one and one-half (1 1/2) times as
well on the government course as a tire graded 100. The relative performance of
tires depends upon the actual conditions of their use, however, and may depart
significantly from the norm due to variations in driving habits, service practices,
and differences in road characteristics and climate.
TractionThe traction grades, from highest to lowest, are AA, A, B, and C. Those grades
represent the tire’s ability to stop on wet pavement as measured under controlled
conditions on specified government test surfaces of asphalt and concrete. A tire
marked C may have poor traction performance.
WARNING: The traction grade assigned to this tire is based on straight-ahead
braking traction tests, and does not include acceleration, cornering, hydroplaning,
or peak traction characteristics.
TemperatureThe temperature grades are A (the highest), B, and C, representing the tire’s
resistance to the generation of heat and its ability to dissipate heat when
tested under controlled conditions on a specified indoor laboratory test wheel.
Sustained high temperature can cause the material of the tire to degenerate and
reduce tire life, and excessive temperature can lead to sudden tire failure. The
grade C corresponds to a level of performance which all passenger car tires must
meet under the Federal Motor Vehicle Safety Standard No. 109. Grades B and
A represent higher levels of performance on the laboratory test wheel than the
minimum required by law.
WARNING: The temperature grade for this tire is established for a tire that
is properly inflated and not overloaded. Excessive speed, underinflation, or
excessive loading, either separately or in combination, can cause heat buildup
and possible tire failure.
Page 69 of 73

130 || 131
CLIENT INFORMATION
CLIENT INFORMATION
TABLE OF
CONTENTS
INDEX
VISUAL INDEX
VOICE COMMAND INDEX
SAFETY
INFORMATION
CLIENT
INFORMATION
INSTRUMENT PANEL
SPECIFICATIONS
VEHICLE
CONTROLS
MAINTENANCE
AUDIO AND
CONNECTIVITY
HANDLING THE UNEXPECTED
BLUETOOTH®
HANDSFREELINK®
DRIVING
ACURALINK®
NAVIGATION
Learn about information specific to you as an Acura client and how to get help.
Frequently Asked Questions/Troubleshooting
Below are some frequently asked questions and troubleshooting items that you
may have about the vehicle.
Q:
Ho
w do I set the vehicle clock?
A:
Y
ou can adjust the clock time from the Settings menu (see page 41).
Q:
Wh
y doesn’t the vehicle start when I press the ENGINE START/STOP button?
A:
The brak
e pedal must be pressed to start the engine.
Q:
What is
the AUTO setting on my headlight lever?
A:
When in
the AUTO position, the vehicle’s exterior lights will automatically turn
on or off depending on the
ambient lighting.
Q:
Wh
y won’t the driver’s door unlock when I grab the door handle, even though the
k
eyless access remote is within range?
A:
If y
ou pull the handle too quickly, the system may not have time to confirm the
door is unlock
ed. Wait to hear a beep to confirm the door is unlocked. If you are
wearing glo
ves, the system may be slow to respond.
Q:
A
fter my battery was disconnected or went dead, the audio system is asking for a
code.
Where do I find this?
A:
In most cases,
you do not need to enter a code. Turn on the vehicle and the
audio system, and pr
ess and hold the power button until the system reactivates.
Q:
Wh
y can’t I select an item using the interface dial?
A:
T
o prevent driver distraction, certain items are limited are inoperable while the
v
ehicle is moving. Use voice commands or pull over to select the items.
Q:
Wher
e can I find the vehicle identification number (VIN)?
A:
Check the
label on the driver’s doorjamb.
Q:
Wh
y can’t I operate Pandora through the audio system?
A:
Audio may be str
eaming through Bluetooth Audio. Make sure Pandora mode
is selected and
the phone cable is properly connected to the USB adapter (if
applicable).
Some phones may prompt you to “Allow” a connection.
Q:
Is m
y phone compatible with Bluetooth features?
A:
Visit www.acura.com/handsfreelink (U.S) or www.handsfreelink.ca (Canada) to
check phone compatibility
for Bluetooth Audio, Bluetooth HandsFreeLink,
and
SMS text messaging and/or e-mail.
CLIENT INFORMATION
Contact Us
Acura dealer personnel are trained professionals. They should be able to answer
all your questions. If you encounter a problem that your dealership does not solve
to your satisfaction, please discuss it with the dealership’s service manager or
general manager. If you are dissatisfied with the decision made by the dealership’s
management, contact Acura Client Relations/Services.U.S. owners:
American Honda Motor Co., Inc.
Acura Client Relations
1919 Torrance Blvd.
Mail Stop 500-2N-7E
Torrance, CA 90501-2746
Tel: (800) 382-2238
In Puerto Rico and
the U.S. Virgin Islands:
Bella International
P.O. Box 190816
San Juan, PR 00919-0816
Tel: (787) 620-7546 Canadian owners:
Honda Canada, Inc.
Acura Client Services
180 Honda Blvd.
Markham, ON
L6C 0H9
Tel: (888) 922-8729
Fax: (877) 939-0909
E-Mail: [email protected]
Q:
Ev
ery time I press the Talk button, the system gives me voice prompts. Can I turn
these of
f?
A:
Pr
ess SETTINGS. Use the interface dial to select System Settings then Voice
Pr
ompt. Select Off.
When you call or write, please give us the following information:
• Vehicle Identification Number
• Date of purchase
• Odometer reading of your vehicle
• Your name, address, and telephone number
• A detailed description of the problem
• Name of the dealer who sold the vehicle to you
EPA Contact Information
An owner may obtain further
information concerning emission
warranties or report violations of the
terms of the emission warranties by
contacting: U.S. Environmental Protection Agency
Office of Transportation and Air Quality
Compliance Division,
Light-Duty Vehicles Group
Attn: Warranty Complaints
2000 Traverwood Drive
Ann Arbor, MI 48105
Email: [email protected]
Page 73 of 73
138 || 139
INDEX
INDEX
TABLE OF
CONTENTS
INDEX
VISUAL INDEX
VOICE COMMAND INDEX
SAFETY
INFORMATION
CLIENT
INFORMATION
INSTRUMENT PANEL
SPECIFICATIONS
VEHICLE
CONTROLS
MAINTENANCE
AUDIO AND
CONNECTIVITY
HANDLING THE UNEXPECTED
BLUETOOTH®
HANDSFREELINK®
DRIVING
ACURALINK®
NAVIGATION
Remote Battery Strength ..................................... 98
R emote Engine Start .............................................. 76
Remote Transmitter
............................................... 28
Reporting Safety Defects
......................................21
Reserve Tank
.......................................................... 119
Reverse Tilt Door Mirrors
.....................................40
Right selector wheel
.............................................. 26
Road Departure Mitigation indicator
.................23
Road Departure Mitigation (RDM) System
......90
Roadside Assistance
...................................... 63, 132
Routing
..................................................................... 71
Safety Information
................................................... 3
Carbon Monoxide Gas
..........................................4
Child Safety ........................................................... 14
Reporting Safety Defects
...................................21
Safety Label Locations
........................................20
Safety Messages
.................................................... 3
Safety Label Locations
..........................................20
Seat Belt Inspection
................................................. 6
Seat belt reminder indicator
................................24
Seat Belts
................................................................... 5
Adjusting the Shoulder Anchor
...........................7
Fastening a Seat Belt
............................................. 7
Lap/Shoulder Seat Belts
.......................................5
Seat Belt Inspection
.............................................. 6
Seat belt reminder indicator
.............................24
Seat Heaters and
Ventilation
...............................45
Seats
........................................................................\
.. 36
Front Seats
............................................................ 36
Head Restraints
.................................................... 37
Seat Ventilation
...................................................... 45
Security Features
.................................................... 65
Selector wheel
........................................... 26, 47, 57
Sequential Shift Mode
........................................... 79
Service Codes
........................................................ 114
Settings
............................................................... 27, 41
Setting the Clock
.................................................... 41
Shifting
..................................................................... 78
Sequential Shift Mode
........................................79
Shift Lever
............................................................. 78
Shift Lever
................................................................ 78
Shift Lever Does Not Move
.................................98
Shoulder Anchor
....................................................... 7
Side Airbags
............................................................... 9
Side Curtain Airbags
................................................. 9
SiriusXM
® Radio ...................................................... 50
SiriusXM® Radio Commands .............................. 134
SMS T
ext Messaging .............................................. 63
Song By Voice
™ Commands ................................134
Sound
........................................................................\
47
SOURCE button
...................................................... 47
Spare Tire*
............................................................. 105Specifications
........................................................
129
Engine and Fuel ..................................................
129
Fluids ....................................................................
129
Light Bulbs...........................................................129
Tires ......................................................................
129
Vehicle .................................................................
129
Speed Dial .........................................................
61, 62
SPORT Mode ...........................................................
78
SPORT Mode indicator ..........................................
25
SRS indicator ....................................................
10, 23
Steering Wheel ........................................................39
Steering Wheel and Nearby Controls ...................
1
Steering Wheel Controls
................................
47
, 66
Street Address .........................................................
69
Supplemental Restraint System indicator.........23
Surround View Camera
........................................
94
S
ystem Guidance Volume
.................................... 68
System message indicator ....................................
24
Talk button ........................................................
57, 66
Talk button tips ................................................
58, 66
Text Messaging .......................................................
63
Tire Chains .............................................................
124
Tire Information ....................................................
122
DOT Tire Quality Grading
................................
126
Inflation Guidelines
...........................................
122
Inspection Guidelines .......................................
122
Tire and Loading Information Label ...............
123
Tire and Wheel Replacement ..........................
123
Tire Chains ...........................................................
124
Tire Service Life ..................................................
124
Tire Terminology ................................................
125
Wear Indicators ..................................................
122
Winter Tires .........................................................
124
Tire Labeling ..........................................................
125
Tire Identification Number (TIN)
...................
125
Tir
e Pressure Monitoring System indicator .......
23
Tire Pressure Monitoring System (TPMS) 102, 103
Tire Repair Kit .......................................................
104
Tires ........................................................................\
.
129
Tire Service Life .....................................................
124
TPMS indicator ........................................................
23
Traction...................................................................126
Traffic ........................................................................\
72
Treadwear ..............................................................
126
TRIP button ..............................................................
26
Troubleshooting ....................................................130
Trunk ........................................................................\
.
29
Trunk Release Button ............................................
30
Turn-by-Turn Directions........................................ 71
Turn Signal ..............................................................34
Turn signal indicator
..............................................25
Under the Hood
....................................................115
Unlocking the Doors
..............................................29
USB Commands
....................................................134
USB Flash Drive
.......................................................51USB Port
..................................................................
46
Vehicle Controls ......................................................28
Vehicle Settings ......................................................
27
Vehicle Specs .........................................................
129
Vehicle Stability Assist system indicator ...........
23
Vehicle Stability Assist (VSA
®) ............................. 92
Visual Index
................................................................ 1
Voice Command Index
........................................ 133
Voice Prompt
.......................................................... 68
VSA indicator
................................................... 23, 25
VSA off indicator
.................................................... 25
Warranty Coverages
............................................ 1
32
Wear Indicators
..................................................... 122
Window
.................................................................... 31
Window Washer Fluid
......................................... 120
Winter Tires
........................................................... 124
Wiper
....................................................................... 34
Automatic Rain-Sensing Wipers
....................... 35
Headlight-Wiper Integration
........................... 34
Intermittent Wipers
........................................... 34
Wiper Blades
......................................................... 121