wiring ACURA TL 1995 Service Repair Manual
[x] Cancel search | Manufacturer: ACURA, Model Year: 1995, Model line: TL, Model: ACURA TL 1995Pages: 1771, PDF Size: 62.49 MB
Page 53 of 1771
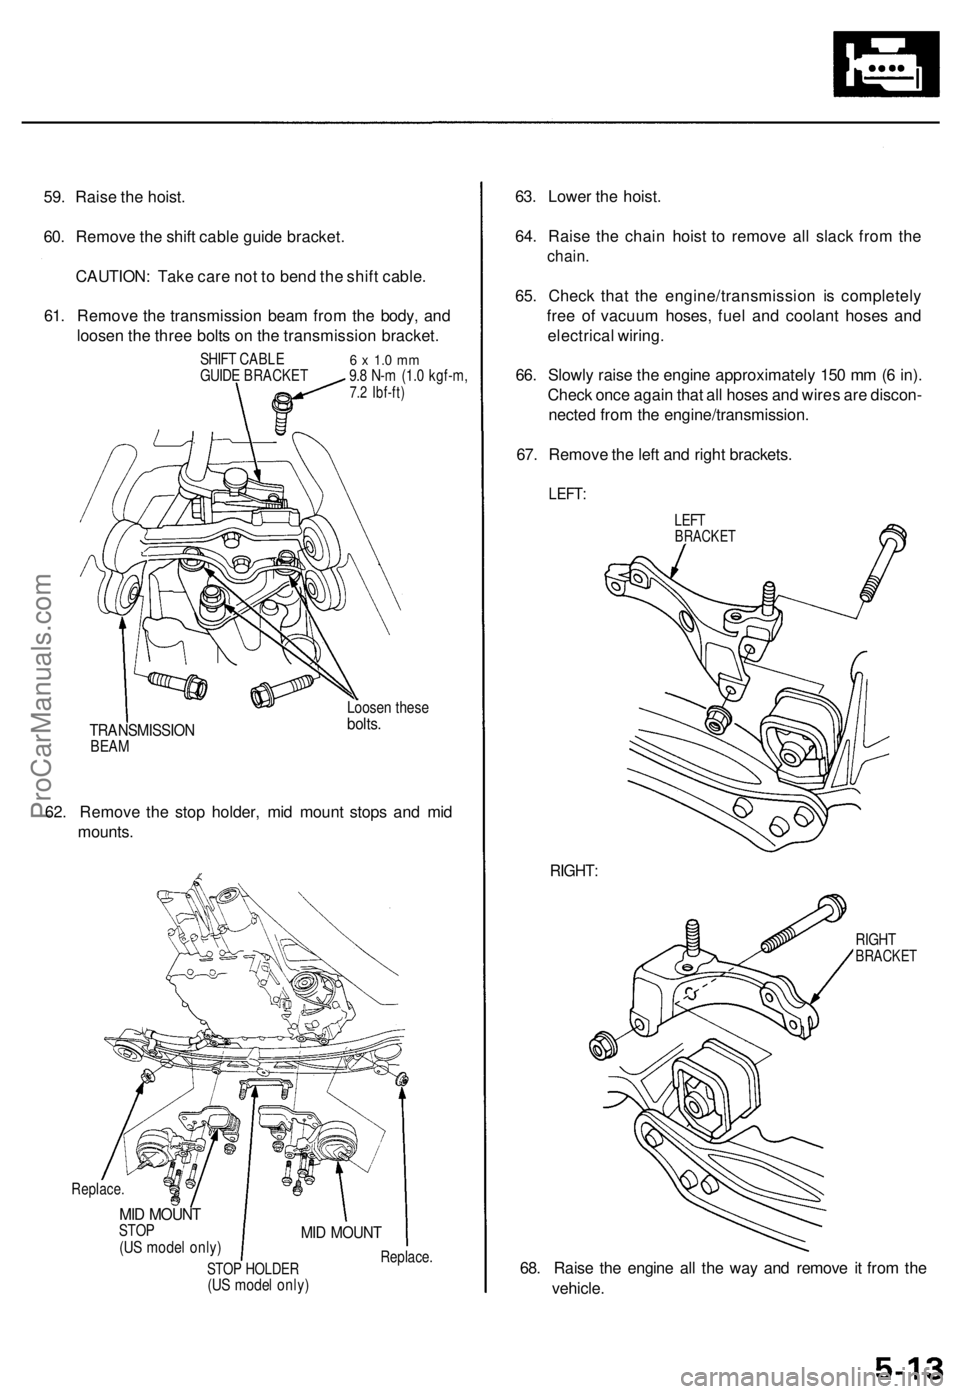
59. Raise the hoist.
60. Remove the shift cable guide bracket.
CAUTION: Take care not to bend the shift cable.
61. Remove the transmission beam from the body, and
loosen the three bolts on the transmission bracket.
SHIFT CABLE
GUIDE BRACKET
6 x 1.0 mm
9.8 N-m (1.0 kgf-m,
7.2 Ibf-ft)
TRANSMISSION
BEAM
Loosen these
bolts.
62. Remove the stop holder, mid mount stops and mid
mounts.
Replace.
MID MOUNT
STOP
(US model only)
STOP HOLDER
(US model only)
MID MOUNT
Replace.
63. Lower the hoist.
64. Raise the chain hoist to remove all slack from the
chain.
65. Check that the engine/transmission is completely
free of vacuum hoses, fuel and coolant hoses and
electrical wiring.
66. Slowly raise the engine approximately 150 mm (6 in).
Check once again that all hoses and wires are discon-
nected from the engine/transmission.
67. Remove the left and right brackets.
LEFT:
LEFT
BRACKET
RIGHT:
RIGHT
BRACKET
68. Raise the engine all the way and remove it from the
vehicle.ProCarManuals.com
Page 543 of 1771
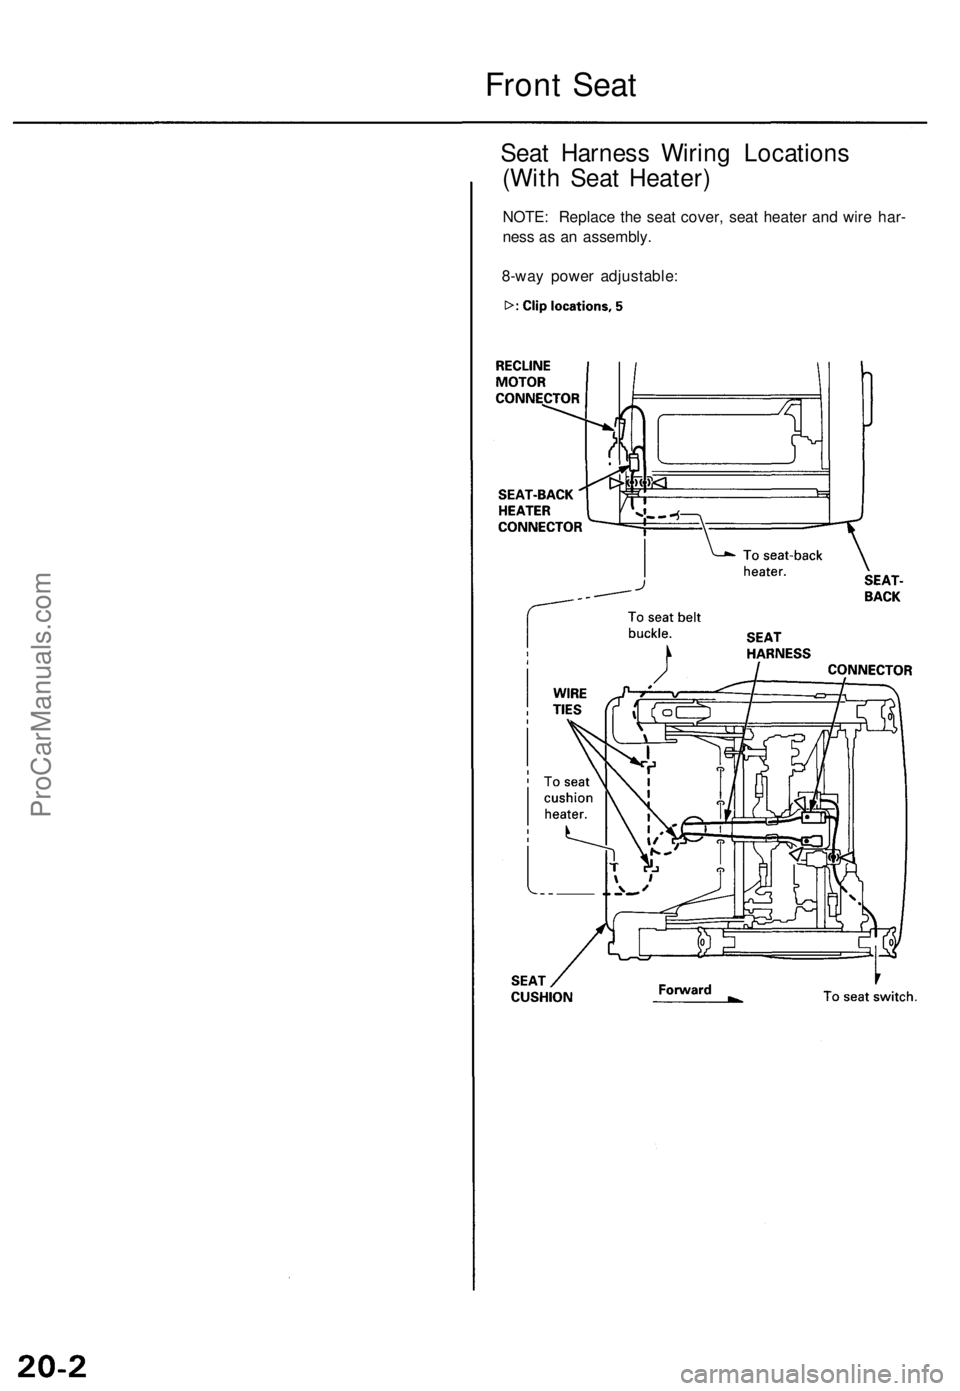
Front Seat
Seat Harness Wiring Locations
(With Seat Heater)
NOTE: Replace the seat cover, seat heater and wire har-
ness as an assembly.
8-way power adjustable:ProCarManuals.com
Page 561 of 1771
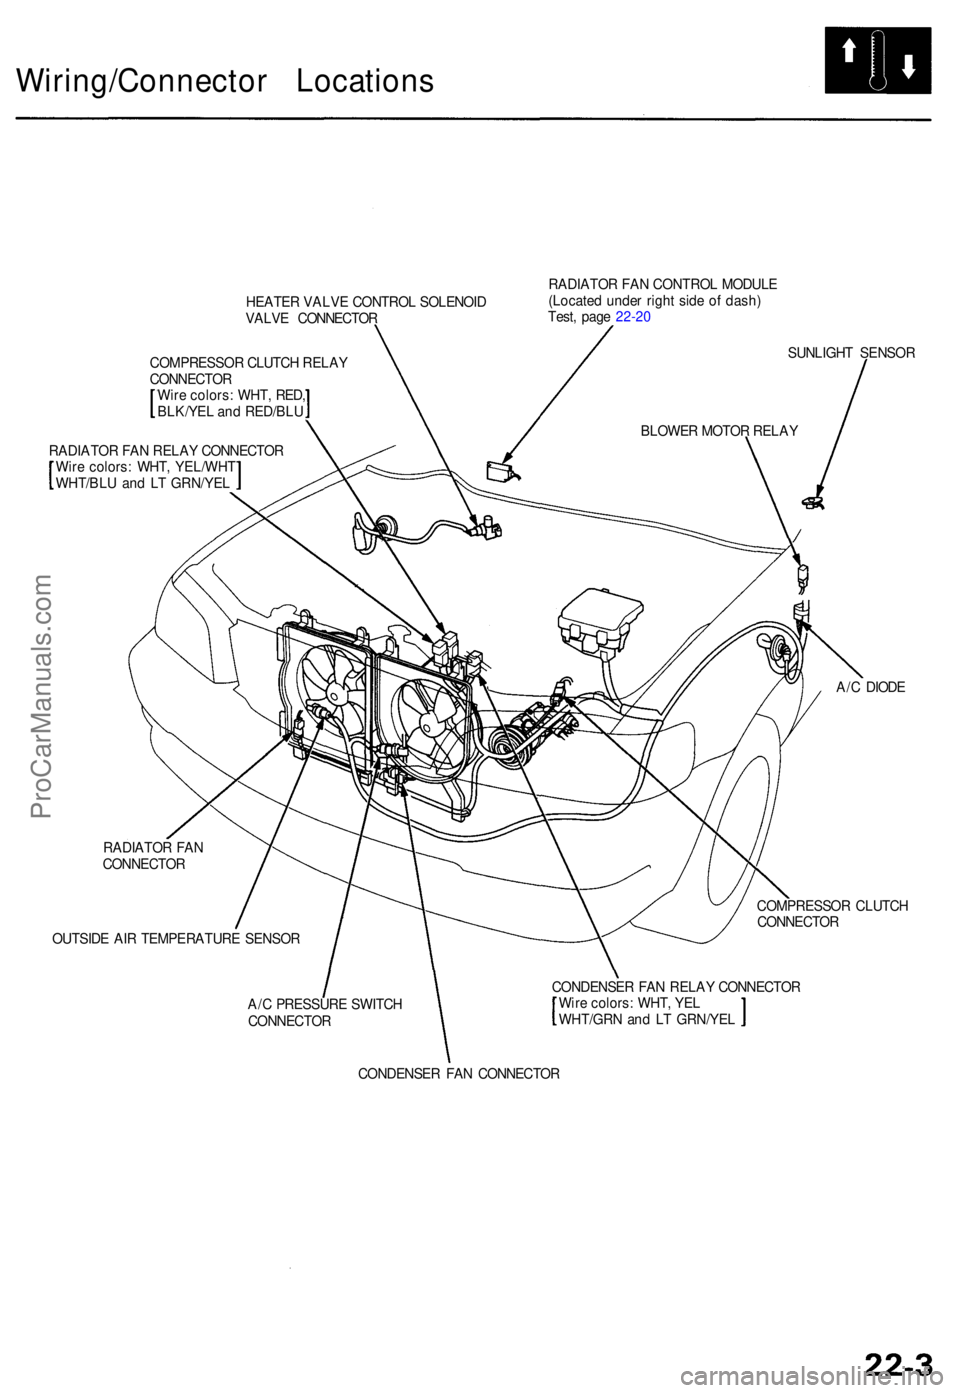
Wiring/Connector Location s
HEATER VALV E CONTRO L SOLENOI D
VALV E CONNECTO R RADIATO
R FA N CONTRO L MODUL E
(Locate d unde r righ t sid e o f dash )
Test , pag e 22-2 0
COMPRESSO R CLUTC H RELA Y
CONNECTO R
Wir e colors : WHT , RED ,
BLK/YE L an d RED/BL U
RADIATO R FA N RELA Y CONNECTO R
Wir e colors : WHT , YEL/WH T
WHT/BLU an d L T GRN/YE L SUNLIGH
T SENSO R
A/ C DIOD E
RADIATO R FA N
CONNECTO R
OUTSID E AI R TEMPERATUR E SENSO R COMPRESSO
R CLUTC H
CONNECTO R
A/ C PRESSUR E SWITC H
CONNECTO R CONDENSE
R FA N RELA Y CONNECTO R
Wir e colors : WHT , YE L
WHT/GR N an d L T GRN/YE L
CONDENSE R FA N CONNECTO R BLOWE
R MOTO R RELA Y
ProCarManuals.com
Page 644 of 1771
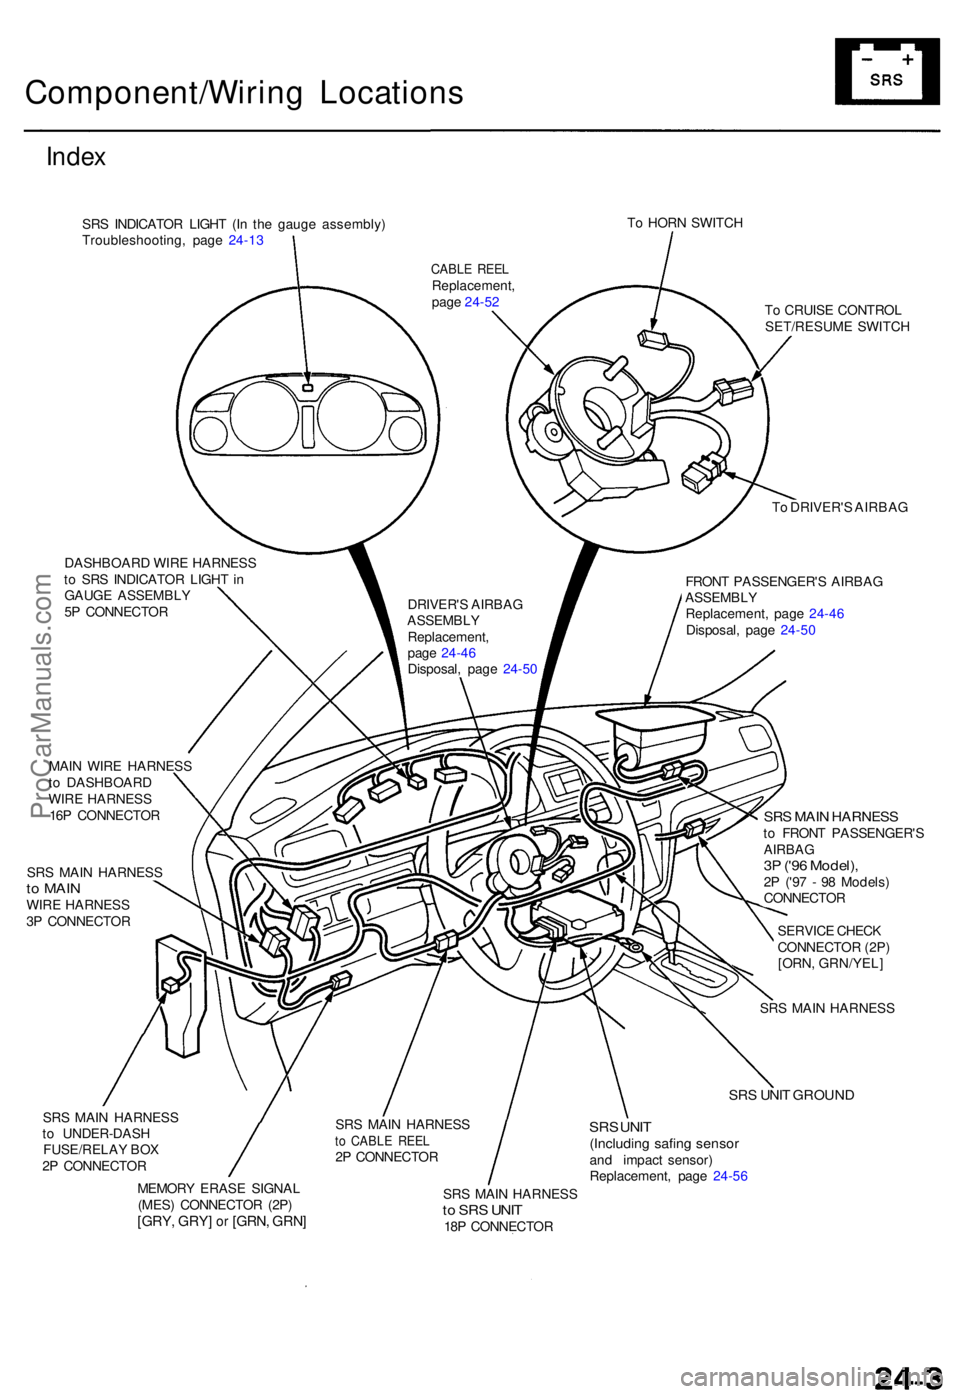
Component/Wiring Location s
Index
SRS INDICATO R LIGH T (I n th e gaug e assembly )
Troubleshooting , pag e 24-1 3 T
o HOR N SWITC H
DASHBOAR D WIR E HARNES S
t o SR S INDICATO R LIGH T in
GAUG E ASSEMBL Y
5 P CONNECTO R T
o CRUIS E CONTRO L
SET/RESUM E SWITC H
T o DRIVER' S AIRBA G
FRON T PASSENGER' S AIRBA G
ASSEMBL Y
Replacement , pag e 24-4 6
Disposal , pag e 24-5 0
MAI N WIR E HARNES S
t o DASHBOAR D
WIR E HARNES S
16 P CONNECTO R
SR S MAI N HARNES S
to MAI NWIRE HARNES S
3 P CONNECTO R
SRS MAI N HARNES Sto FRON T PASSENGER' SAIRBAG3P ('9 6 Model) ,2P ('9 7 - 9 8 Models )
CONNECTO R
SERVIC E CHEC K
CONNECTO R (2P )
[ORN , GRN/YEL ]
SR S MAI N HARNES S
SRS UNI T GROUN D
SRS MAI N HARNES S
t o UNDER-DAS H
FUSE/RELA Y BO X
2 P CONNECTO R
MEMOR Y ERAS E SIGNA L
(MES ) CONNECTO R (2P )
[GRY , GRY ] or [GRN , GRN ]
SRS UNI T(Includin g safin g senso rand impac t sensor)
Replacement , pag e 24-5 6
SR S MAI N HARNES S
to SR S UNI T18P CONNECTO R
SR
S MAI N HARNES S
to CABL E REE L2P CONNECTO R
DRIVER'
S AIRBA G
ASSEMBL Y
Replacement ,
pag e 24-4 6
Disposal , pag e 24-50
CABL E REE LReplacement ,
pag e 24-5 2
ProCarManuals.com
Page 647 of 1771
Precautions/Procedures
Wiring Precaution s
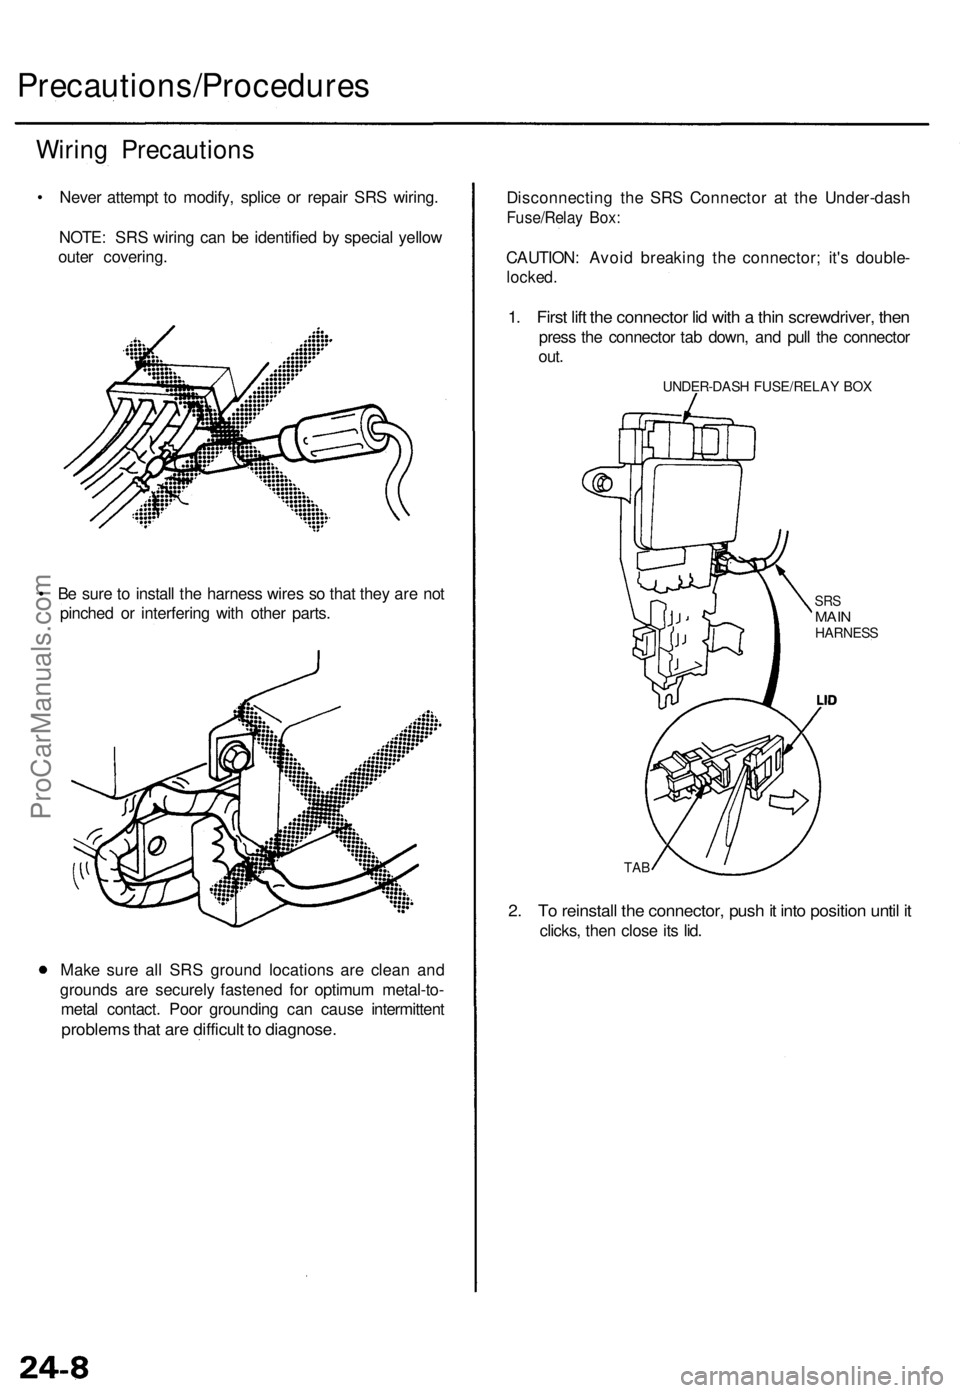
• Neve r attemp t t o modify , splic e o r repai r SR S wiring .
NOTE : SR S wirin g ca n b e identifie d b y specia l yello w
oute r covering .
• B e sur e to instal l th e harnes s wire s s o tha t the y ar e no t
pinche d o r interferin g wit h othe r parts .
Mak e sur e al l SR S groun d location s ar e clea n an d
ground s ar e securel y fastene d fo r optimu m metal-to -
meta l contact . Poo r groundin g ca n caus e intermitten t
problems tha t ar e difficul t t o diagnose .
Disconnectin g th e SR S Connecto r a t th e Under-das h
Fuse/Relay Box :
CAUTION : Avoi d breakin g th e connector ; it' s double -
locked.
1. Firs t lif t th e connecto r li d wit h a thi n screwdriver , the n
pres s th e connecto r ta b down , an d pul l th e connecto r
out.
UNDER-DAS H FUSE/RELA Y BO X
SRSMAI NHARNES S
TAB
2. T o reinstal l th e connector , pus h it int o positio n unti l i t
clicks , the n clos e it s lid .
ProCarManuals.com
Page 660 of 1771
Airbag
Replacement (cont'd)
CAUTION: Be sure to install the SRS wiring so that it is
not pinched or interfering with other parts.
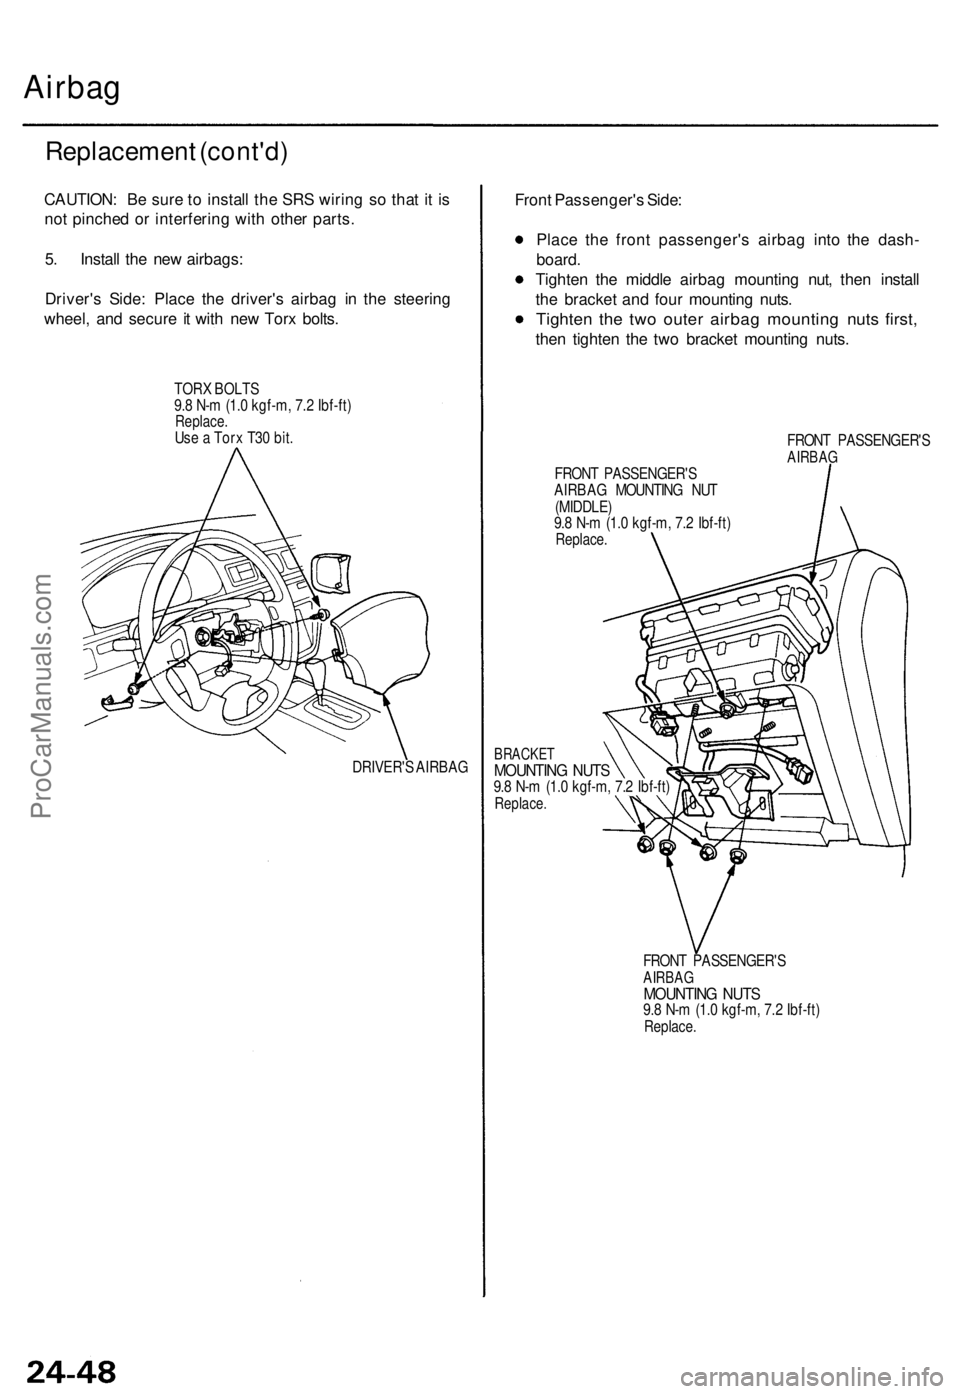
5. Install the new airbags:
Driver's Side: Place the driver's airbag in the steering
wheel, and secure it with new Torx bolts.
TORX BOLTS
9.8 N-m (1.0 kgf-m, 7.2 Ibf-ft)
Replace.
Use a Torx T30 bit.
DRIVER'S AIRBAG
Front Passenger's Side:
Place the front passenger's airbag into the dash-
board.
Tighten the middle airbag mounting nut, then install
the bracket and four mounting nuts.
Tighten the two outer airbag mounting nuts first,
then tighten the two bracket mounting nuts.
FRONT PASSENGER'S
AIRBAG
FRONT PASSENGER'S
AIRBAG MOUNTING NUT
(MIDDLE)
9.8 N-m (1.0 kgf-m, 7.2 Ibf-ft)
Replace.
BRACKET
MOUNTING NUTS
9.8 N-m (1.0 kgf-m, 7.2 Ibf-ft)
Replace.
FRONT PASSENGER'S
AIRBAG
MOUNTING NUTS
9.8 N-m (1.0 kgf-m, 7.2 Ibf-ft)
Replace.ProCarManuals.com
Page 682 of 1771
Warning/Caution Label Locations
(cont'd)
D: DRIVER INFORMATION (SUNVISOR)
Canada model (98 model)
CAUTION
TO AVOID SERIOUS INJURY:
FOR MAXIMUM SAFETY PROTECTION IN ALL TYPES OF
CRASHES, YOU MUST ALWAYS WEAR YOUR SAFETY
BELT.
DO NOT INSTALL REARWARD FACING CHILD SEATS IN
ANY FRONT PASSENGER SEAT POSITION.
DO NOT SIT OR LEAN UNNECESSARILY CLOSE TO THE
AIRBAG.
DO NOT PLACE ANY OBJECTS OVER THE AIRBAG OR
BETWEEN THE AIRBAG AND YOURSELF.
SEE THE OWNER'S MANUAL FOR FURTHER INFORMA-
TION AND EXPLANATIONS.
THE SRS MUST BE INSPECTED TEN YEARS AFTER IT IS
INSTALLED.
THE DATE OF INSTALLATION IS SHOWN OF THE DRIV-
ER'S DOORJAMB.
E: ASSISTANT INFORMATION
U.S. model
AIRBAG SEE OTHER SIDE.
U.S. model (98 model)
AIRBAG WARNING
FLIP VISOR OVER
F: STEERING COLUMN NOTICE
NOTICE
TO PREVENT SRS DAMAGE, REMOVE STEERING WHEEL
BEFORE REMOVING STEERING SHAFT CONNECTING
BOLT.
G: MONITOR NOTICE
NOTICE
• NO SERVICEABLE PARTS INSIDE.
• REFER TO SERVICE MANUAL FOR DETAILED INSTRUC-
TIONS.
H: SRS CONSOLE/GLOVE BOX INFORMATION
Canada model (95 - 97 model)
AIRBAG INFORMATION
SUPPLEMENTAL RESTRAINT SYSTEM (SRS)
• THE SRS MUST BE INSPECTED TEN YEARS AFTER IT IS
INSTALLED. THE DATE OF INSTALLATION IS SHOWN
ON THE CERTIFICATION PLATE, LOCATED ON THE
DRIVER'S DOORJAMB.
• DIAGNOSTIC CHECKS AND REPLACEMENT OF SRS
COMPONENTS MUST BE DONE BY AN AUTHORIZED
DEALER.
• SEE YOUR OWNER'S MANUAL FOR ADDITIONAL SRS
INFORMATION.
I: FRONT SEAT PASSENGER AIRBAG MODULE DANGER
DANGER
EXPLOSIVE/FLAMMABLE
CONTACT WITH ACID, WATER OR HEAVY METALS SUCH
AS COPPER, LEAD OR MERCURY MAY PRODUCE HARM-
FUL AND IRRITATING GASES OR EXPLOSIVE COM-
POUNDS. STORAGE TEMPERATURES MUST NOT EXCEED
200 F (100°C). FOR PROPER HANDLING, STORAGE AND
DISPOSAL PROCEDURES REFER TO SERVICE MANUAL,
SRS SUPPLEMENT.
POISON
CONTAINS POISONOUS SODIUM AZIDE AND POTASSIUM
NITRATE.
FIRST AID
IF CONTENTS ARE SWALLOWED, INDUCE VOMITING.
FOR EYE CONTACT, FLUSH EYES WITH WATER FOR 15
MINUTES. IF GASES (FROM ACID OR WATER CONTACT)
ARE INHALED, SEEK FRESH AIR. IN EVERY CASE, GET
PROMPT MEDICAL ATTENTION.
KEEP OUT OF REACH OF CHILDREN.
WARNING
THE AIRBAG INFLATOR IS EXPLOSIVE AND, IF ACCIDEN-
TALLY DEPLOYED, CAN SERIOUSLY HURT OR KILL YOU.
• DO NOT USE ELECTRICAL TEST EQUIPMENT OR PROB-
ING DEVICES. THEY CAN CAUSE ACCIDENTAL DEPLOY-
MENT.
• NO SERVICEABLE PARTS INSIDE. DO NOT DISASSEM-
BLE.
• PLACE AIRBAG UPRIGHT WHEN REMOVED.
• FOLLOW SERVICE MANUAL INSTRUCTIONS CAREFULLY.
J: PASSENGER AIRBAG CAUTION
U.S. model (98 model)
WARNING
CHILDREN CAN BE KILLED OR INJURED BY A PASSENGER
AIRBAG.
THE BACK SEAT IS THE SAFEST PLACE FOR CHILDREN
AGES 12 AND UNDER. MAKE SURE ALL CHILDREN USE
SEAT BELTS OR CHILD SEATS.
K: SRS WARNING (HOOD)
SUPPLEMENTAL RESTRAINT SYSTEM (SRS)
THIS VEHICLE IS EQUIPPED WITH DRIVER AND FRONT
SEAT PASSENGER AIRBAGS.
ALL SRS ELECTRICAL WIRING AND CONNECTORS ARE
COLORED YELLOW.
TAMPERING WITH, DISCONNECTING OR USING ELECTRI-
CAL TEST EQUIPMENT ON THE SRS WIRING CAN MAKE
THE SYSTEM INOPERATIVE OR CAUSE ACCIDENTAL FIR-
ING OF THE INFLATOR.
WARNING
THE AIRBAG INFLATOR IS EXPLOSIVE AND, IF ACCIDEN-
TALLY DEPLOYED, CAN SERIOUSLY HURT YOU. FOLLOW
SERVICE MANUAL INSTRUCTIONS CAREFULLY.ProCarManuals.com
Page 719 of 1771
Engine Removal/Installation
Removal
• Make sure jacks and safety stands are placed properly
and hoist brackets are attached to the correct positions
on the engine.
• Make sure the car will not roll off stands and fall
while you are working under it.
CAUTION:
• Use fender covers to avoid damaging painted sur-
face.
• Unplug the wiring connectors carefully while holding
the connector portion to avoid damage.
• Mark all wiring and hoses to avoid misconnection.
Also, be sure that they do not contact other wiring
or hoses or interfere with other parts.
1. Secure the hood open as far as possible.
2. Make sure you have the anti-theft code for the radio,
then write down the frequencies for the radio's pre-
set buttons.
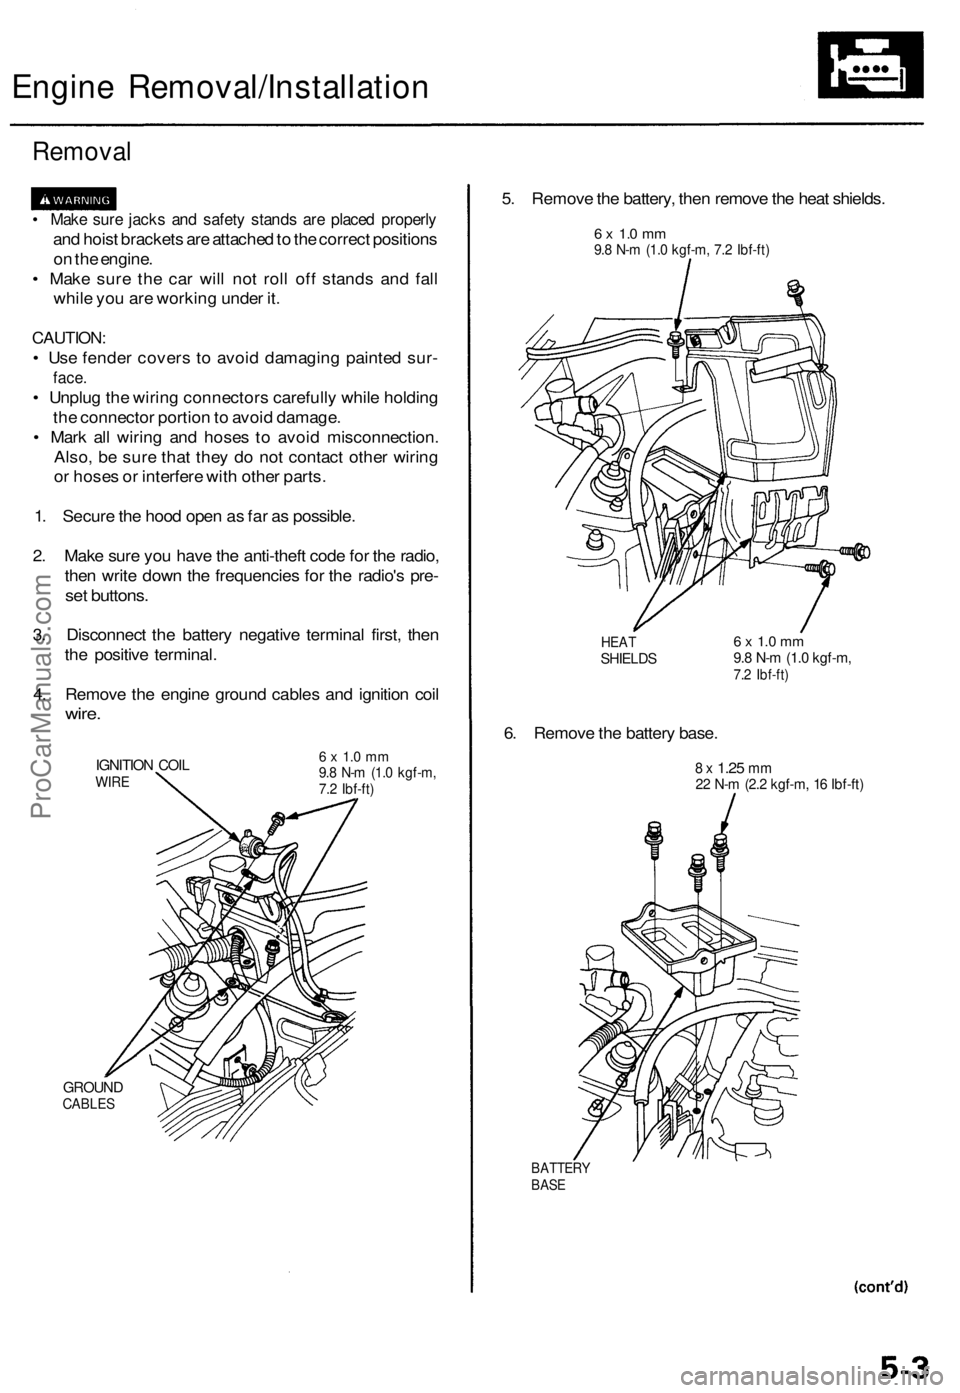
3. Disconnect the battery negative terminal first, then
the positive terminal.
4. Remove the engine ground cables and ignition coil
wire.
IGNITION COIL
WIRE
GROUND
CABLES
6 x 1.0 mm
9.8 N-m (1.0 kgf-m,
7.2 Ibf-ft)
5. Remove the battery, then remove the heat shields.
6 x 1.0 mm
9.8 N-m (1.0 kgf-m, 7.2 Ibf-ft)
HEAT
SHIELDS
6. Remove the battery base.
6 x 1.0 mm
9.8 N-m (1.0 kgf-m,
7.2 Ibf-ft)
8 x
1.25
mm
22 N-m (2.2 kgf-m, 16 Ibf-ft)
BATTERY
BASEProCarManuals.com
Page 727 of 1771
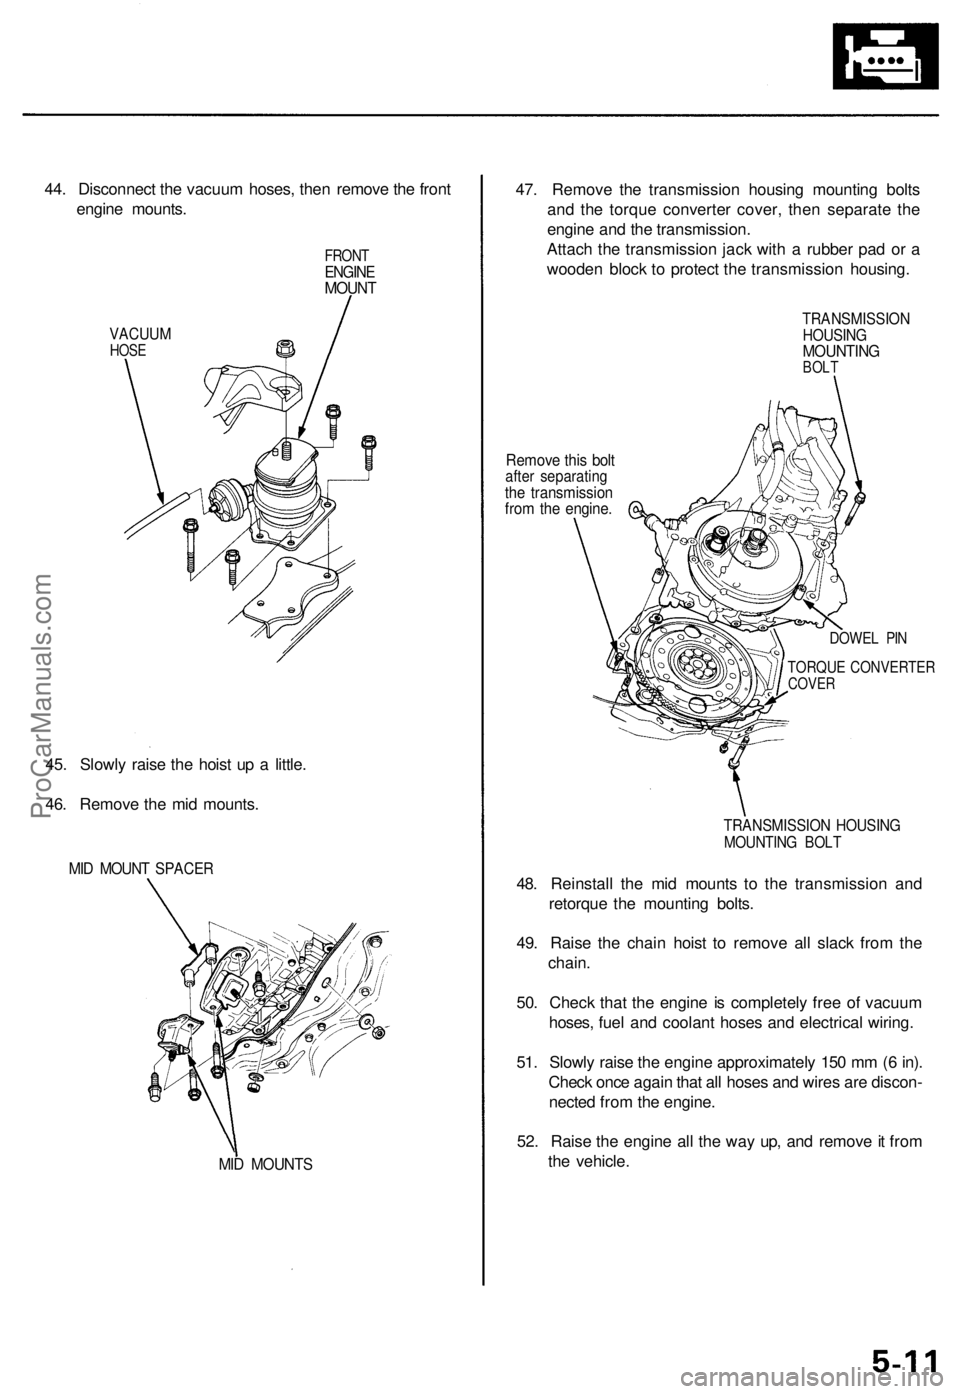
44. Disconnect the vacuum hoses, then remove the front
engine mounts.
VACUUM
HOSE
FRONT
ENGINE
MOUNT
45. Slowly raise the hoist up a little.
46. Remove the mid mounts.
MID MOUNT SPACER
MID MOUNTS
47. Remove the transmission housing mounting bolts
and the torque converter cover, then separate the
engine and the transmission.
Attach the transmission jack with a rubber pad or a
wooden block to protect the transmission housing.
Remove this bolt
after separating
the transmission
from the engine.
TRANSMISSION
HOUSING
MOUNTING
BOLT
DOWEL PIN
TORQUE CONVERTER
COVER
TRANSMISSION HOUSING
MOUNTING BOLT
48. Reinstall the mid mounts to the transmission and
retorque the mounting bolts.
49. Raise the chain hoist to remove all slack from the
chain.
50. Check that the engine is completely free of vacuum
hoses, fuel and coolant hoses and electrical wiring.
51. Slowly raise the engine approximately 150 mm (6 in).
Check once again that all hoses and wires are discon-
nected from the engine.
52. Raise the engine all the way up, and remove it from
the vehicle.ProCarManuals.com
Page 1491 of 1771
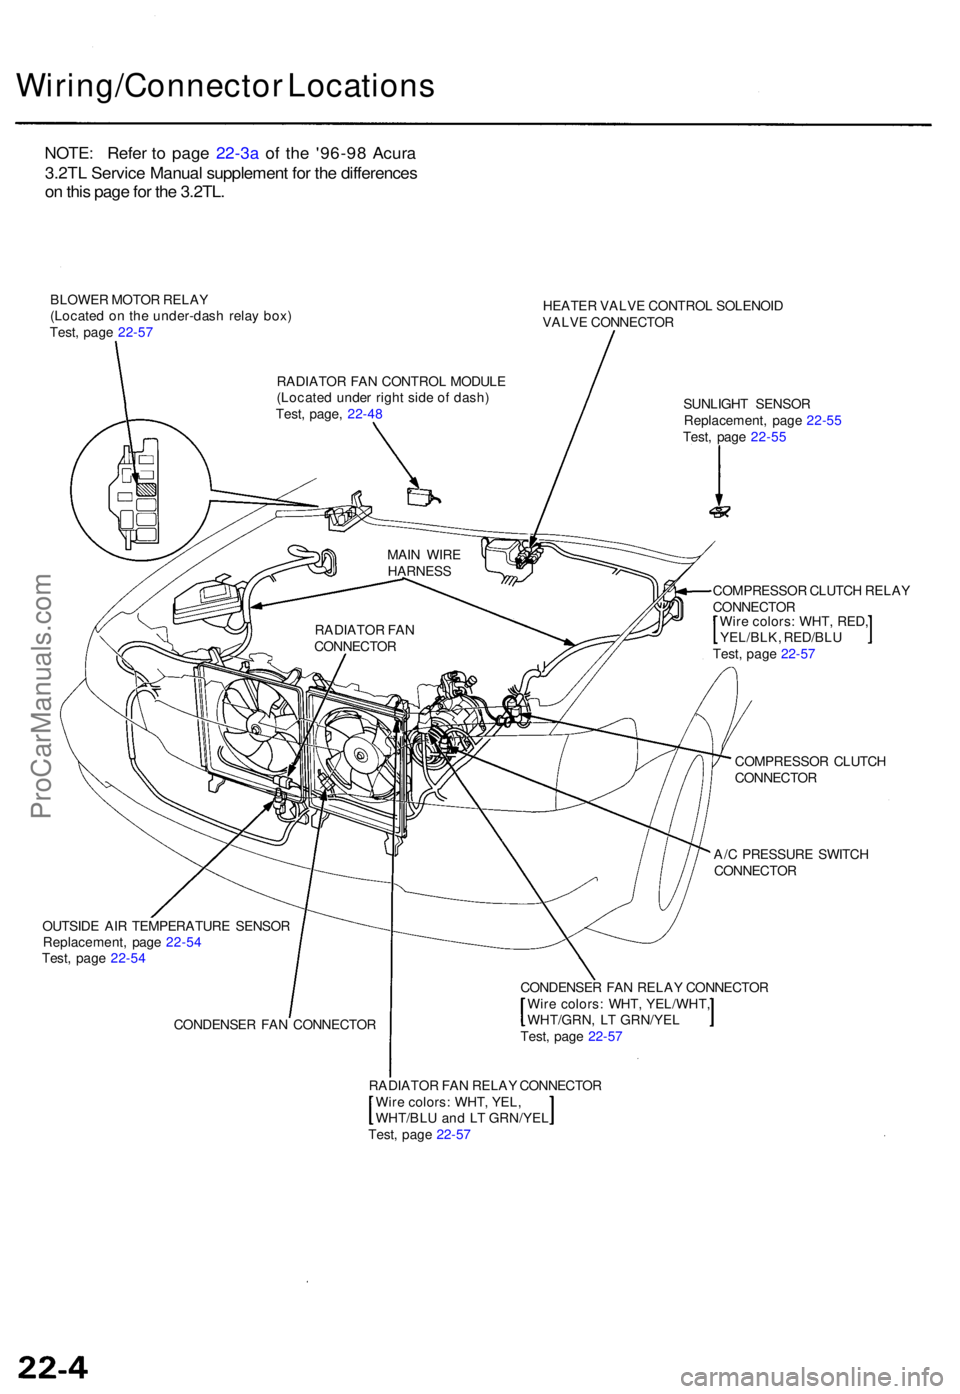
Wiring/Connector Location s
BLOWER MOTO R RELA Y
(Locate d o n th e under-das h rela y box )
Test , pag e 22-5 7 HEATE
R VALV E CONTRO L SOLENOI D
VALV E CONNECTO R
SUNLIGH T SENSO R
Replacement , pag e 22-5 5
Test , pag e 22-5 5
COMPRESSO R CLUTC H RELA Y
CONNECTO R
Wir e colors : WHT , RED ,
YEL/BLK , RED/BL U
Test , pag e 22-5 7
COMPRESSO R CLUTC H
CONNECTO R
A/ C PRESSUR E SWITC H
CONNECTO R
OUTSID E AI R TEMPERATUR E SENSO R
Replacement , pag e 22-5 4
Test , pag e 22-5 4
CONDENSE R FA N CONNECTO R CONDENSE
R FA N RELA Y CONNECTO R
Wir e colors : WHT , YEL/WHT ,
WHT/GRN, L T GRN/YE L
Test , pag e 22-5 7
RADIATO R FA N RELA Y CONNECTO R
Wir e colors : WHT , YEL ,
WHT/BL U an d L T GRN/YE L
Test , pag e 22-5 7
RADIATO
R FA N
CONNECTO RMAI
N WIR E
HARNES S
RADIATO R FA N CONTRO L MODUL E
(Locate d unde r righ t sid e o f dash )
Test , page , 22-4 8
NOTE : Refe r t o page 22-3a of the '96-9 8 Acura
3.2TL Servic e Manual supplement for the differences
on this page for the 3.2TL.
ProCarManuals.com