lock Acura TL 2000 3.2 Workshop Manual
[x] Cancel search | Manufacturer: ACURA, Model Year: 2000, Model line: TL, Model: Acura TL 2000Pages: 311, PDF Size: 3.05 MB
Page 171 of 311

Automatic Transmission
Drive (D4, D3) — These positions
are similar to D
5, except when you
select the D
4 position, only the first
four gears are selected. When you select D
5, only the first three gears
are selected. D
4 can also keep the
transmission from cycling between
fourth and fifth gears in stop-and-go driving, and D
3 can keep the
transmission from cycling between
third and fourth gears.
Use D
3 when towing a trailer in hilly
terrain, or to provide engine braking
when going down a steep hill. D
3
gives you more power and increased engine braking. For faster acceleration when in D
3
D4 or D5, you can get the
transmission to automatically downshift by pushing the accelerator
pedal to the floor. The transmission
will shift down one or two gears, depending on your speed. Second (2) — This position locks
the transmission in second gear. It does not downshift to first gear
when you come to a stop. Second gives you more power when climbing,and increased engine braking when
going down steep hills. Use second
gear when starting out on a slippery surface or in deep snow. It will help
reduce wheelspin.
Driving
Page 172 of 311

Automatic Transmission
First (1) - With the lever in this
position, the transmission locks in
First gear.
If you shift into First position when
the vehicle speed is above 31 mph(50 km/h), the transmission shifts
into Second gear first to avoid sudden engine braking. Engine Speed Limiter
If you exceed the maximum speed
for the gear you are in, the engine speed will enter into the tachometer's
red zone. If this occurs, you may feel
the engine cut in and out. This is caused by a limiter in the engine's
computer controls. The engine will
run normally when you reduce the
RPM below the red zone. Shift Lock Release
This allows you to move the shift lever out of Park if the normal
method of pushing on the brake
pedal does not work. This procedure
also releases the Reverse Lockout.
1. Set the Parking brake.
2. Make sure the key is in the ignition switch OFF (0) position.
To release the Reverse Lockout, make sure the key is in the
ACCESSORY (I) position.
CONTINUED
Driving
Page 173 of 311

Automatic Transmission
COVER
3. Put a cloth on the edge of the ShiftLock Release slot cover next to
the shift lever.
Use a small flat-tipped screwdriver
or small metal plate (neither are
included in the tool kit) to remove
the cover. Carefully pry off the
edge of the cover.
SHIFT LOCK RELEASE SLOT
4. Insert a screwdriver in the shift lock release slot
5. Push down on the screwdriver and move the shift lever out of Park to
Neutral.
To release the Reverse Lockout, move the shift lever from Neutral
to Reverse, then Park. 6. Remove the screwdriver from the
shift lock release slot, then install
a new cover.
Depress the brake pedal and
restart the engine.
If you need to use the Shift Lock
Release, it means your car is
developing a problem. Have the car
checked by your Acura dealer.
Driving
Page 176 of 311

The Braking System
Brake System Design
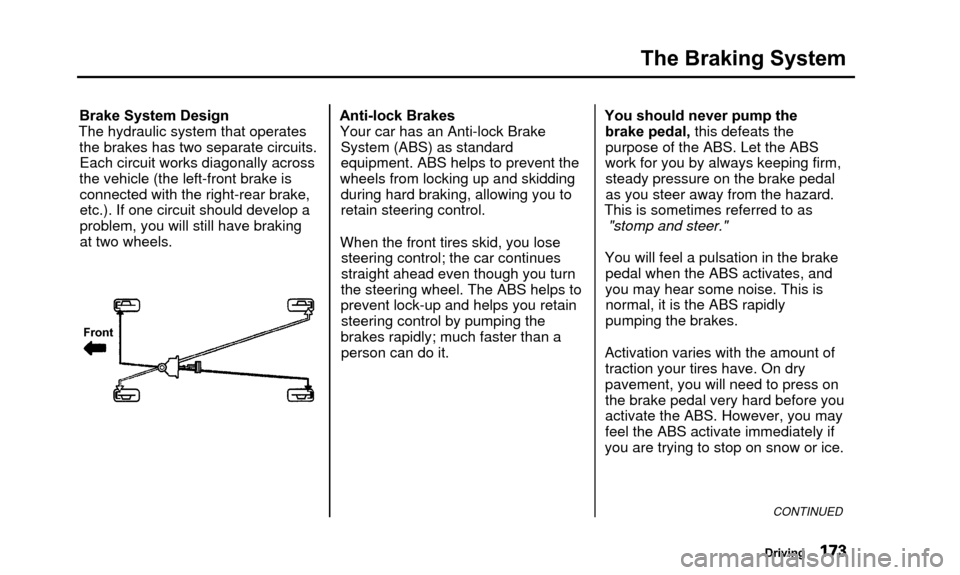
The hydraulic system that operates the brakes has two separate circuits.Each circuit works diagonally across
the vehicle (the left-front brake is connected with the right-rear brake,
etc.). If one circuit should develop a
problem, you will still have brakingat two wheels.
Front
Anti-lock Brakes Your car has an Anti-lock Brake System (ABS) as standard
equipment. ABS helps to prevent the
wheels from locking up and skidding during hard braking, allowing you to
retain steering control.
When the front tires skid, you lose steering control; the car continues
straight ahead even though you turn
the steering wheel. The ABS helps to
prevent lock-up and helps you retain steering control by pumping the
brakes rapidly; much faster than a person can do it. You should never pump the
brake pedal, this defeats thepurpose of the ABS. Let the ABS
work for you by always keeping firm, steady pressure on the brake pedal
as you steer away from the hazard.
This is sometimes referred to as "stomp and steer."
You will feel a pulsation in the brake pedal when the ABS activates, and
you may hear some noise. This is normal, it is the ABS rapidly
pumping the brakes.
Activation varies with the amount of traction your tires have. On dry
pavement, you will need to press on
the brake pedal very hard before you
activate the ABS. However, you may
feel the ABS activate immediately if
you are trying to stop on snow or ice.
CONTINUED
Driving
Page 177 of 311

The Braking System
Important Safety Reminders
ABS does not reduce the time or distance it takes to stop the
vehicle, it only helps with steering control during braking. You should
always maintain a safe following
distance from other vehicles.
ABS will not prevent a skid that results from changing direction
abruptly, such as trying to take a
corner too fast or making a sudden
lane change. Always drive at a safe,prudent speed for the road and
weather conditions. ABS cannot prevent a loss of
stability. Always steer moderately
when you are braking hard. Severe or sharp steering wheel movement
can still cause your car to veer into oncoming traffic or off the road.
A vehicle with ABS may require a longer distance to stop on loose or
uneven surfaces, such as gravel or
snow, than a vehicle without anti-
lock. Slow down and allow a greater
distance between vehicles under
those conditions.ABS Indicator
ABS INDICATOR
The ABS is self-checking. If anythinggoes wrong, the ABS indicator on
the instrument panel comes on (seepage 55). This means the anti-lock
function of the braking system has
shut down. The brakes still work like
a conventional system without anti-
lock, providing normal stopping
ability. You should have the dealer inspect your car as soon as possible.
Driving
Page 180 of 311

Traction Control System
If the TCS indicator comes on whiledriving, pull to the side of the road
when it is safe and turn off the engine. Reset the system by re-starting the engine, and watch the
TCS indicator. If the indicator remains on, or comes back on whiledriving, have the TCS inspected by
your Acura dealer. You can still drive the vehicle without TCS.
The TCS indicator may occasionally come on for one or two seconds and
then go out. This is normal. This indicator will come on along
with the ABS indicator if there is aproblem in the anti-lock brakesystem (see ABS Indicator on page 174).
If the TCS indicator comes on along
with the Brake System indicator, it indicates a problem in the brakesystem (see Brake System
Indicator on page 54).
Driving
Page 182 of 311

Driving in Bad Weather
Visibility — Being able to seeclearly in all directions and being
visible to other drivers are important in all weather conditions. This is
more difficult in bad weather. To be
seen more clearly during daylight
hours, turn on your headlights.
Inspect your windshield wipers and
washers frequently. Keep the wind- shield washer reservoir full of theproper fluid. Have the windshield
wiper blades replaced if they start to streak the windshield or leave parts
unwiped. Use the defroster and air
conditioning to keep the windows
from fogging up on the inside (see pages 112 and 118). Traction — Check your tires
frequently for wear and properpressure. Both are important in
preventing "hydroplaning" (loss of
traction on a wet surface). In the
winter, mount snow tires on all four
wheels for the best handling.
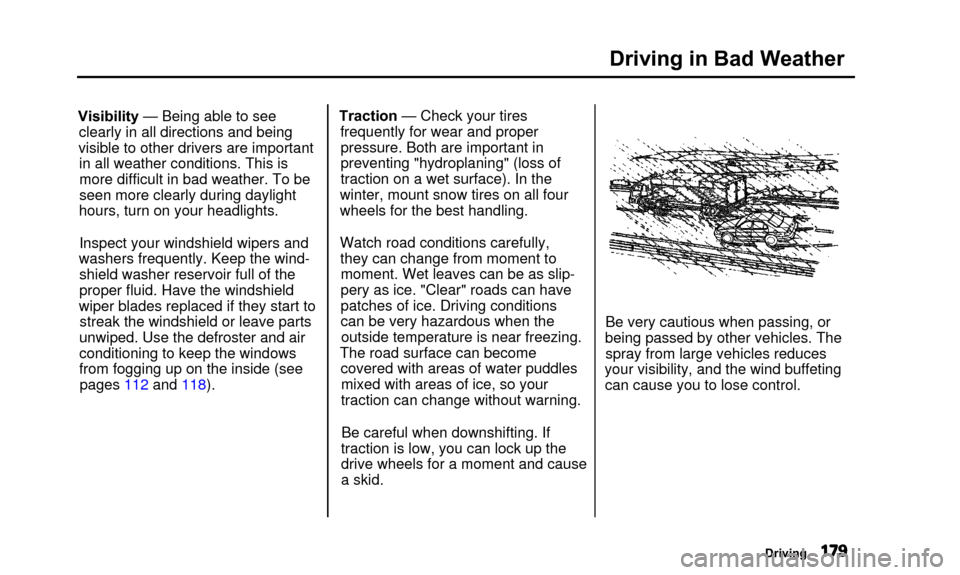
Watch road conditions carefully, they can change from moment tomoment. Wet leaves can be as slip-
pery as ice. "Clear" roads can have
patches of ice. Driving conditions
can be very hazardous when theoutside temperature is near freezing.
The road surface can become covered with areas of water puddlesmixed with areas of ice, so your
traction can change without warning.
Be careful when downshifting. If
traction is low, you can lock up the
drive wheels for a moment and cause
a skid. Be very cautious when passing, or
being passed by other vehicles. The spray from large vehicles reduces
your visibility, and the wind buffeting can cause you to lose control.
Driving
Page 197 of 311

Service at the indicated
distance or time — whichever
comes first. miles x 1,000
km x 1,000
months
Replace engine oil and oil filter
Check engine oil and coolant
Clean (o) or replace ( • ) air cleaner element Use normal schedule except in dusty conditons
Inspect valve clearance
Replace spark plugs
Replace timing belt*
1-*, and inspect water pump
Inspect and adjust drive belts
Inspect idle speed
Replace engine coolant
Replace transmission fluid Inspect front and rear brakes
Replace brake fluid
Check parking brake adjustment
Replace air conditioning filter*
2Lubricate all hinges, locks and latches Rotate tires (Check tire inflation and condition
at least once per month) 15
24 12 30
48
24 45
72
3660
96
48 75
120 60 90
144
72 105
168
84 120
192
96
Replace every 3,750 miles (6,000 km) or 6 months Check oil and coolant at each fuel stop
O •
O • O •
Adjust only if noisy
•
•
•
•
•
•
•
•
O •
•
•
Inspect every 7,500 miles (12,000 km) or 6 months
•
• •
•
•
•
•
••
•
••
•
•
• •
•
•
••
•
•
Rotate tires every 7,500 miles (12,000 km)
Visually inspect the following items:
Tie rod ends, steering gear box, Suspension components
Driveshaft boots and boots
Brake hoses and lines (including ABS)
All fluid levels and conditions of fluids Cooling system hoses and connections
'Exhaust system
'Fuel lines and connections
Lights and controls
Vehicle underbody Every 7,500 miles (12,000 km) or 6 months
U.S. Owners
Follow the Severe Conditions
Maintenance Schedule if you
drive your vehicle MAINLY
under one or more of the
following conditions:
• Driving less than 5 miles (8 km) per trip or, in freezing
temperatures, driving less
than 10 miles (16 km) per trip.
• Driving in extremely hot[over 90°F (32° C)] conditions.
• Extensive idling or long periods of stop-and-go driving.
• Trailer towing, driving with a roof rack, or driving in
mountainous conditions.
• Driving on muddy, dusty, orde-iced roads.
Canadian Owners
Follow the Maintenance Schedule for Severe Conditions.
# : See information on maintenance and emissions warranty, last column, \
page 191.
* 1: See Timing Belt on page 227 to determine need for replacement.
* 2: See Air Conditioning Filter on page 226 for replacement information under special conditions.
Maintenance
Maintenance Schedule for Normal Conditions• • • • • • • \
•
Page 199 of 311

NOTE:• Check engine oil and coolant at each fuel stop.• Check and adjust valve clearance, cold engine, if noisy.# : See information on maintenance and emissions warranty, last
column, page 191.
* 1: See Timing Belt on page 227 to determine need for replacement.
* 2: See Air Conditioning Filter on page 226 for replacement
information under special conditions.
Maintenance
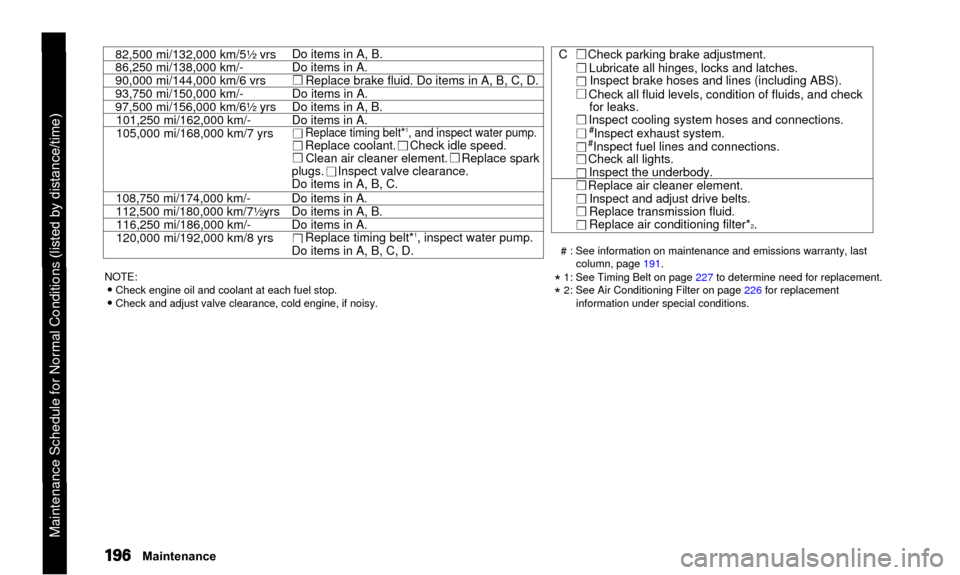
82,500 mi/132,000 km/5½ vrs
86,250 mi/138,000 km/-
90,000 mi/144,000 km/6 vrs
93,750 mi/150,000 km/-
97,500 mi/156,000 km/6½ yrs101,250 mi/162,000 km/-
105,000 mi/168,000 km/7 yrs
108,750 mi/174,000 km/-
112,500 mi/180,000 km/7½yrs 116,250 mi/186,000 km/-
120,000 mi/192,000 km/8 yrs Do items in A, B.
Do items in A.
Replace brake fluid. Do items in A, B, C, D. Do items in A.
Do items in A, B.
Do items in A.
Replace timing belt*1, and inspect water pump. Replace coolant. Check idle speed. Clean air cleaner element. Replace spark
plugs. Inspect valve clearance.
Do items in A, B, C.
Do items in A.
Do items in A, B.
Do items in A.
Replace timing belt*
1, inspect water pump.
Do items in A, B, C, D.
C Check parking brake adjustment.
Lubricate all hinges, locks and latches.• Inspect brake hoses and lines (including ABS).
Check all fluid levels, condition of fluids, and check for leaks.
Inspect cooling system hoses and connections.
#Inspect exhaust system.
•' #Inspect fuel lines and connections.
Check all lights.
Inspect the underbody. Replace air cleaner element.
• Inspect and adjust drive belts.
• Replace transmission fluid.
• Replace air conditioning filter*
2.
Maintenance Schedule for Normal Conditions (listed by distance/time)
Page 210 of 311

Cooling System
Removing the radiator cap
while the engine is hot can
cause the coolant to spray out,
seriously scalding you.
Always let the engine and radiator cool down beforeremoving the radiator cap.RADIATOR CAP
1. Make sure the engine and radiator
are cool.
2. Turn the radiator cap counter- clockwise, without pressing down
on it, until it stops. This relieves
any pressure remaining in the
cooling system. 3. Remove the radiator cap by
pushing down and turningcounterclockwise.
CONTINUED
Maintenance