display Acura TL 2009 Navigation Manua
[x] Cancel search | Manufacturer: ACURA, Model Year: 2009, Model line: TL, Model: Acura TL 2009Pages: 172, PDF Size: 16.82 MB
Page 68 of 172

Driving to Your Destination
68 Navigation System
Showing Icons on the Map
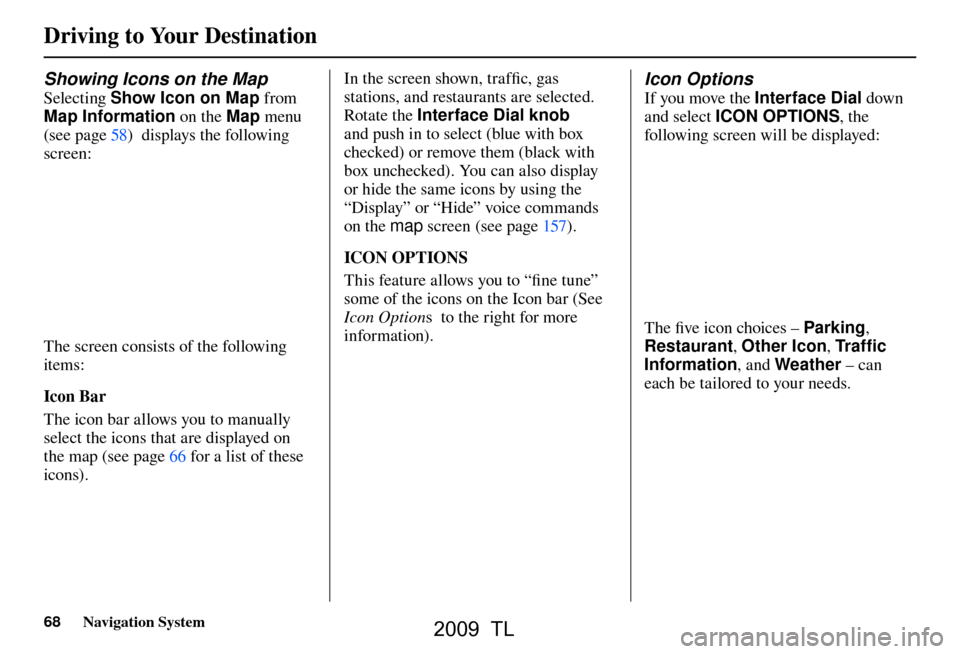
Selecting Show Icon on Map from
Map Information on the Map menu
(see page 58 ) displays the following
screen:
The screen consists of the following
items:
Icon Bar
The icon bar allows you to manually
select the icons that are displayed on
the map (see pag e 66 for a list of these
icons). In the screen shown, traffi
c, gas
stations, and restaurants are selected.
Rotate the Interface Dial knob
and push in to select (blue with box
checked) or remove them (black with
box unchecked). You can also display
or hide the same icons by using the
“Display” or “Hide” voice commands
on the map screen (see page 157 ).
ICON OPTIONS
This feature allows you to “fi ne tune”
some of the icons on the Icon bar (See
Icon Option s to the right for more
information).
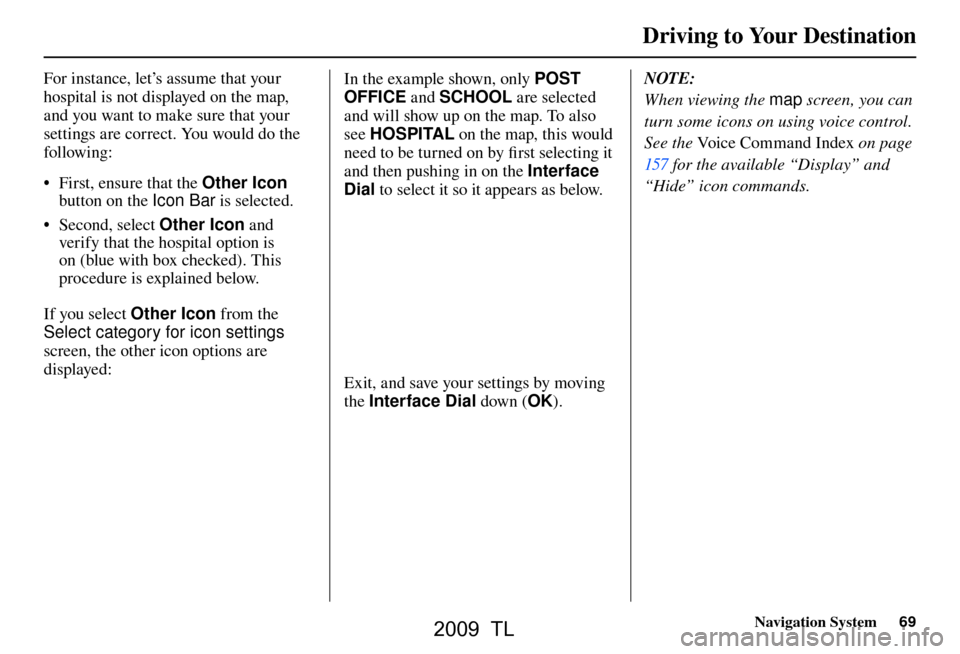
Icon Options
If you move the Interface Dial down
and select ICON OPTIONS , the
following screen will be displayed:
The fi ve icon choices – Parking ,
Restaurant , Other Icon , Tr a f � c
Information , and Weather – can
each be tailored to your needs.
2009 TL
Page 69 of 172

Driving to Your Destination
Navigation System69
For instance, let’s assume that your
hospital is not displayed on the map,
and you want to make sure that your
settings are correct. You would do the
following:
• First, ensure that the Other Icon
button on the Ic
on Ba
r is selected.
• Second, select Other Icon and
verify that the hospital option is
on (blue with box checked). This
procedure is explained below.
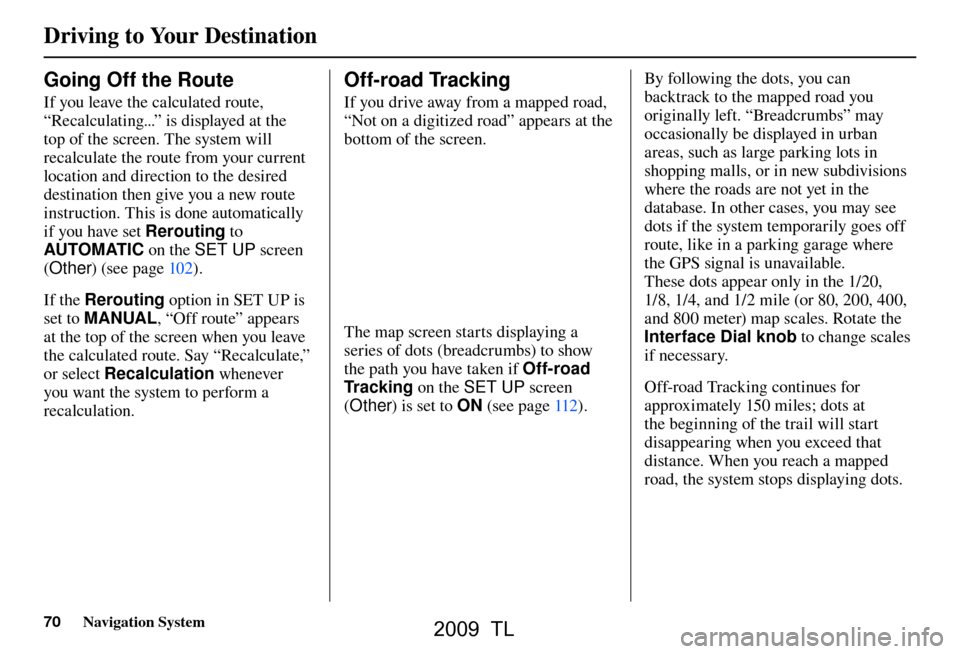
If you select Other Icon from the
Select category for icon settings
screen, the other icon options are
displayed:
In the example shown, only POST
OFFICE and SCHOOL are selected
and will show up on the map. To also
see HOSPITAL on the map, this would
need to be turned on by fi rst selecting it
and then pushing in on the Interface
Dial to select it so it appears as below.
Exit, and save your settings by moving
the Interface Dial down (OK). NOTE:
When viewing the
map screen, you can
turn some icons on using voice control.
See the Voice Command Index on page
157 for the available “Display” and
“Hide” icon commands.
2009 TL
Page 70 of 172

Driving to Your Destination
70 Navigation System
Going Off the Route
If you leave the calculated route,
“Recalculating...” is displayed at the
top of the screen. The system will
recalculate the route from your current
location and direction to the desired
destination then give you a new route
instruction. This is done automatically
if you have set Rerouting to
AUTOMATIC on the SET UP screen
( Other ) (see page 102 ).
If the Rerouting option in SET UP is
set to MANUAL , “Off route” appears
at the top of the screen when you leave
the calculated route. Say “Recalculate,”
or select Recalculation whenever
you want the system to perform a
recalculation.
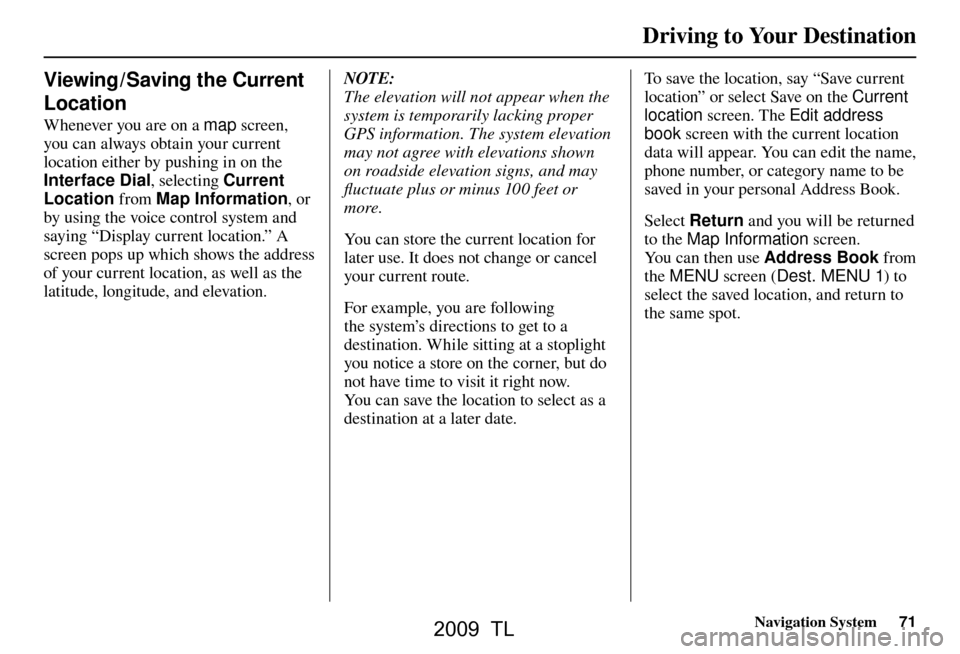
Off-road Tracking
If you drive away from a mapped road,
“Not on a digitized road” appears at the
bottom of the screen.
The map screen starts displaying a
series of dots (breadcrumbs) to show
the path you have taken if Off-road
Tr a c k i n g on the SET UP screen
( Other ) is set to ON (see page 112 ). By following the dots, you can
backtrack to the mapped road you
originally left. “Breadcrumbs” may
occasionally be displayed in urban
areas, such as large parking lots in
shopping malls, or in new subdivisions
where the roads are not yet in the
database. In other cases, you may see
dots if the system temporarily goes off
route, like in a parking garage where
the GPS signal is unavailable.
These dots appear only in the 1/20,
1/8, 1/4, and 1/2 mile (or 80, 200, 400,
and 800 meter) map scales. Rotate the
Interface Dial knob
to change scales
if necessary.
Off-road Tracking continues for
approximately 150 miles; dots at
the beginning of the trail will start
disappearing when you exceed that
distance. When you reach a mapped
road, the system stops displaying dots.
2009 TL
Page 71 of 172

Driving to Your Destination
Navigation System71
Viewing / Saving the Current
Location
Whenever you are on a map screen,
you can always obtain your current
location either by pushing in on the
Interface Dial , selecting Current
Location from Map Information , or
by using the voice control system and
saying “Display current location.” A
screen pops up which shows the address
of your current location, as well as the
latitude, longitude, and elevation.
NOTE:
The elevation will not appear when the
system is temporarily lacking proper
GPS information. The system elevation
may not agree with elevations shown
on roadside elevation signs, and may
fl uctuate plus or minus 100 feet or
more.
You can store the current location for
later use. It does not change or cancel
your current route.
For example, you are following
the system’s directions to get to a
destination. While sitting at a stoplight
you notice a store on the corner, but do
not have time to visit it right now.
You can save the location to select as a
destination at a later date. To save the location, say “Save current
location” or select Save on the
Current
location screen. The Edit address
book screen with the current location
data will appear. You can edit the name,
phone number, or category name to be
saved in your personal Address Book.
Select Return and you will be returned
to the Map Information screen.
You can then use Address Book from
the MENU screen ( Dest. MENU 1) to
select the saved location, and return to
the same spot.
2009 TL
Page 73 of 172

Driving to Your Destination
Navigation System73
• You actually entered an unverifi ed
area (see Unverifi ed Area Routing on
page 103 ).
Tr a f � c Rerouting
When driving en route to your
destination with Tr a f � c Rerouting is
ON , the system can fi nd a faster route
based on traffi c fl ow information or
detect a Road Closed incident and fi nd
a detour route. In either case, the system
automatically recalculates and displays
a pop-up box to signify that the route
has changed.
You can also calculate the detour route
manually by choosing to avoid specifi c
incidents and/or congestion on your
route. Say “Display traffi c incidents” or
“Display traffi c list,” and select the “On
Route” tab on the Tr a f � c Incidents
screen.
Select an incident from the list,
and push in on the Interface Dial
twice. The system will display the
co n
fi rmation screen:
2009 TL
Page 74 of 172

Driving to Your Destination
74 Navigation System
When you say or select Avoid, the
display returns to the list screen. When
you move the Interface Dial down
on the list screen to select Reroute,
the system recalculates a detour route
avoiding the road.
You can choose to avoid up to 10 traffi c
incidents.
NOTE:
• When you select the “All” tab, Avoid
is not displayed.
• To activate this function, you need to set Tr a f � c Rerouting to ON in the
Routing & Guidance settings (see
page 110 ).
• Because the criterion for whether the traffi c event is to be detoured or
not is included in the traffi c event
data itself, the traffi c rerouting is not
performed for all the traffi c incidents
ahead on the route.
• Even when the route recalculation is performed for a traffi c event, if the
system cannot fi nd any detour route
or a quicker detour route, the event
location is not always avoided.
• Traffi c rerouting is available only if you have a current traffi c /weather
subscription with XM. See page 121 . Changing the Route
While en route, you may wish to alter
your route, add an interim “Waypoint”
(pit stop), choose a different destination,
or cancel your current destination. To
change your present route, you can do
any of the following:
Say “Menu,” or press the MENU button
to view the MENU screen ( Route):
• Cancel Route (pag e 75 )
• Detour (pag e 75 )
• Avoid Streets (pag e 75 )
• Change Route Preference (pag e 75 )
• Waypoint (pag e 75
)
• Back to Route (pag e 76 )
Choose a different destination (other
methods) by:
• Saying, “Find nearest...” to fi nd a POI
(page 77 ).
• Saying, “Go home” (pag e 77 ). • Using the
Interface Dial to select a
different POI or address on the map
(page 77 ).
• Pressing the MENU button and
selecting the “Dest. MENU 1 or 2”
tab on the MENU screen (page 78 ).
MENU Screen (Route)
Pressing the MENU button displays the
MENU screen ( Route):
NOTE:
The “Route” tab can be selected only
when you are en route.
2009 TL
Page 75 of 172

Driving to Your Destination
Navigation System75
Cancel Route
Cancels the current route (and any
waypoints) and returns you to the map
screen.
Detour
Calculates a detour route for you if
you encounter an unexpected obstacle
such as a closed road or extremely
heavy traffi c congestion. If a detour
is selected, the system will attempt to
recalculate a new route, avoiding the
next 5 miles (while on a freeway) or 1
mile (while on a surface street).
Avoid Streets
From the MENU screen (Route), if
you say or select Avoid Streets, the
system displays a list of streets that will
get you to your destination. This feature
allows you to avoid a street or streets
along your route. This is helpful if you
know of road construction, closures,
or excessive traffi c along the route.
Simply select the street or streets you
wish to avoid. You can store up to 10
streets to be avoided. You cannot avoid
your current street, or the streets of your waypoint(s) or destination (system
beeps if selected).
NOTE:
Although you can choose streets to
avoid, you cannot choose specifi c
streets you want to use.
Change Route Preference
From the MENU screen (Route), if you
say or select Change Route Pref.
,
then the Route Preference screen is
displayed. See Changing the Routing
Method on page 53 for details. Way p o i nt
Waypoints allow you to add an
interim “pit stop” while traveling to
a destination. For instance, you may
want to stop for gas or food, and then
continue on to your destination.
Although you can enter up to fi ve places
including the destination at a time,
typically you may never use more than
one at a time.
Waypoints are routed to in the order
they were entered (number 1 fi rst, etc.),
with your fi nal destination routed to
last.
When you enter waypoints, they appear
on the map screen as small red fl ags
numbered 1-4.
2009 TL
Page 76 of 172

Driving to Your Destination
76 Navigation System
Adding Waypoint
From the MENU screen (Route),
if you say or select Waypoint, the
Add Waypoint screen is displayed.
Select either SEARCH AROUND
or SEARCH ALONG by rotating
Interface Dial knob . Next, select the category from the
“Originals” or “My Favorites” tab on
the Category screen, then follow the
menu prompts to select a destination.
When the system performs a search
from SEARCH ALONG, it displays
matches that lie within a corridor on
either side and in front of your route.
From SEARCH AROUND , the system
displays matches that are a uniform
distance from the departure point/
waypoint/destination.
The search “corridor” distance value
can be changed in Edit Waypoint
Search Area in SET UP (see page
10 9 ). If you add a waypoint, the Dest List
screen will be displayed. If you move
the
Interface Dial down and select
OK , the addition is completed and
rerouting begins. Press the MAP/
GUIDE button to return to the map
screen without adding the waypoint.
To add another waypoint, press
the MENU button and repeat the
procedure.
If Waypoint is grayed out, the
maximum of fi ve places (including the
destination) has been entered.
NOTE:
The system does not allow you to select
the roads you want to use to get to a
destination. However, after you enter a
destination, you can select intersections
or POI waypoints that the system will
use to tailor your route.
Back to Route
R e
turns you to the original map screen.
2009 TL
Page 77 of 172

Driving to Your Destination
Navigation System77
Changing Your Destination
There are four methods by which you
can change or add a waypoint to your
route. These are:
Find Nearest (Voice command)
From the map screen, say one of the
“Find Nearest...” voice commands to
locate the nearest gas station, ATM,
restaurant or other point of interest. See
the “Find Nearest” voice commands
listing on page 158 .
Go Home (Voice command)
From the map screen, say “Go Home
1” or “Go Home 2.” If an address has
been entered in both Home Address
1 and Home Address 2 , say “Go
Home” and the system will give
preference to Home Address 1 and
display the confi rmation screen.
Using Interface Dial to Change
Destination
While following a calculated route, you
can select a new destination with the
map screen and the Interface Dial.
With the map screen displayed,
use the Interface Dial to move the
cursor. It will change to crosshairs.
Use the Interface Dial to position
the crosshairs on your desired new
destination, street, or icon, then push in
on the Interface Dial . The Select an
item screen or a pop-up menu may be
displayed if there are multiple POIs in
the vicinity.
NOTE:
The Select an item screen will be
displayed when the crosshairs are
positioned near multiple icons or
locations. A pop-up menu will be
displayed when the crosshairs are
positioned on a particular street. If this is not your desired new
destination, press the CANCEL
button
or the BACK button to return to the
map screen. Reposition the crosshairs
with the Interface Dial , then push in
on the Interface Dial again to see the
new address.
When the Select an item screen is
displayed, select an item from the list,
and the Calculate route to screen is
displayed. Then select OK and push in
on the Interface Dial .
2009 TL
Page 78 of 172

Driving to Your Destination
78 Navigation System
When the pop-up menu is displayed,
select New Dest . to set your location
as a replacement destination, or
Waypoint to set as a waypoint.
The system will return to the map
screen and recalculate the route to your
new destination or waypoint.
Entering a Destination from the
Menu Screen (while en route)
If you say “Menu”, or press the MENU
button and select the “Dest. MENU
1” or “Dest. MENU 2” tab, the system
displays the MENU screen. Follow
the procedure described in Entering a
Destination , which begins on page 28 .
When the Calculate route to screen is
displayed, select OK and push in on the
Interface Dial .
When the pop-up menu is displayed,
select New Dest . to set your location
as a replacement destination, or
Waypoint to set as a waypoint.
The system will return to the map
screen and recalculate the route to your
specifi ed new destination or waypoint.
Continue Trip to Screen
If you restart the vehicle without having
completed your prior trip, you will see
the following screen:
• To continue to your destination or
other waypoints, say or select OK.
• To cancel your destination, press the CANCEL button or the BACK
button on the steering wheel, or
using the voice control system, say
“Cancel” or “Back.”
• If you wish to change the routing method, select Route Pref. by using
the Interface Dial .
• For additional information on changing the routing method, see
Changing the Routing Method on
page 53 .
2009 TL