display Acura TLX 2015 Owner's Manual
[x] Cancel search | Manufacturer: ACURA, Model Year: 2015, Model line: TLX, Model: Acura TLX 2015Pages: 545, PDF Size: 19.64 MB
Page 313 of 545

312
uuBluetooth ® HandsFreeLink ®u HFL Menus
Features
■Making a call to a sender
1. Go to the text message screen.
u The system automatically starts reading
the message aloud.
2 Displaying text messages P. 309
2.Move and rotate to select Call, then
press .
John 0123456789####Reply Call
Page 314 of 545

313Features
Compass
*
When you set the power mode to ON, the compass self-calibrates, and the compass
display appears.Compass CalibrationIf the compass indicates the wrong direction, or the CAL indicator blinks, you need
to manually calibrate the system.
1.Set the power mode to ON.
2. On the top screen of any audio source,
press and hold for five seconds.
u The display switches to the Compass
settings screen.
3. Rotate to select Calibration, then press
.
4. When the display changes to Calibration
Start, press .
5. Drive the vehicle slowly in two circles.
u The compass starts to show a direction
after the calibration. The CAL indicator
goes off.
1 Compass
*
Compass operation can be affected under the
following conditions:•Driving near power lines or stations•Crossing a bridge•Passing a large vehicle, or driving near a large
object that can cause a magnetic disturbance•When accessories such as antennas and roof racks
are mounted by magnets
1Compass Calibration
Calibrate the compass in an open area.
While setting the compass, press the BACK button to
cancel the setting mode and return to the previous
screen.
* Not available on all models
Page 315 of 545

314
uuCompass
*uCompass Zone Selection
Features
Compass Zone Selection
1. Set the power mode to ON.
2. On the top screen of any audio source,
press and hold for five seconds.
u The display switches to the Compass
settings screen.
3. Rotate to select Zone Adjust, then
press .
u The display shows the current zone
number the system is set to.
4. To change the zone, rotate to select the
zone number of your area (See Zone Map),
then press .
2
3
4 5678910
111213
14
15
Zone Map
Guam Island: Zone 8
Puerto Rico: Zone 11
1 Compass Zone Selection
The zone selection is done to compensate the
variation between magnetic north and true north.
If the calibration starts while the audio system is in
use, the display returns to no rmal after the calibration
is completed.
Page 326 of 545

Continued
325
uuWhen Driving uStarting the Engine
Driving
You can remotely start the engine using the two-way keyless access remote from
extended distances.■To start the engine
The engine runs for up to 10 minutes without you starting the vehicle.
To extend the run time for another 10 minutes during the first run, press the
button, then press and hold the button. u The amber LED blinks, then the green LED comes back on if a 10-minute
extension request was transmitted successfully.
After pressing the (lock) button, wait for the green LED to blink. This indicates that
the all the doors and the trunk are locked. ■
Remote Engine Start with Vehicle Feedback
*
1 Remote Engine Start with Vehicle Feedback
*
WARNING:
Carbon monoxide gas is toxic and can
rapidly accumulate in closed or even partly enclosed
areas. Breathing it can cause unconsciousness and
even kill you. Never use the remote engine starter
with the vehicle parked in a garage or other areas
with limited ventilation.
If there are buildings and obstacles between your
vehicle and the remote, the range will be reduced.
This distance may vary by external electrical
interference.
The engine may not start by the remote engine start
if:
•You have disabled a remote engine start setting
using the multi-information display.•The power mode is not in VEHICLE OFF (LOCK).•The gear is in a position other than
( P.
•The hood is open, or any door or the trunk is
unlocked.•You have already used the remote twice to start
the engine.•Another registered keyless access remote is in the
vehicle.•There is any antenna failure.•Door is unlocked with the built-in key.
With the doors locked, Press the button,
then press and hold the button.
Amber LED: Blinks when any button is pressed.
Continues to blink
during a vehicle
self check until the
engine starts. Go within the range,
and try again.
Green LED: Comes on while
the engine is running. Red LED: Blinks when the
remote is out of the keyless
access system range.
* Not available on all models
Page 332 of 545
331
uuWhen Driving uShifting
Continued
Driving
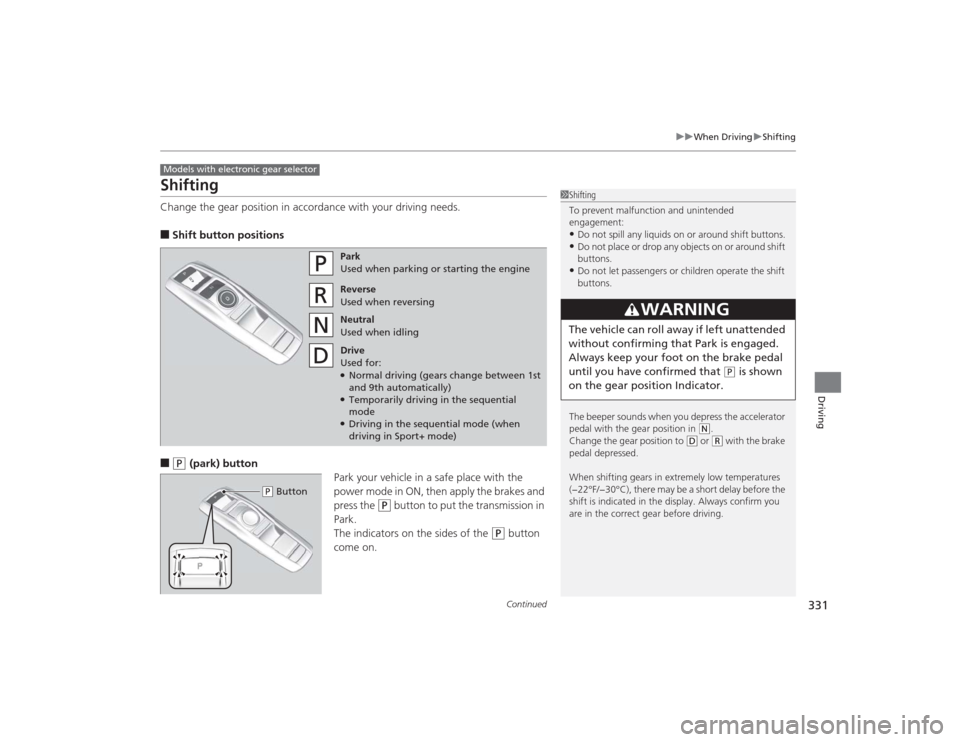
ShiftingChange the gear position in accordance with your driving needs.■Shift button positions■
(P
(park) button
Park your vehicle in a safe place with the
power mode in ON, then apply the brakes and
press the
(P
button to put the transmission in
Park.
The indicators on the sides of the
(P
button
come on.
Models with electronic gear selector
1 Shifting
To prevent malfunction and unintended
engagement:•Do not spill any liquids on or around shift buttons.•Do not place or drop any objects on or around shift
buttons.•Do not let passengers or children operate the shift
buttons.
The beeper sounds when you depress the accelerator
pedal with the gear position in
( N.
Change the gear position to
( D or
(R with the brake
pedal depressed.
When shifting gears in extremely low temperatures
(−22°F/−30°C), there may be a short delay before the
shift is indicated in the display. Always confirm you
are in the correct gear before driving.
3
WARNING
The vehicle can roll away if left unattended
without confirming that Park is engaged.
Always keep your foot on the brake pedal
until you have confirmed that
( P is shown
on the gear position Indicator.
Park
Used when parking or starting the engine
Reverse
Used when reversing
Neutral
Used when idling
Drive
Used for:●Normal driving (gears change between 1st
and 9th automatically)●Temporarily driving in the sequential
mode●Driving in the sequential mode (when
driving in Sport+ mode)
( P Button
Page 333 of 545
uuWhen Driving uShifting
332Driving
■
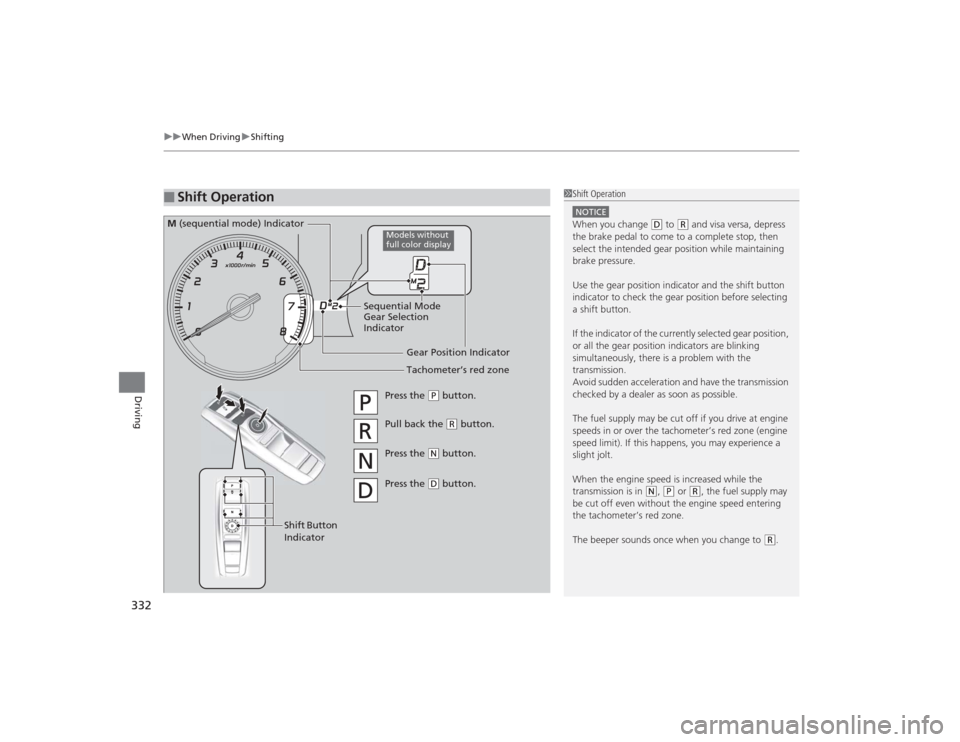
Shift Operation
1Shift OperationNOTICEWhen you change
(D to
(R and visa versa, depress
the brake pedal to come to a complete stop, then
select the intended gear position while maintaining
brake pressure.
Use the gear position indicator and the shift button
indicator to check the gear position before selecting
a shift button.
If the indicator of the currently selected gear position,
or all the gear position indicators are blinking
simultaneously, there is a problem with the
transmission.
Avoid sudden acceleration and have the transmission
checked by a dealer as soon as possible.
The fuel supply may be cut off if you drive at engine
speeds in or over the tachometer’s red zone (engine
speed limit). If this happens, you may experience a
slight jolt.
When the engine speed is increased while the
transmission is in
( N, (P or
(R, the fuel supply may
be cut off even without the engine speed entering
the tachometer’s red zone.
The beeper sounds once when you change to
( R.
Gear Position Indicator
Tachometer’s red zone
Press the
(P button.
Pull back the
(R button.
Press the
( N button.
Press the ( D button.
Shift Button
Indicator
M (sequential mode) Indicator
Sequential Mode
Gear Selection
Indicator
Models without
full color display
Page 339 of 545
338
uuWhen Driving uShifting
Driving
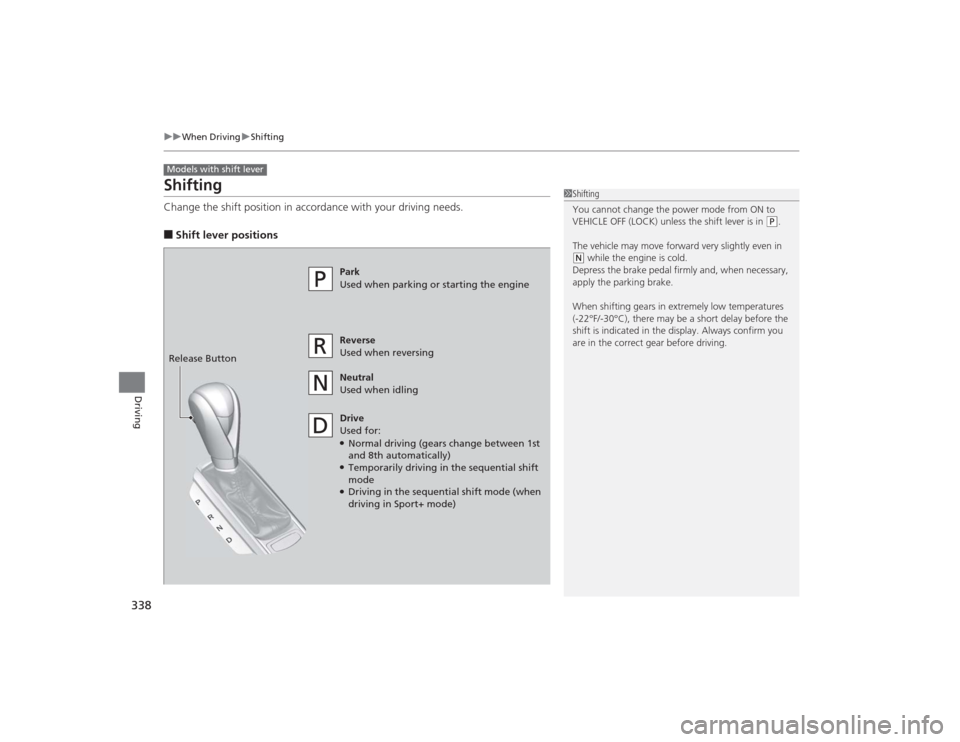
ShiftingChange the shift position in accordance with your driving needs.■Shift lever positionsModels with shift lever
1Shifting
You cannot change the power mode from ON to
VEHICLE OFF (LOCK) unless the shift lever is in
(P.
The vehicle may move forward very slightly even in
( N while the engine is cold.
Depress the brake pedal firmly and, when necessary,
apply the parking brake.
When shifting gears in extremely low temperatures
(-22°F/-30°C), there may be a short delay before the
shift is indicated in the display. Always confirm you
are in the correct gear before driving.
Park
Used when parking or starting the engine
Reverse
Used when reversing
Neutral
Used when idling
Drive
Used for:●Normal driving (gears change between 1st
and 8th automatically)●Temporarily driving in the sequential shift
mode●Driving in the sequential shift mode (when
driving in Sport+ mode)
Release Button
Page 340 of 545
Continued
339
uuWhen Driving uShifting
Driving
■
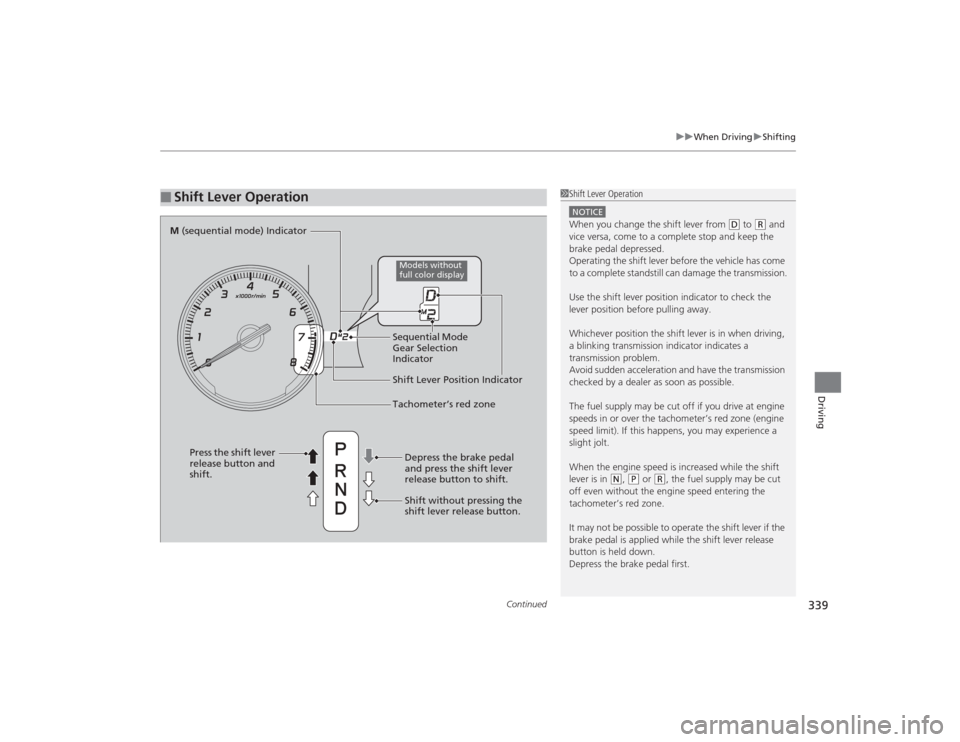
Shift Lever Operation
1Shift Lever OperationNOTICEWhen you change the shift lever from
(D to
( R and
vice versa, come to a complete stop and keep the
brake pedal depressed.
Operating the shift lever before the vehicle has come
to a complete standstill can damage the transmission.
Use the shift lever position indicator to check the
lever position before pulling away.
Whichever position the shift lever is in when driving,
a blinking transmission indicator indicates a
transmission problem.
Avoid sudden acceleration and have the transmission
checked by a dealer as soon as possible.
The fuel supply may be cut off if you drive at engine
speeds in or over the tachometer’s red zone (engine
speed limit). If this happens, you may experience a
slight jolt.
When the engine speed is increased while the shift
lever is in
( N, (P or
(R, the fuel supply may be cut
off even without the engine speed entering the
tachometer’s red zone.
It may not be possible to operate the shift lever if the
brake pedal is applied while the shift lever release
button is held down.
Depress the brake pedal first.
Shift Lever Position Indicator
Depress the brake pedal
and press the shift lever
release button to shift.
Shift without pressing the
shift lever release button.
Press the shift lever
release button and
shift.Tachometer’s red zone
M
(sequential mode) Indicator
Sequential Mode
Gear Selection
Indicator
Models without
full color display
Page 343 of 545
342
uuWhen Driving uAuto Idle Stop
*
Driving
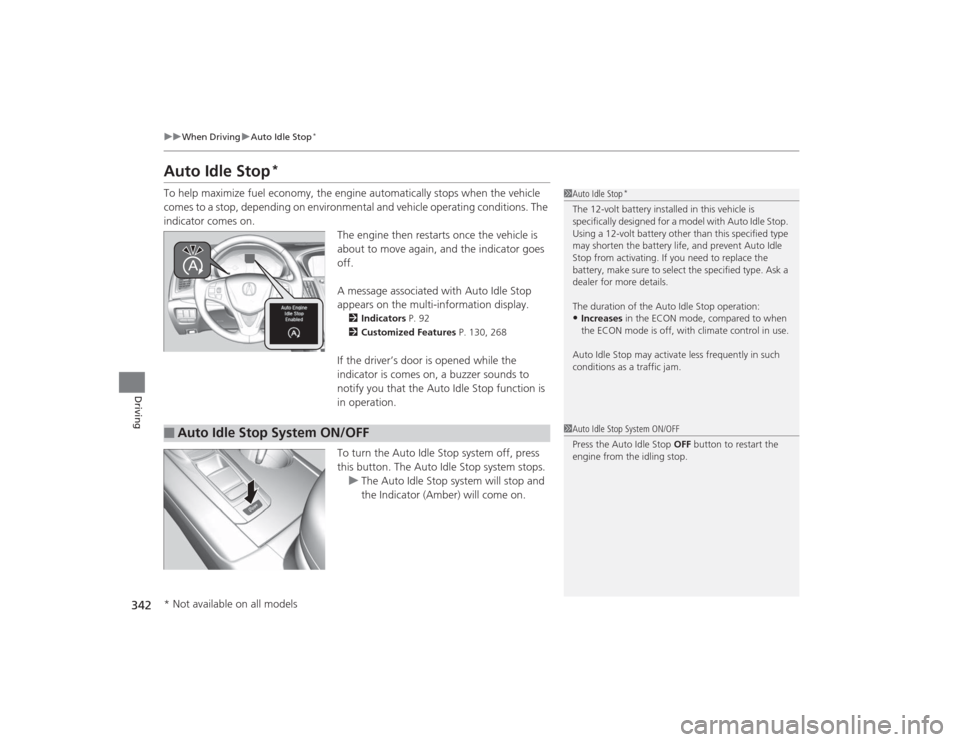
Auto Idle Stop
*
To help maximize fuel economy, the engine automatically stops when the vehicle
comes to a stop, depending on environmental and vehicle operating conditions. The
indicator comes on.
The engine then restarts once the vehicle is
about to move again, and the indicator goes
off.
A message associated with Auto Idle Stop
appears on the multi-information display.
2Indicators P. 92
2 Customized Features P. 130, 268If the driver’s door is opened while the
indicator is comes on, a buzzer sounds to
notify you that the Auto Idle Stop function is
in operation.
To turn the Auto Idle Stop system off, press
this button. The Auto Idle Stop system stops.
u The Auto Idle Stop system will stop and
the Indicator (Amber) will come on.
1Auto Idle Stop
*
The 12-volt ba ttery installed in this vehicle is
specifically designed for a model with Auto Idle Stop.
Using a 12-volt battery other than this specified type
may shorten the battery life, and prevent Auto Idle
Stop from activating. If you need to replace the
battery, make sure to select the specified type. Ask a
dealer for more details.
The duration of the Auto Idle Stop operation:•Increases in the ECON mode, compared to when
the ECON mode is off, with climate control in use.
Auto Idle Stop may activate less frequently in such
conditions as a traffic jam.
■
Auto Idle Stop System ON/OFF
1 Auto Idle Stop System ON/OFF
Press the Auto Idle Stop OFF button to restart the
engine from the idling stop.
* Not available on all models
Page 347 of 545

346
uuWhen Driving uIntegrated Dynamics System (IDS)
Driving
Integrated Dynamics System (IDS)Modifies the dynamic character of the vehicle. There are four IDS modes to select
from: Econ, Normal , Sport , and Sport+ .
Press the IDS button to select a mode. The mode you have selected appears on the
multi-information display.
You can customize the IDS mode default setting using the multi-information display.2 Customized Features P. 126, 259
IDS Button
Models with full color display
Econ (Econ mode)
Maximizes fuel economy.
Normal (Normal mode)
Provides the best balance of fuel economy and sportiness for
everyday driving.
Sport (Sport mode)
Enhances vehicle response and feel with decreased steering
assist. Also increases throttle response and SH-AWD
* control.
Sport+ (Sport+ mode)
Adds to Sport mode to allow for increase performance when
using the steering wheel paddle shifters.
* Not available on all models